


由于搭建一个ssm框架的细节可能过于琐碎,为防止以后的重复性劳动,所以记录下来,以便日后查看,需要注意的是,本文展示的是使用Eclipse搭建web工程(非maven工程形式搭建而成(也就是手动导入jar包),好了废话不多说,下面请看:
先展示集成原理,对整体有个认识:
-指定工作空间字符集编码方式为UTF-8,
-修改字型,字体大小
-并将jsp文件的格式改为utf-8(window->perferences输入jsp files)
-先解压一个tomcat,配置一下CATALINA_HOME环境变量,
-在server里面,选择runtime Environments 把我们配置好的tomcat添加进去,下一步之后,把我们磁盘上的tomcat导入进入,选择固定版本的jre点击应用,确定即可!
-ssm集成原理
ssm集成,实际上就是spring和mybatis的集成,因为springMVC本身就是spring的一部分.
spring提供了IOC和AOP
如果使用了IOC,那么mybatis中的sqlSessionFactory对象的创建交给spring的IOC容器
如果使用AOP,那么mybatis中的事务,不需要程序员编写代码进行处理,只需要做些简单的配置即可
IOC和DI的关系?
IOC是控制翻转,是一种编程思想;DI是依赖注入,是IOC的具体实现.
-搭建ssm开发环境概要
1.拷贝相关jar包
2.编写web.xml配置文件
*spring监听器 该监听器在服务器启动阶段会被创建,实现了ServletContextListener接口,在ServletContext对象创建或者销毁的时候,监听器中的方法会被执行,解析spring的配置文件
*解决post请求中文乱码的过滤器
*springMVC的中央调度器
3.编写spring的基本配置文件 spring-base.xml和jdbc.properties属性文件
<!-- 引入外部的配置文件,获取数据库连接的信息 -->
<!-- 数据源 c3p0连接池 -->
<!-- SqlSessionFactory -->
<!-- transactionManager -->
<!-- Aspect是切面,是一个抽象的概念;Advice是事务通知,是Aspect的具体实现 -->
<!-- 切入 -->
4.编写spring-mvc.xml文件
因为web.xml文件当中配置了中央调度器,所以需要把spring-mvc.xml文件复制进来,否则编译通不过,提示该文件不存在
5.编写mybatis-config.xml文件
因为在spring-base.xml文件当中配置SqlSessionFactory时,指定了mybatis-config.xml文件,所以这个文件也要配!
搭建环境之前需要做的配置:
1.打开eclipse,指定工作空间字符集编码方式为UTF-8

2.
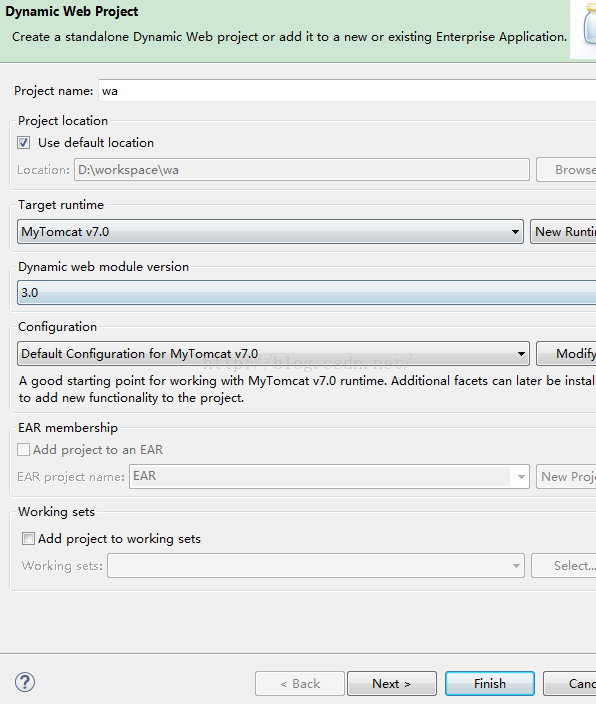
File->new-Dynamic web project,并确认使用的tomcat是你配置的
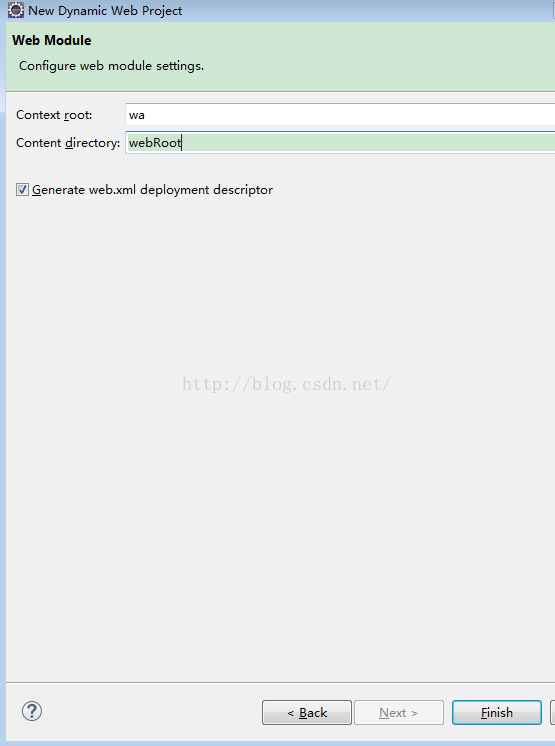
3.点击next,再次点击next、如下图,修改为webRoot,选中生成web.xml那个选项,点击完成,web工程已经创建成功
此时的目录结构如下:
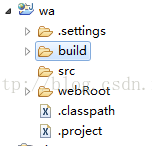
4.我们要对这个目录做一些改动:
我们需要让classes文件放在web-inf下,而不是build文件目录下,所以我们需要对这个目录进行修改
java build path-》browse

然后在web-inf目录下,创建一个classes文件夹
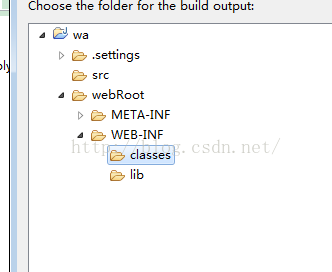
然后删掉build文件夹(如果不改变目录,该文件夹删不掉),接下来结构目录如下(在package eXplorer下查看):

注意(这里的settings里面可以修改项目在服务器上的名称,该选项默认没有(点击右上角的小三角形,选择Filters,把.*Resources那项前面的勾去掉去可以显示了))
测试一下,该项目是否能放在tomcat上跑
在web-inf下新建一个index.html文件,然后在里面随便输入几个汉子,启动服务器,在浏览器中输入localhost:8080/wa
-------------------------------------------搭建ssm集成开发环境的具体步骤如下:--------------------------------------------
步骤一:
拷贝ssm需要的jar包到lib文件夹中(网盘里有 ssm集成jar)
步骤二:
编写web.xml文件
 1 <?xml version="1.0" encoding="UTF-8"?>
 2
 3 <web-app xmlns:xsi="http://www.w3.org/2001/XMLSchema-instance" xmlns="http://java.sun.com/xml/ns/javaee" xsi:schemaLocation="http://java.sun.com/xml/ns/javaee http://java.sun.com/xml/ns/javaee/web-app_3_0.xsd" id="WebApp_ID" version="3.0">
 4
 5     <!-- 1.2指定spring配置文件的路径-->
 6     <context-param>
 7         <param-name>contextConfigLocation</param-name>
 8         <param-value>classpath:resources/spring-*.xml</param-value>
 9     </context-param>
10     <!-- 1.spring监听器 ,该监听器在服务器启动阶段会被创建,实现了ServletContextListener接口,在ServletContext对象创建或者销毁的时候
11         监听器中的方法会被执行,解析spring的配置文件,【1.2那么此时你就需要指定一下它的路径吧!】
12     -->
13     <listener>
14         <listener-class>org.springframework.web.context.ContextLoaderListener</listener-class>
15     </listener>
16
17     <!-- 解决post请求中文乱码的过滤器(get请求不能搞定,要在server配置文件中,加上URIEncoding的配置) -->
18     <filter>
19         <filter-name>characterEncodingFilter</filter-name>
20         <filter-class>org.springframework.web.filter.CharacterEncodingFilter</filter-class>
21         <!-- 此处还需要配置两个参数 -->
22         <init-param>
23             <param-name>encoding</param-name>
24             <param-value>UTF-8</param-value>
25         </init-param>
26         <init-param>
27             <param-name>forceEncoding</param-name>
28             <param-value>true</param-value>
29         </init-param>
30     </filter>
31     <filter-mapping>
32         <filter-name>characterEncodingFilter</filter-name>
33         <url-pattern>/*</url-pattern>
34     </filter-mapping>
35
36     <!-- springmvc的中央调度器,是一个servlet,接受请求,根据请求找到相应的处理器,将处理器响应的数据返回给浏览器客户端
37         默认情况下,会去WEB-INF目录下,找【servlet-name】-servlet.xml文件进行解析,所以下面要指定参数
38     -->
39     <servlet>
40         <servlet-name>springmvc</servlet-name>
41         <servlet-class>org.springframework.web.servlet.DispatcherServlet</servlet-class>
42         <init-param>
43             <param-name>contextConfigLocation</param-name>
44             <param-value>classpath:resources/spring-mvc.xml</param-value>
45         </init-param>
46         <!-- 在服务器启动阶段,创建serlvet实例 -->
47         <load-on-startup>1</load-on-startup>
48     </servlet>
49     <servlet-mapping>
50         <servlet-name>springmvc</servlet-name>
51         <url-pattern>*.do</url-pattern>
52     </servlet-mapping>
53
54 </web-app>
步骤三:编写spring的基本配置文件 spring-base.xml和jdbc.properties属性文件。
【在src目录下新建一个包,叫resources,在resources目录下新建spring-base.xml文件和jdbc.properties文件(该文件一般放在src目录下)】
 1 <?xml version="1.0" encoding="UTF-8"?>
 2 <beans xmlns="http://www.springframework.org/schema/beans"
 3     xmlns:xsi="http://www.w3.org/2001/XMLSchema-instance"
 4     xmlns:context="http://www.springframework.org/schema/context"
 5     xmlns:aop="http://www.springframework.org/schema/aop"
 6     xmlns:tx="http://www.springframework.org/schema/tx"
 7     xsi:schemaLocation="
 8         http://www.springframework.org/schema/beans
 9         http://www.springframework.org/schema/beans/spring-beans.xsd
10         http://www.springframework.org/schema/context
11         http://www.springframework.org/schema/context/spring-context.xsd
12         http://www.springframework.org/schema/tx
13         http://www.springframework.org/schema/tx/spring-tx.xsd
14         http://www.springframework.org/schema/aop
15         http://www.springframework.org/schema/aop/spring-aop.xsd">
16
17     <!-- 引入外部的配置文件,获取数据库连接的信息 -->
18     <context:property-placeholder location="classpath:resources/jdbc.properties"/>
19
20     <!-- 数据源 c3p0连接池 -->
21     <bean id="dataSource" class="com.mchange.v2.c3p0.ComboPooledDataSource">
22         <property name="driverClass" value="${driver}"/>
23         <property name="jdbcUrl" value="${url}"/>
24         <property name="user" value="${user}"/>
25         <property name="password" value="${password}"/>
26     </bean>
27
28     <!-- SqlSessionFactory -->
29     <bean id="sqlSessionFactoryBean" class="org.mybatis.spring.SqlSessionFactoryBean">
30         <property name="dataSource" ref="dataSource"/><!-- 这里的dataSource必须和21行的dataSource一致 -->
31         <property name="configLocation" value="classpath:resources/mybatis-config.xml"/>
32     </bean>
33
34     <!-- transactionManager -->
35     <bean id="transactionManager" class="org.springframework.jdbc.datasource.DataSourceTransactionManager">
36         <property name="dataSource" ref="dataSource"/><!-- 这里的dataSource必须和21行的dataSource一致 -->
37     </bean>
38
39     <!-- Aspect是切面,是一个抽象的概念;Advice是事务通知,是Aspect的具体实现 -->
40     <tx:advice id="transactionAdvice" transaction-manager="transactionManager">
41         <tx:attributes> <!-- *表示任意的方法  isolation表示事务的隔离级别,oracle默认的是读已提交, propagation表示事务的传播特性,rollback-for表示事务的回滚策略  -->
42             <tx:method name="*" isolation="DEFAULT" propagation="REQUIRED" rollback-for="java.lang.Exception"/>
43             <tx:method name="get*" read-only="true"/> <!-- 上面增删改,这里是查的方法 -->
44         </tx:attributes>
45     </tx:advice>
46
47     <!-- 切入 -->
48     <aop:config> <!-- 下面的*表示的是返回值,那个包下,所有的方法,参数任意,在这样条件范围之内,执行切入,切入到这些方法中 -->
49         <aop:advisor advice-ref="transactionAdvice" pointcut="execution(* com.mrkj.wa.service.*.*(..))"/>
50     </aop:config>
51 </beans>
属性文件代码:
1 driver=oracle.jdbc.driver.OracleDriver
2 url=jdbc:oracle:thin:@localhost:1521:XE
3 user=wa
4 password=aivbadi
步骤四:把log4j属性文件放入到src目录下,并编写mybatis-config.xml文件(该文件也是在resources下)
 1 ##define an appender named console
 2 log4j.appender.console=org.apache.log4j.ConsoleAppender
 3 #The Target value is System.out or System.err
 4 log4j.appender.console.Target=System.out
 5 #set the layout type of the apperder
 6 log4j.appender.console.layout=org.apache.log4j.PatternLayout
 7 #set the layout format pattern
 8 log4j.appender.console.layout.ConversionPattern=[%-5p] %m%n
 9
10 ##define a logger
11 #log4j.rootLogger=debug,console
12 #log4j.logger.com.mrkj.dao.IStudentDao=trace,console
<?xml version="1.0" encoding="UTF-8" ?>
<!DOCTYPE configuration
PUBLIC "-//mybatis.org//DTD Config 3.0//EN"
"http://mybatis.org/dtd/mybatis-3-config.dtd">
<configuration>
    <settings>
        <!-- 当传递的参数为null的时候,jdbc数据类型的处理 -->
        <setting name="jdbcTypeForNull" value="NULL"/>
    </settings>

    <!-- 注册类的别名 -->
    <typeAliases>
        <package name="com.mrkj.wa.domain"/>
    </typeAliases>
</configuration>
步骤五:前面的配置文件利用引用到了spring-mvc.xml,所以这个文件,我们也得配置,要不然找不到,在resources下新建一个文件叫spring-mvc.xml
 1 <?xml version="1.0" encoding="UTF-8"?>
 2 <beans xmlns="http://www.springframework.org/schema/beans"
 3     xmlns:xsi="http://www.w3.org/2001/XMLSchema-instance"
 4     xmlns:context="http://www.springframework.org/schema/context"
 5     xmlns:aop="http://www.springframework.org/schema/aop"
 6     xmlns:tx="http://www.springframework.org/schema/tx"
 7     xmlns:mvc="http://www.springframework.org/schema/mvc"
 8     xsi:schemaLocation="
 9         http://www.springframework.org/schema/beans
10         http://www.springframework.org/schema/beans/spring-beans.xsd
11         http://www.springframework.org/schema/context
12         http://www.springframework.org/schema/context/spring-context.xsd
13         http://www.springframework.org/schema/tx
14         http://www.springframework.org/schema/tx/spring-tx.xsd
15         http://www.springframework.org/schema/aop
16         http://www.springframework.org/schema/aop/spring-aop.xsd
17         http://www.springframework.org/schema/mvc
18         http://www.springframework.org/schema/mvc/spring-mvc.xsd">
19
20
21
22 </beans>
测试是否成功:现在可以测试一下你的搭建是否是成功的: 在web-Root目录下新建一个index.html,在页面上随便写点东西,然后把该项目放到tomcat当中,启动服务,在浏览器上输入 localhost:8080/wa 回车 如果服务器启动阶段控制台没有报错,并且利用浏览器访问项目之后出现恭喜你成功的字样,那就说明成功了! 


 63万+
63万+

 被折叠的 条评论
为什么被折叠?
被折叠的 条评论
为什么被折叠?
 到【灌水乐园】发言


