


文章目录
新建Maven/Web项目
web项目
如果是新建的web项目,则需要将事先准备好的jar导入到lib中就可以了。
接下来会在Maven的依赖中说明各个jar包的用途
Maven项目
打开pom.xml ,因为我这里是配置的阿里的镜像仓库,之前已经下载过,所以大部分的jar包全能在仓库中找到,如果特殊的 可以网上搜索键入 mvn xxx直接到中央仓库下载。
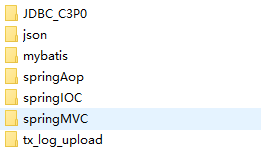
项目依赖/需要导入的jar
Spring IoC
控制反转:将对象的创建和生命周期的管理全部交给Spring来管理。
依赖注入:spring创建对象的过程中对属性的设置。
目的:低耦合,降低代码的耦合度,提高代码的复用率。
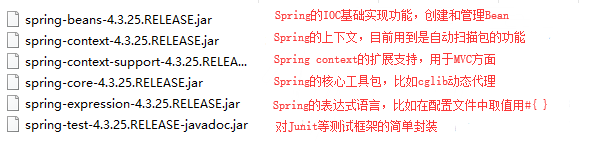
Spring AoP
面向切面别编程:业务层只实现业务,将功能性代码,比如事务管理,权限控制分离到切面中,实际上也是软件分层的思想。
目的:高内聚
原理:java动态代理 和cglib动态代理

SpringMVC
Spring可以在java环境下进行测试,但是springmvc就必须在web环境下。
作用:
我们用浏览器发出请求后,服务器这端接收请求后首先是会加载web.xml,
并且去寻找前端控制器(DispatcherServlet),这是springMVC中唯一的servlet,他会找到对应的springmvc.xml寻找对应的请求处理类。

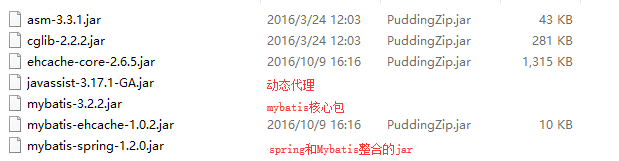
mybatis

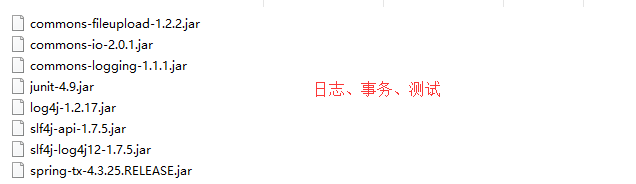
其他
特别需要注意的是:spring的jar与jdk版本的问题(JDK1.8必须用spring4.0以上)
当用Maven pom.xml 导入的包是3.x的时候,不要慌,这可能是由于你的仓库没有更新,先把maven仓库中的springframework全部干掉,重新到中央仓库中下载旧可以了
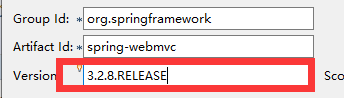
这里就是你需要的版本,前提是得有这个版本,可以去官网参考一下版本。
编写配置文件
web.xml
  <!-- SpringMVC中唯一的Servlet  又名前端控制器-->
  <servlet>
  	<servlet-name>springmvc</servlet-name>
  	<servlet-class>org.springframework.web.servlet.DispatcherServlet
  	</servlet-class>
  	<init-param>
  		<param-name>contextConfigLocation</param-name>
  		<param-value>classpath:/springmvc.xml</param-value>
  	</init-param>
  </servlet>
  <servlet-mapping>
  	<servlet-name>springmvc</servlet-name>
  	<url-pattern>/</url-pattern>
  </servlet-mapping>
init-param 将配置文件的位置放到类路径下。
springmvc.xml
导入相关必要的约束文件,生成模板方便以后使用,这个文件中的配置主要有三步:
- 开启注解方式注册控制器
- 自动扫描控制器
- 配置视图解析器
<?xml version="1.0" encoding="UTF-8"?>
 <beans xmlns="http://www.springframework.org/schema/beans"
 xmlns:xsi="http://www.w3.org/2001/XMLSchema-instance"
 xmlns:context="http://www.springframework.org/schema/context"
 xmlns:mvc="http://www.springframework.org/schema/mvc"
 xsi:schemaLocation="http://www.springframework.org/schema/beans
 					 http://www.springframework.org/schema/beans/spring-beans.xsd
 					 http://www.springframework.org/schema/context
 					 http://www.springframework.org/schema/context/spring-context.xsd
 					 http://www.springframework.org/schema/mvc
 					 http://www.springframework.org/schema/mvc/spring-mvc.xsd">
 <!-- 配置自动扫描的包 -->
 <!-- 先空下,这里表示控制器类 -->
<context:component-scan base-package="****"></context:component-scan>
<!--配置注解方式实现注册控制器  -->
 <mvc:annotation-driven/>
<!-- 配置视图解析器 -->
<bean class="org.springframework.web.servlet.view.InternalResourceViewResolver">
	<property name="prefix" value="/WEB-INF/jsp/"></property>
	<property name="suffix" value=".jsp"></property>
</bean>
</beans>
application.xml
因为spring是IOC机制,对象的创建和管理都由spring来操作,所以在服务器启动的时候就应该同时初始化Spring容器,所以在web.xml中配置监听器使得服务器与spring共生死。
web.xml修改
  <!-- 配置spring监听器 -->
  	<listener>
		<listener-class>org.springframework.web.context.ContextLoaderListener</listener-class>
    </listener>
    <!-- 将spring的初始化文件作为全局参数加载到容器中 -->
	<context-param>
		<param-name>contextConfigLocation</param-name>
		<param-value>classpath:/application.xml</param-value>
	</context-param>
<?xml version="1.0" encoding="UTF-8"?>
 <beans xmlns="http://www.springframework.org/schema/beans"
 xmlns:xsi="http://www.w3.org/2001/XMLSchema-instance"
 xmlns:context="http://www.springframework.org/schema/context"
 xmlns:mvc="http://www.springframework.org/schema/mvc"
 xmlns:aop="http://www.springframework.org/schema/aop"

 xsi:schemaLocation="http://www.springframework.org/schema/beans
 					 http://www.springframework.org/schema/beans/spring-beans.xsd
 					 http://www.springframework.org/schema/context
 					 http://www.springframework.org/schema/context/spring-context.xsd
 					 http://www.springframework.org/schema/mvc
 					 http://www.springframework.org/schema/mvc/spring-mvc.xsd
 					 http://www.springframework.org/schema/aop
 					 http://www.springframework.org/schema/aop/spring-aop.xsd">

 <!--  配置IOC包扫描 mvc三层都需要-->
 <context:component-scan base-package=""></context:component-scan>
 <context:component-scan base-package=""></context:component-scan>
 <context:component-scan base-package=""></context:component-scan>
 <!-- 配置注解方式的DI -->
 <context:annotation-config/>
 <!-- 配置注解方式的AOP -->
<aop:aspectj-autoproxy/>
 </beans>
sqlMapConfig.xml
数据源的配置和sqlSessionFactory的创建全部交给spring来做
<?xml version="1.0" encoding="UTF-8"?>
<!DOCTYPE configuration  PUBLIC "-//mybatis.org//DTD Config 3.0//EN"
                         "http://mybatis.org/dtd/mybatis-3-config.dtd">
           <configuration>

           </configuration>
userMapper.xml
<?xml version="1.0" encoding="UTF-8"?>
<!DOCTYPE mapper  PUBLIC "-//mybatis.org//DTD Mapper 3.0//EN"
				 "http://mybatis.org/dtd/mybatis-3-mapper.dtd">
<mapper namespace="cn.tedu.repository.UserMapper">
	<select resultType="cn.tedu.domain.User" id="selectAll">select * from user; </select>
</mapper>
application.xml修改
<!-- 整合mybatis -->
<!-- 配置数据源 这里引入了c3p0的xml文件,不需要在里面配置 -->
<bean id="dataSource" class="com.mchange.v2.c3p0.ComboPooledDataSource">
</bean>

<!-- 配置sqlSession工厂 -->
<bean class="org.mybatis.spring.SqlSessionFactoryBean" id="sqlSessionFactory">
	<property name="dataSource" ref="dataSource"></property>
	<property value="classpath:/sqlMapConfig.xml" name="configLocation">		 </property>
	<property value="classpath:/mapper/*.xml" name="mapperLocations"></property>
</bean>

<!-- 配置mapperbean的扫描器 -->
<bean class="org.mybatis.spring.mapper.MapperScannerConfigurer">
	<property value="cn.tedu.repository" name="basePackage"/>
</bean>
c3p0-config.xml
对于c3p0的配置文件,这个是由于在ComboPooledDataSource这个类下面会自动去加载c3p0-config.xml或者是c3p0.properties的配置文件,所以不需要我们手动配置。
<c3p0-config>
  <default-config>
 	<property name="driverClass">com.mysql.jdbc.Driver</property>
 	<property name="jdbcUrl">jdbc:mysql:///数据库名称</property>
 	<property name="user">root</property>
 	<property name="password">123456</property>
  </default-config>
</c3p0-config>


 3738
3738


 被折叠的 条评论
为什么被折叠?
被折叠的 条评论
为什么被折叠?
 到【灌水乐园】发言


