


一、钉钉开放平台文档参考
https://open.dingtalk.com/document/orgapp-server/tutorial-obtaining-user-personal-information
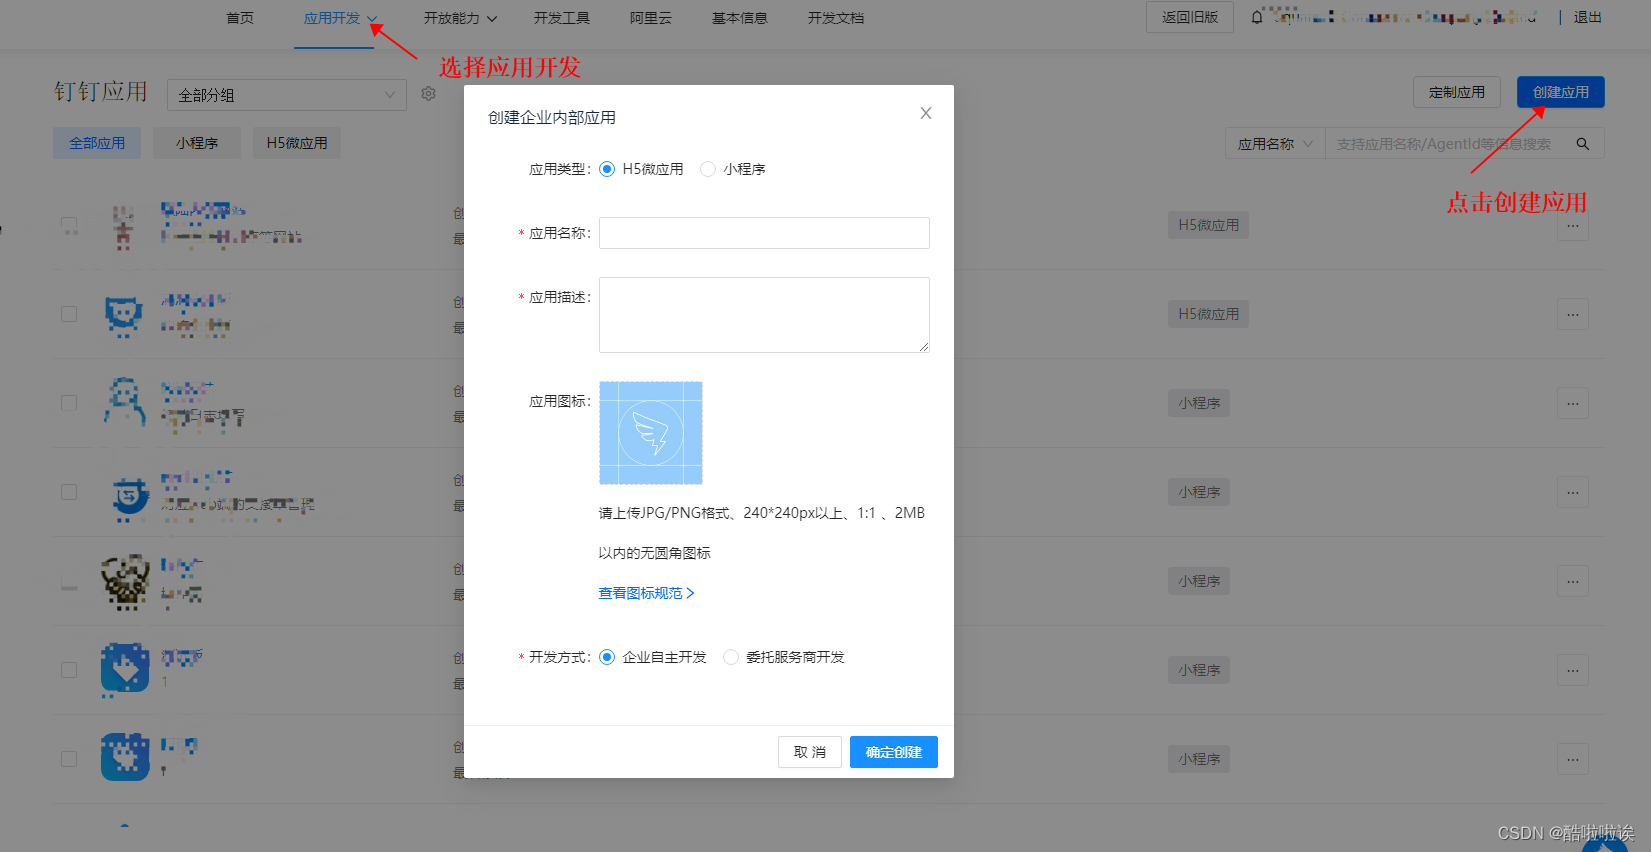
二、登陆钉钉开发者后台,创建H5微应用
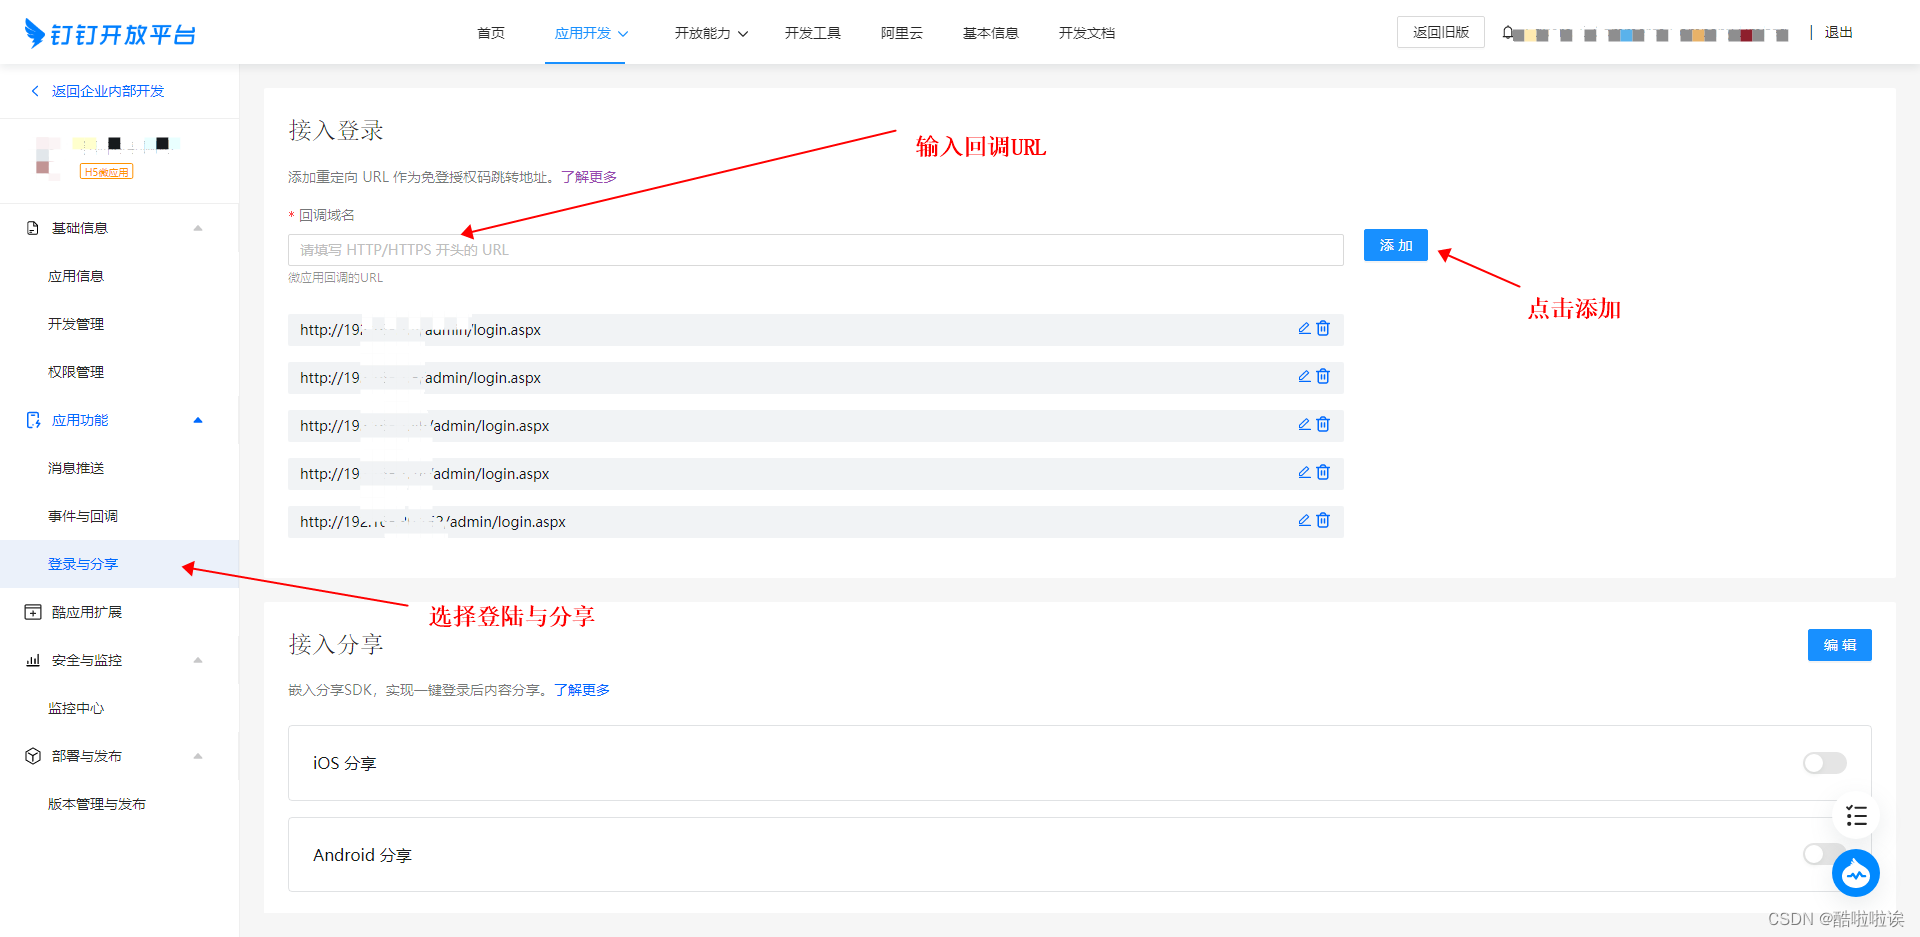
三、点击第二步创建的H5应用,设置回调域名
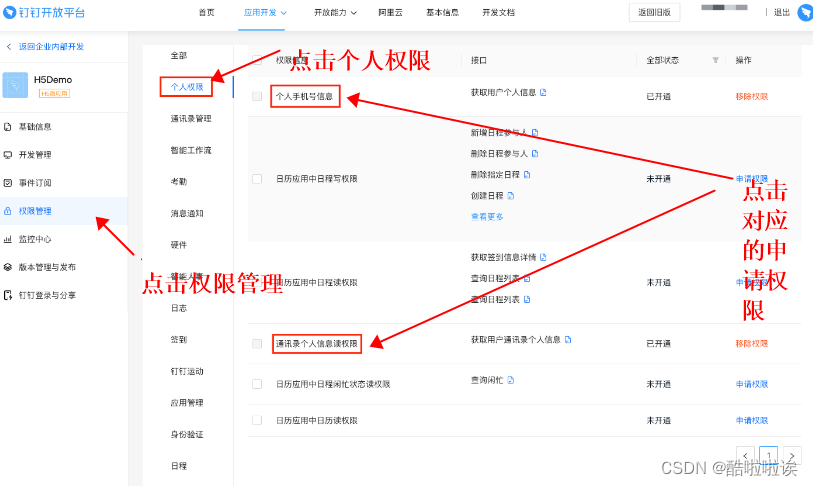
四、添加接口权限
这一步是为了扫码时,能获取到扫码人的信息
五、 前台代码
<div  id="login_container">
</div>
 <script src="https://apps.bdimg.com/libs/jquery/2.1.4/jquery.min.js"></script>
<script src="https://g.alicdn.com/dingding/dinglogin/0.0.5/ddLogin.js"></script>
<script>
  $(function () {
      var ding = {
          "appid": "",
          "agentid": "",
          "corpid": "",
          " uri": "",
          "redirect_uri": "",
          "code": "",
          "accesstoken": ""
    };
     //这里的appid是设置H5应用的AppKey
     ding.appid = "12345546";
     //设置重定向地址,重定向地址要与步骤三中的回调地址一致
     ding.redirect_uri = window.document.location.origin + '/admin/login.aspx';
     ding.uri = "https://oapi.dingtalk.com/connect/oauth2/sns_authorize?appid=" + ding.appid + "&response_type=code&scope=snsapi_login&state=bind&redirect_uri=" + ding.redirect_uri;
    //2.2.扫码触发事件
     var obj = DDLogin({
         id: "login_container",
         goto: encodeURIComponent(ding.uri),
         style: "border:none;background-color:#FFFFFF;",
         width: "240",
         height: "300",
     });

      //监听钉钉扫码获取loginTmpCode
      var getcode = function (event) {
          var origin = event.origin;
          console.log("origin", event.origin);
          if (origin == "https://login.dingtalk.com") { //判断是否来自ddLogin扫码事件。
              var loginTmpCode = event.data; //拿到loginTmpCode后就可以在这里构造跳转链接进行跳转了
              ding.code = loginTmpCode;
              console.log("获取到code", loginTmpCode);
              window.parent.postMessage(loginTmpCode, '*');
              //1.跳转到主页面,微应用自身截取code比对用户信息
              var redirect_uri_check = "https://oapi.dingtalk.com/connect/oauth2/sns_authorize?appid=" + ding.appid + "&response_type=code&scope=snsapi_login&state=bind&redirect_uri=" + ding.redirect_uri + "&loginTmpCode=";
              console.log("获取到redirect_uri_check", redirect_uri_check);
              window.location.href = redirect_uri_check + loginTmpCode;
          };
      };
      //2.4.钉钉扫码监听
      if (typeof window.addEventListener != 'undefined') {
          window.addEventListener('message', getcode, false);
      } else if (typeof window.attachEvent != 'undefined') {
          window.attachEvent('onmessage', getcode);
      };

  })
</script>
六、后台处理
我用的C# 编写的代码,其中用到了钉钉提供的TopSdk.dll,且需要在web.config中配置DingDing:QrAppId及DingDing:QrAppSecret
  var code = Request.QueryString["code"];
  //通过登陆code获取钉钉用户信息
  public static string getDDUserInfo(string code)
  {
      try
      {
          DefaultDingTalkClient client = new DefaultDingTalkClient("https://oapi.dingtalk.com/sns/getuserinfo_bycode");
          OapiSnsGetuserinfoBycodeRequest req = new OapiSnsGetuserinfoBycodeRequest();
          req.TmpAuthCode = code;
          req.Validate();
          string qrAppId = ConfigurationManager.AppSettings.Get("DingDing:QrAppId");
          string qrAppSecret = ConfigurationManager.AppSettings.Get("DingDing:QrAppSecret");
          OapiSnsGetuserinfoBycodeResponse response = client.Execute(req, qrAppId, qrAppSecret);
          if (response.Errcode == 0)
          {
              return response.UserInfo.Unionid;
          }
          else
          {
              baseLog.warn("code:"+ code + ",response.Errcode:"+ response.Errcode + ",response.ErrCode:"+ response.ErrCode + "请求用户信息失败" + response.Body);
              return null;
          }
      }
      catch (Exception e)
      {
          baseLog.error("请求用户信息异常msg= " + e.Message + ",stack=" + e.StackTrace);
          return null;
      }

  }

   //通过unionid获取用户信息
   public static string getDDUserid(string unionid)
    {
        try
        {
            DefaultDingTalkClient client = new DefaultDingTalkClient("https://oapi.dingtalk.com/topapi/user/getbyunionid");
            OapiUserGetbyunionidRequest req = new OapiUserGetbyunionidRequest();
            req.Unionid = unionid;
            req.Validate();
            //string qrAppId = ConfigurationManager.AppSettings.Get("DingDing:QrAppId");
            //string qrAppSecret = ConfigurationManager.AppSettings.Get("DingDing:QrAppSecret");
            OapiUserGetbyunionidResponse response = client.Execute(req, getAccessToken());
            if (response.Errcode == 0)
            {
                return response.Result.Userid;
            }
            else
            {
                baseLog.warn("通过登陆unionid:" + unionid + ",请求用户信息失败" + response.Body);
                return null;
            }
        }
        catch (Exception e)
        {
            baseLog.error("请求用户信息异常msg= " + e.Message + ",stack=" + e.StackTrace);
            return null;
        }
    }


       /// <summary>
      /// 获取钉钉用户的详细信息
      /// </summary>
      /// <param name="userid"></param>
      /// <returns></returns>
      public static OapiV2UserGetResponse getDDUserDetailInfo(string userid)
      {

          try
          {
              DefaultDingTalkClient client = new DefaultDingTalkClient("https://oapi.dingtalk.com/topapi/v2/user/get");
              OapiV2UserGetRequest req = new OapiV2UserGetRequest();
              req.Userid = userid;
              req.Language = "zh_CN";
              OapiV2UserGetResponse response = client.Execute(req,getAccessToken());
              baseLog.info("到这一步就成功了" + response.Body);
              if(response.Errcode == 0)
              {
                  return response;
              }
              else
              {
                  baseLog.warn("通过登陆userid:" + userid + ",请求用户信息失败" + response.Body);
                  return null;
              }
          }
          catch (Exception e)
          {
              baseLog.error("请求用户详细信息异常msg=" + e.Message + ",stack=" + e.StackTrace);
              return null;
          }
      }


 4309
4309


 被折叠的 条评论
为什么被折叠?
被折叠的 条评论
为什么被折叠?
 到【灌水乐园】发言


