


1.概述
在本教程中,我们将回顾Spring Cloud Config Server的基础知识。 我们将设置一个Config Server ,然后构建一个客户端应用程序 ,该客户端应用程序在启动时会消耗配置 ,然后刷新配置而不重新启动。 我们正在构建的应用程序与《 集中式配置入门指南 》中讨论的“ Hello World”应用程序相同,但是在本文中,我们将更深入地介绍Spring Cloud Config Server的概念。
本教程的完整源代码在Github上 。
2.什么是Spring Cloud Config Server?
正如文档简要指出的那样,“ Spring Cloud Config为分布式系统中的外部化配置提供服务器和客户端支持。” 服务器存储后端的默认实现使用git ,因此它轻松支持带标签的配置环境版本,并且许多用于管理内容的工具都可以使用它。
Spring Cloud Config 非常适合Spring应用程序,因为它的客户端和服务器概念都精确地映射到Spring Environment和PropertySource抽象。 但是,Spring Cloud Config可以与以任何语言运行的任何应用程序一起使用。
3.创建一个多模块项目
我们正在创建的应用程序将具有两个模块:一个模块用于配置服务,另一个模块用于配置客户端。 因此,我们需要创建一个父pom 。
3.1父母
在我们的IDE中,让我们创建一个新项目。 我正在使用Spring Tool Suite,但这只是个人喜好。
在我们的pom.xml中 ,我们指定两个模块:
<?xml version="1.0" encoding="UTF-8"?>
<project xmlns="http://maven.apache.org/POM/4.0.0" xmlns:xsi="http://www.w3.org/2001/XMLSchema-instance" xsi:schemaLocation="http://maven.apache.org/POM/4.0.0 http://maven.apache.org/xsd/maven-4.0.0.xsd">
	<modelVersion>4.0.0</modelVersion>

	<groupId>com.michaelcgood</groupId>
	<artifactId>com.michaelcgood</artifactId>
	<version>0.0.1</version>
	<packaging>pom</packaging>

	<name>michaelcgood-spring-cloud-config-server</name>
	<description>Intro to Spring Cloud Config Server</description>


    <modules>
        <module>mcg-configuration-client</module>
        <module>mcg-configuration-service</module>
    </modules>

</project>
3.2配置服务
在我们的IDE中,让我们为配置服务创建一个新的Maven模块,并将其插入到pom中 :
<?xml version="1.0"?>
<project xsi:schemaLocation="http://maven.apache.org/POM/4.0.0 http://maven.apache.org/xsd/maven-4.0.0.xsd" xmlns="http://maven.apache.org/POM/4.0.0" xmlns:xsi="http://www.w3.org/2001/XMLSchema-instance">
  <modelVersion>4.0.0</modelVersion>
  <groupId>com.michaelcgood</groupId>
  <artifactId>mcg-configuration-service</artifactId>
  <version>0.0.1</version>
  <packaging>jar</packaging>
  <name>mcg-configuration-service</name>

    <parent>
        <groupId>org.springframework.boot</groupId>
        <artifactId>spring-boot-starter-parent</artifactId>
        <version>1.5.9.RELEASE</version>
        <relativePath /> <!-- lookup parent from repository -->
    </parent>

    <properties>
        <project.build.sourceEncoding>UTF-8</project.build.sourceEncoding>
        <java.version>1.8</java.version>
    </properties>

    <dependencies>
        <dependency>
            <groupId>org.springframework.cloud</groupId>
            <artifactId>spring-cloud-config-server</artifactId>
        </dependency>

        <dependency>
            <groupId>org.springframework.boot</groupId>
            <artifactId>spring-boot-starter-test</artifactId>
            <scope>test</scope>
        </dependency>
    </dependencies>

    <dependencyManagement>
        <dependencies>
            <dependency>
                <groupId>org.springframework.cloud</groupId>
                <artifactId>spring-cloud-dependencies</artifactId>
                <version>Edgware.RELEASE</version>
                <type>pom</type>
                <scope>import</scope>
            </dependency>
        </dependencies>
    </dependencyManagement>

    <build>
        <plugins>
            <plugin>
                <groupId>org.springframework.boot</groupId>
                <artifactId>spring-boot-maven-plugin</artifactId>
            </plugin>
        </plugins>
    </build>
</project>
3.3配置客户端
现在,我们只需要为我们的配置客户端创建一个模块。 因此,让我们制作另一个Maven模块并将其插入到pom中 :
<?xml version="1.0"?>
<project xsi:schemaLocation="http://maven.apache.org/POM/4.0.0 http://maven.apache.org/xsd/maven-4.0.0.xsd" xmlns="http://maven.apache.org/POM/4.0.0" xmlns:xsi="http://www.w3.org/2001/XMLSchema-instance">
<modelVersion>4.0.0</modelVersion>
<groupId>com.michaelcgood</groupId>
<artifactId>mcg-configuration-client</artifactId>
<version>0.0.1</version>
<packaging>jar</packaging>
<parent>
<groupId>org.springframework.boot</groupId>
<artifactId>spring-boot-starter-parent</artifactId>
<version>1.5.9.RELEASE</version>
<relativePath/> <!-- lookup parent from repository -->
</parent>
<properties>
<project.build.sourceEncoding>UTF-8</project.build.sourceEncoding>
<java.version>1.8</java.version>
</properties>
<dependencies>
<dependency>
<groupId>org.springframework.cloud</groupId>
<artifactId>spring-cloud-starter-config</artifactId>
</dependency>
<dependency>
<groupId>org.springframework.boot</groupId>
<artifactId>spring-boot-starter-actuator</artifactId>
</dependency>
<dependency>
<groupId>org.springframework.boot</groupId>
<artifactId>spring-boot-starter-web</artifactId>
</dependency>
<dependency>
<groupId>org.springframework.boot</groupId>
<artifactId>spring-boot-starter-test</artifactId>
<scope>test</scope>
</dependency>
</dependencies>
<dependencyManagement>
<dependencies>
<dependency>
<groupId>org.springframework.cloud</groupId>
<artifactId>spring-cloud-dependencies</artifactId>
<version>Edgware.RELEASE</version>
<type>pom</type>
<scope>import</scope>
</dependency>
</dependencies>
</dependencyManagement>
<build>
<plugins>
<plugin>
<groupId>org.springframework.boot</groupId>
<artifactId>spring-boot-maven-plugin</artifactId>
</plugin>
</plugins>
</build>
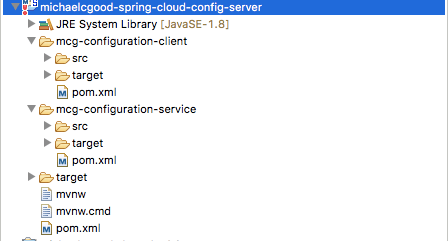
</project> 我们的项目结构现在看起来像这样:
4.配置服务器
现在,我们将创建一个Config Servic e,以充当客户端和git存储库之间的中介。
4.1启用配置服务器
我们使用Spring Cloud的@EnableConfigServer创建可以与之通信的配置服务器。 因此,这只是一个普通的Spring Boot应用程序,其中添加了一个注释以启用Config Server 。
@EnableConfigServer
@SpringBootApplication
public class ConfigServiceApplication {

    public static void main(String[] args) {
        SpringApplication.run(ConfigServiceApplication.class, args);
    }
}
4.2 application.properties
为确保Config Service和客户端的端口之间没有冲突,我们为Config Service指定了另一个端口:
server.port=8888

spring.cloud.config.server.git.uri=${HOME}/Desktop/mcg-config第二行spring.cloud.config.server.git.uri = $ {HOME} / Desktop / mcg-config指向git存储库,我们将在其下创建它。
4.3 Git
在* nix系统上,我们可以在命令行上执行所有操作。
我们在桌面上创建一个文件夹:
mkdir mcg-config我们使用vim创建一个名为a-bootiful-client.properties的文件:
vim a-bootiful-client.properties我们添加了消息“ Hello World”,但这可能是我们想要的。 写(:w)之后,我们退出(:q)vim。
现在让我们创建一个新的仓库:
git init现在,我们添加包含消息的文件:
git add a-bootiful-client.properties让我们提交:
git commit5.配置客户端
现在,让我们创建一个新的Spring Boot应用程序,该应用程序使用Config Server加载其自己的配置,并刷新其配置以按需反映对Config Server的更改,而无需重新启动JVM。
Spring将看到配置属性文件,就像从application.properties , application.yml或任何其他PropertySource加载的任何属性文件一样。
5.1反映变化
客户端可以使用标准的Spring方法访问Config Server中的任何值,例如@ConfigurationProperties或@Value(“ $ {…}}”) 。
考虑到这一点,我们创建一个REST控制器,该控制器返回已解析的message属性的值:
@SpringBootApplication
public class ConfigClientApplication {

    public static void main(String[] args) {
        SpringApplication.run(ConfigClientApplication.class, args);
    }
}

@RefreshScope
@RestController
class MessageRestController {

    @Value("${message:Hello default}")
    private String message;

    @RequestMapping("/message")
    String getMessage() {
        return this.message;
    }
}
默认配置仅允许在客户端启动时读取值,而不是再次读取。 因此,使用@RefreshScope我们强制Bean刷新其配置,这意味着它将从Config Server中获取更新的值,然后触发刷新事件。
5.2 bootstrap.properties
在引导阶段,必须先读取配置Config Client的属性,然后才能从Config Server中读取应用程序的其余配置。
我们指定客户端的spring.application.name以及配置服务器spring.cloud.config.uri的位置:
spring.application.name=a-bootiful-client
spring.cloud.config.uri=http://localhost:8888
management.security.enabled=false
注意:
我们通过设置management.security.enabled = false禁用了安全性,从而使我们的测试和修补变得容易。
6.演示
首先,我们需要将目录更改为我们的配置服务并启动它:
mcg-configuration-service mike$ mvn spring-boot:run然后为我们的客户做同样的事情:
mcg-configuration-client mike$ mvn spring-boot:run当添加a-bootiful-client.properties时,我们可以在终端中看到配置服务:
INFO 5921 --- [nio-8888-exec-1] o.s.c.c.s.e.NativeEnvironmentRepository : Adding property source: file:/var/folders/dk/48l9cm2x3vnfl5ymh6dtxpwc0000gn/T/config-repo-7195892194658362240/a-bootiful-client.properties让我们打开浏览器并访问http:// localhost:8080 / message 。 我们看到“ Hello World”。
现在,让我们再次在a-bootiful-client.properties中更改消息,这次输入“嗨! :-)”。
保存并提交后,我们访问http:// localhost:8888 / a-bootiful-client / default确认更改。
现在,我们调用Spring Boot Actuator引用端点来刷新客户端:
curl -X POST http://localhost:8080/refresh我们访问http:// localhost:8080 / message并看到我们的消息“嗨! :-)“ 被陈列。
有关Spring Boot Actuator的更多信息,请参阅教程Building Spring Boot RESTful Service + Spring Boot Actuator 。
7.结论
我们刚刚在Spring中完成了服务的集中配置。 我们通过站起来一个Spring Cloud Config Server并创建一个客户端来在启动时使用配置,然后刷新配置而不重新启动来实现此目的。
我们没有接触过的Spring Cloud Config Server可以完成许多其他事情,例如:
- 让Config Server向Spring Cloud Netflix,Eureka Service Discovery或Spring Cloud Consul的Discovery Service注册
- 提供YAML或属性格式的配置
- 服务纯文本配置文件
- 将配置服务器嵌入到应用程序中
完整的源代码可以在Github上找到。
翻译自: https://www.javacodegeeks.com/2017/12/intro-spring-cloud-config-server.html


 1987
1987


 被折叠的 条评论
为什么被折叠?
被折叠的 条评论
为什么被折叠?
 到【灌水乐园】发言


