


1.简介
在本教程中,我们将介绍如何将Spring Security与OAuth结合使用以保护REST服务。 在演示应用程序中,可以使用路径模式( / api / ** )访问服务器上受保护的REST资源,以便基于该路径的请求URL映射到不同的控制器方法。 这意味着 -
- 路径中没有' / api '的任何REST请求URL都将保持无效 ,因为这些URL与任何控制器映射都不匹配。
- 完成所需的OAuth2配置后,任何不带令牌作为参数的REST请求URL都将是未授权的 。
我们配置的另一个路径模式( / oauth / token )将帮助已配置的授权服务器生成访问令牌。 请注意,我们将在此演示应用程序中使用“ 密码授予类型” 。
在继续实施之前,让我们回顾一下与该授予类型有关的事件。
2.资源所有者密码凭证授予类型
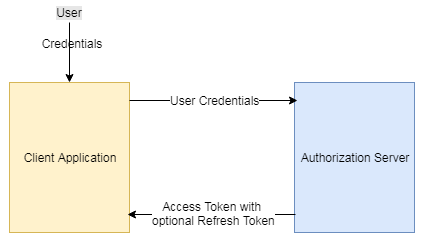
- 在受信任的应用程序之间使用。
- 用户(资源所有者)直接与客户端应用程序共享凭据,客户端应用程序在成功验证用户凭据并进一步授权用户访问服务器上的有限资源后,请求授权服务器返回访问令牌。
有用的链接
3.实施
确保将所需的pom条目正确添加到pom.xml文件中。
pom.xml
<project xmlns="http://maven.apache.org/POM/4.0.0" xmlns:xsi="http://www.w3.org/2001/XMLSchema-instance"
	xsi:schemaLocation="http://maven.apache.org/POM/4.0.0 http://maven.apache.org/xsd/maven-4.0.0.xsd">
	<modelVersion>4.0.0</modelVersion>
	<groupId>org.springframework.samples.service.service</groupId>
	<artifactId>SecureRESTWithOAuth</artifactId>
	<version>0.0.1-SNAPSHOT</version>
	<packaging>war</packaging>

	<dependencies>
		<dependency>
			<groupId>junit</groupId>
			<artifactId>junit</artifactId>
			<version>3.8.1</version>
			<scope>test</scope>
		</dependency>

		<!-- Spring dependencies -->
		<dependency>
			<groupId>org.springframework</groupId>
			<artifactId>spring-core</artifactId>
			<version>4.2.1.RELEASE</version>
		</dependency>

		<dependency>
			<groupId>org.springframework</groupId>
			<artifactId>spring-web</artifactId>
			<version>4.2.1.RELEASE</version>
		</dependency>

		<dependency>
			<groupId>org.springframework</groupId>
			<artifactId>spring-webmvc</artifactId>
			<version>4.2.1.RELEASE</version>
		</dependency>

		<!-- Jackson JSON Processor -->
		<dependency>
			<groupId>com.fasterxml.jackson.core</groupId>
			<artifactId>jackson-databind</artifactId>
			<version>2.4.1</version>
		</dependency>

		<!-- Spring Security Dependencies -->
		<dependency>
			<groupId>org.springframework.security</groupId>
			<artifactId>spring-security-core</artifactId>
			<version>3.2.3.RELEASE</version>
		</dependency>
		<dependency>
			<groupId>org.springframework.security</groupId>
			<artifactId>spring-security-web</artifactId>
			<version>3.2.3.RELEASE</version>
		</dependency>
		<dependency>
			<groupId>org.springframework.security</groupId>
			<artifactId>spring-security-config</artifactId>
			<version>3.2.3.RELEASE</version>
		</dependency>
		<dependency>
			<groupId>org.springframework.security.oauth</groupId>
			<artifactId>spring-security-oauth2</artifactId>
			<version>1.0.0.RELEASE</version>
		</dependency>
	</dependencies>
</project>
web.xml
更新web.xml文件以加载上下文文件并配置Spring Security过滤器,该过滤器将在处理请求之前重定向身份验证和授权请求。
<?xml version="1.0" encoding="ISO-8859-1"?>
<web-app xmlns:xsi="http://www.w3.org/2001/XMLSchema-instance"
	xmlns="http://java.sun.com/xml/ns/javaee"
	xsi:schemaLocation="http://java.sun.com/xml/ns/javaee
	http://java.sun.com/xml/ns/javaee/web-app_2_5.xsd"
	id="WebApp_ID" version="2.5">

	<display-name>SecureRESTWithOAuth</display-name>

	<servlet>
		<servlet-name>mvc-dispatcher</servlet-name>
		<servlet-class>org.springframework.web.servlet.DispatcherServlet</servlet-class>
		<load-on-startup>1</load-on-startup>
	</servlet>

	<servlet-mapping>
		<servlet-name>mvc-dispatcher</servlet-name>
		<url-pattern>/*</url-pattern>
	</servlet-mapping>

	<listener>
		<listener-class>org.springframework.web.context.ContextLoaderListener</listener-class>
	</listener>

    <!-- Loads context files -->
	<context-param>
		<param-name>contextConfigLocation</param-name>
		<param-value>
            /WEB-INF/mvc-dispatcher-servlet.xml,
            /WEB-INF/spring-security.xml
        </param-value>
	</context-param>

	<!-- Spring Security -->
	<filter>
		<filter-name>springSecurityFilterChain</filter-name>
		<filter-class>org.springframework.web.filter.DelegatingFilterProxy
		</filter-class>
	</filter>

	<filter-mapping>
		<filter-name>springSecurityFilterChain</filter-name>
		<url-pattern>/*</url-pattern>
	</filter-mapping>

</web-app>
mvc-dispatcher-servlet.xml
<?xml version="1.0" encoding="UTF-8"?>
<beans xmlns="http://www.springframework.org/schema/beans"
	xmlns:xsi="http://www.w3.org/2001/XMLSchema-instance" xmlns:context="http://www.springframework.org/schema/context"
	xmlns:util="http://www.springframework.org/schema/util" xmlns:mvc="http://www.springframework.org/schema/mvc"
	xsi:schemaLocation="http://www.springframework.org/schema/mvc http://www.springframework.org/schema/mvc/spring-mvc-3.2.xsd
  http://www.springframework.org/schema/beans http://www.springframework.org/schema/beans/spring-beans.xsd
  http://www.springframework.org/schema/util http://www.springframework.org/schema/util/spring-util-3.2.xsd
  http://www.springframework.org/schema/context http://www.springframework.org/schema/context/spring-context-3.2.xsd">

	<context:component-scan base-package="com.jcombat.controller" />
	<mvc:annotation-driven />

</beans>
由于我们将使用admin JSP文件,因此我们已经为其配置了相应的视图解析器。
现在,让我们在其上下文文件中配置Spring Security OAuth。
spring-security.xml
<?xml version="1.0" encoding="UTF-8" ?>
<beans xmlns="http://www.springframework.org/schema/beans"
	xmlns:xsi="http://www.w3.org/2001/XMLSchema-instance" xmlns:oauth="http://www.springframework.org/schema/security/oauth2"
	xmlns:context="http://www.springframework.org/schema/context"
	xmlns:sec="http://www.springframework.org/schema/security" xmlns:mvc="http://www.springframework.org/schema/mvc"
	xsi:schemaLocation="http://www.springframework.org/schema/security/oauth2 http://www.springframework.org/schema/security/spring-security-oauth2-2.0.xsd
  http://www.springframework.org/schema/mvc http://www.springframework.org/schema/mvc/spring-mvc-3.2.xsd
  http://www.springframework.org/schema/security http://www.springframework.org/schema/security/spring-security-3.2.xsd
  http://www.springframework.org/schema/beans http://www.springframework.org/schema/beans/spring-beans-4.1.xsd
  http://www.springframework.org/schema/context http://www.springframework.org/schema/context/spring-context-4.1.xsd ">

	<!-- Default url to get a token from OAuth -->
	<http pattern="/oauth/token" create-session="stateless"
		authentication-manager-ref="clientAuthenticationManager"
		xmlns="http://www.springframework.org/schema/security">
		<intercept-url pattern="/oauth/token" access="IS_AUTHENTICATED_FULLY" />
		<anonymous enabled="false" />
		<http-basic entry-point-ref="clientAuthenticationEntryPoint" />
		<custom-filter ref="clientCredentialsTokenEndpointFilter"
			after="BASIC_AUTH_FILTER" />
		<access-denied-handler ref="oauthAccessDeniedHandler" />
	</http>

	<!-- URLs should be protected and what roles have access to them -->
	<!-- Can define more patterns based on the protected resources hosted on
		the server -->
	<http pattern="/api/**" create-session="never"
		entry-point-ref="oauthAuthenticationEntryPoint"
		access-decision-manager-ref="accessDecisionManager"
		xmlns="http://www.springframework.org/schema/security">
		<anonymous enabled="false" />
		<intercept-url pattern="/api/**" access="ROLE_APP" />
		<!-- Protect oauth clients with resource ids -->
		<custom-filter ref="resourceServerFilter" before="PRE_AUTH_FILTER" />
		<access-denied-handler ref="oauthAccessDeniedHandler" />
	</http>

	<bean id="oauthAuthenticationEntryPoint"
		class="org.springframework.security.oauth2.provider.error.OAuth2AuthenticationEntryPoint">
		<property name="realmName" value="demo/client" />
	</bean>

	<bean id="clientAuthenticationEntryPoint"
		class="org.springframework.security.oauth2.provider.error.OAuth2AuthenticationEntryPoint">
		<property name="realmName" value="demo/client" />
		<property name="typeName" value="Basic" />
	</bean>

	<bean id="oauthAccessDeniedHandler"
		class="org.springframework.security.oauth2.provider.error.OAuth2AccessDeniedHandler" />

	<bean id="clientCredentialsTokenEndpointFilter"
		class="org.springframework.security.oauth2.provider.client.ClientCredentialsTokenEndpointFilter">
		<property name="authenticationManager" ref="clientAuthenticationManager" />
	</bean>

	<bean id="accessDecisionManager" class="org.springframework.security.access.vote.UnanimousBased"
		xmlns="http://www.springframework.org/schema/beans">
		<constructor-arg>
			<list>
				<bean class="org.springframework.security.oauth2.provider.vote.ScopeVoter" />
				<bean class="org.springframework.security.access.vote.RoleVoter" />
				<bean class="org.springframework.security.access.vote.AuthenticatedVoter" />
			</list>
		</constructor-arg>
	</bean>

	<authentication-manager id="clientAuthenticationManager"
		xmlns="http://www.springframework.org/schema/security">
		<authentication-provider user-service-ref="clientDetailsUserService" />
	</authentication-manager>

	<!-- This is simple authentication manager, with a hard-coded username/password
		combination. We can replace this with a user defined service to fetch user
		credentials from DB instead -->
	<authentication-manager alias="authenticationManager"
		xmlns="http://www.springframework.org/schema/security">
		<authentication-provider>
			<user-service>
				<user name="admin" password="123" authorities="ROLE_APP" />
			</user-service>
		</authentication-provider>
	</authentication-manager>

	<bean id="clientDetailsUserService"
		class="org.springframework.security.oauth2.provider.client.ClientDetailsUserDetailsService">
		<constructor-arg ref="clientDetails" />
	</bean>

	<!-- This defines the token store. We have currently used in-memory token
		store but we can instead use a user defined one -->
	<bean id="tokenStore"
		class="org.springframework.security.oauth2.provider.token.InMemoryTokenStore" />
	<!-- If need to store tokens in DB
	<bean id="tokenStore"
		class="org.springframework.security.oauth2.provider.token.store.JdbcTokenStore">
		<constructor-arg ref="jdbcTemplate" />
	</bean> -->

	<!-- This is where we defined token based configurations, token validity
		and other things -->
	<bean id="tokenServices"
		class="org.springframework.security.oauth2.provider.token.DefaultTokenServices">
		<property name="tokenStore" ref="tokenStore" />
		<property name="supportRefreshToken" value="true" />
		<property name="accessTokenValiditySeconds" value="120" />
		<property name="clientDetailsService" ref="clientDetails" />
	</bean>

	<bean id="userApprovalHandler"
		class="org.springframework.security.oauth2.provider.approval.TokenServicesUserApprovalHandler">
		<property name="tokenServices" ref="tokenServices" />
	</bean>

	<!-- The server issuing access tokens to the client after successfully authenticating
		the resource owner and obtaining authorization -->
	<oauth:authorization-server
		client-details-service-ref="clientDetails" token-services-ref="tokenServices"
		user-approval-handler-ref="userApprovalHandler">
		<oauth:authorization-code />
		<oauth:implicit />
		<oauth:refresh-token />
		<oauth:client-credentials />
		<oauth:password />
	</oauth:authorization-server>

	<!-- Define protected resources hosted by the resource server -->
	<oauth:resource-server id="resourceServerFilter"
		resource-id="adminProfile" token-services-ref="tokenServices" />

	<!-- OAuth clients allowed to access the protected resources, can be something
		like facebook, google if we are sharing any resource with them -->
	<oauth:client-details-service id="clientDetails">
		<oauth:client client-id="fbApp"
			authorized-grant-types="password,refresh_token"
			secret="fbApp" authorities="ROLE_APP" resource-ids="adminProfile" />
	</oauth:client-details-service>

	<sec:global-method-security
		pre-post-annotations="enabled" proxy-target-class="true">
		<sec:expression-handler ref="oauthExpressionHandler" />
	</sec:global-method-security>

	<oauth:expression-handler id="oauthExpressionHandler" />
	<oauth:web-expression-handler id="oauthWebExpressionHandler" />

</beans>我们已经配置了/ oauth / token URL来发布访问和刷新令牌,并且/ api / **映射到服务器上实际受保护的资源。 因此,要访问与模式/ api / **匹配的任何URL,需要将有效令牌与请求一起传递。
身份验证管理器是进行身份验证的容器。 在我们的情况下,身份验证管理器检查–
- 用户是否通过身份验证。
- 用户是否请求了正确的客户ID。
- 如果client-id正确,则该用户是否有权使用它来访问服务器上的管理配置文件。
请参阅以下代码段–
<authentication-manager id="clientAuthenticationManager"
		xmlns="http://www.springframework.org/schema/security">
	<authentication-provider user-service-ref="clientDetailsUserService" />
</authentication-manager>

<bean id="clientDetailsUserService"
		class="org.springframework.security.oauth2.provider.client.ClientDetailsUserDetailsService">
	<constructor-arg ref="clientDetails" />
</bean>

<!-- OAuth clients allowed to access the protected resources, can be something
		like facebook, google if we are sharing any resource with them -->
<oauth:client-details-service id="clientDetails">
	<oauth:client client-id="fbApp"
		authorized-grant-types="password,refresh_token"
		secret="fbApp" authorities="ROLE_APP" resource-ids="adminProfile" />
</oauth:client-details-service>
用户通过身份验证后, 授权服务器将调用tokenServices并颁发访问令牌。
<oauth:authorization-server
	client-details-service-ref="clientDetails" token-services-ref="tokenServices"
	user-approval-handler-ref="userApprovalHandler">
	<oauth:authorization-code />
	<oauth:implicit />
	<oauth:refresh-token />
	<oauth:client-credentials />
	<oauth:password />
</oauth:authorization-server>

<bean id="tokenServices"
		class="org.springframework.security.oauth2.provider.token.DefaultTokenServices">
	<property name="tokenStore" ref="tokenStore" />
	<property name="supportRefreshToken" value="true" />
	<property name="accessTokenValiditySeconds" value="120" />
	<property name="clientDetailsService" ref="clientDetails" />
</bean>

<bean id="tokenStore"
		class="org.springframework.security.oauth2.provider.token.InMemoryTokenStore" />

<bean id="userApprovalHandler"
		class="org.springframework.security.oauth2.provider.approval.TokenServicesUserApprovalHandler">
	<property name="tokenServices" ref="tokenServices" />
</bean>在指定客户端时,请注意我们指定的授权类型,即password 。
<oauth:client-details-service id="clientDetails">
<oauth:client client-id="fbApp"
authorized-grant-types="password,refresh_token"
secret="fbApp" authorities="ROLE_APP" resource-ids="adminProfile" />
</oauth:client-details-service>发出访问令牌后,我们便可以访问服务器上受保护的资源,并将其与每个请求一起传递。 最后,让我们看看我们编写的Spring Controller –
EmployeeController.java
package com.jcombat.controller;

import org.springframework.web.bind.annotation.PathVariable;
import org.springframework.web.bind.annotation.RequestMapping;
import org.springframework.web.bind.annotation.RequestMethod;
import org.springframework.web.bind.annotation.RequestParam;
import org.springframework.web.bind.annotation.RestController;

import com.jcombat.bean.Employee;

@RestController
@RequestMapping(value = "/api/Employee")
public class EmployeeController {

	@RequestMapping(value = "/{name}", method = RequestMethod.GET)
	public Employee process(
			@PathVariable("name") String name,
			@RequestParam(value = "empId", required = false, defaultValue = "00000") final String id) {
		Employee employee = new Employee();
		employee.setEmpId(id);
		employee.setName(name);
		return employee;
	}
};
4.运行应用程序
要运行该应用程序,让我们首先从授权服务器请求访问令牌-
http:// localhost:8080 / SecureRESTWithOAuth / oauth / token? grant_type =密码和client_id = fbApp& client_secret = fbApp& 用户名 = admin& 密码 = 123
{
    "value":"a7718567-6e38-4be3-aa41-382c90e042e0",
    "expiration":1505631027817,
    "tokenType":"bearer",
    "refreshToken":{
        "value":"7792b077-7ae0-427e-8170-8b1440e5fefd",
        "expiration":1508222907814
    },
    "scope":[

    ],
    "additionalInformation":{

    },
    "expiresIn":109,
    "expired":false
}
生成访问令牌后,我们准备将其与服务器上对受保护资源的所有后续请求一起传递。
http:// localhost:8080 / SecureRESTWithOAuth / api / Employee / abhimanyu? access_token = 7792b077-7ae0-427e-8170-8b1440e5fefd

5.下载代码
翻译自: https://www.javacodegeeks.com/2017/09/secure-rest-service-oauth2-tokens.html


 383
383

 被折叠的 条评论
为什么被折叠?
被折叠的 条评论
为什么被折叠?
 到【灌水乐园】发言


