


IMDG或内存数据网格不是内存中关系数据库,NOSQL数据库或关系数据库。 它是另一种软件数据存储库。 数据模型分布在单个位置或多个位置的许多服务器上。 这种分布称为数据结构。 这种分布式模型被称为“无共享”架构。 IMDG具有以下特征:
- 所有服务器可以在每个站点中处于活动状态。
- 所有数据都存储在服务器的RAM中。
- 可以不中断地添加或删除服务器,以增加可用的RAM量。
- 数据模型是非关系的,是基于对象的。
- 用平台独立语言编写的分布式应用程序。
- 数据结构具有弹性,可以无中断地自动检测和恢复单个或多个服务器。
大多数情况下,我们将IMDG用于应用程序服务器的Web会话管理,并用作分布式缓存或L2缓存。 Hazelcast社区的添加是我们一直以来最喜欢的IMDG工具,但是从hazelcast社区版的最新情况来看,它的性能让我们感到非常不满意。 作为HazelCast的快速替代方案,我们决定尝试使用
Apache点燃 。 这篇文章专门针对apache点燃,可用于快速启动指南。 对于安装,我将使用具有以下配置的2个Redhat操作系统虚拟机:
- CPU:2
- 内存:4
- 硬盘:25 GB
- 操作系统:Redhat Santiago
从Apache ignite6的许多功能中,我们将仅研究以下功能:
- 准备操作系统
- 使用Spring使用DataGrid
- MyBatis缓存配置
- Spring缓存
安装apache点燃
前提条件:
- Java 1.7及更高版本
- 打开端口:47500..47509、8080(用于Rest接口),47400、47100:47101、48100:48101、31100:31101在操作系统中安装JDK之后,我们必须打开上述端口。 通过执行以下命令,我们可以操纵iptables。
vi /etc/sysconfig/iptables
-A INPUT -m state --state NEW -m tcp -p tcp --dport 47500:47509 -j ACCEPT
-A INPUT -m state --state NEW -m tcp -p tcp --dport 47400 -j ACCEPT
-A INPUT -m state --state NEW -m tcp -p tcp --dport 47100 -j ACCEPT
-A INPUT -m state --state NEW -m tcp -p tcp --dport 47101 -j ACCEPT
-A INPUT -m state --state NEW -m tcp -p tcp --dport 48100 -j ACCEPT
-A INPUT -m state --state NEW -m tcp -p tcp --dport 48101 -j ACCEPT
-A INPUT -m state --state NEW -m tcp -p tcp --dport 31100 -j ACCEPT
-A INPUT -m state --state NEW -m tcp -p tcp --dport 31101 -j ACCEPT

/etc/init.d/iptables restart
在几台机器上安装Apache ignite
- 让我们从以下链接下载ignite 1.5.0final版本。
- 将档案解压缩到os中的任何位置,例如/ opt / apache-ignite
- 将环境路径IGNITE_HOME添加到apache ignite的主目录中。
- 将文件夹$ IGNITE_HOME / libs / optional / ignite-rest-http复制到/home/user/apache-ignite-fabric-1.5.0/libs,它将通过REST接口启用apign点火。
- 运行命令ignite.sh examples / config / example-cache.xml以启动apache ignite。
如果一切正常,您应该在控制台中看到以下日志:
[12:32:01] Ignite node started OK (id=ceb614ca)
[12:32:01] Topology snapshot [ver=4, servers=2, clients=0, CPUs=3, heap=2.0GB]
并且通过网址http:// host:port / ignite?cmd = version也可以通过http获得ignite
使用Spring使用DataGrid
首先,我们必须构建Maven项目以编写一堆代码来检查apache Ignite的功能。
- 将以下依赖项添加到pom.xml
<dependency>
            <groupId>org.apache.ignite</groupId>
            <artifactId>ignite-core</artifactId>
            <version>${ignite.version}</version>
        </dependency>
        <dependency>
            <groupId>org.apache.ignite</groupId>
            <artifactId>ignite-spring</artifactId>
            <version>${ignite.version}</version>
        </dependency>
        <dependency>
            <groupId>org.apache.ignite</groupId>
            <artifactId>ignite-indexing</artifactId>
            <version>${ignite.version}</version>
        </dependency>
        <!-- myBatis -->
        <dependency>
            <groupId>org.mybatis.caches</groupId>
            <artifactId>mybatis-ignite</artifactId>
            <version>1.0.0-beta1</version>
        </dependency>
        <dependency>
            <groupId>org.mybatis</groupId>
            <artifactId>mybatis-spring</artifactId>
            <version>1.2.4</version>
        </dependency>
        <dependency>
            <groupId>org.mybatis</groupId>
            <artifactId>mybatis</artifactId>
            <version>3.3.1</version>
        </dependency>
        <!-- Oracle 12-->
        <dependency>
            <groupId>com.oracle</groupId>
            <artifactId>ojdbc6</artifactId>
            <version>11.2.0.3</version>
        </dependency>
请注意,Oracle JDBC客户端jar应该位于本地Maven存储库中。 就我而言,我使用Oracle 11.2.02客户端。
- 使用以下上下文在资源目录中添加spring-context.xml文件:
<beans xmlns="http://www.springframework.org/schema/beans"
       xmlns:context="http://www.springframework.org/schema/context"
       xmlns:xsi="http://www.w3.org/2001/XMLSchema-instance"
       xmlns:mvc="http://www.springframework.org/schema/mvc"
       xmlns:cache="http://www.springframework.org/schema/cache"
       xsi:schemaLocation="
        http://www.springframework.org/schema/beans
        http://www.springframework.org/schema/beans/spring-beans.xsd
        http://www.springframework.org/schema/cache
        http://www.springframework.org/schema/cache/spring-cache-3.1.xsd
        http://www.springframework.org/schema/context
        http://www.springframework.org/schema/context/spring-context.xsd ">
    <!-- Enable annotation-driven caching. -->
    <cache:annotation-driven/>

    <context:property-placeholder location="classpath:jdbc.properties"/>
    <!-- beans -->

    <bean id="ignite.cfg" class="org.apache.ignite.configuration.IgniteConfiguration">
        <property name="gridName" value="TestGrid"/>
        <!-- Enable client mode. -->
        <property name="clientMode" value="true"/>

        <property name="cacheConfiguration">
            <list>
                <!-- Partitioned cache example configuration (Atomic mode). -->
                <bean class="org.apache.ignite.configuration.CacheConfiguration">
                    <!--<property name="atomicityMode" value="ATOMIC"/>-->
                    <!-- Set cache mode. -->
                    <property name="cacheMode" value="PARTITIONED"/>
                    <property name="backups" value="1"/>
                    <property name="statisticsEnabled" value="true" />
                </bean>
            </list>
        </property>
        <!-- Explicitly configure TCP discovery SPI to provide list of initial nodes. -->
        <property name="discoverySpi">
            <bean class="org.apache.ignite.spi.discovery.tcp.TcpDiscoverySpi">
                <property name="ipFinder">
                    <!-- Uncomment static IP finder to enable static-based discovery of initial nodes. -->
                    <!--<bean class="org.apache.ignite.spi.discovery.tcp.ipfinder.vm.TcpDiscoveryVmIpFinder">-->
                    <bean class="org.apache.ignite.spi.discovery.tcp.ipfinder.multicast.TcpDiscoveryMulticastIpFinder">
                        <property name="addresses">
                            <list>
                                <!-- In distributed environment, replace with actual host IP address. -->
                                <value>Add your node ip address</value>
                                <value>add your node ip address</value>
                            </list>
                        </property>
                    </bean>
                </property>
            </bean>
        </property>
    </bean>
    <bean id="sqlSessionFactory" class="org.mybatis.spring.SqlSessionFactoryBean">
        <property name="dataSource" ref="dataSource" />
        <property name="mapperLocations" value="classpath*:com/blu/ignite/dao/*Mapper.xml"/>
    </bean>
    <bean id="dataSource" class="oracle.jdbc.pool.OracleDataSource" destroy-method="close">
        <property name="URL" value="${jdbc.url}" />
        <property name="user" value="${jdbc.username}"/>
        <property name="password" value="${jdbc.password}"/>
        <property name="connectionCachingEnabled" value="true"/>
    </bean>
</beans>
让我们检查一些配置属性:
- 属性名称=“ clientMode”值=“ true” –此属性将强制当前应用程序作为客户端运行。
- 属性名称=“ cacheMode”值=“已分配” –缓存模式将被分区,缓存模式也可被复制。
- 属性名=“备份”值=“ 1” –总是在另一个节点中有一个冗余的缓存元素。
- 属性名称=“ statisticsEnabled”值=“ true” –此属性将激活缓存统计信息。
- 现在让我们写一些:
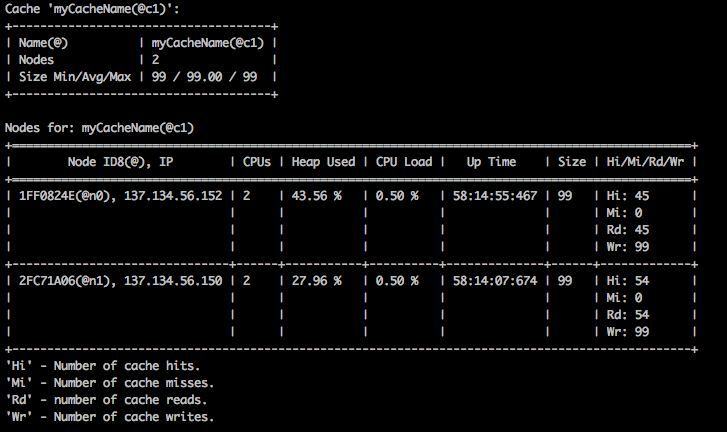
public class SpringIgniteRun {
    public static void main(String[] args) throws Exception{
        System.out.println("Run Spring example!!");
        ApplicationContext ctx = new ClassPathXmlApplicationContext("spring-core.xml");

        IgniteConfiguration igniteConfiguration = (IgniteConfiguration) ctx.getBean("ignite.cfg");
        Ignite ignite = Ignition.start(igniteConfiguration);
        // get or create cache
        IgniteCache cache = ignite.getOrCreateCache("myCacheName");
        for(int i = 1; i < 1000; i++){
            cache.put(i, Integer.toString(i));
        }
        for(int i =1; i<1000;i++){
            System.out.println("Cache get:"+ cache.get(i));
        }
        Thread.sleep(20000); // sleep for 20 seconds
        // statistics
        System.out.println("Cache Hits:"+ cache.metrics(ignite.cluster()).getCacheHits());
        ignite.close();
    }
}
上面的代码是自我解释的,我们只创建一个名为“ myCacheName”的缓存,并添加1000 String整数值。 将值插入缓存后,我们还从缓存中读取元素并检查统计信息。 通过ignitevisorcmd,您还可以监视数据网格,随后您可以找到网格统计信息的屏幕截图
MyBatis缓存配置
现在,让我们添加MyBatis ORM l2缓存并检查其工作方式。
<bean id="servicesBean" class="com.blu.ignite.WebServices">
        <property name="dao" ref="userServicesBean"/>
    </bean>
    <bean id="userServicesBean" class="com.blu.ignite.dao.UserServices">
        <property name="userMapper" ref="userMapper"/>
    </bean>

    <bean id="sqlSessionFactory" class="org.mybatis.spring.SqlSessionFactoryBean">
        <property name="dataSource" ref="dataSource" />
        <property name="mapperLocations" value="classpath*:com/blu/ignite/dao/*Mapper.xml"/>
    </bean>
    <bean id="dataSource" class="oracle.jdbc.pool.OracleDataSource" destroy-method="close">
        <property name="URL" value="${jdbc.url}" />
        <property name="user" value="${jdbc.username}"/>
        <property name="password" value="${jdbc.password}"/>
        <property name="connectionCachingEnabled" value="true"/>
    </bean>


    <bean id="userMapper" autowire="byName" class="org.mybatis.spring.mapper.MapperFactoryBean">
        <property name="mapperInterface" value="com.blu.ignite.mapper.UserMapper" />
        <property name="sqlSessionFactory" ref="sqlSessionFactory" />
    </bean>
    <bean class="org.mybatis.spring.mapper.MapperScannerConfigurer">
        <property name="basePackage" value="com.blu.ignite.mapper" />
    </bean>
我们添加了SQLsessionFactory,MyBatis映射器和Service Bean。 现在让我们添加* .Mapper.xml
<?xml version="1.0" encoding="UTF-8" ?>

<!DOCTYPE mapper
        PUBLIC "-//mybatis.org//DTD Mapper 3.0//EN" "http://mybatis.org/dtd/mybatis-3-mapper.dtd">

<mapper namespace="com.blu.ignite.mapper.UserMapper">

    <cache type="org.mybatis.caches.ignite.IgniteCacheAdapter" />

    <select id="getUser" parameterType="String" resultType="com.blu.ignite.dto.User" useCache="true">
      SELECT * FROM users WHERE id = #{id}
    </select>

    <select id="getUniqueJob" parameterType="String" resultType="String" useCache="false">
        select unique job from emp order by job desc
    </select>

</mapper>
emp和dept表的完整sql(DDL / DML)脚本位于com / blu / ignite / scripts目录中。我创建了一个简单的Web服务,以获取用户和员工的独特工作。 这是Web服务的代码,如下所示:
@WebService(name = "BusinessRulesServices",
        serviceName="BusinessRulesServices",
        targetNamespace = "http://com.blu.rules/services")
public class WebServices {
    private UserServices userServices;

    @WebMethod(operationName = "getUserName")
    public String getUserName(String userId){
        User user = userServices.getUser(userId);
        return user.getuName();
    }
    @WebMethod(operationName = "getUniqueJobs")
    public List getUniqueJobs(){
        return userServices.getUniqueJobs();
    }
    @WebMethod(exclude = true)
    public void setDao(UserServices userServices){
        this.userServices = userServices;
    }

}
调用Web方法getUserName将查询数据库并将查询结果缓存在ignite缓存中。
Spring缓存
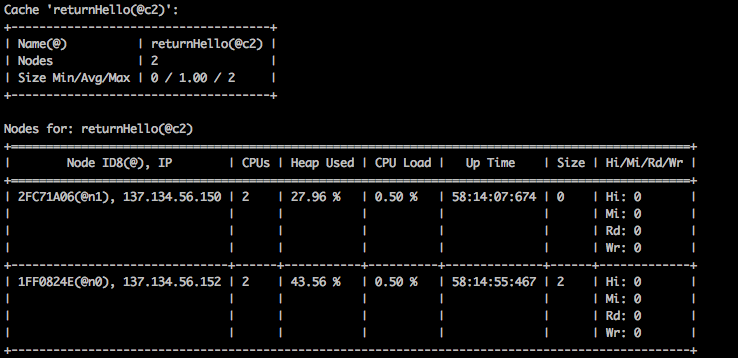
使用spring缓存,您可以实现任何spring bean方法的返回值的缓存。 Apache ignite将通过您将通过注释@Cacheable(“ returnHello”)提供的缓存名称来创建缓存,例如,如果我具有如下方法:
@Cacheable("returnHello")
    public String sayhello(String str){
        System.out.println("Client says:"+ str);

        return "hello"+str;
    }
第一次调用该方法时,将在ignite中创建一个带有参数名称的复制缓存,下次调用上述方法时,将从缓存中返回该值。
- 现在就足够了。 很快我将以apache ignite的一些新功能返回。 该项目的完整源代码可在github中找到。
翻译自: https://www.javacodegeeks.com/2016/02/quick-start-memory-data-grid-apache-ignite.html


 1204
1204


 被折叠的 条评论
为什么被折叠?
被折叠的 条评论
为什么被折叠?
 到【灌水乐园】发言


