


最近,我正在研究概念验证的Web应用程序,我想将其部署到公共云以进行快速演示。
我决定使用Amazon,因为我已经有过使用它的经验。 亚马逊提供了几种不同的方式来部署Java Web应用程序。
EC2使我们可以灵活地在机箱上安装和配置任何我们想要的东西。 对于想要控制其应用程序的部署和运行方式的人来说,这是一个非常灵活的解决方案,但是缺点是我们必须自己完成大部分服务器安装和配置以及应用程序部署任务。
Elastic Beanstalk是一项易于使用的服务,可自动处理部署,自动扩展,负载平衡和运行状况监视。 只需单击几下,任何人都可以使用Elastic Beanstalk将Web应用程序部署到Amazon云。
我决定使用快速简便的Elastic Beanstalk选项...
Elastic Beanstalk具有多种部署Java应用程序的方式:
- 使用Docker
- 将War文件部署到Tomcat服务器
- 部署从命令行执行的fatjar
在本文中,我将使用Fatjar来介绍该选项,该Fatjar基本上是一个jar文件,其中捆绑了所有类和jar依赖项。
为了使其在亚马逊上正常工作,必须将jar文件放在一个zip文件中。
创建JAR和ZIP文件
在本文中,我将使用Maven来创建上述的jar和zip文件。 让我们来看一个示例pom.xml文件,看看它是如何完成的:
<?xml version="1.0" encoding="UTF-8"?>
<project xmlns="http://maven.apache.org/POM/4.0.0" xmlns:xsi="http://www.w3.org/2001/XMLSchema-instance" xsi:schemaLocation="http://maven.apache.org/POM/4.0.0 http://maven.apache.org/xsd/maven-4.0.0.xsd">
  <modelVersion>4.0.0</modelVersion>
  ...
  <groupId>com.kaviddiss</groupId>
  <artifactId>spring-boot-aws-beanstalk</artifactId>
  <version>0.0.1-SNAPSHOT</version>
  <packaging>jar</packaging>
  ...
  <parent>
    <groupId>org.springframework.boot</groupId>
    <artifactId>spring-boot-starter-parent</artifactId>
    <version>1.3.2.RELEASE</version>
    <relativePath />
    <!-- lookup parent from repository -->
    </parent>
  <dependencies>
    <dependency>
      <groupId>org.springframework.boot</groupId>
      <artifactId>spring-boot-starter-web</artifactId>
    </dependency>
    ...
  </dependencies>

  <build>
    <finalName>${project.artifactId}</finalName>
    <plugins>
      ...
      <plugin>
        <groupId>org.springframework.boot</groupId>
        <artifactId>spring-boot-maven-plugin</artifactId>
      </plugin
       <plugin>
      <!-- NOTE: We don't need a groupId specification because the group is org.apache.maven.plugins ...which is assumed by default. -->
        <artifactId>maven-assembly-plugin</artifactId>
        <version>2.6</version>
        <executions>
          <execution>
            <id>make-zip</id>
            <!-- this is used for inheritance merges -->
            <phase>package</phase>
            <!-- bind to the packaging phase -->
            <goals>
              <goal>
                single
              </goal>
            </goals>
          </execution>
        </executions>
        <configuration>
          <appendAssemblyId>false</appendAssemblyId>
          <descriptors>
            <descriptor>src/assembly/zip.xml</descriptor>
          </descriptors>
        </configuration>
      </plugin>
    </plugins>
  </build>
</project>该文件基于为http://start.spring.io/上的 Spring Boot Web应用程序生成的pom.xml文件,它包括一些其他更改:
- 确保包装标签设置为jar
- spring-boot-maven-plugin将负责创建jar文件,包括文件本身内部的所有jar依赖项
- 使用src / assembly / zip.xml描述符文件配置maven-assembly-plugin以从jar文件生成zip文件
在pom.xml文件中配置了maven-assembly-plugin之后,我们还需要配置zip.xml描述符,该描述符告诉程序集插件如何构造zip文件本身。
<assembly xmlns="http://maven.apache.org/plugins/maven-assembly-plugin/assembly/1.1.3"
 xmlns:xsi="http://www.w3.org/2001/XMLSchema-instance"
 xsi:schemaLocation="http://maven.apache.org/plugins/maven-assembly-plugin/assembly/1.1.3 http://maven.apache.org/xsd/assembly-1.1.3.xsd">
   <id>zip</id>
   <formats>
     <format>zip</format>
   </formats>
   <includeBaseDirectory>false</includeBaseDirectory>
   <fileSets>
     <fileSet>
       <directory>${project.build.directory}</directory>
       <includes>
         <include>${project.artifactId}.jar</include>
       </includes>
       <outputDirectory>.</outputDirectory>
    </fileSet>
   </fileSets>
</assembly>
正如您在上面看到的,我们将输出配置为zip,这是许多受支持的格式之一。
我们还配置了将jar文件包含在zip文件的顶级目录中。 这是Amazon从命令行运行应用程序所需要的,
使用Spring Boot的示例微服务
为了能够测试Maven配置,我创建了一个简单的Spring Boot Web应用程序(请参见下文)。
应用程序
import org.springframework.boot.SpringApplication;
import org.springframework.boot.autoconfigure.SpringBootApplication;
import org.springframework.stereotype.Controller;
import org.springframework.web.bind.annotation.RequestMapping;
import org.springframework.web.bind.annotation.ResponseBody;

@SpringBootApplication
@Controller
public class Application {
  @RequestMapping(value = "/hello")
  public @ResponseBody String helloWorld() {
    return "Hello, World!";
  }

  public static void main(String[] args) {
    SpringApplication.run(Application.class, args);
  }
}
这个Application类是Web应用程序的主类,它将是从命令行运行fatjar的入口点
部署到Elastic Beanstalk
如果您尚未注册AWS Elastic Beanstalk,则可以单击以下链接: https : //console.aws.amazon.com/elasticbeanstalk 。
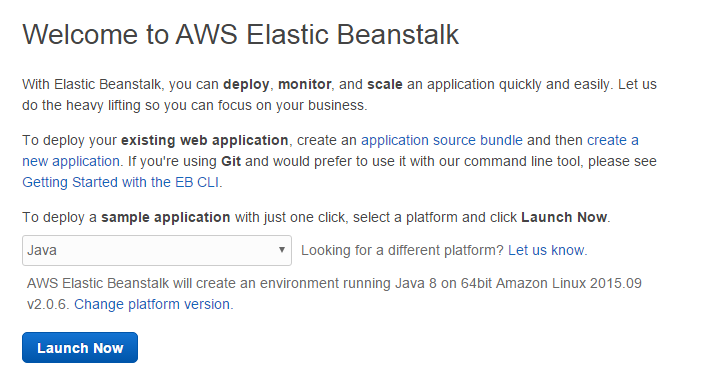
选择Amazon Elastic Beanstalk平台
进入控制台后,单击“为应用程序创建新环境”。 然后单击“创建Web服务器”,然后在平台下拉列表中选择“ Java”,然后单击“立即启动”。

设置环境变量
AWS将nginx代理服务器配置为将请求转发到在端口8080上运行的我们的应用程序。为了向nginx告知端口8080,请在配置->软件配置中添加一个环境变量,其键和值设置为PORT = 8080。
就是这样。 如果一切顺利,您应该可以在AWS上访问示例Web应用程序!


 1121
1121

 被折叠的 条评论
为什么被折叠?
被折叠的 条评论
为什么被折叠?
 到【灌水乐园】发言


