


在这篇文章中,我将解释如何使用Gatling项目为您的JAX-RS Java EE端点编写压力测试,以及如何将它们与Gradle和Jenkins Pipeline集成,因此,除了进行简单的压力测试外,您还可以使用以下方法: 连续的压力测试,其中每个提交都可能自动触发此类测试,并提供自动断言和每个执行的更重要的图形反馈,因此您可以监视应用程序中性能的变化。
首先要开发的是JAX-RS JavaEE服务:
@Path("/planet")
@Singleton
@Lock(LockType.READ)
public class PlanetResources {

    @Inject
    SwapiGateway swapiGateway;

    @Inject
    PlanetService planetService;

    @Inject
    @AverageFormatter
    DecimalFormat averageFormatter;

    @GET
    @Path("/orbital/average")
    @Produces(MediaType.TEXT_PLAIN)
    @Asynchronous
    public void calculateAverageOfOrbitalPeriod(@Suspended final AsyncResponse response) {

        // Timeout control
        response.setTimeoutHandler(asyncResponse -> asyncResponse.resume(Response.status
                (Response.Status.SERVICE_UNAVAILABLE)
                .entity("TIME OUT !").build()));
        response.setTimeout(30, TimeUnit.SECONDS);

        try {
            // SwapiGateway is an interface to swapi.co (Star Wars API)
            JsonObject planets = swapiGateway.getAllPlanets();
            final JsonArray results = planets.getJsonArray("results");

            // Make some calculations with the result retrieved from swapi.co
            double average = planetService.calculateAverageOfOrbitalPeriod(results);
            final Response averageResponse = Response.ok(
                    averageFormatter.format(average))
                  .build();
            response.resume(averageResponse);

        } catch(Throwable e) {
            response.resume(e);
        }
    }
}
没什么特别的,这是一个异步的JAX-RS端点,它连接到swapi.co网站,检索“星球大战”行星的所有信息,计算出轨道周期的平均值,最后以文本形式返回。 为了简单起见,我不会向您展示所有其他类,但是它们非常简单,在文章结尾,我将为您提供github存储库。
该应用程序打包在war文件中,并部署到应用程序服务器中。 在这种情况下,将部署到官方Apache TomEE Docker映像内部署的Apache TomEE 7 。
下一步是使用Gatling依赖项配置Gradle构建脚本。 由于Gatling是用Scala编写的,因此您需要使用Scala插件。
 apply plugin: 'java'
apply plugin: 'scala'

def gatlingVersion = "2.1.7"

dependencies {
    compile "org.scala-lang:scala-library:2.11.7"
    testCompile "io.gatling:gatling-app:${gatlingVersion}"
    testCompile "io.gatling.highcharts:gatling-charts-highcharts:${gatlingVersion}"
}
之后,是时候编写我们的第一个压力测试了。 重要的是要注意,为加特林编写压力测试正在使用提供的DSL编写Scala类。 即使对于从未看过Scala的人来说,如何使用它也非常直观。
因此,创建一个名为src / test / scala的目录,并创建一个具有下一个内容的名为AverageOrbitalPeriodSimulation.scala的新类:
 package org.starwars

import io.gatling.core.Predef._
import io.gatling.http.Predef._
import scala.concurrent.duration._
import scala.util.Properties

// Extends from Simulation
class AverageOrbitalPeriodSimulation extends Simulation {

  // Gets the base URL where our service is running from environment/system property
  val LOCATION_PROPERTY = "starwars_planets_url";
  val location = Properties.envOrElse(LOCATION_PROPERTY,
                 Properties.propOrElse(LOCATION_PROPERTY, "http://localhost:8080/"))

  // configures the base URL
  val conf = http.baseURL(location)

  // defines the scenario to run, which in this case is a GET to endpoint defined in JAX-RS service
  val scn = scenario("calculate average orbital period")
    .exec(http("get average orbital period")
      .get("rest/planet/orbital/average"))
    .pause(1)

  // instead of simulating 10 users at once, it adds gradullay the 10 users during 3 seconds
  // asserts that there is no failing requests and that at max each request takes less than 3 seconds
  setUp(scn.inject(rampUsers(10).over(3 seconds)))
    .protocols(conf)
    .assertions(global.successfulRequests.percent.is(100), global.responseTime.max.lessThan(3000))
}
每个模拟都必须扩展模拟对象。 此模拟从starwars_planets_url环境或系统属性中获取服务的基本URL,创建指向JAX-RS中定义的端点的方案,最后在3秒钟内它将逐步添加用户,直到同时运行10个用户。 仅在所有请求在3秒内成功通过后,测试才能通过。
现在我们需要运行此测试。 您会注意到这不是JUnit测试,因此您无法执行Run As JUnit测试。 您需要做的是使用Gatling提供的可运行类,该类要求您将模拟类作为参数传递。 使用Gradle确实很容易做到。
task runLoadTest(type: JavaExec) {
    // before runnign the task we need to compile the tests
    dependsOn testClasses
    description = 'Stress Test Calculating Orbital Period'
    classpath = sourceSets.main.runtimeClasspath + sourceSets.test.runtimeClasspath

    // if starwars_planets_url is not provided we add the DOCKER_HOST one automatically
    def starwarsUrl;
    if (!System.env.containsKey('starwars_planets_url') && !System.properties.containsKey('starwars_planets_url')) {
        if (System.env.containsKey('DOCKER_HOST')) {
            starwarsUrl = System.env.DOCKER_HOST.replace("tcp", "http").replace("2376", "9090") + "/starwars/"
        } else {
            starwarsUrl = "http://localhost:8080/starwars/"
        }
    }

    jvmArgs = [ "-Dgatling.core.directory.binaries=${sourceSets.test.output.classesDir.toString()}" ]

    // Means that the url has been calculated here and we set it
    if (starwarsUrl != null) {
        environment["starwars_planets_url"] = starwarsUrl
    }

    // Gatling application
    main = "io.gatling.app.Gatling"


    // Specify the simulation to run and output
    args = [
            "--simulation", "org.starwars.AverageOrbitalPeriodSimulation",
            "--results-folder", "${buildDir}/reports/gatling-results",
            "--binaries-folder", sourceSets.test.output.classesDir.toString(),
            "--output-name", "averageorbitalperiodsimulation",
            "--bodies-folder", sourceSets.test.resources.srcDirs.toList().first().toString() + "/gatling/bodies",
    ]
}

// when running test task we want to execute the Gatling test
test.dependsOn runLoadTest
我们正在定义JavaExec类型的Gradle任务,因为我们想要的是运行一个可运行的类。 然后,通过自动检测到是否未设置starwars_planets_url,我们将该测试运行到已安装Docker的计算机上,因此可能使开发人员的工作变得更加轻松。
最后,如果需要,我们将覆盖环境变量,我们为可运行类设置必需的属性,并配置Gradle在每次执行测试任务(./gradlew test)时执行此任务。
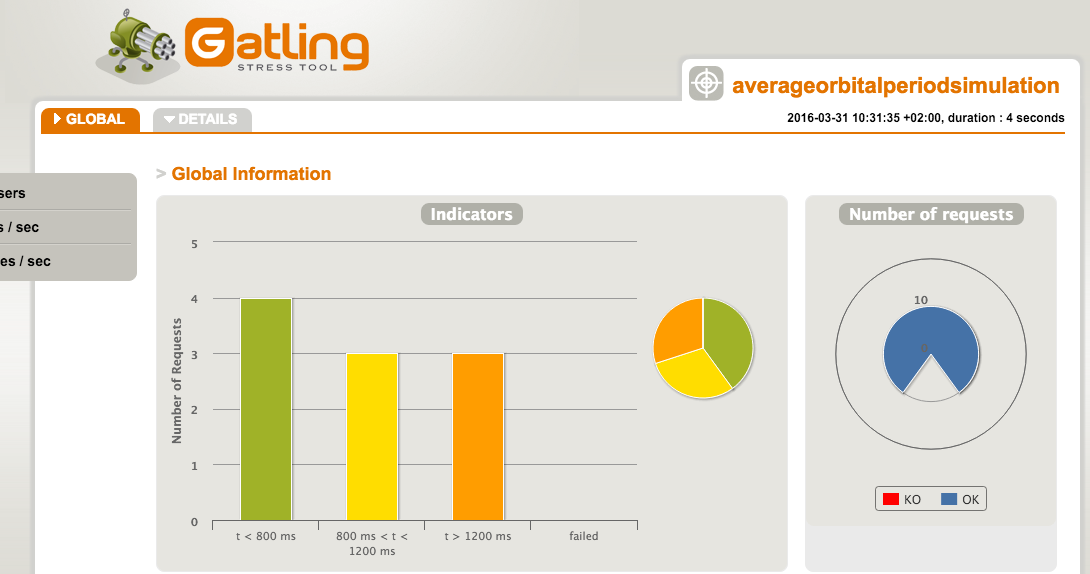
如果运行它,您可能会看到来自Gatling的一些输出消息,以及所有类似以下的消息:请打开以下文件: /Users/…./stress-test/build/reports/gatlingresults / averageorbitalperiodsimulation-1459413095563 / index。 html ,这是您获取报告的地方。 请注意,在目录末尾附加了一个随机数,这很重要,因为稍后我们将要看到。 该报告可能如下所示:
目前,我们已将Gatling与Gradle集成在一起,但是这里缺少一个片段,它在方程式上添加了连续部分。 为了添加连续的压力测试,我们将使用Jenkins和Jenkins Pipeline作为CI服务器,因此对于每个提交都执行压力测试 其他任务,例如编译,运行单元,集成测试或代码质量门。
过去, Jenkins作业是使用Web UI配置的,要求用户手动创建作业,填写作业的详细信息并通过Web浏览器创建管道。 同样,这也使得将作业的配置与正在构建的实际代码分开。
随着Jenkins Pipeline插件的引入。 该插件是Groovy DSL,可让您在文件中实施整个构建过程,并将其与代码一起存储。 Jenkins 2.0默认带有此插件,但是如果您使用的是Jenkins 1.X,则可以将其安装为其他任何插件( https://wiki.jenkins-ci.org/display/JENKINS/Pipeline+Plugin )
因此,现在我们可以开始对发布插件进行编码了,但是出于本文的目的,仅涉及压力部分。 您需要在项目的根目录上创建一个名为Jenkinsfile的文件(名称不是强制性的,但实际上是名称),在本例中为下一个内容:
 stage 'Compile And Unit Test'

stage 'Code Quality'

stage 'Integration Test'

stage 'Acceptance Test'

// defines an stage for info purposes
stage 'Stress Test'

def dockerHost = '...'
//defines a node to run the stage
node {
  // get source code from location where Jenkinsfile (this) is located.
  // you could use stash/unstash to get sources from previous stages instead of getting from SCM
  checkout scm
  // defines the environment variable for stress test
  withEnv(["starwars_planets_url=http://${dockerHost}:9090/starwars/"]) {
    // executes shell script
    sh './gradlew test'
  }

}
在这种情况下,我们定义了一个新阶段,称为压力测试。 阶段步骤仅用作参考,将用于记录目的。 接下来定义一个节点。 节点是执行代码的Jenkins执行程序。 在此节点内,从放置Jenkinsfile的相同位置检出源代码,设置一个新的环境变量,该变量指向应用程序的部署位置,最后是执行Gradle测试任务的shell步骤。
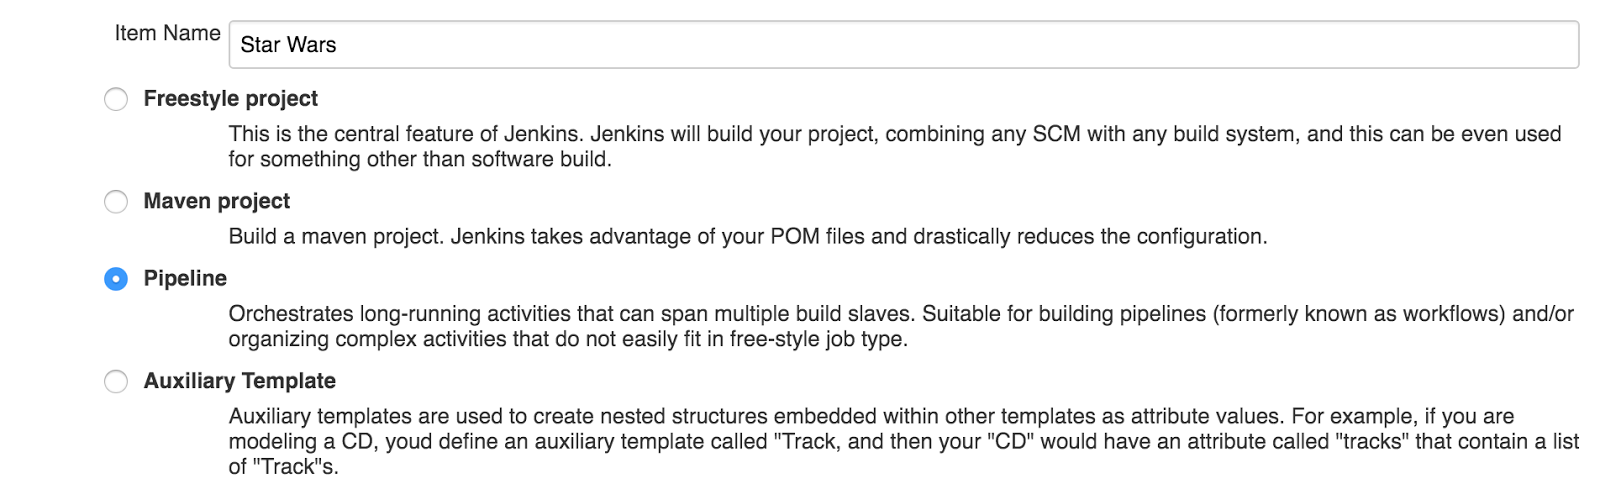
Jenkins的最后一步是创建类型为Pipeline的新作业并设置Jenkinsfile的位置。 因此,转到“ 詹金斯”>“新项目”>“管道”,并为作业命名。
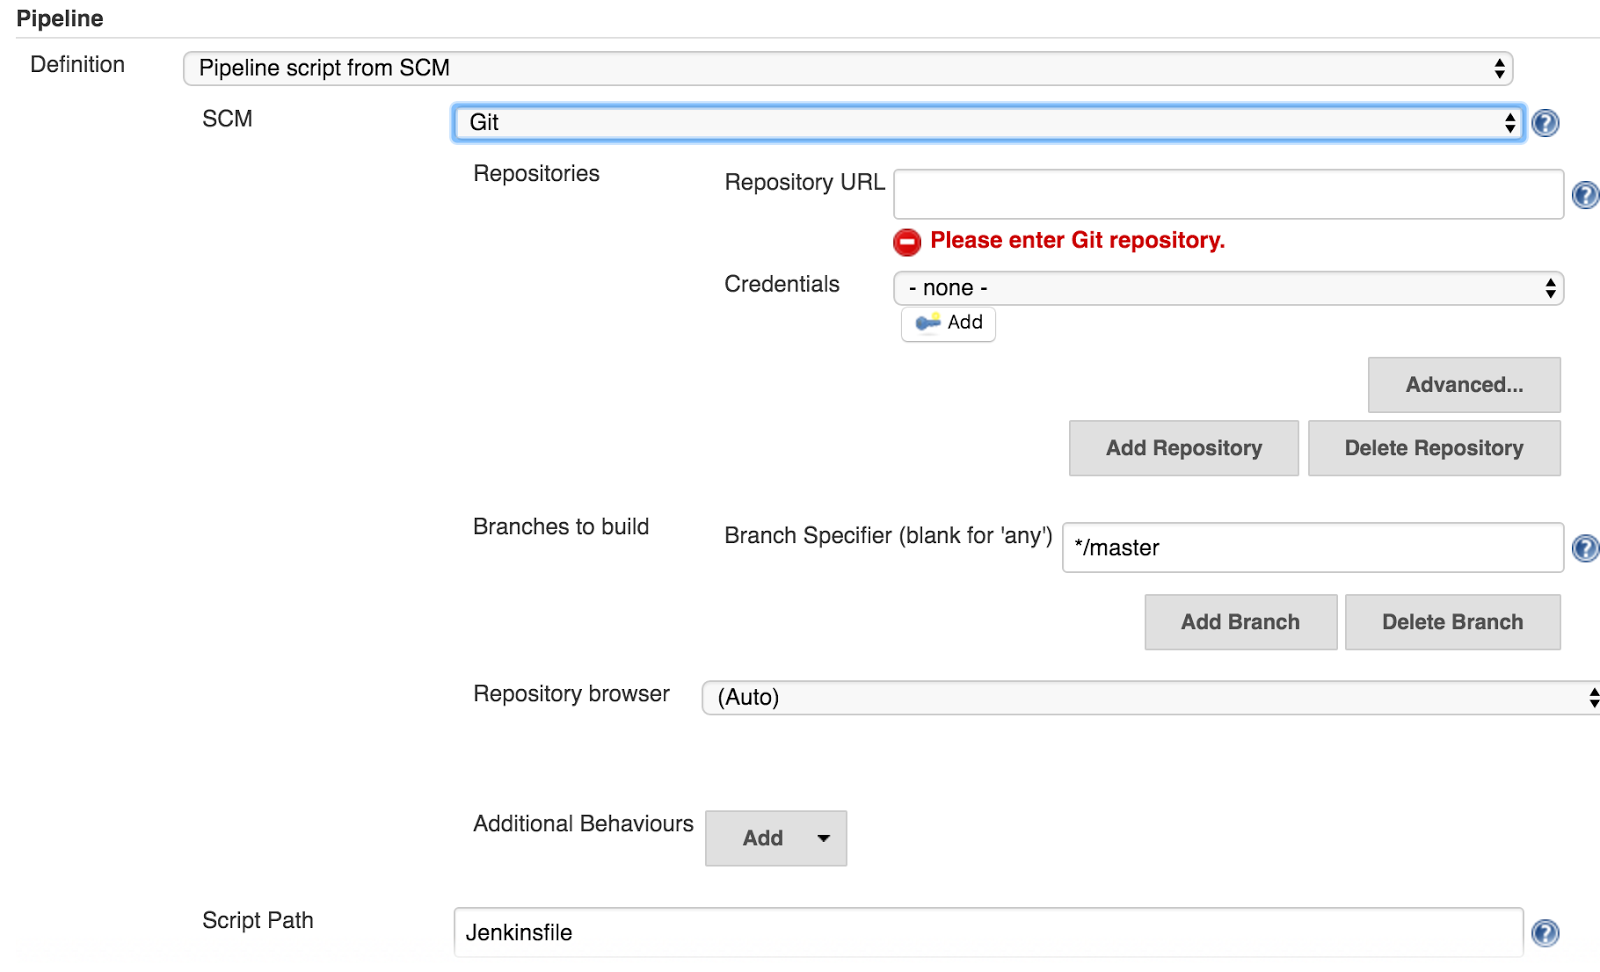
然后,您只需要转到“ 管道”部分,并配置用于存储项目的SCM存储库。
然后,如果您已经正确配置了Jenkins和您的SCM服务器的挂钩,那么将在每次提交时执行此作业,因此您的压力测试将连续运行。
当然,您可能已经注意到压力测试已执行,但Jenkins没有发布任何报告,因此您无法查看或比较不同执行的结果。 因此,您可以使用publishHtml插件将生成的报告存储在Jenkins中 。 如果尚未安装该插件,则需要与其他任何Jenkins插件一样安装。
PublishHtml插件使我们可以将构建工具生成的一些html文件发布到Jenkins,以便用户可以使用,也可以按内部版本号进行分类。 您需要配置要发布的文件目录的位置,在这里我们找到第一个问题,您还记得盖特林生成带有随机数的目录吗? 因此,我们需要首先解决此问题。 您可以采用不同的策略,但是最简单的方法是在测试后将目录重命名为已知的静态名称。
打开Gradle构建文件并添加下一个内容。
 task(renameGatlingDirectory) << {
    // find the directory
    def report = {file -> file.isDirectory() && file.getName().startsWith('averageorbitalperiodsimulation')}
    def reportDirectory = new File("${buildDir}/reports/gatling-results").listFiles().toList()
    .findAll(report)
    .sort()
    .last()

    // rename to a known directory
    // should always work because in CI it comes from a clean execution
    reportDirectory.renameTo("${buildDir}/reports/gatling-results/averageorbitalperiodsimulation")
}

// it is run after test phase
test.finalizedBy renameGatlingDirectory
我们正在创建一个在测试任务结束时执行的新任务,该任务将最后创建的目录重命名为averageorbitalperiodsimulation 。
最后一步是在Jenkinsfile中的shell调用之后的下一个调用中添加:
publishHTML(target: [reportDir:'stress-test/build/reports/gatling-results/averageorbitalperiodsimulation', reportFiles: 'index.html', reportName: 'Gatling report', keepAll: true])
之后,您可能会在作业页面中看到一个指向报告的链接。
就是如此,多亏了Gradle和Jenkins,您可以轻松地实施持续的压力测试策略,而只需使用所有开发人员都讲的语言代码即可。
我们不断学习,
亚历克斯


 3904
3904

 被折叠的 条评论
为什么被折叠?
被折叠的 条评论
为什么被折叠?
 到【灌水乐园】发言


