


1.简介
在第一个教程中,我们创建了一个基本的OpenMap GIS应用程序,该应用程序在JFrame中显示一个从文件系统加载的具有一个形状图层的地图。 该教程基于com.bbn.openmap.app.example.SimpleMap 。 在该教程中,我们使用了以下OpenMap类: MapBean, PropertyHandler, ShapeLayer, com.bbn.openmap.util.SwingWorker 。
我们向JFrame添加了MapBean 。 但是,OpenMap提供了自己的JFrame , OpenMapFrame ,它可以容纳MapPanel 。 MapPanel是一个接口(请参见图1),描述了一个组件,该组件包含MapBean, MapHandler ,菜单小部件以及所有其他组成OpenMap地图小部件的组件。 MapPanel是一个独立的OpenMap Swing组件。 预期MapPanel将从java.awt.Container扩展,否则如果在OpenMapFrame中找到它,它可能不会自动添加到MapHandler (我们将在本文后面讨论MapHandler )。
所述com.bbn.openmap.BufferedMapBean延伸MapBean通过迫使其层油漆他们的地图特征为缓冲的图像。 每当调用Java AWT线程绘制图层时,都会渲染此绘制缓冲区。 由于它避免了(可能很昂贵的) Layer绘制过程,因此极大地提高了性能。 如果图层请求绘制,则图层将重新生成绘制缓冲区并将其绘制到地图窗口中。
com.bbn.openmap.BufferedLayerMapBean用特殊的内部图像缓冲区扩展了BufferedMapBean ,该缓冲区保存了所有被指定为“背景”层的层。 当某些图层为移动的地图要素设置动画并且地图经常被重新绘制时,此缓冲区特别有用。 将单独的缓冲图像用于背景图层可大大减少渲染地图所需的时间和工作量,从而提高了地图更新的速度。 默认情况下,由于提高了性能,因此OpenMap应用程序使用BufferedLayerMapBean而不是MapBean 。
2. OpenMapFrame和MapPanel
让我们看看如何修改上一个教程中的MapFram e,以利用上述OpenMap类:
- 修改
MapFrame,以使其扩展OpenMapFrame而不是javax.swing.JFrame。 - 修复导入(Ctrl + I)。 (可选)您可以执行该应用程序,以确保它像以前一样运行。
- 通过单击“设计”按钮切换到“设计”视图。
- 选择并删除
MapBean实例(从“ 导航”窗口中)。 - 将
OpenMapFrame从OpenMap面板组拖到BasicMapPanel上。 - 将其重命名为
mapPanel。 - 从“ 属性”窗口中将其布局方向更改为“ 居中 ”。
- 返回“ 源”视图,修改以下行:
mapBean.add(shapeLayer);到mapPanel.getMapBean().add(shapeLayer);。
作为练习,在上面的步骤5中用OverlayMapPanel替换BasicMapPanel 。 各种MapPanel (请参见图1)包含BufferedLayerMapBean因此您无需执行其他任何操作即可提高性能。
清单1:MapFrame Basic OpenMap应用程序
public class MapFrame extends OpenMapFrame {

   /** Creates new form MapFrame */
   public MapFrame() {
      super("Simple Map");
      initComponents();
      initMap();
   }

  @SuppressWarnings("unchecked")
   private void initComponents() {
      mapPanel = new com.bbn.openmap.gui.BasicMapPanel();
      setDefaultCloseOperation(javax.swing.WindowConstants.EXIT_ON_CLOSE);
      getContentPane().add(mapPanel, java.awt.BorderLayout.PAGE_END);

      pack();
   }

   /** @param args the command line arguments */
   public static void main(String args[]) {

      /* Create and display the form */
      java.awt.EventQueue.invokeLater(
          () -> new MapFrame().setVisible(true)
      );
   }

   // Variables declaration - do not modify
   private com.bbn.openmap.gui.BasicMapPanel mapPanel;
   // End of variables declaration

   private void initMap() {
      CompletableFuture.supplyAsync(() -> getShapeLayer())
           .thenAcceptAsync(
                shapeLayer -> {
                   // Add the political layer to the map
                   mapPanel.getMapBean().add(shapeLayer);
                   MapFrame.this.revalidate();
      });
   }
   // ...
}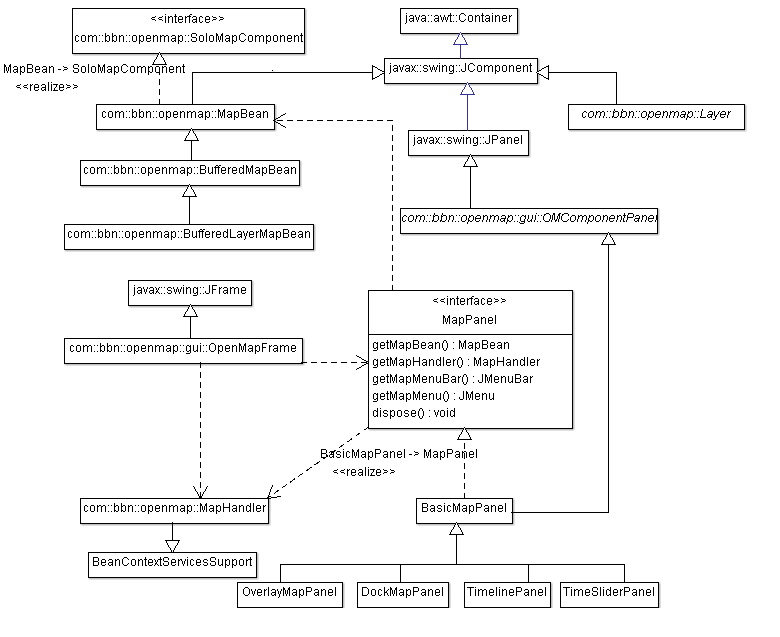
图1:OpenMap的主类类图
3. MapHandler
MapHandler是一个java.beans.beancontext.BeanContext ,可以认为是一个大型存储桶,可以在其中添加或删除对象。 将BeanContext对象作为体系结构的中心的好处是,当其对象成员身份更改时,它将事件发送给侦听器。 添加到BeanContext任何java.beans.beancontext.BeanContextMembershipListener都将接收这些事件,并且可以使用这些事件来建立或提供与要添加或删除的对象的连接。
可以将MapHandler视为一个地图,其中包含MapBean , Layer以及其中包含的其他管理组件。 那些需要获取其他对象和服务句柄的组件可以使用它。 它可用于在运行时向应用程序添加或删除组件,并且添加到MapHandler所有其他对象会自动收到添加/删除的通知。
让我们看看如何利用MapHandler 。 修改后的initMap()如清单2所示。 如前所述,您可以将MapHandler视为一个大型存储桶,可以在其中添加对象或从中删除对象。 我们拿到的MapHandler从MapPanel 。 为了能够向其添加图层,我们需要向LayerHandler添加一个MapHandler 。 我们向它添加shapeLayer和GraticuleLayer 。 顺序很重要,即最后添加的层是显示在顶部的层。 最后,我们需要将OpenMapFrame添加到MapHandler 。 MapHandler是将所有这些粘合在一起的实体。 com.bbn.openmap.app.example.SimpleMap2检查com.bbn.openmap.app.example.SimpleMap2 。
与简单地使用BeanContext ,存在MapHandler的原因是它是扩展的BeanContext ,可以跟踪SoloMapComponent ( com.bbn.openmap.SoloMapComponents )。 SoloMapComponent是一个接口,可用于对象上,以指示BeanContext中一次仅存在该组件类型的一个实例。 例如, MapBean是SoloMapComponent ,并且只能有一个 MapBean在MapHandler在时间(汉兰达!)。 MapHandler有一个com.bbn.openmap.SoloMapComponentPolicy ,它告诉它如果遇到添加SoloMapComponent的重复实例的情况该怎么办。 根据政策, MapHandler将拒绝的第二个实例SoloMapComponent ( com.bbn.openmap.SoloMapComponentRejectPolicy )或替换以前的组件( com.bbn.openmap.SoloMapComponentReplacePolicy )。
private void initMap() {
   try {
      // Get the default MapHandler the BasicMapPanel created.
      MapHandler mapHandler = mapPanel.getMapHandler();
      // Set the map's center
      mapPanel.getMapBean().setCenter(new LatLonPoint.Double(38.0, 24.5));
      // Set the map's scale 1:120 million
      mapPanel.getMapBean().setScale(120000000f);
      /*
       * Create and add a LayerHandler to the MapHandler. The LayerHandler
       * manages Layers, whether they are part of the map or not.
       * layer.setVisible(true) will add it to the map. The LayerHandler
       * has methods to do this, too. The LayerHandler will find the
       * MapBean in the MapHandler.
       */
       mapHandler.add(new LayerHandler());

       CompletableFuture.supplyAsync(() -> getShapeLayer())
          .thenAcceptAsync(
             shapeLayer -> {
                  // Add the political layer to the map
                  mapHandler.add(shapeLayer);
                  mapHandler.add(new GraticuleLayer());
                  MapFrame.this.revalidate();
             });
         // Add the map to the frame
         mapHandler.add(this);
    } catch (MultipleSoloMapComponentException msmce) {
         // The MapHandler is only allowed to have one of certain
         // items. These items implement the SoloMapComponent
         // interface. The MapHandler can have a policy that
         // determines what to do when duplicate instances of the
         // same type of object are added - replace or ignore.

         // In this example, this will never happen, since we are
         // controlling that one MapBean, LayerHandler,
         // MouseDelegator, etc is being added to the MapHandler.
      }
}
但是,此基本应用程序缺少许多东西。 例如,无法在地图上执行任何操作,例如放大/缩小,平移等。 但是可以借助MapHandler轻松添加它们。 相关处理程序只需添加到MapHandler的try-catch块内initMap()如清单3所示。现在,您可以在输入/输出放大与鼠标中间的滚轮和泛用鼠标左键地图。
private void initMap() {
   //...
   // Add MouseDelegator, which handles mouse modes (managing mouse
   // events)
   mapHandler.add(new MouseDelegator());
   // Add OMMouseMode, which handles how the map reacts to mouse
   // movements
   mapHandler.add(new OMMouseMode());
   //...
}
到目前为止,我们已经看到了如何使用: MapBean, MapHandler, LayerHandler, PropertyHandler, ShapeLayer, GraticuleLayer, OpenMapFrame 。
4. openmap.properties
但是,OpenMap比这更灵活。 借助BeanContext技术,我们可以在属性文件openmap.properties定义组成应用程序的组件。 我们已经在应用程序中创建了一个openmap.properties ,其中包含ESRI形状图层的属性。 属性文件可以包含针对特定组件的范围内的属性。 使用属性前缀执行作用域确定,因此可以将属性定义为:
prefix.property=value
让我们从为现有属性添加前缀开始,看看在我们的代码中需要进行哪些修改。
shapePolitical.prettyName=Political Solid
shapePolitical.lineColor=000000
shapePolitical.fillColor=BDDE83
shapePolitical.shapeFile=resources/map/shape/dcwpo-browse.shp
shapePolitical.spatialIndex=resources/map/shape/dcwpo-browse.ssx PropertyHandler支持前缀,如清单5中的粗体所示。在下一个教程中,我们将看到属性作用域的有用性。 由于下一部分内容会很广泛,因此最好在此处进行介绍。
private ShapeLayer getShapeLayer() {
   PropertyHandler propertyHandler = null;
   try {
      propertyHandler = new PropertyHandler.Builder().setPropertiesFile("./openmap.properties").setPropertyPrefix("shapePolitical").build();
   } catch (IOException ex) {
      Logger.getLogger(MapFrame.class.getName()).log(Level.SEVERE, null, ex);
   }
   //ShapeLayer:
   ShapeLayer shapeLayer = new ShapeLayer();
   if (propertyHandler != null) {
        shapeLayer.setProperties(propertyHandler.getPropertyPrefix(), propertyHandler.getProperties(propertyHandler.getPropertyPrefix()));
   }
   return shapeLayer;
}
5.结论
在本教程中,我们学习了如何使用: MapBean, MapHandler, LayerHandler, PropertyHandler, ShapeLayer, GraticuleLayer, OpenMapFrame 。 我们还看到了openmap.properties文件提供的灵活性。 可以在那里重新配置新的应用程序,而无需重新编译。 在下一个教程中,我们将看到如何执行此操作而无需重新编译我们的应用程序。


 2060
2060


 被折叠的 条评论
为什么被折叠?
被折叠的 条评论
为什么被折叠?
 到【灌水乐园】发言


