


 本文是Spring Integration for EAI课程的一部分,讲解如何使用Spring集成与Web服务,包括Web服务通道适配器的解释、创建Spring Web Services项目、实现Spring集成流程、添加超时、使用拦截器和重试操作。教程涵盖从基础到进阶的实践应用,帮助开发者更好地理解和应用Spring Integration。
本文是我们名为“ Spring Integration for EAI ”的学院课程的一部分。
在本课程中,向您介绍了企业应用程序集成模式以及Spring Integration如何解决它们。 接下来,您将深入研究Spring Integration的基础知识,例如通道,转换器和适配器。 在这里查看 !
目录
1.简介
在本教程中,您将看到使用Spring Integration增强的应用程序的第一个示例。 为了实现这一目标,本示例将重点介绍与外部Web服务的集成。
首先,我将解释什么是必需的适配器,它将使我们能够从Spring Integration调用Web服务。 接下来,我们将对Spring Web Services项目进行简要说明,该项目将是将从我们的应用程序中调用的外部Web服务。 在完成本教程的主要部分之后,我们将实现一个将调用Web服务的应用程序。
结束本教程,我们将使用Spring Integration提供的一些功能来完成我们的应用程序,例如添加超时,使用拦截器以及学习如何重试失败的调用。
本教程由以下部分组成:
- 介绍
- 解释Web服务通道适配器
- 创建一个Spring Web Services项目
- 实施Spring Integration流程
- 添加客户端超时
- 使用拦截器
- Web服务重试操作
2.解释Web服务通道适配器
与外部Web服务的通信是通过带有网关的Spring Integration完成的。 如上一教程中所述,您可以找到两种类型的网关:入站和出站。 在本教程中,我们将使用一种特殊的网关:出站Web服务网关 。 在本节中,我们将重点介绍这种类型。
为了使用Web服务网关,您将需要指定一个新的名称空间:
<beans xmlns="http://www.springframework.org/schema/beans"
    xmlns:xsi="http://www.w3.org/2001/XMLSchema-instance"
    xmlns:int="http://www.springframework.org/schema/integration"
    xmlns:int-ws="http://www.springframework.org/schema/integration/ws"
    xsi:schemaLocation="
        http://www.springframework.org/schema/beans http://www.springframework.org/schema/beans/spring-beans-3.0.xsd
        http://www.springframework.org/schema/integration http://www.springframework.org/schema/integration/spring-integration.xsd
        http://www.springframework.org/schema/integration/ws http://www.springframework.org/schema/integration/ws/spring-integration-ws.xsd">
设置了新的名称空间后,我们现在可以使用Web服务网关:
<int-ws:outbound-gateway id="aGateway"
        request-channel="requestChannel" reply-channel="responseChannel"
        uri="http://localhost:8080/spring-ws-tickets/tickets" marshaller="marshaller"
        unmarshaller="marshaller"/>
那么,此网关的行为是什么? 该流程的执行如下:
- 消息发送到通道
requestChannel。 - 然后将此消息发送到Web服务网关,该Web服务网关通过设置其
request-channel属性来订阅该通道。 - 网关将请求发送到外部Web服务,这将在下一部分中进行说明。
uri属性指定目的地。 - 网关等待外部Web服务,直到它返回响应。
- 指定的编组器将返回响应并将其编组。
- 响应被包装到消息中,并发送到由
responseChannelreply-channel属性指定的channelresponseChannel。
如您所见,您只需要定义流(请求和答复通道)以及调用位置。 发送消息所需的基础结构详细信息由Spring Integration处理。
其他属性
还有其他一些属性可用于定制网关的调用。 以下是主要属性的简要说明:
-
Destination provider:可以使用它代替提供“ uri”属性。 这样,您可以实现自己的类,该类将动态解析调用了哪个端点。 您应该为bean提供以下接口:
public class MyDestinationProvider implements DestinationProvider {
    @Override
    public URI getDestination() {
        //resolve destination
    }
}
在网关定义中,我们可以使用此提供程序来代替直接提供URI:
<int-ws:outbound-gateway id="aGateway"
    request-channel="requestChannel" reply-channel="responseChannel" destination-provider="myDestinationProvider"
marshaller="marshaller" unmarshaller="marshaller"/>-
Message sender:允许我们定义一个WebServiceMessageSender。 在本教程的后面,我们将使用它来定义客户端超时。 -
Interceptor/Interceptors:您可以定义客户端拦截器。 这也将在本教程的后面部分中进行说明。 入站Web服务网关
本部分只是为了快速了解入站服务网关,以了解其一般工作原理,因为在本教程中我们将不使用它。
该网关将接收来自外部服务的请求,将该请求包装为消息,然后将其发送到我们的消息传递系统中。 处理完请求后,将向网关发送一条消息,以传递Web服务正在等待的响应。
语法类似于出站Web服务网关:
<int-ws:inbound-gateway id="anotherGateway" request-channel="requestChannel"
    marshaller="marshaller" unmarshaller="marshaller"/>
您可能还记得以前的教程,响应将通过临时消息通道到达网关。 如果没有必要,请不要显式定义通道。
3.创建一个Spring Web Services项目
本节说明将公开我们的应用程序将使用的Web服务的项目。 它包含一个使用Spring Web Services项目实现的Web应用程序。
该应用程序非常简单。 它包含一个服务界面,该界面允许用户从电影院服务订购门票。 请求订单时,服务将对其进行处理并返回
TicketConfirmation。下图显示了其结构:

图1
我们将从下至上进行解释。
票务服务界面
这是服务接口和实现:
public interface TicketService {

    public TicketConfirmation order(String filmId, Date sessionDate, int quantity);
}
该实现根据提供的数据构建
TicketConfirmation实例。@Service public class TicketServiceimpl implements TicketService { @Override public TicketConfirmation order(String filmId, Date sessionDate, int quantity) { float amount = 5.95f * quantity; TicketConfirmation confirmation = new TicketConfirmation(filmId, sessionDate, quantity, amount); return confirmation; } }TicketConfirmation对象是一个不变的类,将用于读取确认数据:public final class TicketConfirmation { private String confirmationId; private String filmId; private int quantity; private Date sessionDate; private float amount; public TicketConfirmation(String filmId, Date sessionDate, int quantity, float amount) { this.confirmationId = UUID.randomUUID().toString(); this.filmId = filmId; this.sessionDate = new Date(sessionDate.getTime()); this.quantity = quantity; this.amount = amount; } public String getConfirmationId() { return confirmationId; } public String getFilmId() { return filmId; } public int getQuantity() { return quantity; } public Date getSessionDate() { return new Date(sessionDate.getTime()); } public float getAmount() { return amount; } }票证端点
端点负责接收请求并将订单处理委托给
Ticket服务:@Endpoint public class TicketEndpoint { @Autowired private TicketService ticketService; @PayloadRoot(localPart="ticketRequest", namespace="http://www.xpadro.spring.samples.com/tickets") public @ResponsePayload TicketResponse order(@RequestPayload TicketRequest ticketRequest) throws InterruptedException { Calendar sessionDate = Calendar.getInstance(); sessionDate.set(2013, 9, 26); TicketConfirmation confirmation = ticketService.order( ticketRequest.getFilmId(), DateUtils.toDate(ticketRequest.getSessionDate()), ticketRequest.getQuantity().intValue()); return buildResponse(confirmation); } private TicketResponse buildResponse(TicketConfirmation confirmation) { TicketResponse response = new TicketResponse(); response.setConfirmationId(confirmation.getConfirmationId()); response.setFilmId(confirmation.getFilmId()); response.setSessionDate(DateUtils.convertDate(confirmation.getSessionDate())); BigInteger quantity = new BigInteger(Integer.toString(confirmation.getQuantity())); response.setQuantity(quantity); BigDecimal amount = new BigDecimal(Float.toString(confirmation.getAmount())); response.setAmount(amount); return response; } }该服务将接收使用命名空间
"http://www.xpadro.spring.samples.com/tickets"和ticketRequest请求元素ticketRequest请求。服务配置
在Spring配置中,我们定义了Web服务组件:
<!-- Detects @Endpoint since it is a specialization of @Component --> <context:component-scan base-package="xpadro.spring.ws"/> <!-- detects @PayloadRoot --> <ws:annotation-driven/> <ws:dynamic-wsdl id="ticketDefinition" portTypeName="Tickets" locationUri="http://localhost:8080/spring-ws-tickets"> <ws:xsd location="/WEB-INF/schemas/xsd/ticket-service.xsd"/> </ws:dynamic-wsdl>web.xml文件公开了MessageDispatcherServlet:<context-param> <param-name>contextConfigLocation</param-name> <param-value>classpath:xpadro/spring/ws/config/root-config.xml</param-value> </context-param> <listener> <listener-class>org.springframework.web.context.ContextLoaderListener</listener-class> </listener> <servlet> <servlet-name>Ticket Servlet</servlet-name> <servlet-class>org.springframework.ws.transport.http.MessageDispatcherServlet</servlet-class> <init-param> <param-name>contextConfigLocation</param-name> <param-value>classpath:xpadro/spring/ws/config/servlet-config.xml</param-value> </init-param> <load-on-startup>1</load-on-startup> </servlet> <servlet-mapping> <servlet-name>Ticket Servlet</servlet-name> <url-pattern>/tickets/*</url-pattern> </servlet-mapping>现在,我们只需要将其部署到服务器中,即可开始处理票单请求。
4.实施Spring集成流程
我们的Spring Integration应用程序从一个简单的流程开始。

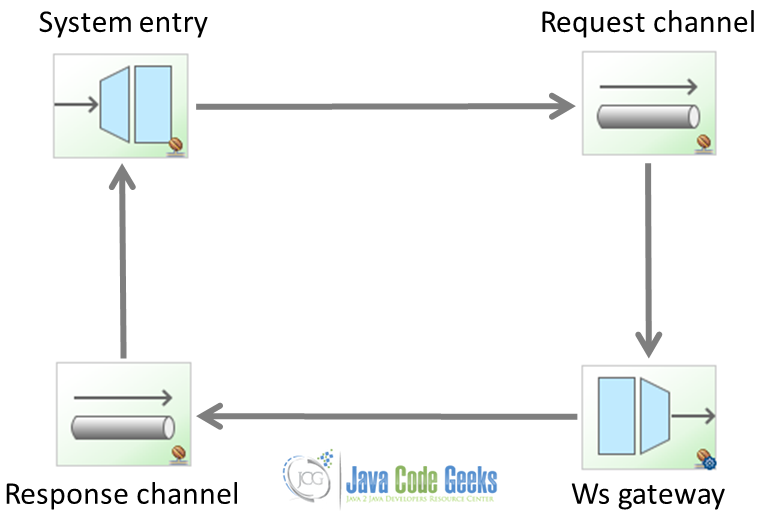
图2
该请求消息将通过系统入口网关。 然后,该消息将传递到Web服务出站网关,该网关将其发送到端点并等待响应。 收到响应后,它将通过响应通道发送响应,然后返回系统入口网关,然后系统入口网关会将其传递给客户端。
客户端应用程序将
TicketRequest发送到TicketService接口。 该接口被网关拦截。 通过这种方式,TicketRequest对象被包装到Spring Integration消息中并发送到消息传递系统。public interface TicketService { /** * Entry to the messaging system. * All invocations to this method will be * intercepted and sent to the SI "system entry" gateway * * @param request */ @Gateway public TicketResponse invoke(TicketRequest request); }查看网关配置,我们可以看到已将其链接到
TicketService接口:<int:gateway id="systemEntry" default-request-channel="requestChannel" default-reply-channel="responseChannel" service-interface="xpadro.spring.integration.ws.gateway.TicketService" />我们还定义了请求和回复渠道。
该请求消息将被发送到
requestChannel通道,在该通道上订阅了Web服务出站网关:<int-ws:outbound-gateway id="marshallingGateway" request-channel="requestChannel" reply-channel="responseChannel" uri="http://localhost:8080/spring-ws-tickets/tickets" marshaller="marshaller" unmarshaller="marshaller"/>responseChannel被配置为其回复通道,系统进入网关已在该通道中订阅。 这样,客户端将收到响应。使用直接通道配置完整流。 这意味着流程是同步的; 客户端将阻止等待Web服务响应:
<context:component-scan base-package="xpadro.spring.integration" />

<!-- Entry to the messaging system -->
<int:gateway id="systemEntry" default-request-channel="requestChannel" default-reply-channel="responseChannel"
    service-interface="xpadro.spring.integration.ws.gateway.TicketService" />

<int:channel id="requestChannel"/>

<int-ws:outbound-gateway id="marshallingGateway"
    request-channel="requestChannel" reply-channel="responseChannel"
    uri="http://localhost:8080/spring-ws-tickets/tickets" marshaller="marshaller"
    unmarshaller="marshaller"/>

<oxm:jaxb2-marshaller id="marshaller" contextPath="xpadro.spring.integration.ws.types" />

<int:channel id="responseChannel" />
系统已设置; 我们不必实现任何Java类。 全部通过配置进行配置。
在完成示例之后,让我们看一下执行此流程的测试:
@ContextConfiguration({"classpath:xpadro/spring/integration/ws/test/config/int-ws-config.xml"})
@RunWith(SpringJUnit4ClassRunner.class)
public class TestInvocation {

    @Autowired
    private TicketService service;

    @Test
    public void testInvocation() throws InterruptedException, ExecutionException {
        TicketRequest request = new TicketRequest();
        request.setFilmId("aFilm");
        request.setQuantity(new BigInteger("3"));
        request.setSessionDate(DateUtils.convertDate(new Date()));

        TicketResponse response = service.invoke(request);

        assertNotNull(response);
        assertEquals("aFilm", response.getFilmId());
        assertEquals(new BigInteger("3"), response.getQuantity());
    }
}
在下一节中,我们将向此示例应用程序添加一些功能。
5.添加客户端超时
检查网关的名称空间,我们可以看到没有用于设置调用超时的配置。 无论如何,我们都可以使用消息发送者。
消息发送者是
WebServiceMessageSender的实现。 Spring Web Services项目提供的一种有趣的实现是HttpComponentsMessageSender类。 此类将允许我们通过内部使用Apache HttpClient将身份验证或连接池添加到调用中。 而且,我们还将能够定义读取和连接超时。在此示例之后,我们将其添加为超时。
首先,我们需要使用上述类定义一个bean。 这将是我们的消息发件人:
<bean id="messageSender" class="org.springframework.ws.transport.http.HttpComponentsMessageSender">
    <property name="connectionTimeout" value="5000"/>
    <property name="readTimeout" value="10000"/>
</bean>
接下来,我们将在我们的Web服务网关中配置消息发送者:
<int-ws:outbound-gateway id="marshallingGateway"
    request-channel="requestChannel" reply-channel="responseChannel"
    uri="http://localhost:8080/spring-ws-tickets/tickets" marshaller="marshaller"
    unmarshaller="marshaller" message-sender="messageSender"/>
而已。 现在,如果达到超时,将抛出
WebServiceIOException。6.使用拦截器
Web服务网关的名称空间中包含的另一个功能是可以配置客户端拦截器。 这些客户端拦截器是Spring Web Services项目的功能,并且引用客户端上的端点拦截器。
ClientInterceptor实现具有以下方法:public interface ClientInterceptor { boolean handleRequest(MessageContext messageContext) throws WebServiceClientException; boolean handleResponse(MessageContext messageContext) throws WebServiceClientException; boolean handleFault(MessageContext messageContext) throws WebServiceClientException; }-
handleRequest:在调用端点之前调用此方法。 -
handleResponse:在端点成功返回之后,将调用此方法。 -
handleFault:如果端点抛出错误,则调用此方法。
注意,这些方法可以操纵
MessageContext,该MessageContext包含请求和响应。让我们看一个例子。 我们将实现自定义客户端拦截器以在调用端点之前拦截该调用,并且将更改请求值。
拦截器实现
ClientInterceptor接口:public class MyInterceptor implements ClientInterceptor { private Logger logger = LoggerFactory.getLogger(this.getClass()); @Override public boolean handleRequest(MessageContext messageContext) throws WebServiceClientException { WebServiceMessage message = messageContext.getRequest(); DOMSource source = (DOMSource) message.getPayloadSource(); Node quantityNode = source.getNode().getAttributes().getNamedItem("quantity"); String oldValue = quantityNode.getNodeValue(); quantityNode.setNodeValue("5"); logger.info("Before endpoint invocation. Changed quantity old value {} for {}", oldValue, 5); return true; } @Override public boolean handleResponse(MessageContext messageContext) throws WebServiceClientException { logger.info("endpoint invocation succeeds"); return true; } @Override public boolean handleFault(MessageContext messageContext) throws WebServiceClientException { logger.info("endpoint returned a fault"); return true; } }现在,我们需要将拦截器添加到网关配置中:
<int-ws:outbound-gateway id="marshallingGateway"
    request-channel="requestChannel" reply-channel="responseChannel"
    uri="http://localhost:8080/spring-ws-tickets/tickets" marshaller="marshaller"
    unmarshaller="marshaller" message-sender="messageSender" interceptor="myInterceptor" />

<bean id="myInterceptor" class="xpadro.spring.integration.ws.interceptor.MyInterceptor" />
Web服务网关名称空间还允许我们定义
interceptors属性。 这使我们可以配置客户端拦截器列表。该测试将验证请求值已被修改:
@ContextConfiguration({"classpath:xpadro/spring/integration/ws/test/config/int-ws-config.xml"})
@RunWith(SpringJUnit4ClassRunner.class)
public class TestInvocation {

    @Autowired
    private TicketService service;

    @Test
    public void testInvocation() throws InterruptedException, ExecutionException {
        TicketRequest request = new TicketRequest();
        request.setFilmId("aFilm");
        request.setQuantity(new BigInteger("3"));
        request.setSessionDate(DateUtils.convertDate(new Date()));

        TicketResponse response = service.invoke(request);

        assertNotNull(response);
        assertEquals("aFilm", response.getFilmId());
        assertEquals(new BigInteger("5"), response.getQuantity());
    }
}
在实现自定义拦截器之前,请考虑到Spring Web Services项目提供了几种实现:
-
PayloadValidatingInterceptor:使用模式验证Web服务消息的有效负载。 如果未通过验证,则处理将被取消。 -
Wss4jSecurityInterceptor:基于Apache的WSS4J的Web服务安全端点拦截器。 -
XwsSecurityInterceptor:基于Sun的XML和Web服务安全包的Web服务安全端点拦截器。
7. Web服务重试操作
有时,我们可能想调用一项服务,但该服务暂时关闭,或者该服务仅在某些日子才在线。 如果发生这种情况,我们可能要稍后重试调用。 Spring Integration提供了开始重试服务调用直到满足条件的可能性。 这种情况可能是服务最终响应,或者我们达到了最大尝试次数。 对于此功能,Spring Integration提供了重试建议。 该建议由Spring Retry项目提供支持。
重试建议包含在Web服务出站网关中。 这样,网关将Web服务调用委托给重试建议。 如果服务调用失败,则建议将根据其配置继续尝试重试该操作。
定义重试建议
我们必须使用
RequestHandlerRetryAdvice类定义一个新bean:<bean id="retryAdvice" class="org.springframework.integration.handler.advice.RequestHandlerRetryAdvice" > <property name="retryTemplate"> <bean class="org.springframework.retry.support.RetryTemplate"> <property name="backOffPolicy"> <bean class="org.springframework.retry.backoff.FixedBackOffPolicy"> <property name="backOffPeriod" value="5000" /> </bean> </property> <property name="retryPolicy"> <bean class="org.springframework.retry.policy.SimpleRetryPolicy"> <property name="maxAttempts" value="5" /> </bean> </property> </bean> </property> </bean>我们定义了一个建议,如果调用失败,它将每5秒重新尝试一次,直到服务响应或尝试5次为止。 稍后我们将查看建议中定义的这些策略。
将建议添加到网关
定义建议后,我们需要将其包含在网关中。 Spring Integration Web Services名称空间已经为此提供了一个元素:
<int-ws:outbound-gateway id="marshallingGateway"
    request-channel="requestChannel" reply-channel="responseChannel"
    uri="http://localhost:8080/spring-ws-tickets/tickets" marshaller="marshaller"
    unmarshaller="marshaller" message-sender="messageSender" interceptor="myInterceptor" >

    <int-ws:request-handler-advice-chain>
        <ref bean="retryAdvice" />
    </int-ws:request-handler-advice-chain>
</int-ws:outbound-gateway>
我们已将建议集成到网关中。 现在,让我们修改示例以查看其工作原理。
修改Web服务端点
我们将修改端点,以便在尝试指定次数的重试之前一直失败。 在这种情况下,需要两次直到返回响应。
@PayloadRoot(localPart="ticketRequest", namespace="http://www.xpadro.spring.samples.com/tickets")
public @ResponsePayload TicketResponse order(@RequestPayload TicketRequest ticketRequest) throws InterruptedException {
    Calendar sessionDate = Calendar.getInstance();
    sessionDate.set(2013, 9, 26);

    TicketConfirmation confirmation = ticketService.order(
            ticketRequest.getFilmId(), DateUtils.toDate(ticketRequest.getSessionDate()), ticketRequest.getQuantity().intValue());

    TicketResponse response = buildResponse(confirmation);

    retries++;
    if (retries < 3) {
        throw new RuntimeException("not enough retries");
    }
    else {
        retries = 0;
    }

    return response;
}
现在,我们将启动测试并使用我们先前定义的拦截器来查看它如何记录尝试:
2014-03-26 08:24:50,535|AbstractEndpoint|started org.springframework.integration.endpoint.EventDrivenConsumer@392044a1
2014-03-26 08:24:50,626|MyInterceptor|Before endpoint invocation. Changed quantity old value 3 for 5
2014-03-26 08:24:51,224|MyInterceptor|endpoint returned a fault
2014-03-26 08:24:56,236|MyInterceptor|Before endpoint invocation. Changed quantity old value 3 for 5
2014-03-26 08:24:56,282|MyInterceptor|endpoint returned a fault
2014-03-26 08:25:01,285|MyInterceptor|Before endpoint invocation. Changed quantity old value 3 for 5
2014-03-26 08:25:01,377|MyInterceptor|endpoint invocation succeeds
网关一直尝试调用,直到服务响应为止,因为重试建议具有较高的重试次数(五个)。
重试建议政策
Spring Integration重试建议是在Spring Retry项目策略上备份的。 这些政策说明如下:
退避政策
它确定了重试之间或初次重试之前的时间。 BackOffPolicy接口定义了两种方法:
BackOffContext start(RetryContext context);void backOff(BackOffContext backOffContext)抛出BackOffInterruptedException;
start方法允许定义初始行为。 例如,初始时间延迟。
backoff方法允许定义重试之间的暂停。Spring Retry项目提供了回退策略的几种实现:
- 无状态退避策略:调用之间不保持任何状态。
-
FixedBackOffPolicy:重试之间暂停指定的时间。 没有设置初始延迟。 -
NoBackOffPolicy:重试在它们之间完全没有暂停地执行。
-
- 有状态的后退策略:在调用之间保持状态。
-
ExponentialBackOffPolicy:从指定的时间量开始,它将在每次调用时相乘。 默认情况下,它使时间加倍。 您可以更改乘数。 -
ExponentialRandomBackOffPolicy:扩展ExponentialBackOffPolicy。 乘数以随机方式设置。
重试政策
它允许定义重试建议在放弃之前将执行Web服务调用多少次。
RetryPolicy接口定义了几种方法:boolean canRetry(RetryContext context);RetryContext open(RetryContext parent);
void close(RetryContext context);
void registerThrowable(RetryContext context,Throwable throwable);
如果可以重试该操作,则
canRetry方法将返回。 例如,如果我们尚未达到最大重试次数,则可能发生这种情况。
open方法用于获取所有必要的资源,跟踪尝试次数或在上一次重试期间是否引发异常。
每次失败的调用后都会调用registerThrowable方法。Spring Retry项目提供了重试策略的几种实现:
-
SimpleRetryPolicy:重试调用,直到达到最大重试次数。 -
TimeoutRetryPolicy:它将一直重试,直到达到超时为止。 在打开方法期间开始超时。 -
NeverRetryPolicy:它只会尝试一次调用。 -
AlwaysRetryPolicy:canRetry方法始终返回true。 它将继续重试,直到服务响应为止。 -
ExceptionClassifierRetryPolicy:根据抛出的ExceptionClassifierRetryPolicy:它定义了不同的最大尝试次数。 -
CompositeRetryPolicy:它包含将按顺序执行的重试策略的列表。
使用轮询器重试操作
可用的重试策略是使用时间延迟实现的,这在大多数情况下都很好,但是在本节中,我们将实现一个自定义解决方案,该解决方案将使我们能够使用通过Cron Expression配置的轮询器。
由于调用可能会失败,因此网关不会返回结果。 我们将使流程异步,以便允许客户端发送服务请求并继续。 这样,流将继续从另一个线程重试,直到服务激活程序处理结果或达到重试限制为止。
网关如下:
public interface AsyncTicketService {
    @Gateway
    public void invoke(TicketRequest request);
}
网关未定义回复通道,因为不会发送响应。 由于这是一个异步请求,因此请求通道包含一个队列。 这将允许其使用者主动轮询来自另一个线程的消息:
<int:gateway id="systemEntry" default-request-channel="requestChannel"
    service-interface="xpadro.spring.integration.ws.gateway.AsyncTicketService" />

<int:channel id="requestChannel">
    <int:queue />
</int:channel>
我们已经在Web服务网关中包含了一个轮询器,因为现在它将轮询消息:
<int-ws:outbound-gateway id="marshallingGateway"
    request-channel="requestChannel" reply-channel="responseChannel"
    uri="http://localhost:8080/spring-ws-tickets/tickets" marshaller="marshaller"
    unmarshaller="marshaller" interceptor="myInterceptor" >

    <int:poller fixed-rate="500" />
</int-ws:outbound-gateway>
先前的调用可能导致三种不同的结果:正确的调用,需要重试的失败调用以及需要记录的最终失败的调用。
服务调用已正确调用
我们有一个服务激活器订阅了响应通道。 这是一个简单的示例,因此只记录结果:
<!-- Service is running - Response received -->
<int:channel id="responseChannel" />
<int:service-activator ref="clientServiceActivator" method="handleServiceResult" input-channel="responseChannel" />
服务调用失败。 重试该操作
如果出现问题,并且由于它是异步请求,则该异常将被包装到
MessageHandlingException,并发送到错误通道,该通道由Spring Integration默认配置。至此,我们已经有一个路由器订阅了错误通道。 该路由器处理尝试的重试次数,并基于此尝试将失败的消息重定向到适当的通道。 如果要重试该操作,它将把消息发送到重试通道:
@Component("serviceRouter")
public class ServiceRouter {
    private Logger logger = LoggerFactory.getLogger(this.getClass());
    private int maxRetries = 3;
    private int currentRetries;

    public String handleServiceError(Message<?> msg) {
        logger.info("Handling service failure");

        if (maxRetries > 0) {
            currentRetries++;
            if (currentRetries > maxRetries) {
                logger.info("Max retries [{}] reached", maxRetries);
                return "failedChannel";
            }
        }

        logger.info("Retry number {} of {}", currentRetries, maxRetries);
        return "retryChannel";
    }
}
路由器的配置如下所示:
<!-- Service invocation failed -->
<int:router ref="serviceRouter" method="handleServiceError" input-channel="errorChannel"/>
<int:channel id="retryChannel" />
<int:channel id="failedChannel" />
接下来,我们有以下这些端点:
<!-- Retry --> <int:service-activator ref="clientServiceActivator" method="retryFailedInvocation" input-channel="retryChannel" /> <int:inbound-channel-adapter id="retryAdapter" channel="requestChannel" ref="clientServiceActivator" method="retryInvocation" auto-startup="false"> <int:poller cron="0/5 * * * * *"/> </int:inbound-channel-adapter> <!-- Log failed invocation --> <int:service-activator ref="clientServiceActivator" method="handleFailedInvocation" input-channel="failedChannel" />retryAdapter入站通道适配器将继续轮询请求通道,但是请注意,属性auto-startup设置为false。 这意味着该适配器将被禁用,直到有人激活它为止。 我们需要这样做,否则它将从头开始轮询,并且我们只想在发生失败的调用时将其激活。服务激活器将根据服务调用的结果启动或停止适配器。 失败时,它将启动适配器以开始重试。 如果达到最大重试次数,则路由器会将消息重定向到失败的通道,在该通道中,服务激活器将禁用适配器以阻止其轮询。 如果调用最终成功,它将记录消息并停止适配器。
@Component("clientServiceActivator")
public class ClientServiceActivator {
    private Logger logger = LoggerFactory.getLogger(this.getClass());

    @Autowired
    @Qualifier("retryAdapter")
    private AbstractEndpoint retryAdapter;

    private Message<?> message;

    public void handleServiceResult(Message<?> msg) {
        logger.info("service successfully invoked. Finishing flow");
        retryAdapter.stop();
    }

    public void retryFailedInvocation(Message<?> msg) {
        logger.info("Service invocation failed. Activating retry trigger...");
        MessageHandlingException exc = (MessageHandlingException) msg.getPayload();
        this.message = exc.getFailedMessage();
        retryAdapter.start();
    }

    public Message<?> retryInvocation() {
        logger.info("Retrying service invocation...");

        return message;
    }

    public void handleFailedInvocation(MessageHandlingException exception) {
        logger.info("Maximum number of retries reached. Finishing flow.");
        retryAdapter.stop();
    }
}
测试类已被修改,以免产生以下结果:
@ContextConfiguration({"classpath:xpadro/spring/integration/ws/test/config/int-ws-async-config.xml"})
@RunWith(SpringJUnit4ClassRunner.class)
public class TestAsyncInvocation {

    @Autowired
    private AsyncTicketService service;

    @Test
    public void testInvocation() throws InterruptedException, ExecutionException {
        TicketRequest request = new TicketRequest();
        request.setFilmId("aFilm");
        request.setQuantity(new BigInteger("3"));
        request.setSessionDate(DateUtils.convertDate(new Date()));

        service.invoke(request);
        Thread.sleep(80000);
    }
}
而已。 显然,无需知道我们可以使用Spring Retry项目的重试建议就可以实现所有这些流程,但是此示例的目的是获得更多有关如何使用适配器的激活和停用来构建更复杂的流程的知识,路由器重定向和其他功能可以满足您的需求。
8.下载源代码
您可以从此处下载有关spring集成和Web服务的源代码: Spring_Integration_Sample.zip和Spring_WS_Sample.zip
翻译自: https://www.javacodegeeks.com/2015/09/spring-integration-and-web-services.html
-


 196
196

 被折叠的 条评论
为什么被折叠?
被折叠的 条评论
为什么被折叠?
 到【灌水乐园】发言


