


这是Angular JS承诺的Java EE 7的后续版本–第1部分 。 花了比我预期更长的时间(找到时间来准备代码和博客文章),但是终于到了!
应用程序
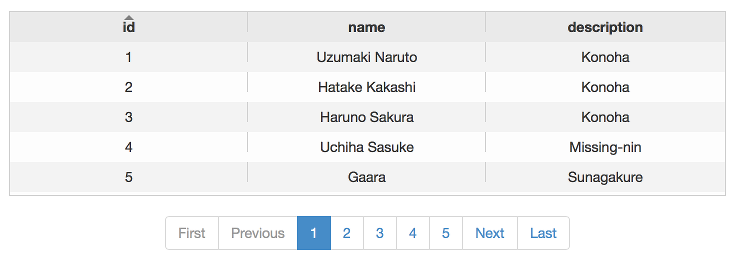
第1部分中的原始应用程序只是带有分页的简单列表,以及提供列表数据的REST服务。
在本文中,我们将添加CRUD(创建,读取,更新,删除)功能,绑定REST服务以在服务器端执行这些操作并验证数据。
设置
该设置与第1部分中的设置相同,但是这里是供参考的列表:
编码
后端– Java EE 7
后端不需要很多更改。 由于我们希望能够创建,读取,更新和删除,因此我们需要在REST服务中添加适当的方法来执行以下操作:
人员资源
package com.cortez.samples.javaee7angular.rest;

import com.cortez.samples.javaee7angular.data.Person;
import com.cortez.samples.javaee7angular.pagination.PaginatedListWrapper;

import javax.ejb.Stateless;
import javax.persistence.EntityManager;
import javax.persistence.PersistenceContext;
import javax.persistence.Query;
import javax.ws.rs.*;
import javax.ws.rs.core.Application;
import javax.ws.rs.core.MediaType;
import java.util.List;

@Stateless
@ApplicationPath("/resources")
@Path("persons")
@Consumes(MediaType.APPLICATION_JSON)
@Produces(MediaType.APPLICATION_JSON)
public class PersonResource extends Application {
    @PersistenceContext
    private EntityManager entityManager;

    private Integer countPersons() {
        Query query = entityManager.createQuery("SELECT COUNT(p.id) FROM Person p");
        return ((Long) query.getSingleResult()).intValue();
    }

    @SuppressWarnings("unchecked")
    private List<Person> findPersons(int startPosition, int maxResults, String sortFields, String sortDirections) {
        Query query = entityManager.createQuery("SELECT p FROM Person p ORDER BY " + sortFields + " " + sortDirections);
        query.setFirstResult(startPosition);
        query.setMaxResults(maxResults);
        return query.getResultList();
    }

    private PaginatedListWrapper<Person> findPersons(PaginatedListWrapper<Person> wrapper) {
        wrapper.setTotalResults(countPersons());
        int start = (wrapper.getCurrentPage() - 1) * wrapper.getPageSize();
        wrapper.setList(findPersons(start,
                                    wrapper.getPageSize(),
                                    wrapper.getSortFields(),
                                    wrapper.getSortDirections()));
        return wrapper;
    }

    @GET
    public PaginatedListWrapper<Person> listPersons(@DefaultValue("1")
                                                    @QueryParam("page")
                                                    Integer page,
                                                    @DefaultValue("id")
                                                    @QueryParam("sortFields")
                                                    String sortFields,
                                                    @DefaultValue("asc")
                                                    @QueryParam("sortDirections")
                                                    String sortDirections) {
        PaginatedListWrapper<Person> paginatedListWrapper = new PaginatedListWrapper<>();
        paginatedListWrapper.setCurrentPage(page);
        paginatedListWrapper.setSortFields(sortFields);
        paginatedListWrapper.setSortDirections(sortDirections);
        paginatedListWrapper.setPageSize(10);
        return findPersons(paginatedListWrapper);
    }

    @GET
    @Path("{id}")
    public Person getPerson( @PathParam("id") Long id) {
        return entityManager.find(Person.class, id);
    }

    @POST
    public Person savePerson(Person person) {
        if (person.getId() == null) {
            Person personToSave = new Person();
            personToSave.setName(person.getName());
            personToSave.setDescription(person.getDescription());
            personToSave.setImageUrl(person.getImageUrl());
            entityManager.persist(person);
        } else {
            Person personToUpdate = getPerson(person.getId());
            personToUpdate.setName(person.getName());
            personToUpdate.setDescription(person.getDescription());
            personToUpdate.setImageUrl(person.getImageUrl());
            person = entityManager.merge(personToUpdate);
        }

        return person;
    }

    @DELETE
    @Path("{id}")
    public void deletePerson(@PathParam("id") Long id) {
        entityManager.remove(getPerson(id));
    }
}
该代码与普通的Java POJO完全相同,但是使用Java EE批注来增强行为。 @ApplicationPath("/resources")和@Path("persons")将在URL yourdomain/resources/persons ( yourdomain将是运行应用程序的主机@Path("persons")公开REST服务。 @Consumes(MediaType.APPLICATION_JSON)和@Produces(MediaType.APPLICATION_JSON)接受REST请求和响应并将其格式化为JSON。
对于REST操作:
| 注释/ HTTP方法 | Java方法 | 网址 | 行为 |
|---|---|---|---|
@GET / GET | listPersons | http:// yourdomain / resources / persons | 返回10个人的分页列表。 |
@GET / GET | getPerson | http:// yourdomain / resources / persons / {id} | 通过其ID返回一个Person实体。 |
@POST / POST | savePerson | http:// yourdomain / resources / persons | 创建或更新人员。 |
@DELETE / DELETE | deletePerson | http:// yourdomain / resources / persons / {id} | 通过其ID删除一个Person实体。 |
每个操作调用的url非常相似。 提交请求时,HTTP方法本身定义了区分需要调用哪个操作的魔术。 检查HTTP方法定义 。
对于getPerson和deletePerson请注意,我们添加了注释@Path("{id}") ,该注释定义了调用服务的可选路径。 由于我们需要知道要获取或删除的对象,因此需要以某种方式指示该id 。 这是在要调用的服务网址中完成的,因此,如果要删除ID为1的Person,我们将使用HTTP方法DELETE调用http://yourdomain/resources/persons/1 。
后端内容就是这样。 仅30行代码添加到了旧的REST服务。 我还向Person对象添加了一个新属性,以保留指向图像的链接,目的是显示此人的化身。
UI – Angular JS
对于UI部分,我决定将其分为3个部分:网格,表单和反馈消息部分,每个部分都有自己的Angular控制器。 网格与第1部分中的网格基本相同,但确实需要对新内容进行一些调整:
网格HTML
<!-- Specify a Angular controller script that binds Javascript variables to the grid.-->
<div class="grid" ng-controller="personsListController">
    <div>
        <h3>List Persons</h3>
    </div>

    <!-- Binds the grid component to be displayed. -->
    <div class="gridStyle" ng-grid="gridOptions"></div>

    <!--  Bind the pagination component to be displayed. -->
    <pagination direction-links="true" boundary-links="true"
                total-items="persons.totalResults" items-per-page="persons.pageSize"
                ng-model="persons.currentPage" ng-change="refreshGrid()">
    </pagination>
</div>
这里没什么特别的。 与第1部分几乎相同。
网格角控制器
app.controller('personsListController', function ($scope, $rootScope, personService) {
    // Initialize required information: sorting, the first page to show and the grid options.
    $scope.sortInfo = {fields: ['id'], directions: ['asc']};
    $scope.persons = {currentPage: 1};

    $scope.gridOptions = {
        data: 'persons.list',
        useExternalSorting: true,
        sortInfo: $scope.sortInfo,

        columnDefs: [
            { field: 'id', displayName: 'Id' },
            { field: 'name', displayName: 'Name' },
            { field: 'description', displayName: 'Description' },
            { field: '', width: 30, cellTemplate: '<span class="glyphicon glyphicon-remove remove" ng-click="deleteRow(row)"></span>' }
        ],

        multiSelect: false,
        selectedItems: [],
        // Broadcasts an event when a row is selected, to signal the form that it needs to load the row data.
        afterSelectionChange: function (rowItem) {
            if (rowItem.selected) {
                $rootScope.$broadcast('personSelected', $scope.gridOptions.selectedItems[0].id);
            }
        }
    };

    // Refresh the grid, calling the appropriate rest method.
    $scope.refreshGrid = function () {
        var listPersonsArgs = {
            page: $scope.persons.currentPage,
            sortFields: $scope.sortInfo.fields[0],
            sortDirections: $scope.sortInfo.directions[0]
        };

        personService.get(listPersonsArgs, function (data) {
            $scope.persons = data;
        })
    };

    // Broadcast an event when an element in the grid is deleted. No real deletion is perfomed at this point.
    $scope.deleteRow = function (row) {
        $rootScope.$broadcast('deletePerson', row.entity.id);
    };

    // Watch the sortInfo variable. If changes are detected than we need to refresh the grid.
    // This also works for the first page access, since we assign the initial sorting in the initialize section.
    $scope.$watch('sortInfo.fields[0]', function () {
        $scope.refreshGrid();
    }, true);

    // Do something when the grid is sorted.
    // The grid throws the ngGridEventSorted that gets picked up here and assigns the sortInfo to the scope.
    // This will allow to watch the sortInfo in the scope for changed and refresh the grid.
    $scope.$on('ngGridEventSorted', function (event, sortInfo) {
        $scope.sortInfo = sortInfo;
    });

    // Picks the event broadcasted when a person is saved or deleted to refresh the grid elements with the most
    // updated information.
    $scope.$on('refreshGrid', function () {
        $scope.refreshGrid();
    });

    // Picks the event broadcasted when the form is cleared to also clear the grid selection.
    $scope.$on('clear', function () {
        $scope.gridOptions.selectAll(false);
    });
});
还需要一些其他属性来配置网格的行为。 重要的data: 'persons.list'是data: 'persons.list' ,它将网格数据绑定到Angular模型值$scope.persons , columnDefs允许我们根据需要对网格进行建模。 由于我想添加一个选项来删除每一行,因此我需要添加一个新单元格,当您单击十字图标时,该单元格将调用函数deleteRow 。 需要afterSelectionChanges函数来与网格中选定的人更新表单数据。 您可以在此处检查其他网格选项。
其余代码是不言自明的,其中也有一些注释。 关于$rootScope.$broadcast特别说明:用于将事件调度到所有其他控制器。 这是控制器之间进行通信的一种方式,因为网格,表单和反馈消息具有单独的控制器。 如果所有内容都只在一个控制器中,则不需要这样做,只需一个简单的函数调用就足够了。 如果我们要保留多个控制器,另一种可能的解决方案是使用Angular服务。 所使用的方法看起来更加简洁,因为它可以将应用程序问题分开,并且不需要您实现其他Angular服务,但是如果需要的话,调试起来可能会有些困难。
表格HTML
<div class="form" ng-controller="personsFormController">
    <!-- Verify person, if there is no id present, that we are Adding a Person -->
    <div ng-if="person.id == null">
        <h3>Add Person</h3>
    </div>
    <!-- Otherwise it's an Edit -->
    <div ng-if="person.id != null">
        <h3>Edit Person</h3>
    </div>

    <div>
        <!-- Specify the function to be called on submit and disable HTML5 validation, since we're using Angular validation-->
        <form name="personForm" ng-submit="updatePerson()" novalidate>

            <!-- Display an error if the input is invalid and is dirty (only when someone changes the value) -->
            <div class="form-group" ng-class="{'has-error' : personForm.name.$invalid && personForm.name.$dirty}">
                <label for="name">Name:</label>
                <!-- Display a check when the field is valid and was modified -->
                <span ng-class="{'glyphicon glyphicon-ok' : personForm.name.$valid && personForm.name.$dirty}"></span>

                <input id="name" name="name" type="text" class="form-control" maxlength="50"
                       ng-model="person.name"
                       required ng-minlength="2" ng-maxlength="50"/>

                <!-- Validation messages to be displayed on required, minlength and maxlength -->
                <p class="help-block" ng-show="personForm.name.$error.required">Add Name.</p>
                <p class="help-block" ng-show="personForm.name.$error.minlength">Name must be at least 2 characters long.</p>
                <p class="help-block" ng-show="personForm.name.$error.maxlength">Name cannot be longer than 50 characters.</p>
            </div>

            <!-- Display an error if the input is invalid and is dirty (only when someone changes the value) -->
            <div class="form-group" ng-class="{'has-error' : personForm.description.$invalid && personForm.description.$dirty}">
                <label for="description">Description:</label>
                <!-- Display a check when the field is valid and was modified -->
                <span ng-class="{'glyphicon glyphicon-ok' : personForm.description.$valid && personForm.description.$dirty}"></span>

                <input id="description" name="description" type="text" class="form-control" maxlength="100"
                       ng-model="person.description"
                       required ng-minlength="5" ng-maxlength="100"/>

                <!-- Validation messages to be displayed on required, minlength and maxlength -->
                <p class="help-block" ng-show="personForm.description.$error.required">Add Description.</p>
                <p class="help-block" ng-show="personForm.description.$error.minlength">Description must be at least 5 characters long.</p>
                <p class="help-block" ng-show="personForm.description.$error.maxlength">Description cannot be longer than 100 characters.</p>
            </div>

            <!-- Display an error if the input is invalid and is dirty (only when someone changes the value) -->
            <div class="form-group" ng-class="{'has-error' : personForm.imageUrl.$invalid && personForm.imageUrl.$dirty}">
                <label for="imageUrl">Image URL:</label>
                <!-- Display a check when the field is valid and was modified -->
                <span ng-class="{'glyphicon glyphicon-ok' : personForm.imageUrl.$valid && personForm.imageUrl.$dirty}"></span>

                <input id="imageUrl" name="imageUrl" type="url" class="form-control" maxlength="500"
                       ng-model="person.imageUrl"
                       required/>

                <!-- Validation messages to be displayed on required and invalid. Type 'url' makes checks to a proper url format. -->
                <p class="help-block" ng-show="personForm.imageUrl.$error.required">Add Image URL.</p>
                <p class="help-block" ng-show="personForm.imageUrl.$invalid && personForm.imageUrl.$dirty">Invalid Image URL.</p>
            </div>

            <div class="avatar" ng-if="person.imageUrl">
                <img ng-src="{{person.imageUrl}}" width="400" height="250"/>
            </div>

            <!-- Form buttons. The 'Save' button is only enabled when the form is valid. -->
            <div class="buttons">
                <button type="button" class="btn btn-primary" ng-click="clearForm()">Clear</button>
                <button type="submit" class="btn btn-primary" ng-disabled="personForm.$invalid">Save</button>
            </div>
        </form>
    </div>
</div>
外观如下:
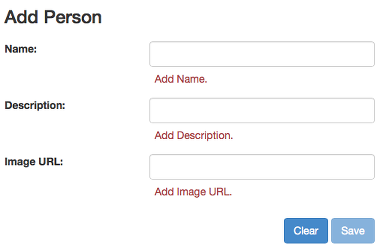
许多代码用于验证目的,但让我们更详细地研究一下:每个input元素将其值绑定到person.something 。 这允许在HTML和JavaScript控制器之间的数据进行建模,所以我们可以写$scope.person.name在我们的控制器到达填好了表单输入与名称值, name 。 要访问HTML表单中的数据,我们使用表单名称personForm加上输入字段的名称。
HTML5在输入字段中有自己的一组验证,但是我们想使用Angular验证。 在这种情况下,我们需要通过在form元素上使用novalidate来禁用表单验证。 现在,要使用Angular验证,我们可以在input元素中使用一些Angular指令。 对于这种非常基本的形式,我们仅使用required , ng-minlength和ng-maxlength ,但您可以使用其他形式。 只需查看文档即可 。
Angular根据输入验证状态分配CSS类。 想一想,这些是可能的值:
| 州 | CSS | 上 |
|---|---|---|
valid | ng有效 | 该字段有效时。 |
invalid | ng无效 | 当该字段无效时。 |
pristine | ng-原始 | 当领域从未被触及过。 |
dirty | ng-dirty | 更改字段时。 |
这些CSS类为空。 您需要创建它们,并在随附CSS表单中为应用程序分配样式。 相反,我们将使用Bootstrap中非常好的样式。 为了使它们起作用,需要将一些其他类应用于这些元素。 包含输入的div元素需要CSS类form-group ,而input元素需要CSS类form-control 。
要显示无效的输入字段,我们将ng-class="{'has-error' : personForm.name.$invalid && personForm.name.$dirty}"到包含的输入div中。 此代码评估personForm中的名称是否无效以及名称是否肮脏。 条件验证后,输入将显示为无效。
最后,对于表单验证消息,我们需要为每个输入和要执行的验证类型验证$error指令。 只需将ng-show="personForm.name.$error.minlength"到带有消息HTML显示元素,以警告用户名称输入字段太短。
表单角度控制器
// Create a controller with name personsFormController to bind to the form section.
app.controller('personsFormController', function ($scope, $rootScope, personService) {
    // Clears the form. Either by clicking the 'Clear' button in the form, or when a successfull save is performed.
    $scope.clearForm = function () {
        $scope.person = null;
        // For some reason, I was unable to clear field values with type 'url' if the value is invalid.
        // This is a workaroud. Needs proper investigation.
        document.getElementById('imageUrl').value = null;
        // Resets the form validation state.
        $scope.personForm.$setPristine();
        // Broadcast the event to also clear the grid selection.
        $rootScope.$broadcast('clear');
    };

    // Calls the rest method to save a person.
    $scope.updatePerson = function () {
        personService.save($scope.person).$promise.then(
            function () {
                // Broadcast the event to refresh the grid.
                $rootScope.$broadcast('refreshGrid');
                // Broadcast the event to display a save message.
                $rootScope.$broadcast('personSaved');
                $scope.clearForm();
            },
            function () {
                // Broadcast the event for a server error.
                $rootScope.$broadcast('error');
            });
    };

    // Picks up the event broadcasted when the person is selected from the grid and perform the person load by calling
    // the appropiate rest service.
    $scope.$on('personSelected', function (event, id) {
        $scope.person = personService.get({id: id});
    });

    // Picks us the event broadcasted when the person is deleted from the grid and perform the actual person delete by
    // calling the appropiate rest service.
    $scope.$on('deletePerson', function (event, id) {
        personService.delete({id: id}).$promise.then(
            function () {
                // Broadcast the event to refresh the grid.
                $rootScope.$broadcast('refreshGrid');
                // Broadcast the event to display a delete message.
                $rootScope.$broadcast('personDeleted');
                $scope.clearForm();
            },
            function () {
                // Broadcast the event for a server error.
                $rootScope.$broadcast('error');
            });
    });
});
对于表单控制器,我们需要两个功能来执行与按钮“清除”和“保存”按钮相关的操作,这两个功能是不言自明的。 快速说明:出于某种原因,Angular不会清除处于无效状态的输入字段。 我确实发现一些人抱怨同样的问题,但我需要对此进行进一步调查。 也许这是我做错了。
使用已实现相应HTTP方法的$resource对象中的save和delete调用REST服务。 检查文档 。 您可以通过以下工厂获得$resource :
REST服务
// Service that provides persons operations
app.factory('personService', function ($resource) {
    return $resource('resources/persons/:id');
});
控制器代码的其余部分具有拾取由网格创建的事件的功能,以在表单中加载人员数据并删除人员。 该控制器还会创建一些事件。 如果我们添加或删除人员,则需要更新网格,以便生成一个事件,要求更新网格。
反馈消息HTML
<!-- Specify a Angular controller script that binds Javascript variables to the feedback messages.-->
<div class="message" ng-controller="alertMessagesController">
    <alert ng-repeat="alert in alerts" type="{{alert.type}}" close="closeAlert($index)">{{alert.msg}}</alert>
</div>
这只是应用程序的顶部,用于根据保存,删除或服务器错误显示成功或错误消息。
反馈消息角度控制器
// Create a controller with name alertMessagesController to bind to the feedback messages section.
app.controller('alertMessagesController', function ($scope) {
    // Picks up the event to display a saved message.
    $scope.$on('personSaved', function () {
        $scope.alerts = [
            { type: 'success', msg: 'Record saved successfully!' }
        ];
    });

    // Picks up the event to display a deleted message.
    $scope.$on('personDeleted', function () {
        $scope.alerts = [
            { type: 'success', msg: 'Record deleted successfully!' }
        ];
    });

    // Picks up the event to display a server error message.
    $scope.$on('error', function () {
        $scope.alerts = [
            { type: 'danger', msg: 'There was a problem in the server!' }
        ];
    });

    $scope.closeAlert = function (index) {
        $scope.alerts.splice(index, 1);
    };
});
这是将消息推送到视图的控制器。 侦听由网格和表单控制器创建的事件。
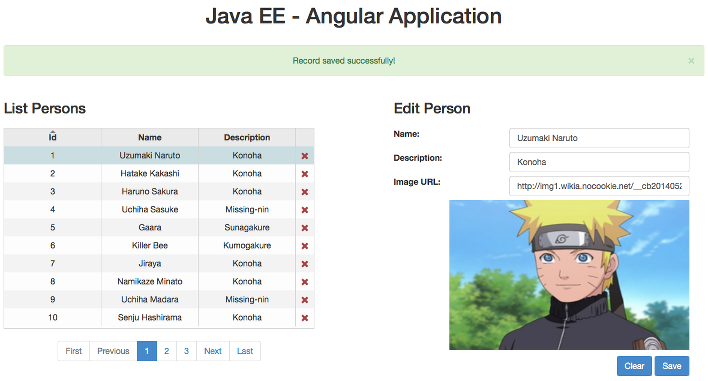
最终结果
Uff ..那是很多代码和新信息。 让我们看一下最终结果:
感谢Cloudbees ,在http://javaee7-angular.radcortez.cloudbees.net中也运行了一个实时版本。 如果云实例处于休眠状态,则可能需要一段时间才能打开(因为没有使用)。
资源资源
您可以从我的github存储库中克隆完整的工作副本,然后将其部署到Wildfly。 您可以在此处找到说明进行部署。 也应该在Glassfish上工作。
由于我将来可能会修改代码,因此您可以从3.0版中下载本文的原始源。 或者,克隆存储库并使用以下命令从版本3.0中检出标记: git checkout 3.0 。
另请检查:
最后的想法
- 开始输入后,表单验证即会启动。 Angular 1.3将具有on模糊属性,仅在失去焦点之后才能进行验证,但我仍在使用Angular1.2.x。
- 我不得不承认,我发现验证代码过于冗长。 我不知道是否有一种方法可以简化它,但是您不必将每个消息验证都添加到每个输入中。
- 这里仍然缺少一些东西,例如参数清除或服务器端验证。 我将在下一篇博客文章中介绍这些内容。
这是一篇很长的文章,实际上是我在博客上写的最长的文章。 如果您到此为止,非常感谢您拨冗阅读本文 。 我希望你喜欢它! 让我知道您是否有任何意见。
翻译自: https://www.javacodegeeks.com/2014/10/java-ee-7-with-angular-js-crud-rest-validations-part-2.html


 7292
7292

 被折叠的 条评论
为什么被折叠?
被折叠的 条评论
为什么被折叠?
 到【灌水乐园】发言


