


1引言
本文介绍了如何使用来实现和测试SOAP Web服务
Spring Web Services项目 。 本示例使用JAXB2进行(取消)编组。 为了开发服务,我将使用合同优先的方法,该方法首先定义服务合同,然后基于该合同实施服务。
本文分为以下几节:
- 2解释申请
- 3实施服务
- 3.1创建合同
- 3.2生成Java类
- 3.3实现SOAP端点
- 3.4配置应用程序
- 4测试服务
- 5附加信息
- 5.1实施客户
- 5.2内部运作方式
2解释申请
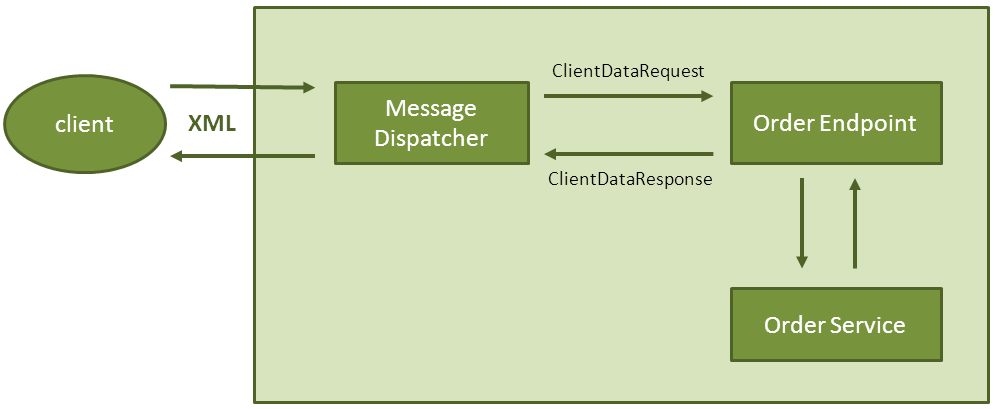
示例应用程序处理订单。 我们有一个前端控制器(messageDispatcher servlet),它将处理订单请求,调用服务以处理订单并返回结果。
您可以在github上获取源代码。
3实施服务
3.1创建合同
由于我们将使用合同优先的方法,因此创建合同的最简单方法是首先定义示例xml文档,然后我们将使用工具生成合同。 以下是示例xml文档:
client-request.xml
<clientDataRequest xmlns="http://www.xpadro.spring.samples.com/orders"
    clientId="A-123"
    productId="C5FH"
    quantity="5" />
client-response.xml
<clientDataResponse xmlns="http://www.xpadro.spring.samples.com/orders"
    confirmationId="7890B"
    orderDate="2013-09-22"
    amount="15.50" />
为了创建模式,我们可以使用Trang,这是一个开放源代码工具,将允许我们从xml文档中生成xsd模式。 我已经将该库包含到项目构建路径中(可以从Trang 网站获得此jar),并且我已经创建了一个Ant任务来执行转换:
generate-schema.xml
<project name="Ant-Generate-Schema-With-Trang" default="generate" basedir=".">
    <property name="src.dir" location="src" />
    <property name="trang.dir" location="lib" />
    <property name="source.dir" location="${src.dir}/main/webapp/WEB-INF/schemas/samples" />
    <property name="schema.dir" location="${src.dir}/main/webapp/WEB-INF/schemas/xsd" />

    <target name="generate" description="generates order schema">
        <delete dir="${schema.dir}" />
        <mkdir dir="${schema.dir}" />

        <java jar="${trang.dir}/trang.jar" fork="true">
            <arg value="${source.dir}/client-request.xml" />
            <arg value="${schema.dir}/client-request.xsd" />
        </java>

        <java jar="${trang.dir}/trang.jar" fork="true">
            <arg value="${source.dir}/client-response.xml" />
            <arg value="${schema.dir}/client-response.xsd" />
        </java>
    </target>
</project>
一旦执行了Ant任务,它将生成架构。 由于模式是自动生成的,因此我们可能需要进行一些修改以使其适应我们的需求。 让我们来看看:
客户端请求
<xs:schema xmlns:xs="http://www.w3.org/2001/XMLSchema"
    elementFormDefault="qualified"
    targetNamespace="http://www.xpadro.spring.samples.com/orders"
    xmlns:orders="http://www.xpadro.spring.samples.com/orders">

    <xs:element name="clientDataRequest">
        <xs:complexType>
            <xs:attribute name="clientId" use="required" type="xs:NCName"/>
            <xs:attribute name="productId" use="required" type="xs:NCName"/>
            <xs:attribute name="quantity" use="required" type="xs:integer"/>
        </xs:complexType>
    </xs:element>
</xs:schema>
客户端响应
<xs:schema xmlns:xs="http://www.w3.org/2001/XMLSchema"
    elementFormDefault="qualified"
    targetNamespace="http://www.xpadro.spring.samples.com/orders"
    xmlns:orders="http://www.xpadro.spring.samples.com/orders">

    <xs:element name="clientDataResponse">
        <xs:complexType>
            <xs:attribute name="amount" use="required" type="xs:decimal"/>
            <xs:attribute name="confirmationId" use="required" type="xs:NMTOKEN"/>
            <xs:attribute name="orderDate" use="required" type="xs:NMTOKEN"/>
        </xs:complexType>
    </xs:element>
</xs:schema>
我们可以向这些架构添加不同的验证,但是在本示例中,我将仅修改几种类型,例如clientId,productId和ConfirmationId(xs:string)和orderDate(xs:date)。 XML数据类型到Java类型的映射是由JAXB完成的。 您可以检查提供了哪些映射
在这里 。
为了完成该架构,我们将把response元素复制到请求架构中。 我用响应和请求创建了第三个模式:
客户端服务
<xs:schema xmlns:xs="http://www.w3.org/2001/XMLSchema"
    elementFormDefault="qualified" targetNamespace="http://www.xpadro.spring.samples.com/orders"
    xmlns:orders="http://www.xpadro.spring.samples.com/orders">

    <xs:element name="clientDataRequest">
        <xs:complexType>
            <xs:attribute name="clientId" use="required" type="xs:string" />
            <xs:attribute name="productId" use="required" type="xs:string" />
            <xs:attribute name="quantity" use="required" type="xs:integer" />
        </xs:complexType>
    </xs:element>

    <xs:element name="clientDataResponse">
        <xs:complexType>
            <xs:attribute name="amount" use="required" type="xs:decimal" />
            <xs:attribute name="confirmationId" use="required" type="xs:string" />
            <xs:attribute name="orderDate" use="required" type="xs:date" />
        </xs:complexType>
    </xs:element>
</xs:schema>
最后一步是写合同,通常用WSDL文件表示。 如果您不想手动创建它,Spring-ws项目为我们提供了一种从XSD模式生成此文件的方法。 您将在配置应用程序部分中看到第二种方法。
3.2生成Java类
我们将使用JAXB2生成请求和响应对象。 JAXB的XJC编译器将负责从我们之前生成的XSD架构转换这些对象。 它将作为Ant任务执行:
<project name="Ant-Generate-Classes-With-JAXB2" default="generate" basedir=".">
    <property name="src.dir" location="src" />
    <property name="java.dir" location="src/main/java" />
    <property name="schema.dir" location="${src.dir}/main/webapp/WEB-INF/schemas/xsd" />

    <target name="generate">
        <exec executable="xjc">
            <arg line=" -d ${java.dir} -p xpadro.spring.ws.types ${schema.dir}/client-service.xsd" />
        </exec>
    </target>
</project>
该任务将在xpadro.spring.ws.types包中创建Java类(您可能需要刷新项目)。

3.3实现SOAP端点
端点接收未编组的消息有效负载,并使用此数据来调用订单服务。 然后它将返回服务响应,该响应将由端点适配器编组:
@Endpoint
public class OrderEndpoint {
    @Autowired
    private OrderService orderService;

    @PayloadRoot(localPart="clientDataRequest", namespace="http://www.xpadro.spring.samples.com/orders")
    public @ResponsePayload ClientDataResponse order(@RequestPayload ClientDataRequest orderData) {
        OrderConfirmation confirmation =
            orderService.order(orderData.getClientId(), orderData.getProductId(), orderData.getQuantity().intValue());

        ClientDataResponse response = new ClientDataResponse();
        response.setConfirmationId(confirmation.getConfirmationId());
        BigDecimal amount = new BigDecimal(Float.toString(confirmation.getAmount()));
        response.setAmount(amount);
        response.setOrderDate(convertDate(confirmation.getOrderDate()));

        return response;
    }

    //date conversion
}
这是端点使用的注释的简短描述:
@Endpoint :将类注册为组件。 这样,将通过组件扫描检测到该类。
@PayloadRoot :将端点方法注册为请求的处理程序。 该注释将定义该方法可以处理的请求消息类型。 在我们的示例中,它将接收消息,其中其有效负载根元素具有与我们创建的XSD架构中定义的名称空间相同的名称空间,并且其本地名称是为请求定义的名称(clientDataRequest)。
@RequestPayload :指示请求消息的有效负载作为参数传递给方法。
@ResponsePayload ,指示将返回值用作响应消息的有效负载。
3.4配置应用程序
web.xml
应用程序配置(如数据源,transactionManager…)
<context-param>
    <param-name>contextConfigLocation</param-name>
    <param-value>classpath:xpadro/spring/ws/config/root-config.xml</param-value>
</context-param>
加载应用程序上下文
<listener>
    <listener-class>org.springframework.web.context.ContextLoaderListener</listener-class>
</listener>
这是一个Servlet,它将充当处理所有SOAP调用的前端控制器。 它的功能是将传入的XML消息派生到端点,就像Spring MVC的DispatcherServlet一样。
<servlet>
    <servlet-name>orders</servlet-name>
    <servlet-class>org.springframework.ws.transport.http.MessageDispatcherServlet</servlet-class>
    <init-param>
        <param-name>contextConfigLocation</param-name>
        <param-value>classpath:xpadro/spring/ws/config/servlet-config.xml</param-value>
    </init-param>
    <load-on-startup>1</load-on-startup>
</servlet>

<servlet-mapping>
    <servlet-name>orders</servlet-name>
    <url-pattern>/orders/*</url-pattern>
</servlet-mapping>
servlet-config.xml
此配置包含Web服务基础结构bean。
<!-- Detects @Endpoint since it is a specialization of @Component -->
<context:component-scan base-package="xpadro.spring.ws"/>

<!-- detects @PayloadRoot -->
<ws:annotation-driven/>

<ws:dynamic-wsdl id="orderDefinition" portTypeName="Orders" locationUri="http://localhost:8081/spring-ws">
    <ws:xsd location="/WEB-INF/schemas/xsd/client-service.xsd"/>
</ws:dynamic-wsdl>
在动态wsdl中,将什么值放在locationUri属性中都没有关系,因为它将由MessageDispatcherServlet处理。 因此,wsdl将在以下位置可用:
http:// localhost:8081 / spring-ws / orders / whatever / orderDefinition.wsdl
4测试服务
下面的示例创建一个模拟客户端,该客户端将访问Web服务:
@ContextConfiguration("classpath:xpadro/spring/ws/test/config/test-server-config.xml")
@RunWith(SpringJUnit4ClassRunner.class)
public class TestWebService {
    @Autowired
    ApplicationContext context;

    private MockWebServiceClient mockClient;

    @Test
    public void testValidOrderRequest() {
        Source requestPayload = new StringSource(
            "<clientDataRequest xmlns='http://www.xpadro.spring.samples.com/orders' " +
            "clientId='123' productId='XA-55' quantity='5'/>");

        Source responsePayload = new StringSource(
            "<clientDataResponse xmlns='http://www.xpadro.spring.samples.com/orders' " +
            "amount='55.99' confirmationId='GHKG34L' orderDate='2013-10-26+02:00'/>");

        RequestCreator creator = RequestCreators.withPayload(requestPayload);
        mockClient = MockWebServiceClient.createClient(context);
        mockClient.sendRequest(creator).andExpect(ResponseMatchers.payload(responsePayload));
    }

    @Test
    public void testInvalidOrderRequest() {
        Source requestPayload = new StringSource(
            "<clientDataRequest xmlns='http://www.xpadro.spring.samples.com/orders' " +
            "clientId='456' productId='XA-55' quantity='5'/>");

        Source responsePayload = new StringSource(
            "<SOAP-ENV:Fault xmlns:SOAP-ENV='http://schemas.xmlsoap.org/soap/envelope/'>" +
            "<faultcode>SOAP-ENV:Server</faultcode><faultstring xml:lang='en'>Client [456] not found</faultstring></SOAP-ENV:Fault>");

        RequestCreator creator = RequestCreators.withPayload(requestPayload);
        mockClient = MockWebServiceClient.createClient(context);
        mockClient.sendRequest(creator).andExpect(ResponseMatchers.payload(responsePayload));
    }
}
此测试中使用的配置文件非常简单,仅包含对服务组件的扫描:
<context:component-scan base-package="xpadro.spring.ws"/>
<ws:annotation-driven/>
5附加信息
5.1实施客户
为了方便客户端访问Web服务,Spring为我们提供了WebServiceTemplate类。 此类包含用于发送和接收消息的方法,并且它还使用转换器对(取消)编组对象。
我创建了一个充当服务客户端的测试:
@ContextConfiguration("classpath:xpadro/spring/ws/test/config/client-config.xml")
@RunWith(SpringJUnit4ClassRunner.class)
public class TestClient {
    @Autowired
    WebServiceTemplate wsTemplate;

    @Test
    public void invokeOrderService() throws Exception {
        ClientDataRequest request = new ClientDataRequest();
        request.setClientId("123");
        request.setProductId("XA-55");
        request.setQuantity(new BigInteger("5", 10));

        ClientDataResponse response = (ClientDataResponse) wsTemplate.marshalSendAndReceive(request);

        assertNotNull(response);
        assertEquals(new BigDecimal("55.99"), response.getAmount());
        assertEquals("GHKG34L", response.getConfirmationId());
    }
}
配置测试文件包含WebServiceTemplate配置:
<oxm:jaxb2-marshaller id="marshaller" contextPath="xpadro.spring.ws.types"/>

<bean class="org.springframework.ws.client.core.WebServiceTemplate">
    <property name="marshaller" ref="marshaller" />
    <property name="unmarshaller" ref="marshaller" />
    <property name="defaultUri" value="http://localhost:8081/spring-ws/orders" />
</bean>
只需记住在执行此测试之前使用已部署的Web服务应用程序启动服务器即可。
5.2内部运作方式
如果您只想实现Web服务,则本文在上一节中完成。 对于那些对它如何真正起作用感到好奇的人,我将尝试解释如何将请求映射到端点,这比到目前为止的解释要低一些。
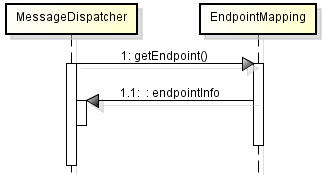
当请求到达MessageDispatcher时,它依赖于两个组件:
- 它询问EndpointMapping哪个是适当的端点。
- 利用从映射接收到的信息,它使用端点适配器来调用端点。 适配器还支持参数解析器和返回类型处理程序。
端点映射
MessageDispatcher包含一个端点映射列表,每个映射都包含一个先前注册的方法端点的映射。 在我们的例子中,JAXB映射PayloadRootAnnotationMethodEndpointMapping已注册所有带有@PayloadRoot注释的方法。 如果消息的有效负载的合格名称解析为注册方法,则它将被返回给MessageDispatcher。 如果我们不注释我们的方法,它将无法处理请求。
端点适配器
然后,MessageDispatcher将询问其每个端点适配器是否支持当前请求。 在我们的情况下,适配器检查以下条件是否都成立:
- 传递给该方法的至少一个参数使用@RequestPayload进行注释
- 如果端点方法返回响应,则必须使用@ResponsePayload进行注释
如果返回了适配器,则它将调用端点,在将参数传递给方法之前先将其解组。 当该方法返回响应时,适配器将封送它。
下图是此步骤的简化版本,以简化操作:

结论
我们已经看到了有关如何实现简单的Web服务然后对其进行测试的介绍。 如果您有兴趣,还可以看看如何使用MockWebServiceServer 测试客户端。
翻译自: https://www.javacodegeeks.com/2014/02/creating-contract-first-web-services-with-spring-ws.html


 216
216

 被折叠的 条评论
为什么被折叠?
被折叠的 条评论
为什么被折叠?
 到【灌水乐园】发言


