使用Spring Boot和Vue.js构建一个简单的CRUD应用

“我喜欢编写身份验证和授权代码。” 〜从来没有Java开发人员。 厌倦了一次又一次地建立相同的登录屏幕? 尝试使用Okta API进行托管身份验证,授权和多因素身份验证。

在本教程中,您将使用Vue.js作为客户端并将Spring Boot作为资源服务器来构建完整的CRUD Web应用程序。 您还将使用OAuth 2.0和Okta保护应用程序的安全。

CRUD是C reate,R EAD,U PDATE,和d elete。 这有点像服务器世界的“ Hello World”。 就像“ Hello服务器!” 如果您可以添加,更新,读取和删除数据,那么您几乎已经掌握了REST接口或基本资源API的所有基本工具。

您将要构建的示例应用程序是一个简单的待办应用程序。 通常,这些待办事项应用程序使用本地存储的数据,但是在本示例中,您将在Spring Boot资源服务器上创建,读取,更新和删除待办事项。

激动吗 大! 在我们深入研究之前,先简要介绍所涉及的技术。

什么是Vue.js?

Vue是一个JavaScript视图库,例如React和Angular。 它的设计旨在逐步采用,并且核心库仅专注于视图层。

以我的经验,Vue.js是React的绝佳替代品。 我首先学习了React,后来又开始使用Vue。 与React一样,Vue使用虚拟DOM,提供反应性和可组合的视图组件,并在定义属性和状态时强制执行严格的单向父子关系。 这意味着它是高性能的,并且避免了在没有单向数据绑定的情况下可能发生的许多令人困惑的状态关系。 但是,与React不同,Vue使用模板而不是JSX(这是一个可能受欢迎并且更易于访问的选项),并且Vue使用单文件组件中的style标签为您提供了组件范围内CSS。 在实践中,这种差异是非常巨大的,因为在React中,JSX和类似CSS的语法与HTML和CSS足够接近,容易引起混淆,但实际上并不完全相同,这在最初就产生了问题(以前的语言不需要分号做到这一点吗?就是这样)。

我发现Vue是一个更简单,更简洁的实现。 React需要深入研究。 您必须服用红色药丸,然后一直服用。 它是一个超级强大的系统,但您必须全力以赴。Vue更加友好,入门也更简单。

关于Spring Boot

您将要使用的服务器技术是Spring Boot。 纯净,纯净的Spring(弹簧启动前)有点像庞然大物:功能强大,但可能会浪费时间并令人沮丧。 我敢肯定,整个计算机会议现象的产生都是为了让人们可以学习和理解老式的Spring XML文件。 当然,它推动了计算机出版帝国的大部分发展。

Spring Boot是Spring对这种复杂性(以及诸如Ruby on Rails和Grails之类的框架)的解决方案。 他们做了出色的工作,将Spring的所有功能分解为一个简单,快速,易于使用的Web框架。 只需很少的几行代码和一些注释,便可以拥有功能全面的资源服务器。

另外,当您准备就绪时,f就可以拥有Spring的全部强大功能,只需等待即可。

对于此项目,您将需要一个服务器和客户端项目。 创建一个名为SpringBootVueApplication的根项目目录,并在该目录下创建两个子目录: clientserver

client将是您的Vue.js客户端应用程序。

server将是Spring Boot资源服务器。

创建您的Spring Boot应用

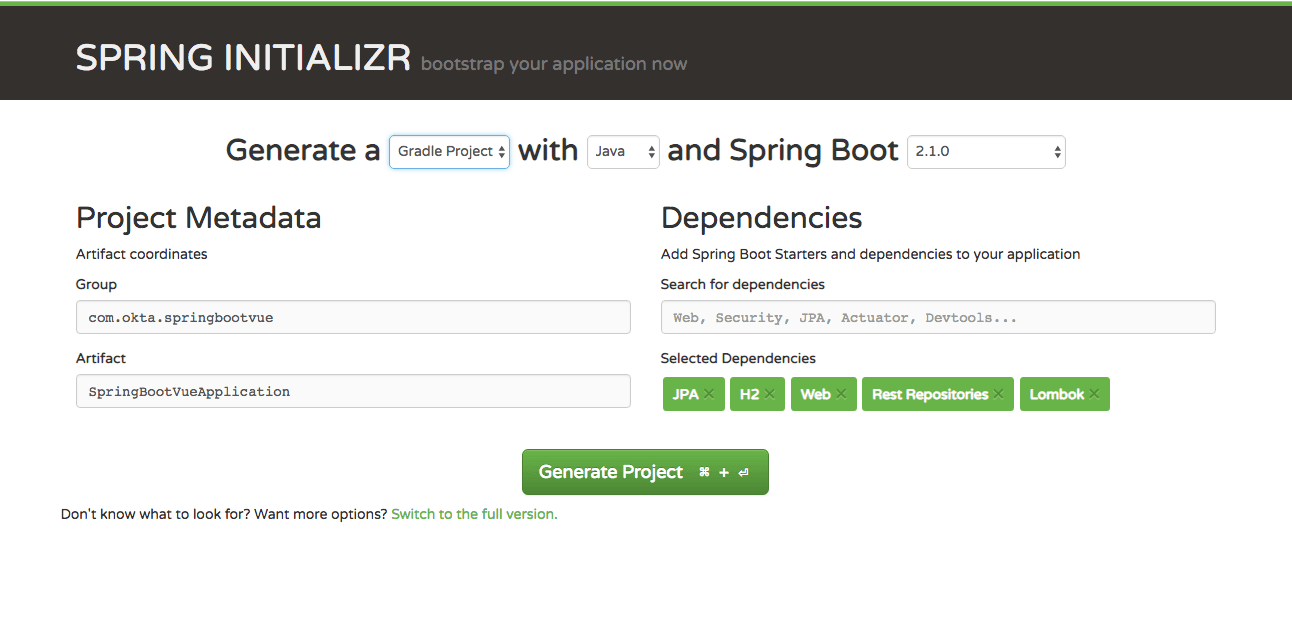
让我们从使用Spring Initializer创建Spring Boot应用程序开始。

进行以下选择:

  • 项目类型: Gradle Project
  • 群组: com.okta
  • 工件: spring-boot-vue
  • 依赖项JPAH2WebRest RepositoriesLombok

CRUD应用

下载文件并将内容解压缩到您的SpringBootVueApplication/server目录。

首先,让我们从简单的事情开始。 将默认端口从8080更改为9000(这样一点儿就不会与Vue.js应用客户端端口冲突)。

server/src/main/resources/application.properties文件的名称更改为application.yml ,并在其中添加以下行:

server:  
  port: 9000

定义Todo模型类

让我们定义Todo模型类文件。 这定义了您的Spring Boot应用程序将使用的数据结构。

com.okta.springbootvue包中的src/main/java下创建一个Todo.java类。

package com.okta.springbootvue;  
  
import lombok.*;  
  
import javax.persistence.Id;  
import javax.persistence.GeneratedValue;  
import javax.persistence.Entity;  
  
@Entity  
@Data  
@NoArgsConstructor  
public class Todo {  
      
  @Id @GeneratedValue  
  private Long id;  

  @NonNull
  private String title;  

  private Boolean completed = false;
      
}

这很简单。 您正在定义一个具有三个属性的数据模型:一个自动生成的id ,一个字符串title和一个completed的true / false属性。

Lombok为您节省了许多定义吸气剂和吸气剂的冗长的仪式代码。 这些都是添加到课程上的所有注释。

后台发生了大量沉重的打击,这使Spring Data和JPA可以自动将此类文件映射到数据库。 这是一门很深的主题,如果您想了解更多信息,可以在本教程的结尾处找到一些链接。 现在,仅知道上面的类将被映射到内存H2数据库中的数据库表就足够了,并且该类中的每个属性都将成为一个表列。 默认情况下,您将获得包含以下依赖项的内存数据库:H2。 这对于教程和测试非常方便,但是很显然,您还想包括更多到实际持久数据库的映射。

定义数据库和REST类

com.okta.springbootvue包中创建一个TodoRepository.java

package com.okta.springbootvue;  
  
import org.springframework.data.jpa.repository.JpaRepository;  
import org.springframework.data.rest.core.annotation.RepositoryRestResource;  
  
@RepositoryRestResource  
interface TodoRepository extends JpaRepository<Todo, Long> {}

此类非常简单。 同样,幕后还有很多事情发生。 实际上,在此处为我们自动生成Todo应用程序的REST API所需的所有方法。 但是,您可以根据需要在此类中定义一些自定义访问方法。

我们还要在同一包中创建RestRepositoryConfigurator类。

package com.okta.springbootvue;

import org.springframework.data.rest.core.config.RepositoryRestConfiguration;
import org.springframework.data.rest.webmvc.config.RepositoryRestConfigurer;
import org.springframework.stereotype.Component;

/**
 * IDs are not returned by RestRepository by default. I like them exposed so that the client can easily find
 * the ID of created and listed resources.
 * */
@Component
public class RestRepositoryConfigurator implements RepositoryRestConfigurer {

  @Override
  public void configureRepositoryRestConfiguration(RepositoryRestConfiguration config) {
    config.exposeIdsFor(Todo.class);
  }
}

此类仅是配置类。 这样做的全部目的是告诉Spring返回带有对象序列化的数据模型实例ID(这样,您可以通过客户端应用程序的ID引用它们,因为这将是UUID)。

测试Rest API服务器

不管您相信与否,到此为止,您都拥有一个有效的REST API。

让我们使用HTTPie对其进行测试。 如果未安装HTTPie,请使用brew install httpie进行brew install httpie 。 或前往他们的网站并实现它。 或者只是跟随。

首先,使用./gradlew bootRun启动服务器。

您应该看到很多这样的输出结束:

2018-11-08 21:20:36.614  INFO 56214 --- [nio-9000-exec-1] o.a.c.c.C.[Tomcat].[localhost].[/]       : Initializing Spring FrameworkServlet 'dispatcherServlet'
2018-11-08 21:20:36.615  INFO 56214 --- [nio-9000-exec-1] o.s.web.servlet.DispatcherServlet        : FrameworkServlet 'dispatcherServlet': initialization started
2018-11-08 21:20:36.646  INFO 56214 --- [nio-9000-exec-1] o.s.web.servlet.DispatcherServlet        : FrameworkServlet 'dispatcherServlet': initialization completed in 31 ms
<=========----> 75% EXECUTING [2m 59s]
> :bootRun

现在,在服务器端点上执行基本的GET请求: http GET http://localhost:9000

HTTP/1.1 200
Content-Type: application/hal+json;charset=UTF-8
Date: Fri, 09 Nov 2018 03:44:37 GMT
Transfer-Encoding: chunked
{
  "_links": {
    "profile": {
      "href": "http://localhost:9000/profile"
    },
    "todos": {
      "href": "http://localhost:9000/todos{?page,size,sort}",
      "templated": true
    }
  }
}

profile链接与ALPS(应用程序级配置文件语义)有关。 看看上面的Spring文档 。 这是描述REST API公开的可用资源的一种方式。

todos链接是从Todo类生成的端点。

使用GET请求查看该端点。 实际上,您可以省略“ GET”和“ http:// localhost”,因为这些是HTTPie的默认设置。

$ http :9000/todos
HTTP/1.1 200
Content-Type: application/hal+json;charset=UTF-8
Date: Fri, 09 Nov 2018 03:50:12 GMT
Transfer-Encoding: chunked
{
  "_embedded": {
    "todos": []
  },
  "_links": {
    "profile": {
      "href": "http://localhost:9000/profile/todos"
    },
    "self": {
      "href": "http://localhost:9000/todos{?page,size,sort}",
      "templated": true
    }
  },
  "page": {
    "number": 0,
    "size": 20,
    "totalElements": 0,
    "totalPages": 0
  }
}

_embedded.todos保存数据。 但是由于还没有待办事项,所以它是空的。

您可以使用以下命令将一些数据发布到服务器:

http POST :9000/todos title="Write Vue client app"

输出将显示您的新Todo已添加:

HTTP/1.1 201
Content-Type: application/json;charset=UTF-8
Date: Fri, 09 Nov 2018 03:51:22 GMT
Location: http://localhost:9000/todos/1
Transfer-Encoding: chunked
{
    "_links": {
        "self": {
            "href": "http://localhost:9000/todos/1"
        },
        "todo": {
            "href": "http://localhost:9000/todos/1"
        }
    },
    "completed": false,
    "id": 1,
    "title": "Write Vue client app"
}

待办事项已创建! 现在,如果再次获取/todos端点,您将看到新创建的待办事项。

$ http :9000/todos
HTTP/1.1 200
Content-Type: application/hal+json;charset=UTF-8
Date: Fri, 09 Nov 2018 03:54:40 GMT
Transfer-Encoding: chunked
{
"_embedded": {
  "todos": [
    {
      "id": 1,
      "title": "Write Vue client app",
      "completed": false,
      "_links": {
        "self": {
          "href": "http://localhost:9000/todos/1"
        },
        "todo": {
          "href": "http://localhost:9000/todos/1"
        }
      }
    }
  ]
},
...
}

太神奇了吧? 这是很多功能,不需要很多代码。 (以前不是那样的,让我告诉你。我们曾经不得不在下雨天和PERL中使用vi编写两种代码,以使类似的工作正常进行。而且,您可以将所有吸气器,设置器和仪式代码。

将CORS筛选器添加到您的Spring Boot应用程序

在继续使用Vue客户端应用程序之前,还有一件事需要更新。 当前,如果您尝试将服务器应用程序与单页应用程序框架(例如Vue)一起使用,则会引发CORS错误。 可以通过在SpringBootVueApplication类中添加CORS过滤器来解决此问题。

什么是CORS? 如果您有这样的疑问,请在Spring的《 理解CORS》文档中进行阅读

更新您的SpringBootVueApplication类以使其与下面的匹配。 请注意,在simpleCorsFilter()方法中定义的URL需要与客户端应用程序的URL匹配。

package com.okta.springbootvue;

import org.springframework.boot.ApplicationRunner;
import org.springframework.boot.SpringApplication;
import org.springframework.boot.autoconfigure.SpringBootApplication;
import org.springframework.boot.web.servlet.FilterRegistrationBean;
import org.springframework.context.annotation.Bean;
import org.springframework.core.Ordered;
import org.springframework.web.cors.CorsConfiguration;
import org.springframework.web.cors.UrlBasedCorsConfigurationSource;
import org.springframework.web.filter.CorsFilter;
import java.util.Collections;
import java.util.stream.Stream;

@SpringBootApplication  
public class SpringBootVueApplication {  
  
    public static void main(String[] args) {  
      SpringApplication.run(SpringBootVueApplication.class, args);  
    }  

    // Bootstrap some test data into the in-memory database
    @Bean  
    ApplicationRunner init(TodoRepository repository) {  
        return args -> {  
            Stream.of("Buy milk", "Eat pizza", "Write tutorial", "Study Vue.js", "Go kayaking").forEach(name -> {  
                    Todo todo = new Todo();  
                    todo.setTitle(name);  
                    repository.save(todo);  
            });  
            repository.findAll().forEach(System.out::println);  
        };  
    }  

    // Fix the CORS errors
    @Bean
    public FilterRegistrationBean simpleCorsFilter() {  
        UrlBasedCorsConfigurationSource source = new UrlBasedCorsConfigurationSource();  
        CorsConfiguration config = new CorsConfiguration();  
        config.setAllowCredentials(true); 
        // *** URL below needs to match the Vue client URL and port ***
        config.setAllowedOrigins(Collections.singletonList("http://localhost:8080")); 
        config.setAllowedMethods(Collections.singletonList("*"));  
        config.setAllowedHeaders(Collections.singletonList("*"));  
        source.registerCorsConfiguration("/**", config);  
        FilterRegistrationBean bean = new FilterRegistrationBean<>(new CorsFilter(source));
        bean.setOrder(Ordered.HIGHEST_PRECEDENCE);  
        return bean;  
    }   
}

您当中的热衷者还会注意到ApplicationRunner init(TodoRepository repository)功能。 这个bean是一个初始化钩子,当应用程序运行时,它将一些测试待办事项添加到存储库中。 在构建客户端应用程序时,这将使生活更轻松。

转到客户端应用程序!

安装Node&Yarn

本教程假定您已安装Node和Yarn。 如果您没有安装,请立即安装。

可以使用brew install yarnbrew install yarn ,或者如果您不在Mac上,请访问其网站

有很多安装Node.js的方法。 您可以从他们的网站下载版本。 我当前使用的是8.12.0版。 另一个选择是n软件包管理器。 从他们的GitHub页面获取它。

创建Vue.js应用

您将使用Vue CLI 3从头开始创建项目。 Vue CLI是一个很棒的项目,可轻松轻松地构建Vue应用。 如果您不熟悉它,请访问他们的网站

使用yarn安装Vue CLI 3:

yarn global add @vue/cli@3.1.5

完成后,请确保您位于根项目目录SpringBootVueApplication并运行以下命令:

vue create -d client

这将在client端子目录中创建名为客户端的默认Vue应用程序。 没有-d选项,Vue CLI的界面非常简洁,您可以选择要包含的选项。 值得再次看看。 您将要构建的项目基于Evan You 的Vue TodoMVC示例项目 。 不同之处在于该项目将使用Spring Boot服务器而不是浏览器本地存储来持久化待办事项。

cd进入SpringBootVueApplication/client目录。

该项目可以与yarn serve一起运行。

现在,您将看到的是标准的“ Welcome to Your Vue.js App”屏幕。

添加几个依赖项:

yarn add axios@0.18.0 vuejs-logger@1.5.3

axios是用于向服务器发出HTTP请求的软件包。 vuejs-logger是一个日志记录框架,因为您还没有使用console.log() ,对吗?

添加Vue配置文件client/vue.config.js

module.exports = {
  runtimeCompiler: true
};

src/main.js替换为以下内容

import Vue from 'vue'
import App from './App'

Vue.config.productionTip = false

import VueLogger from 'vuejs-logger';

const options = {
  isEnabled: true,
  logLevel : 'debug',
  stringifyArguments : false,
  showLogLevel : true,
  showMethodName : false,
  separator: '|',
  showConsoleColors: true
};

Vue.use(VueLogger, options);

/* eslint-disable no-new */
new Vue({
  el: '#app',
  template: '<App/>',
  components: { App }
});

src/App.vue替换为以下内容:

<template>
  <div id="app">
    <Todos />
    <footer class="info">
      <p>Based on a project written by <a href="http://evanyou.me">Evan You</a></p>
      <p>Original Vue TodoApp project is <a href="https://vuejs.org/v2/examples/todomvc.html">here</a></p>
      <p>Modified for this tutorial by Andrew Hughes</p>
    </footer>
  </div>
</template>

<script>
  import Todos from './components/Todos'
  // app Vue instance
  const app = {
    name: 'app',
    components: {
      Todos
    },
    // app initial state
    data: () => {
      return {
      }
    }
  }

  export default app
</script>

<style>
  [v-cloak] { display: none; }
</style>

删除src/components/HelloWorld.vue模块。 如果需要,您也可以删除src/assets文件夹,因为不需要它。

创建一个名为src/components/Todos.vue的新Vue组件:

<template>
  <div>
    <h1 class="title">Todos</h1>
    <h1 class="email">{{userEmail}}</h1>
    <section class="todoapp">
      <div v-if="loading">
        <h1 class="loading">Loading...</h1>
      </div>
      <div v-else>
        <header class="header">
          <input class="new-todo"
                 autofocus autocomplete="off"
                 :placeholder="this.inputPlaceholder"
                 v-model="newTodo"
                 @keyup.enter="addTodo">
        </header>
        <section class="main" v-show="todos.length" v-cloak>
          <input class="toggle-all" type="checkbox" v-model="allDone">
          <ul class="todo-list">
            <li v-for="todo in filteredTodos"
                class="todo"
                :key="todo.id"
                :class="{ completed: todo.completed, editing: todo == editedTodo }">
              <div class="view">
                <input class="toggle" type="checkbox" v-model="todo.completed" @change="completeTodo(todo)">
                <label @dblclick="editTodo(todo)">{{ todo.title }}</label>
                <button class="destroy" @click="removeTodo(todo)"></button>
              </div>
              <input class="edit" type="text"
                     v-model="todo.title"
                     v-todo-focus="todo == editedTodo"
                     @blur="doneEdit(todo)"
                     @keyup.enter="doneEdit(todo)"
                     @keyup.esc="cancelEdit(todo)">
            </li>
          </ul>
        </section>
        <footer class="footer" v-show="todos.length" v-cloak>
          <span class="todo-count">
            <strong>{{ remaining }}</strong> {{ remaining | pluralize }} left
          </span>
          <ul class="filters">
            <li><a href="#/all" @click="setVisibility('all')" :class="{ selected: visibility == 'all' }">All</a></li>
            <li><a href="#/active" @click="setVisibility('active')" :class="{ selected: visibility == 'active' }">Active</a></li>
            <li><a href="#/completed" @click="setVisibility('completed')" :class="{ selected: visibility == 'completed' }">Completed</a></li>
          </ul>
          <button class="clear-completed" @click="removeCompleted" v-show="todos.length > remaining">
            Clear completed
          </button>
        </footer>
      </div>
    </section>
    <div v-if="error" class="error" @click="handleErrorClick">
      ERROR: {{this.error}}
    </div>
  </div>
</template>

<script>

  // visibility filters
  let filters = {
    all: function (todos) {
      return todos
    },
    active: function (todos) {
      return todos.filter(function (todo) {
        return !todo.completed
      })
    },
    completed: function (todos) {
      return todos.filter(function (todo) {
        return todo.completed
      })
    }
  }

  // app Vue instance
  const Todos = {
    name: 'Todos',
    props: {
      activeUser: Object
    },
    
    // app initial state
    data: function() {
      return {
        todos: [],
        newTodo: '',
        editedTodo: null,
        visibility: 'all',
        loading: true,
        error: null,
      }
    },

    mounted() {
      // inject some startup data
      this.todos = [{title: 'Drink coffee', completed:false},{title: 'Write REST API', completed:false}];
      // hide the loading message
      this.loading = false;
    },

    // computed properties
    // http://vuejs.org/guide/computed.html
    computed: {
      filteredTodos: function () {
        return filters[this.visibility](this.todos)
      },
      remaining: function () {
        return filters.active(this.todos).length
      },
      allDone: {
        get: function () {
          return this.remaining === 0
        },
        set: function (value) {
          this.todos.forEach(function (todo) {
            todo.completed = value
          })
        }
      },
      userEmail: function () {
        return this.activeUser ? this.activeUser.email : ''
      },
      inputPlaceholder: function () {
        return this.activeUser ? this.activeUser.given_name + ', what needs to be done?' : 'What needs to be done?'
      }
    },

    filters: {
      pluralize: function (n) {
        return n === 1 ? 'item' : 'items'
      }
    },

    // methods that implement data logic.
    // note there's no DOM manipulation here at all.
    methods: {

      addTodo: function () {
        var value = this.newTodo && this.newTodo.trim()
        if (!value) {
          return
        }

        this.todos.push({
          title: value,
          completed: false
        });

        this.newTodo = ''
      },

      setVisibility: function(vis) {
        this.visibility = vis
      },

      completeTodo (todo) {
      },

      removeTodo: function (todo) { // notice NOT using "=>" syntax
        this.todos.splice(this.todos.indexOf(todo), 1)
      },

      editTodo: function (todo) {
        this.beforeEditCache = todo.title
        this.editedTodo = todo
      },

      doneEdit: function (todo) {
        if (!this.editedTodo) {
          return
        }

        this.editedTodo = null
        todo.title = todo.title.trim()

        if (!todo.title) {
          this.removeTodo(todo)
        }
      },

      cancelEdit: function (todo) {
        this.editedTodo = null
        todo.title = this.beforeEditCache
      },

      removeCompleted: function () {
        this.todos = filters.active(this.todos)
      },

      handleErrorClick: function () {
        this.error = null;
      },
    },

    // a custom directive to wait for the DOM to be updated
    // before focusing on the input field.
    // http://vuejs.org/guide/custom-directive.html
    directives: {
      'todo-focus': function (el, binding) {
        if (binding.value) {
          el.focus()
        }
      }
    }
  }

  export default Todos
</script>

<style>
  [v-cloak] { display: none; }
</style>

最后,添加一个名为public/style.css的样式表,然后将样式表中的样式复制并粘贴到我们的GitHub存储库中。

public/index.html ,在<head></head>块的底部添加以下行。

<link rel="stylesheet" type="text/css" href="<%= BASE_URL %>style.css">

如果现在执行此操作,您将看到一个正在运行的待办事项应用程序,但数据不会持久存在。 待办事项仅保存为Vue模块中的数组。 您将修改它以从Spring Boot资源服务器发送和接收数据。

CRUD应用

添加客户端逻辑以处理API请求

client/src目录下,添加一个名为Api.js的文件,其内容如下:

import axios from 'axios'  
  
const SERVER_URL = 'http://localhost:9000';  
  
const instance = axios.create({  
  baseURL: SERVER_URL,  
  timeout: 1000  
});  
  
export default {  
  // (C)reate  
  createNew: (text, completed) => instance.post('todos', {title: text, completed: completed}),  
  // (R)ead  
  getAll: () => instance.get('todos', {  
    transformResponse: [function (data) {  
      return data? JSON.parse(data)._embedded.todos : data;  
    }]  
  }),  
  // (U)pdate  
  updateForId: (id, text, completed) => instance.put('todos/'+id, {title: text, completed: completed}),  
  // (D)elete  
  removeForId: (id) => instance.delete('todos/'+id)  
}

该文件封装了围绕REST API请求的一些逻辑。 SERVER_URL应该是Spring Boot服务器的URL和端口。

您会注意到定义了CRUD(创建,读取,更新和删除)功能。 实际上,除了您要设置的transformResponse选项之外,该模块将非常简单。 这仅用于规范化_embedded响应属性中的数据。

您可能想知道为什么要烦扰API类这么简单,以为可以轻松地将此代码放到Todos组件中。 就本教程而言,这是真的。 但是,随着项目的增长,这种封装可以使项目随时间推移保持可维护性。

例如,假设在将来的某个时候您决定不想使用axios模块,或者您的老板告诉您将其切换以进行fetch ; 当您意识到所有代码都方便地聚集在一个地方并且只需要编辑一个文件(而不是在整个项目中搜索和替换)时,您会感到非常聪明。

从服务器加载数据

现在,您需要更改Todos组件( src/components/Todos.vue ),以便从Spring Boot REST服务器加载数据。

第一件事是导入刚创建的Api模块。 在<template></template>部分下面的<script>标记下方,添加以下行:

import api from '../Api';

接下来将mounted()方法更改为此:

mounted() {  
  api.getAll()  
    .then(response => {  
      this.$log.debug("Data loaded: ", response.data)  
      this.todos = response.data  
  })  
    .catch(error => {  
      this.$log.debug(error)  
      this.error = "Failed to load todos"  
  })  
    .finally(() => this.loading = false)  
},

此更改使用您刚刚在上方创建并导入的Api模块从Spring REST服务加载待办事项(而不是在应用程序过程中简单地使用数组)。

您可以运行yarn serve并转到http://localhost:8080 。 您将看到从Spring服务器加载了引导数据。 这假设您的Spring Boot应用程序仍在运行。 如果没有,请使用./gradlew bootRun运行它。

CRUD应用

当然,您可以编辑此数据,但仅编辑本地数组。 如果刷新页面,则所有编辑内容都会被删除。 您仍然需要集成其余的CRUD操作。

完成CRUD方法

要完成客户端CRUD方法的集成,请在Todos.vue模块中更新methods()函数以匹配以下各项:

methods: {  
  
  addTodo: function () {  
    var value = this.newTodo &amp;&amp; this.newTodo.trim()  
    if (!value) {  
      return  
	}  
  
    api.createNew(value, false).then( (response) => {  
      this.$log.debug("New item created:", response);  
	  this.todos.push({  
        id: response.data.id,  
		title: value,  
		completed: false  
	  })  
    }).catch((error) => {  
      this.$log.debug(error);  
	  this.error = "Failed to add todo"  
	});  
  
    this.newTodo = ''  
  },  
  
  setVisibility: function(vis) {  
    this.visibility = vis  
  },  
  
  completeTodo (todo) {  
    api.updateForId(todo.id, todo.title, todo.completed).then((response) => {  
      this.$log.info("Item updated:", response.data);  
    }).catch((error) => {  
      this.$log.debug(error)  
      todo.completed = !todo.completed  
      this.error = "Failed to update todo"  
    });  
  },  
  removeTodo: function (todo) { // notice NOT using "=>" syntax  
    api.removeForId(todo.id).then(() => { // notice AM using "=>" syntax  
      this.$log.debug("Item removed:", todo);  
      this.todos.splice(this.todos.indexOf(todo), 1)  
    }).catch((error) => {  
      this.$log.debug(error);  
      this.error = "Failed to remove todo"  
    });
  },  
  
  editTodo: function (todo) {  
    this.beforeEditCache = todo.title  
    this.editedTodo = todo  
  },  
  
  doneEdit: function (todo) {  
    if (!this.editedTodo) {  
      return  
    }  
    this.$log.info("Item updated:", todo);  
    api.updateForId(todo.id, todo.title.trim(), todo.completed).then((response) => {
      this.$log.info("Item updated:", response.data);  
      this.editedTodo = null  
      todo.title = todo.title.trim()  
    }).catch((error) => {  
      this.$log.debug(error)  
      this.cancelEdit(todo)  
      this.error = "Failed to update todo"  
    });  
  
    if (!todo.title) {  
      this.removeTodo(todo)  
    }  
  },  
  
  cancelEdit: function (todo) {  
    this.editedTodo = null  
    todo.title = this.beforeEditCache  
  },  
  
  removeCompleted: function () {  
    this.todos = filters.active(this.todos)  
  },  
  
  handleErrorClick: function () {  
    this.error = null;  
  },  
  
},

注意,在methods()块中定义的methods()不使用箭头语法=> 。 稍后,Vue将这些功能绑定到适当的上下文。 使用=>在这里是行不通的,因为模块尚未创建,因此this将涉及window ,这是不是你想要的。 但是,可能会引起混淆,请注意,API回调方法的确使用箭头语法。 当模块的功能绑定到模块的this实例时,这些箭头功能允许回调引用模块的上下文。

在JavaScript中绑定this的灵活性既是其优势之一,也是其最令人困惑的方面之一。

享受您待办应用的荣耀! 您仍然需要增加安全性,否则您将拥有一个功能齐全的待办事项应用程序,该应用程序可以在服务器上创建,读取,更新和删除数据。 甜。

本教程的这一点对应于存储库的pre-auth分支。

继续使用yarn serve运行它。 确保您的Spring Boot资源服务器仍在运行。

集成Okta并添加用户身份验证

Okta使用户身份验证非常容易。 第一步是注册一个免费的developer.okta.com帐户。 接下来,您需要创建一个OpenID Connect(OIDC)应用程序。 登录后,单击“ 应用程序”顶部菜单项,然后单击“ 添加应用程序”按钮。

CRUD应用

选择单页应用程序

CRUD应用

默认的应用程序设置应该可以。 您需要记下您的客户ID ,因为稍后需要。

CRUD应用

向Vue添加身份验证

Okta有一个SDK,可轻松与Vue集成。 使用以下命令进行安装:

yarn add @okta/okta-vue@1.0.7

现在,在客户端应用程序项目中创建src/router.js文件。

import Auth from "@okta/okta-vue";  
import Vue from 'vue'  
import Router from 'vue-router'  
import Todos from './components/Todos'  
  
Vue.use(Auth, {  
  issuer: 'https://{yourOktaDomain}/oauth2/default',  
  client_id: '{yourClientId}',  
  redirect_uri: window.location.origin + '/implicit/callback',  
  scope: 'openid profile email'  
});  
  
Vue.use(Router);  
  
let router = new Router({  
  mode: 'history',  
  routes: [  
    {  
      path: '/',  
      name: 'Todos',  
      component: Todos,  
      meta: {  
        requiresAuth: true  
      }  
    },  
	{  
	  path: '/implicit/callback',  
	  component: Auth.handleCallback(),  
	},  
  ]  
});  
  
router.beforeEach(Vue.prototype.$auth.authRedirectGuard());  
  
export default router;

您需要将{yourClientId}替换为刚创建的OIDC应用程序中的客户端ID。 您还需要将{yourOktaDomain}更改为Okta预览域,例如dev-123456.oktapreview.com

Okta Vue身份验证插件将authClient对象注入到Vue实例中,可以通过在Vue实例内的任何位置调用this.$auth来访问它。

只有两条路线。 本地路线是待办事项应用程序本身。 meta: { requiresAuth: true } }属性为该路由打开身份验证。

另一个路由/implicit/callback是处理来自Okta服务器的成功身份验证的OAuth 2.0回调路由。

现在,您需要更新src/main.js以使用路由器。

将路由器导入文件:

import router from './router'

并更新Vue应用实例以使用导入的路由器:

new Vue({  
  el: '#app',  
  router,  // <-- add this line
  template: '<App/>',  
  components: { App }  
})

接下来,更新src/App.vue模块以匹配以下内容:

<template>  
  <div id="app">  
  <router-view :activeUser="activeUser"/>  
    <footer class="info">  
      <p v-if="activeUser" class="logout-link"><a @click="handleLogout" href="#">Logout</a></p>  
      <p>Based on a project written by <a href="http://evanyou.me">Evan You</a></p>  
      <p>Original Vue TodoApp project is <a href="https://vuejs.org/v2/examples/todomvc.html">here</a></p>  
      <p>Modified for this tutorial by Andrew Hughes</p>  
    </footer> 
  </div>
</template>  

<script>  
  // app Vue instance  
  const app = {
    name: 'app',  
    // app initial state  
    data: () => {  
      return {  
        activeUser: null  
      }  
    },  
  
  async created () {  
    await this.refreshActiveUser()  
  },  
  
  watch: {  
    '$route': 'refreshActiveUser'  
  },  
  
  methods: {  
    async refreshActiveUser () {  
      this.activeUser = await this.$auth.getUser()  
      this.$log.debug('activeUser',this.activeUser)  
    },  
  
    async handleLogout () {  
      await this.$auth.logout()  
      await this.refreshActiveUser()  
      this.$router.go('/')  
    }  
  },
}  
  
export default app  
  
</script>  
  
<style>  
  [v-cloak] { display: none; }  
</style>

这些更改说明了几件事。 首先,代码创建并更新属性activeUser ,该属性将有关当前活动用户的信息传递给Todos模块(如果有,则为null;如果没有,则为null)。 它还向页脚添加了注销按钮。

您需要做的最后一件事是更新src/Api.js文件。

import axios from 'axios'  
import Vue from 'vue'  
  
const SERVER_URL = 'http://localhost:9000';  
  
const instance = axios.create({  
  baseURL: SERVER_URL,  
  timeout: 1000  
});  
  
export default {  
  
  async execute(method, resource, data, config) {  
    let accessToken = await Vue.prototype.$auth.getAccessToken()  
    return instance({  
      method:method,  
      url: resource,  
      data,  
      headers: {  
            Authorization: `Bearer ${accessToken}`  
      },  
      ...config  
    })  
  },  
  
  // (C)reate  
  createNew(text, completed) {  
    return this.execute('POST', 'todos', {title: text, completed: completed})  
  },  
  // (R)ead  
  getAll() {  
    return this.execute('GET','todos', null, {  
      transformResponse: [function (data) {  
        return data? JSON.parse(data)._embedded.todos : data;  
      }]  
    })  
  },  
  // (U)pdate  
  updateForId(id, text, completed) {  
    return this.execute('PUT', 'todos/' + id, { title: text, completed: completed })  
  },  
  
  // (D)elete  
  removeForId(id) {  
    return this.execute('DELETE', 'todos/'+id)  
  }  
}

这些更改从Okta Vue Auth模块获取访问令牌,并将其注入API请求方法中。

尝试您的Vue + Spring Boot应用程序

使用yarn serve运行应用程序。 现在,您将可以使用Okta登录。 当您进入应用程序屏幕本身时,您将在顶部看到您的电子邮件,并在输入占位符中看到您的姓名。

注意:要查看登录屏幕,您可能必须先注销developer.okta.com。 或者您可以使用隐身窗口

CRUD应用

CRUD应用

但是,还有一步。 您可以通过Okta登录,但是Spring Boot服务器应用程序不需要身份验证。

配置Spring Boot Server进行令牌认证

Okta有一个很好的项目,称为Okta Spring Boot Starter( 请查看GitHub项目 ), 该项目使对Spring Boot项目的令牌认证快速而轻松地进行。

首先,您需要向build.gradle文件添加几个依赖build.gradle

compile ('org.springframework.security.oauth.boot:spring-security-oauth2-autoconfigure:2.0.1.RELEASE')  
compile ('com.okta.spring:okta-spring-boot-starter:0.6.1')

还将以下内容添加到build.gradle文件的底部。 这解决了logback日志记录依赖性冲突。

configurations.all {  
  exclude group: 'org.springframework.boot', module: 'spring-boot-starter-logging'
  exclude group: 'org.springframework.boot', module: 'logback-classic'  
}

接下来,您需要将以下内容添加到application.yml文件中,用Okta OIDC应用程序中的客户端ID替换{yourClientId}

okta:  
  oauth2:  
    issuer: https://{yourOktaDomain}/oauth2/default  
    clientId: {yourClientId}  
    scope: openid profile email

最后,您需要将@EnableResourceServer批注添加到SpringBootVueApplication类。

import org.springframework.security.oauth2.config.annotation.web.configuration.EnableResourceServer;
...

@EnableResourceServer  // <- add me
@SpringBootApplication  
public class SpringBootVueApplication {  
  
   public static void main(String[] args) {  
      SpringApplication.run(SpringBootVueApplication.class, args);  
   }
   ...
}

就是这样! 现在,您已经拥有使用Okta的身份验证服务的功能齐全的Vue客户端和Spring Boot REST服务。 太容易了。

您可以在GitHub上的https://github.com/oktadeveloper/okta-spring-boot-vue-crud-example上找到本教程中开发的应用程序的源代码。

使用Okta,Vue和Spring Boot做更多事情

本教程做了很多事情。 您构建了Vue.js客户端应用程序和Spring Boot REST服务,并使用它们演示了功能全面的CRUD应用程序。 您还使用Okta和Okta Vue SDK添加了身份验证。

如果您想更深入一点,请看Okta Vue SDK项目

Spring Boot REST服务使用Spring Data的JPA实现来持久化基于Java类的数据。 Spring Data和JPA是一个非常深入的领域, 有关它的Spring文档是学习更多内容的好地方。

Okta还提供了许多其他很棒的相关教程。

如果您对此帖子有任何疑问,请在下面添加评论。 有关更多精彩内容, 在Twitter上关注@oktadev在Facebook上关注我们,或订阅我们的YouTube频道

``使用Spring Boot和Vue.js构建简单的CRUD应用程序''最初于2018年10月10日发布在Okta开发人员博客上。

“我喜欢编写身份验证和授权代码。” 〜从来没有Java开发人员。 厌倦了一次又一次地建立相同的登录屏幕? 尝试使用Okta API进行托管身份验证,授权和多因素身份验证。

翻译自: https://www.javacodegeeks.com/2018/12/build-simple-crud-app-spring-boot-vue.html

  • 0
    点赞
  • 1
    收藏
    觉得还不错? 一键收藏
  • 0
    评论

“相关推荐”对你有帮助么?

  • 非常没帮助
  • 没帮助
  • 一般
  • 有帮助
  • 非常有帮助
提交
评论
添加红包

请填写红包祝福语或标题

红包个数最小为10个

红包金额最低5元

当前余额3.43前往充值 >
需支付:10.00
成就一亿技术人!
领取后你会自动成为博主和红包主的粉丝 规则
hope_wisdom
发出的红包
实付
使用余额支付
点击重新获取
扫码支付
钱包余额 0

抵扣说明:

1.余额是钱包充值的虚拟货币,按照1:1的比例进行支付金额的抵扣。
2.余额无法直接购买下载,可以购买VIP、付费专栏及课程。

余额充值