


maven与spring
1.简介
在本教程中,我们将学习使用JAX-WS,Spring和Maven实施合同优先的SOAP服务应用程序。 这是使用合同优先还是代码优先方法的更多设计决定。
在开发基于SOAP的Web服务应用程序时使用应用合同优先的方法最显着的好处是,可以在对合同进行必要的更改后立即与消费者/客户共享合同,因此客户应用程序和Web服务操作实施可以由不同团队同时独立完成,从而节省了大量时间。
2.实施
上面的场景是这样的场景,客户端/消费者应用程序将通过服务端点与我们的示例基于SOAP的JAX-WS Web服务示例进行交互。
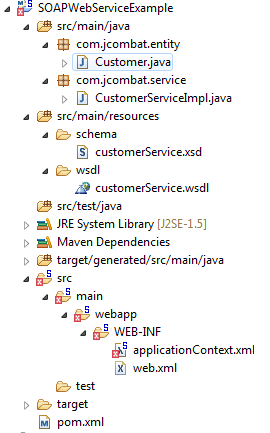
首先从实现开始,首先在Eclipse中创建一个Maven项目,并确保我们继续使用与下面所示内容相似的目录结构。
首先是查看我们的pom依赖关系,它应该类似于:
pom.xml
<dependencies>
	<!-- Spring dependencies -->
	<dependency>
		<groupId>org.springframework</groupId>
		<artifactId>spring-core</artifactId>
		<version>4.2.1.RELEASE</version>
	</dependency>
	<dependency>
		<groupId>org.springframework</groupId>
		<artifactId>spring-web</artifactId>
		<version>4.2.1.RELEASE</version>
	</dependency>

	<!-- JAX-WS dependencies -->
	<dependency>
		<groupId>org.jvnet.jax-ws-commons.spring</groupId>
		<artifactId>jaxws-spring</artifactId>
		<version>1.9</version>
	</dependency>
	<dependency>
		<groupId>com.sun.xml.ws</groupId>
		<artifactId>jaxws-rt</artifactId>
		<version>2.2.8</version>
	</dependency>
</dependencies>
<build>
	<finalName>SOAPWebServiceExample</finalName>
	<plugins>
		<plugin>
			<groupId>org.codehaus.mojo</groupId>
			<artifactId>jaxws-maven-plugin</artifactId>
			<version>1.12</version>
			<configuration>
				<wsdlDirectory>${basedir}/src/main/resources/wsdl</wsdlDirectory>
				<packageName>com.jcombat.ws</packageName>
				<keep>true</keep>
				<sourceDestDir>${basedir}/target/generated/src/main/java</sourceDestDir>
			</configuration>
			<executions>
				<execution>
					<id>wsdl_import</id>
					<goals>
						<goal>wsimport</goal>
					</goals>
				</execution>
			</executions>
		</plugin>
	</plugins>
</build>请注意我们将使用的wsimport工具,以便稍后从WSDL文件生成存根文件。
现在让我们检查一下web.xml文件。
web.xml
<?xml version="1.0" encoding="ISO-8859-1"?>
<web-app xmlns:xsi="http://www.w3.org/2001/XMLSchema-instance"
	xmlns="http://java.sun.com/xml/ns/javaee"
	xsi:schemaLocation="http://java.sun.com/xml/ns/javaee
		http://java.sun.com/xml/ns/javaee/web-app_2_5.xsd"
	id="WebApp_ID" version="2.5">

	<display-name>SOAPWebServiceExample</display-name>

	<listener>
		<listener-class>org.springframework.web.context.ContextLoaderListener</listener-class>
	</listener>

	<servlet>
		<servlet-name>customer</servlet-name>
		<servlet-class>com.sun.xml.ws.transport.http.servlet.WSSpringServlet</servlet-class>
		<load-on-startup>1</load-on-startup>
	</servlet>

	<servlet-mapping>
		<servlet-name>customer</servlet-name>
		<url-pattern>/customer</url-pattern>
	</servlet-mapping>

</web-app>接下来,我们为我们的Web服务创建一个模式文件 。 将其命名为customerService.xsd ,这将基本上为我们将要创建的WSDL文件或Web服务合同定义构造块。
customerService.xsd
<?xml version="1.0" encoding="UTF-8"?>
<schema xmlns="http://www.w3.org/2001/XMLSchema" targetNamespace="http://ws.jcombat.com/"
	xmlns:tns="http://ws.jcombat.com/" elementFormDefault="qualified">

	<element name="CustomerServiceRequest" type="tns:CustomerServiceRequestType">
	</element>

	<complexType name="CustomerServiceRequestType">
		<sequence>
			<element name="customerId" type="int"></element>
		</sequence>
	</complexType>

	<complexType name="CustomerServiceResponseType">
		<sequence>
			<element name="customer" type="tns:Customer" maxOccurs="unbounded"
				minOccurs="0"></element>
		</sequence>
	</complexType>

	<element name="CustomerServiceResponse" type="tns:CustomerServiceResponseType">
	</element>

	<complexType name="Customer">
		<sequence>
			<element name="id" type="int" maxOccurs="1" minOccurs="1"></element>
			<element name="name" type="string" maxOccurs="1" minOccurs="1"></element>
		</sequence>
	</complexType>
</schema>
使用我们刚创建的XML模式创建一个有效的WSDL文件。
customerService.wsdl
<?xml version="1.0" encoding="UTF-8"?>
<wsdl:definitions
xmlns:wsu="http://docs.oasis-open.org/wss/2004/01/oasis-200401-wss-wssecurity-utility-1.0.xsd"
xmlns:wsp="http://www.w3.org/ns/ws-policy" xmlns:wsp1_2="http://schemas.xmlsoap.org/ws/2004/09/policy"
xmlns:wsam="http://www.w3.org/2007/05/addressing/metadata" xmlns:soap="http://schemas.xmlsoap.org/wsdl/soap/"
xmlns:tns="http://ws.jcombat.com/" xmlns:xsd="http://www.w3.org/2001/XMLSchema"
xmlns:wsdl="http://schemas.xmlsoap.org/wsdl/" targetNamespace="http://ws.jcombat.com/"
name="customerService">
<wsdl:types>
<xsd:schema targetNamespace="http://ws.jcombat.com/">
<xsd:import namespace="http://ws.jcombat.com/"
schemaLocation="../schema/customerService.xsd" />
</xsd:schema>
</wsdl:types>
<wsdl:message name="CustomerServiceRequest">
<wsdl:part name="CustomerServiceRequest" element="tns:CustomerServiceRequest" />
</wsdl:message>
<wsdl:message name="CustomerServiceResponse">
<wsdl:part name="CustomerServiceResponse" element="tns:CustomerServiceResponse" />
</wsdl:message>
<wsdl:portType name="CustomerServicePortType">
<wsdl:operation name="getCustomer">
<wsdl:input name="CustomerServiceRequest" message="tns:CustomerServiceRequest" />
<wsdl:output name="CustomerServiceResponse" message="tns:CustomerServiceResponse" />
</wsdl:operation>
</wsdl:portType>
<wsdl:binding name="CustomerEndpointPortBinding" type="tns:CustomerServicePortType">
<soap:binding style="document"
transport="http://schemas.xmlsoap.org/soap/http" />
<wsdl:operation name="getCustomer">
<soap:operation style="document" soapAction="getCustomer" />
<wsdl:input name="CustomerServiceRequest">
<soap:body use="literal" />
</wsdl:input>
<wsdl:output name="CustomerServiceResponse">
<soap:body use="literal" />
</wsdl:output>
</wsdl:operation>
</wsdl:binding>
<wsdl:service name="customerService">
<wsdl:port name="CustomerEndpointPort" binding="tns:CustomerEndpointPortBinding">
<soap:address location="http://localhost:8080/SOAPWebServiceExample/customer" />
</wsdl:port>
</wsdl:service>
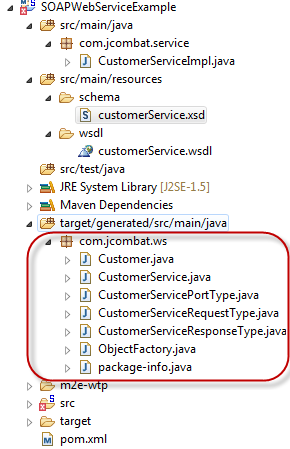
</wsdl:definitions>接下来是从WSDL文件生成存根文件。 为此,请在系统的命令提示符下运行以下命令。
mvn clean install在/ target目录中签出生成的存根文件。
现在,在名为CustomerServiceImpl的类中创建生成的服务接口CustomerServicePortType的实现。
CustomerServiceImpl.java
package com.jcombat.service;

import javax.jws.WebService;

import com.jcombat.ws.Customer;
import com.jcombat.ws.CustomerServicePortType;
import com.jcombat.ws.CustomerServiceRequestType;
import com.jcombat.ws.CustomerServiceResponseType;

@WebService(endpointInterface="com.jcombat.ws.CustomerServicePortType")
public class CustomerServiceImpl implements CustomerServicePortType {

	public CustomerServiceResponseType getCustomer(
			CustomerServiceRequestType customerServiceRequest) {
		final CustomerServiceResponseType response = new CustomerServiceResponseType();
		Customer customer = new Customer();
		customer.setId(123);
		customer.setName("Ramesh");
		response.getCustomer().add(customer);
		return response;
	}

}必须将@WebService批注应用于端点接口实现类,才能将其标记为Web服务端点。 @WebService批注告诉服务器运行时环境将该类的所有公共方法公开为Web服务方法。
我们已经完成了该应用程序。 最终检查是,当点击以下端点URI时,是否可以看到显示的WSDL内容,我们已将其指定的位置指向WSDL文件的底部。
- http:// localhost:8080 / SOAPWebServiceExample / customer?wsdl
下面是我们在浏览器中看到的内容。
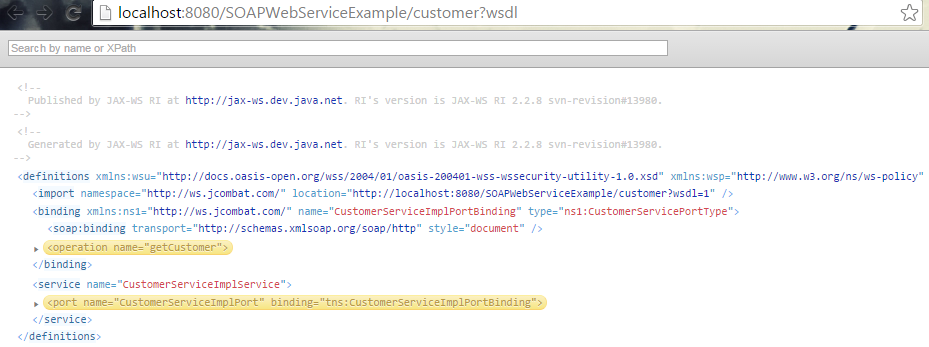
是的,我们成功做到了。
3.运行应用程序
使用WSDL URI(http:// localhost:8080 / SOAPWebServiceExample / customer?wsdl)在SOAP UI中设置SOAP项目。
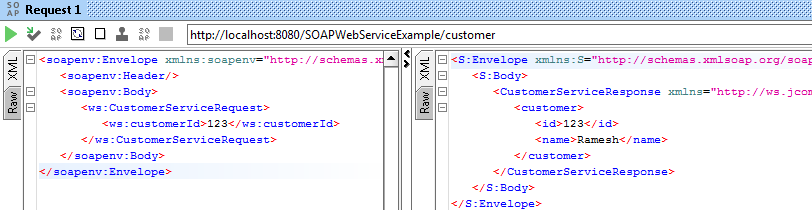
下面是当我们在SOAP UI中实际命中服务时看到的内容。
4.下载源代码
翻译自: https://www.javacodegeeks.com/2016/02/contract-first-soap-service-spring-maven.html
maven与spring


 2667
2667

 被折叠的 条评论
为什么被折叠?
被折叠的 条评论
为什么被折叠?
 到【灌水乐园】发言


