


由于FastDFS集群搭建非常复杂,对于初期学习FastDFS来说,搭建个单机版的作为入门更为实际一些。
第一步:搭建虚拟环境
FastDFS需要在Linux系统上安装,我们一般使用的都是Windows系统,这样就需要有虚拟环境,我这里使用Vmware12创建虚拟机,关于虚拟机最小化的安装大家可以参考:http://blog.csdn.net/u012453843/article/details/68947589这篇博客进行学习
第二步:配置静态IP而且要保证能上网
大家可以参考:http://blog.csdn.net/u012453843/article/details/52839105这篇博客进行学习,需要提醒的是,由于最小化安装默认是没有vim命令的,因此在配置静态IP时使用vi命令即可。
第三步:安装vim命令
之所以安装vim命令是因为在安装它的同时会自动帮我们安装perl,而perl在进行编译安装时是必须要有的。安装vim的命令是:yum install vim-enhanced
第四步:安装gcc
使用命令:yum install make cmake gcc gcc-c++进行安装即可
第五步:上传安装文件到Linux服务器
为了便于管理,我们在Linux服务器上新建一个/usr/local/software目录,专门用于存放安装包,如下所示
- [root@fastdfs ~]# mkdir /usr/local/software
- [root@fastdfs ~]#
大家可以到http://download.csdn.net/detail/u012453843/9802538这个地址下载需要的安装包,上传完之后,如下所示
- [root@fastdfs software]# ll
- 总用量 1248
- -rw-r--r--. 1 root root 17510 11月 28 00:19 fastdfs-nginx-module_v1.16.tar.gz
- -rw-r--r--. 1 root root 345400 11月 28 00:20 FastDFS_v5.05.tar.gz
- -rw-r--r--. 1 root root 102378 11月 28 00:19 libfastcommon-master.zip
- -rw-r--r--. 1 root root 804164 11月 28 01:11 nginx-1.6.2.tar.gz
- [root@fastdfs software]#
第六步:安装zip和unzip命令
由于解压.zip结尾的文件需要用到unzip命令,因此我们需要安装,安装命令是yum install zip unzip
第七步:安装libfastcommon1、解压
- [root@fastdfs software]# unzip libfastcommon-master.zip -d /usr/local/fast/
- [root@fastdfs software]# cd /usr/local/fast/libfastcommon-master/
- [root@fastdfs libfastcommon-master]# ll
- 总用量 28
- -rw-r--r--. 1 root root 2913 2月 27 2015 HISTORY
- -rw-r--r--. 1 root root 582 2月 27 2015 INSTALL
- -rw-r--r--. 1 root root 1342 2月 27 2015 libfastcommon.spec
- -rwxr-xr-x. 1 root root 2151 2月 27 2015 make.sh
- drwxr-xr-x. 2 root root 4096 2月 27 2015 php-fastcommon
- -rw-r--r--. 1 root root 617 2月 27 2015 README
- drwxr-xr-x. 2 root root 4096 2月 27 2015 src
- [root@fastdfs libfastcommon-master]#
- [root@fastdfs libfastcommon-master]# ./make.sh
- [root@fastdfs libfastcommon-master]# ./make.sh install
第八步:创建软链接
FastDFS主程序设置的目录为/usr/local/lib/,所以我们需要创建/ usr/lib64/下的一些核心执行程序的软连接文件。如下所示。
- [root@fastdfs libfastcommon-master]# ln -s /usr/lib64/libfastcommon.so /usr/local/lib/libfastcommon.so
- [root@fastdfs libfastcommon-master]# ln -s /usr/lib64/libfastcommon.so /usr/lib/libfastcommon.so
- [root@fastdfs libfastcommon-master]# ln -s /usr/lib64/libfdfsclient.so /usr/local/lib/libfdfsclient.so
- [root@fastdfs libfastcommon-master]# ln -s /usr/lib64/libfdfsclient.so /usr/lib/libfdfsclient.so
1、进入到cd /usr/local/software下,解压FastDFS_v5.05.tar.gz文件
- [root@fastdfs fast]# cd /usr/local/software/
- [root@fastdfs software]# ll
- 总用量 1248
- -rw-r--r--. 1 root root 17510 4月 11 03:28 fastdfs-nginx-module_v1.16.tar.gz
- -rw-r--r--. 1 root root 345400 4月 11 03:28 FastDFS_v5.05.tar.gz
- -rw-r--r--. 1 root root 102378 4月 11 03:28 libfastcommon-master.zip
- -rw-r--r--. 1 root root 804164 4月 11 03:29 nginx-1.6.2.tar.gz
- [root@fastdfs software]# tar -zxvf FastDFS_v5.05.tar.gz -C /usr/local/fast/
- [root@fastdfs software]# cd /usr/local/fast/FastDFS/
- [root@fastdfs FastDFS]# ./make.sh
- [root@fastdfs FastDFS]# ./make.sh install
- [root@fastdfs FastDFS]# cd /etc/init.d/ && ls | grep fdfs
- fdfs_storaged
- fdfs_trackerd
- [root@fastdfs init.d]#
- [root@fastdfs init.d]# cd /etc/fdfs/
- [root@fastdfs fdfs]# ll
- 总用量 20
- -rw-r--r--. 1 root root 1461 4月 11 04:10 client.conf.sample
- -rw-r--r--. 1 root root 7829 4月 11 04:10 storage.conf.sample
- -rw-r--r--. 1 root root 7102 4月 11 04:10 tracker.conf.sample
- [root@fastdfs fdfs]#
- [root@fastdfs fdfs]# cd /usr/bin/ && ls | grep fdfs
- fdfs_appender_test
- fdfs_appender_test1
- fdfs_append_file
- fdfs_crc32
- fdfs_delete_file
- fdfs_download_file
- fdfs_file_info
- fdfs_monitor
- fdfs_storaged
- fdfs_test
- fdfs_test1
- fdfs_trackerd
- fdfs_upload_appender
- fdfs_upload_file
- [root@fastdfs bin]#
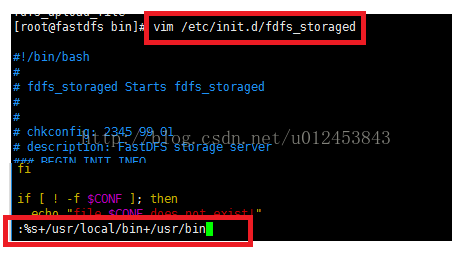
使用命令vim /etc/init.d/fdfs_storaged进入编辑模式,然后直接输入":",光标会定位到最后一行,在":"后输入"%s+/usr/local/bin+/usr/bin",如下图所示。输入完之后回车,会提示修改了7处。为了确保所有的/usr/local/bin都被替换了,我们可以再打开文件确认一下。
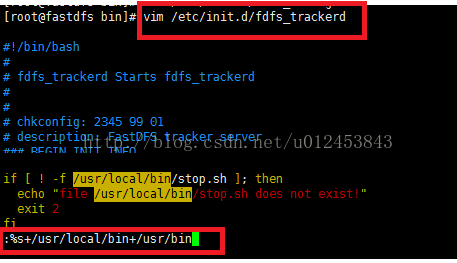
接着修改第二个配置文件,我们使用命令vim /etc/init.d/fdfs_trackerd进入编辑模式,接着按照上面那样输入":%s+/usr/local/bin+/usr/bin "并按回车,同样会提醒我们修改了7处。
第十步:配置跟踪器
1、进入到/etc/fdfs目录并且复制一份tracker.conf.sample并命名为tracker.conf,如下所示。
- [root@fastdfs bin]# cd /etc/fdfs/
- [root@fastdfs fdfs]# ll
- 总用量 20
- -rw-r--r--. 1 root root 1461 4月 11 04:10 client.conf.sample
- -rw-r--r--. 1 root root 7829 4月 11 04:10 storage.conf.sample
- -rw-r--r--. 1 root root 7102 4月 11 04:10 tracker.conf.sample
- [root@fastdfs fdfs]# cp tracker.conf.sample tracker.conf
- [root@fastdfs fdfs]#
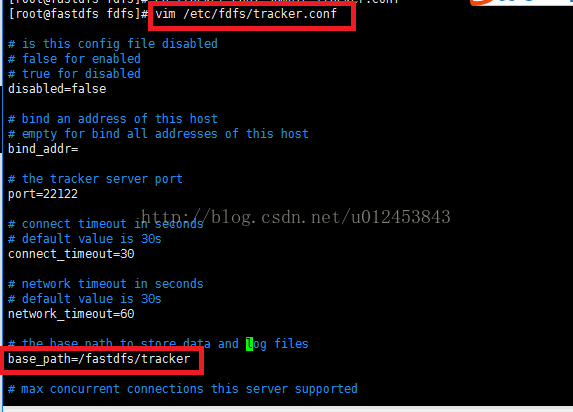
3、我们在上图配置文件中配置的/fastdfs/tracker目前是不存在的,因此我们需要创建一下该目录
- [root@fastdfs fdfs]# mkdir -p /fastdfs/tracker
- [root@fastdfs fdfs]#
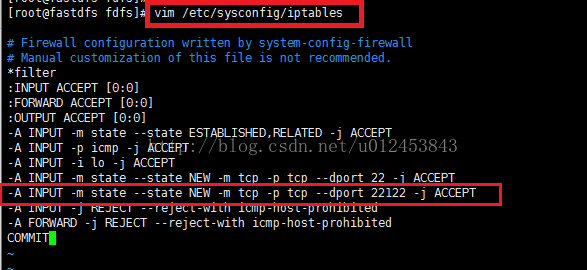
4、配置防火墙,放开tracker使用的端口22122,使用命令vim /etc/sysconfig/iptables进入编辑模式,添加一行内容-A INPUT -m state --state NEW -m tcp -p tcp --dport 22122 -j ACCEPT,如下图所示。
5、重启防火墙
- [root@fastdfs fdfs]# service iptables restart
- iptables:将链设置为政策 ACCEPT:filter [确定]
- iptables:清除防火墙规则: [确定]
- iptables:正在卸载模块: [确定]
- iptables:应用防火墙规则: [确定]
- [root@fastdfs fdfs]#
- [root@fastdfs tracker]# cd /fastdfs/tracker/ && ll
- 总用量 0
- [root@fastdfs tracker]#
- [root@fastdfs tracker]# /etc/init.d/fdfs_trackerd start
- Starting FastDFS tracker server:
- [root@fastdfs tracker]# cd /fastdfs/tracker/ && ll
- 总用量 8
- drwxr-xr-x. 2 root root 4096 4月 11 05:01 data
- drwxr-xr-x. 2 root root 4096 4月 11 05:01 logs
- [root@fastdfs tracker]#
- [root@fastdfs tracker]# vim /etc/rc.d/rc.local
- #!/bin/sh
- #
- # This script will be executed *after* all the other init scripts.
- # You can put your own initialization stuff in here if you don't
- # want to do the full Sys V style init stuff.
- touch /var/lock/subsys/local
- /etc/init.d/fdfs_trackerd start
1、进入/etc/fdfs目录,复制一份storage.conf.sample文件并命名为storage.conf,如下所示。
- [root@fastdfs tracker]# cd /etc/fdfs/
- [root@fastdfs fdfs]# ll
- 总用量 28
- -rw-r--r--. 1 root root 1461 4月 11 04:10 client.conf.sample
- -rw-r--r--. 1 root root 7829 4月 11 04:10 storage.conf.sample
- -rw-r--r--. 1 root root 7098 4月 11 04:45 tracker.conf
- -rw-r--r--. 1 root root 7102 4月 11 04:10 tracker.conf.sample
- [root@fastdfs fdfs]# cp storage.conf.sample storage.conf
- [root@fastdfs fdfs]# ll
- 总用量 36
- -rw-r--r--. 1 root root 1461 4月 11 04:10 client.conf.sample
- -rw-r--r--. 1 root root 7829 4月 11 05:07 storage.conf
- -rw-r--r--. 1 root root 7829 4月 11 04:10 storage.conf.sample
- -rw-r--r--. 1 root root 7098 4月 11 04:45 tracker.conf
- -rw-r--r--. 1 root root 7102 4月 11 04:10 tracker.conf.sample
- [root@fastdfs fdfs]#
- base_path=/fastdfs/storage
- store_path0=/fastdfs/storage
- tracker_server=192.168.156.13:22122
- http.server_port=8888
- [root@fastdfs fdfs]# mkdir -p /fastdfs/storage
- [root@fastdfs fdfs]#
- [root@fastdfs fdfs]# vim /etc/sysconfig/iptables
- # Firewall configuration written by system-config-firewall
- # Manual customization of this file is not recommended.
- *filter
- :INPUT ACCEPT [0:0]
- :FORWARD ACCEPT [0:0]
- :OUTPUT ACCEPT [0:0]
- -A INPUT -m state --state ESTABLISHED,RELATED -j ACCEPT
- -A INPUT -p icmp -j ACCEPT
- -A INPUT -i lo -j ACCEPT
- -A INPUT -m state --state NEW -m tcp -p tcp --dport 22 -j ACCEPT
- -A INPUT -m state --state NEW -m tcp -p tcp --dport 22122 -j ACCEPT
- -A INPUT -m state --state NEW -m tcp -p tcp --dport 23000 -j ACCEPT
- -A INPUT -j REJECT --reject-with icmp-host-prohibited
- -A FORWARD -j REJECT --reject-with icmp-host-prohibited
- COMMIT
- [root@fastdfs fdfs]# service iptables restart
- iptables:将链设置为政策 ACCEPT:filter [确定]
- iptables:清除防火墙规则: [确定]
- iptables:正在卸载模块: [确定]
- iptables:应用防火墙规则: [确定]
- [root@fastdfs fdfs]#
- [root@fastdfs fdfs]# cd /fastdfs/storage/ && ll
- 总用量 0
- [root@fastdfs storage]#
- [root@fastdfs storage]# /etc/init.d/fdfs_storaged start
- Starting FastDFS storage server:
- [root@fastdfs storage]# cd /fastdfs/storage/ && ll
- 总用量 8
- drwxr-xr-x. 68 root root 4096 4月 11 05:21 data
- drwxr-xr-x. 2 root root 4096 4月 11 05:20 logs
- [root@fastdfs storage]#
- [root@fastdfs storage]# ps -ef | grep fdfs
- root 2124 1 0 05:01 ? 00:00:00 /usr/bin/fdfs_trackerd /etc/fdfs/tracker.conf
- root 2228 1 0 05:21 ? 00:00:00 /usr/bin/fdfs_storaged /etc/fdfs/storage.conf
- root 2238 1360 0 05:22 pts/0 00:00:00 grep fdfs
- [root@fastdfs storage]#
- [root@fastdfs storage]# cd /fastdfs/storage/data/ && ls
- 00 09 12 1B 24 2D 36 3F 48 51 5A 63 6C 75 7E 87 90 99 A2 AB B4 BD C6 CF D8 E1 EA F3 FC
- 01 0A 13 1C 25 2E 37 40 49 52 5B 64 6D 76 7F 88 91 9A A3 AC B5 BE C7 D0 D9 E2 EB F4 FD
- 02 0B 14 1D 26 2F 38 41 4A 53 5C 65 6E 77 80 89 92 9B A4 AD B6 BF C8 D1 DA E3 EC F5 fdfs_storaged.pid
- 03 0C 15 1E 27 30 39 42 4B 54 5D 66 6F 78 81 8A 93 9C A5 AE B7 C0 C9 D2 DB E4 ED F6 FE
- 04 0D 16 1F 28 31 3A 43 4C 55 5E 67 70 79 82 8B 94 9D A6 AF B8 C1 CA D3 DC E5 EE F7 FF
- 05 0E 17 20 29 32 3B 44 4D 56 5F 68 71 7A 83 8C 95 9E A7 B0 B9 C2 CB D4 DD E6 EF F8 storage_stat.dat
- 06 0F 18 21 2A 33 3C 45 4E 57 60 69 72 7B 84 8D 96 9F A8 B1 BA C3 CC D5 DE E7 F0 F9 sync
- 07 10 19 22 2B 34 3D 46 4F 58 61 6A 73 7C 85 8E 97 A0 A9 B2 BB C4 CD D6 DF E8 F1 FA
- 08 11 1A 23 2C 35 3E 47 50 59 62 6B 74 7D 86 8F 98 A1 AA B3 BC C5 CE D7 E0 E9 F2 FB
- [root@fastdfs data]#
- [root@fastdfs data]# vim /etc/rc.local
- #!/bin/sh
- #
- # This script will be executed *after* all the other init scripts.
- # You can put your own initialization stuff in here if you don't
- # want to do the full Sys V style init stuff.
- touch /var/lock/subsys/local
- /etc/init.d/fdfs_trackerd start
- /etc/init.d/fdfs_storaged start
1、进入到/etc/fdfs目录下并复制一份client.conf.sample并更名为client.conf,如下所示。
- [root@fastdfs data]# cd /etc/fdfs
- [root@fastdfs fdfs]# ll
- 总用量 36
- -rw-r--r--. 1 root root 1461 4月 11 04:10 client.conf.sample
- -rw-r--r--. 1 root root 7820 4月 11 05:12 storage.conf
- -rw-r--r--. 1 root root 7829 4月 11 04:10 storage.conf.sample
- -rw-r--r--. 1 root root 7098 4月 11 04:45 tracker.conf
- -rw-r--r--. 1 root root 7102 4月 11 04:10 tracker.conf.sample
- [root@fastdfs fdfs]# cp client.conf.sample client.conf
- [root@fastdfs fdfs]# ll
- 总用量 40
- -rw-r--r--. 1 root root 1461 4月 11 05:40 client.conf
- -rw-r--r--. 1 root root 1461 4月 11 04:10 client.conf.sample
- -rw-r--r--. 1 root root 7820 4月 11 05:12 storage.conf
- -rw-r--r--. 1 root root 7829 4月 11 04:10 storage.conf.sample
- -rw-r--r--. 1 root root 7098 4月 11 04:45 tracker.conf
- -rw-r--r--. 1 root root 7102 4月 11 04:10 tracker.conf.sample
- [root@fastdfs fdfs]#
- base_path=/fastdfs/tracker
- tracker_server=192.168.156.13:22122
- [root@fastdfs bin]# cd /usr/bin/ && ls | grep fdfs
- fdfs_appender_test
- fdfs_appender_test1
- fdfs_append_file
- fdfs_crc32
- fdfs_delete_file
- fdfs_download_file
- fdfs_file_info
- fdfs_monitor
- fdfs_storaged
- fdfs_test
- fdfs_test1
- fdfs_trackerd
- fdfs_upload_appender
- fdfs_upload_file
- [root@fastdfs bin]#
- [root@fastdfs bin]# /usr/bin/fdfs_upload_file /etc/fdfs/client.conf /usr/local/software/3.jpg
- group1/M00/00/00/wKicDVjr_ayAE4VVAAHk-VzqZ6w020.jpg
- [root@fastdfs bin]#
1、先安装nginx,大家可以参考http://blog.csdn.net/u012453843/article/details/69396434这篇博客的第四步Nginx安装(我们已经安装过的vim、gcc等就不需要重复安装了)。
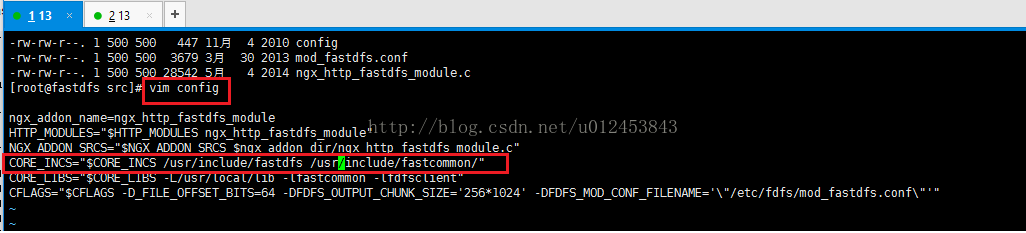
2、安装fastdfs-nginxmodule_v1.16.tar.gz(fast与nginx相结合的模块安装包), 进入 /usr/local/software目录并解压,如下所示。
- [root@fastdfs nginx-1.6.2]# cd /usr/local/software/
- [root@fastdfs software]# tar -zxvf fastdfs-nginx-module_v1.16.tar.gz -C /usr/local/fast/
- fastdfs-nginx-module/
- fastdfs-nginx-module/src/
- fastdfs-nginx-module/src/ngx_http_fastdfs_module.c
- fastdfs-nginx-module/src/mod_fastdfs.conf
- fastdfs-nginx-module/src/config
- fastdfs-nginx-module/src/common.h
- fastdfs-nginx-module/src/common.c
- fastdfs-nginx-module/INSTALL
- fastdfs-nginx-module/HISTORY
- [root@fastdfs software]#
- [root@fastdfs software]# cd /usr/local/fast/
- [root@fastdfs fast]# ll
- 总用量 12
- drwxr-xr-x. 10 8980 users 4096 4月 11 04:10 FastDFS
- drwxrwxr-x. 3 500 500 4096 5月 4 2014 fastdfs-nginx-module
- drwxr-xr-x. 4 root root 4096 4月 11 03:30 libfastcommon-master
- [root@fastdfs fast]# cd fastdfs-nginx-module/src/
- [root@fastdfs src]# ll
- 总用量 76
- -rw-rw-r--. 1 500 500 33207 8月 30 2013 common.c
- -rw-rw-r--. 1 500 500 3479 1月 3 2012 common.h
- -rw-rw-r--. 1 500 500 447 11月 4 2010 config
- -rw-rw-r--. 1 500 500 3679 3月 30 2013 mod_fastdfs.conf
- -rw-rw-r--. 1 500 500 28542 5月 4 2014 ngx_http_fastdfs_module.c
- [root@fastdfs src]#
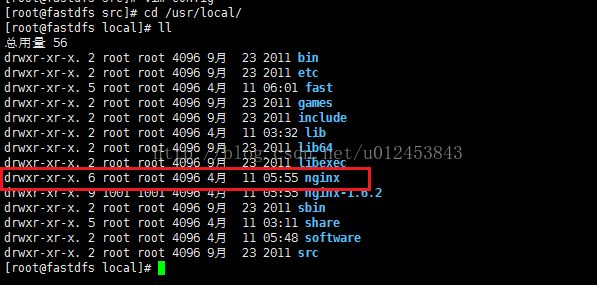
4、fastdfs与nginx进行结合,由于我们刚才安装过nginx了,因此在/usr/local目录下已经生成了一个nginx目录了,如下图所示。
为了将nginx与fastdfs相结合,我们先把这个nginx目录删除掉,如下图所示,可以看到已经没有nginx目录了。
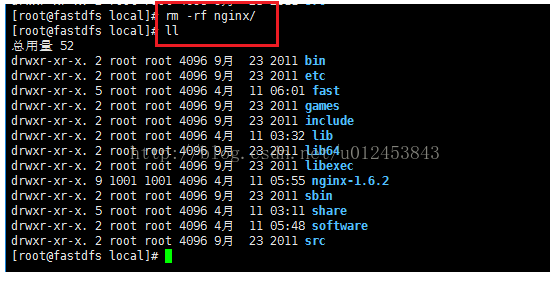
进入到nginx-1.6.2/目录下并执行配置和编译安装,如下所示。
- [root@fastdfs local]# cd nginx-1.6.2/
- [root@fastdfs nginx-1.6.2]# ./configure --add-module=/usr/local/fast/fastdfs-nginx-module/src/
- [root@fastdfs nginx-1.6.2]# make && make install
- [root@fastdfs fdfs]# cd /usr/local/fast/fastdfs-nginx-module/src/
- [root@fastdfs src]# ll
- 总用量 76
- -rw-rw-r--. 1 500 500 33207 8月 30 2013 common.c
- -rw-rw-r--. 1 500 500 3479 1月 3 2012 common.h
- -rw-rw-r--. 1 500 500 435 4月 11 06:09 config
- -rw-rw-r--. 1 500 500 3679 3月 30 2013 mod_fastdfs.conf
- -rw-rw-r--. 1 500 500 28542 5月 4 2014 ngx_http_fastdfs_module.c
- [root@fastdfs src]# cp /usr/local/fast/fastdfs-nginx-module/src/mod_fastdfs.conf /etc/fdfs/
- [root@fastdfs src]#
- connect_timeout=10
- tracker_server=192.168.156.13:22122
- url_have_group_name = true
- store_path0=/fastdfs/storage
- [root@fastdfs fdfs]# cd /usr/local/fast/FastDFS/conf/
- [root@fastdfs conf]# ll
- 总用量 84
- -rw-r--r--. 1 8980 users 23981 12月 2 2014 anti-steal.jpg
- -rw-r--r--. 1 8980 users 1461 12月 2 2014 client.conf
- -rw-r--r--. 1 8980 users 858 12月 2 2014 http.conf
- -rw-r--r--. 1 8980 users 31172 12月 2 2014 mime.types
- -rw-r--r--. 1 8980 users 7829 12月 2 2014 storage.conf
- -rw-r--r--. 1 8980 users 105 12月 2 2014 storage_ids.conf
- -rw-r--r--. 1 8980 users 7102 12月 2 2014 tracker.conf
- [root@fastdfs conf]# cp http.conf mime.types /etc/fdfs/
- [root@fastdfs conf]#
- [root@fastdfs conf]# ln -s /fastdfs/storage/data/ /fastdfs/storage/data/M00
- [root@fastdfs conf]#
修改的内容如下图示
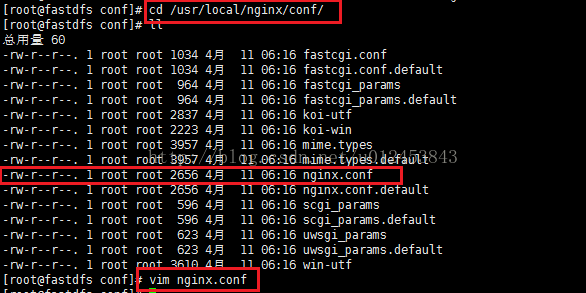
可以直接复制下面的内容。
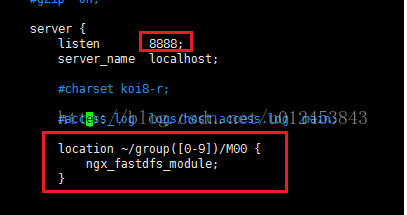
- listen 8888;
- location ~/group([0-9])/M00 {
- ngx_fastdfs_module;
- }
设置nginx开机自启动,这样下次重启设备之后,tracker、storage、nginx都自动启动了,直接就可以使用服务,如下所示。
- [root@fastdfs ~]# vim /etc/rc.d/rc.local
- #!/bin/sh
- #
- # This script will be executed *after* all the other init scripts.
- # You can put your own initialization stuff in here if you don't
- # want to do the full Sys V style init stuff.
- touch /var/lock/subsys/local
- /etc/init.d/fdfs_trackerd start
- /etc/init.d/fdfs_storaged start
- /usr/local/nginx/sbin/nginx
启动nginx,如下所示。
- [root@fastdfs conf]# /usr/local/nginx/sbin/nginx
- ngx_http_fastdfs_set pid=6809
- [root@fastdfs conf]#
配置完防火墙后重启防火墙
- [root@fastdfs conf]# service iptables restart
- iptables:将链设置为政策 ACCEPT:filter [确定]
- iptables:清除防火墙规则: [确定]
- iptables:正在卸载模块: [确定]
- iptables:应用防火墙规则: [确定]
- [root@fastdfs conf]#
至此,一个单机版的FastDFS便搭建完毕了!!


 200
200


 被折叠的 条评论
为什么被折叠?
被折叠的 条评论
为什么被折叠?
 到【灌水乐园】发言


