30分钟学会EventBus3.0详解(一)(引入和初始化EventBus3.0)

转载声明原创地址:http://blog.csdn.net/lsyz0021/article/details/51985307


30分钟学会EventBus3.0详解(一)(引入和初始化EventBus3.0)

30分钟学会EventBus3.0详解(二)(EventBus3.0的详细使用)

前言

EventBus是greenrobot出品的非常优秀的基于发布、订阅模式的一套框架,很早就想写篇文章介绍他的文章,可是一直也没时间写,今天就写篇文章也算总结一下吧。

       首先说说EventBus的优点:它是一个基于观察者模式的事件发布/订阅框架,开发者可以通过极少的代码去实现多个模块之间的通信,而不需要以层层传递接口的形式去单独构建通信桥梁。从而降低因多重回调导致的模块间强耦合,同时避免产生大量内部类。它拥有使用方便,性能高,接入成本低和支持多线程的优点,实乃模块解耦、代码重构必备良药。

它支持Activities, Fragments, Threads, Services之间的数据传递,这是他的官方原理图。


EventBus3.0和之前的EventBus2.4使用上是有区别的,由于3.0使用了注解的方式,并且增加了“SubscriberInfoIndex”要比2.0的效率高出了很多,所以今天我们讲解EventBus3.0的使用。


2017年3月13日文章修改(gradle2.2.0后的代码生成)

由于gradle2.2.0修改了注解的生成方式,所以在eventbus3.0生成“MyEventBusIndex”也不相同。

在gradle2.2.0之前使用:Android-apt

在gradle2.2.0之后使用:annotationProcessor


引入EventBus3.0

gradle2.2.0之前引入EventBus3.0

1、在app的build.gradle中的 dependencies 中添加的 EventBus3.0的依赖

[java]  view plain  copy
  1. compile 'org.greenrobot:eventbus:3.0.0'  

2、如果你想开启加速模式,你还需要配置eventbus-annotation-processor

(1)在dependencies 中添加

[java]  view plain  copy
  1. apt 'org.greenrobot:eventbus-annotation-processor:3.0.1'  

(2)在dependencies的下方添加

[java]  view plain  copy
  1. apt {  
  2.     arguments {  
  3.         eventBusIndex "com.bandeng.MyEventBusIndex"  
  4.     }  
  5. }  

(3)配置plugin

[java]  view plain  copy
  1. apply plugin: 'com.neenbedankt.android-apt'  

app的build.gradle中的配置图


(4)最后这里在project build.gradle配置

[java]  view plain  copy
  1. classpath 'com.neenbedankt.gradle.plugins:android-apt:1.8'  


gradle2.2.0之后引入EventBus3.0

如果你使用的gradle2.2.0及更高版本,那么就需要下面的方式引入Eventbus了,在build.gradle中配置如下

[java]  view plain  copy
  1. <span style="font-size:14px;">android {  
  2.     defaultConfig {  
  3.         javaCompileOptions {  
  4.             annotationProcessorOptions {  
  5.                 arguments = [ eventBusIndex : 'com.bandeng.MyEventBusIndex' ]  
  6.             }  
  7.         }  
  8.     }  
  9. }  
  10.    
  11. dependencies {  
  12.     compile 'org.greenrobot:eventbus:3.0.0'  
  13.     annotationProcessor 'org.greenrobot:eventbus-annotation-processor:3.0.1'  
  14. }</span>  
   看图配置


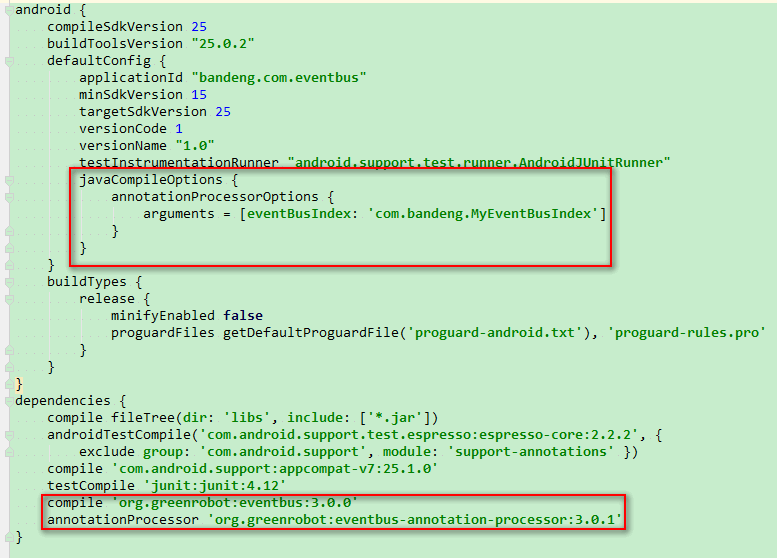
生成加速的MyEventBusIndex类

    设置完成后要记得rebuild一下


rebuild之后,我们就可以做在build目录下看到MyEventBusIndex这个类了(如果还没有生成的话,可以先将app运行到手机后再rebuild试试)


初始EventBus

EventBus有个获取单利的方法EventBus.getDefault(),这样就可以获取EventBus对象了

[java]  view plain  copy
  1. EventBus.getDefault()  
但是,如果我们还想 用加速模式,那么就要先现在Application的onCreate()方法中调用下面的方法

[java]  view plain  copy
  1. /** 
  2.  * 作者: lcw on 2016/7/6. 
  3.  * 博客: http://blog.csdn.net/lsyz0021/ 
  4.  */  
  5. public class MyApplication extends Application {  
  6.   
  7.     @Override  
  8.     public void onCreate() {  
  9.         super.onCreate();  
  10.         // 启用EventBus3.0加速功能  
  11.         EventBus.builder().addIndex(new MyEventBusIndex()).installDefaultEventBus();  
  12.   
  13.     }  
  14. }  

然后在清单文件的Application节点下配置name为

[java]  view plain  copy
  1. <application  
  2.         android:allowBackup="true"  
  3.         android:icon="@mipmap/ic_launcher"  
  4.         android:label="@string/app_name"  
  5.         android:supportsRtl="true"  
  6.         android:name=".MyApplication"  
  7.         android:theme="@style/AppTheme">  
  8.         <activity android:name=".activity.MainActivity">  
  9.             <intent-filter>  
  10.                 <action android:name="android.intent.action.MAIN"/>  
  11.                 <category android:name="android.intent.category.LAUNCHER"/>  
  12.             </intent-filter>  
  13.         </activity>  
  14.         <activity android:name=".activity.SecondActivity"/>  
  15. </application>  

这样我们再调用EventBus.getDefault()就开启了加速模式了
[java]  view plain  copy
  1. EventBus.getDefault();  


我在这里写了一个EventBus工具类,方便大家使用,可以参考一下。https://github.com/lsyz0021/EventBusUtils

  • 0
    点赞
  • 0
    收藏
    觉得还不错? 一键收藏
  • 0
    评论

“相关推荐”对你有帮助么?

  • 非常没帮助
  • 没帮助
  • 一般
  • 有帮助
  • 非常有帮助
提交
评论
添加红包

请填写红包祝福语或标题

红包个数最小为10个

红包金额最低5元

当前余额3.43前往充值 >
需支付:10.00
成就一亿技术人!
领取后你会自动成为博主和红包主的粉丝 规则
hope_wisdom
发出的红包
实付
使用余额支付
点击重新获取
扫码支付
钱包余额 0

抵扣说明:

1.余额是钱包充值的虚拟货币,按照1:1的比例进行支付金额的抵扣。
2.余额无法直接购买下载,可以购买VIP、付费专栏及课程。

余额充值