


一 、Centos 7.x 中Gitlab 的安装
1、Gitlab 主要服务
Nginx静态Web服务器
Gitlab-workhorse 轻量级的反向代理服务器
Gitlab-shell 用于处理Git命令和修改authorized keys列表
Logrotate 日志文件管理工具
Postgresql数据库
Redis 缓存服务器
2、安装以及配置必要的依赖
说明:需要root权限
2.1 安装ssh
yum install -y curl policycoreutils-python openssh-server
2.2 将ssh服务器设置成开机启动
#设置开机启动
systemctl enable sshd

#启动(正常来说,都是已启动的)
systemctl start sshd
2.3 关闭防火墙或者开放http访问权限
#关闭防火墙
systemctl stop firewalld

#开放http访问权限
firewall-cmd --permanent --add-service=http
systemctl reload firewalld
#
2.4 安装Postfix(用来发送邮件通知)
 yum -y install postfix
 #设置开机启动
 systemctl enable postfix
#启动
systemctl start postfix
3、安装
3.1 方式一:离线安装
3.1.1 下载安装包
官网企业版下载地址:https://packages.gitlab.com/gitlab/gitlab-ee
清华大学企业版下载地址:https://mirrors.tuna.tsinghua.edu.cn/gitlab-ee/yum/el7/
这里我下载安装gitlab的10.0.0-ee版本进行安装
wget https://mirrors.tuna.tsinghua.edu.cn/gitlab-ee/yum/el7/gitlab-ee-10.0.0-ee.0.el7.x86_64.rpm
3.1.2 安装
rpm -ivh gitlab-ee-10.0.0-ee.0.el7.x86_64.rpm
3.2 方式二:在线安装
3.2.1 添加Gitlab资源库
1.最新企业版:
https://packages.gitlab.com/install/repositories/gitlab/gitlab-ee/script.rpm.sh
2.最新社区版
https://packages.gitlab.com/install/repositories/gitlab/gitlab-ce/script.rpm.sh
以企业版为例:
curl https://packages.gitlab.com/install/repositories/gitlab/gitlab-ee/script.rpm.sh | sudo bash
3.2.2 安装
#企业版最新版
yum -y install -y gitlab-ee

#社区版最新版
yum -y install -y gitlab-ce
4、 修改配置
vim /etc/gitlab/gitlab.rb
#修改服务器IP,可以配置域名或者IP地址端口,也可以加路径,比如http://example.domain:8989/gitlab
external_url 'http://example.domain'
5、 重新加载配置并重启gitlab
gitlab-ctl reconfigure

gitlab-ctl restart
重启如果出现类似unable to open supervise/ok: file does not exist的错误,可以重启gitlab-runsvdir服务并重新加载配置并重启
systemctl restart gitlab-runsvdir

gitlab-ctl reconfigure

gitlab-ctl restart
6、 查看Gitlab版本
rpm -qa | grep gitlab
或者
cat /opt/gitlab/embedded/service/gitlab-rails/VERSION
7、 访问Gitlab页面
在浏览器输入配置中你配置的external_url地址即可。
如果无法访问,通常是由于Centos的防火墙拦截了请求,可以在防火墙中开放端口号或者关闭访问墙。
firewall-cmd --zone=public --add-port=访问端口/tcp --permanent
--zone #作用域
--add-port=访问端口/tcp  #添加端口,格式为:端口/通讯协议
--permanent   #永久生效,没有此参数重启后失效
设置完之后需要重启一下防火墙或者关闭再打开防火墙
systemctl restart firewalld
查看防火墙是否开启该端口的命令如下,yes表示已经开启。
firewall-cmd --zone=public --query-port=端口/tcp
首次访问时,您将被重定向到密码重置页面。设置初始管理员帐户的密码。使用默认帐户的用户名root登录。
8、 Gitlab 常用命令
    gitlab-ctl start                 # 启动所有 gitlab 组件;
    gitlab-ctl stop                  # 停止所有 gitlab 组件;
    gitlab-ctl restart               # 重启所有 gitlab 组件;
    gitlab-ctl status                # 查看服务状态;
    vim /etc/gitlab/gitlab.rb        # 修改gitlab配置文件;
    gitlab-ctl reconfigure           # 重新编译gitlab的配置;
    gitlab-rake gitlab:check SANITIZE=true --trace    # 检查gitlab;
    gitlab-ctl tail                  # 查看日志;
    gitlab-ctl tail nginx/gitlab_access.log
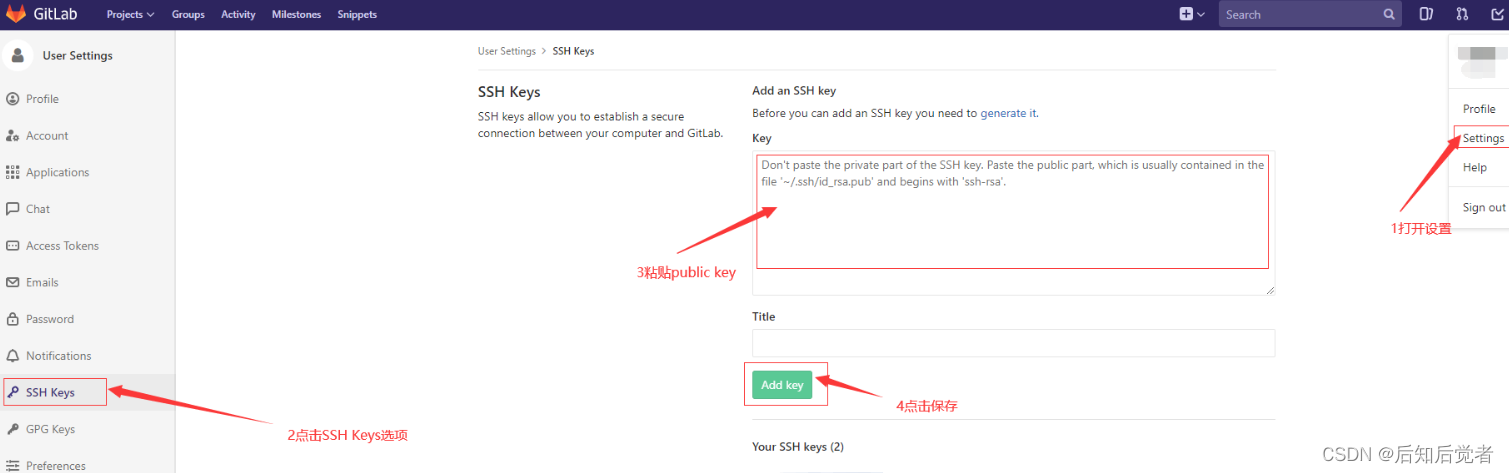
二、Gitlab SSH认证配置
1、生成RSA公私钥
ssh-keygen
复制生成的id_rsa.pub公钥,将其配置至Gitlab中。
三、卸载
1、停止gitlab
gitlab-ctl stop
2、卸载gitlab
如果是rpm安装的,则可以用rpm -e命令来卸载
#先查询安装的版本
rpm -qa | grep gitlab
#删除安装的版本
rpm -evh gitlab-版本
3、查看gitlab进程
ps -ef | grep gitlab
检查下是还还有gitlab相关进程在进丢,如果有,需要先kill掉。
4、删除所有包含gitlab文件
find / -name gitlab | xargs rm -rf
所有步骤完成之后,可全部卸载gitlab。
卸载重装Gitlab的时候,出现* ruby_block[supervise_redis_sleep] action run 卡死不动的解决方法
1、重启gitlab-runsvdir服务:sudo systemctl restart gitlab-runsvdir
2、重新加载配置:sudo gitlab-ctl reconfigure
3、重新启动gitlab :gitlab-ctl restart
四、Gitlab升级
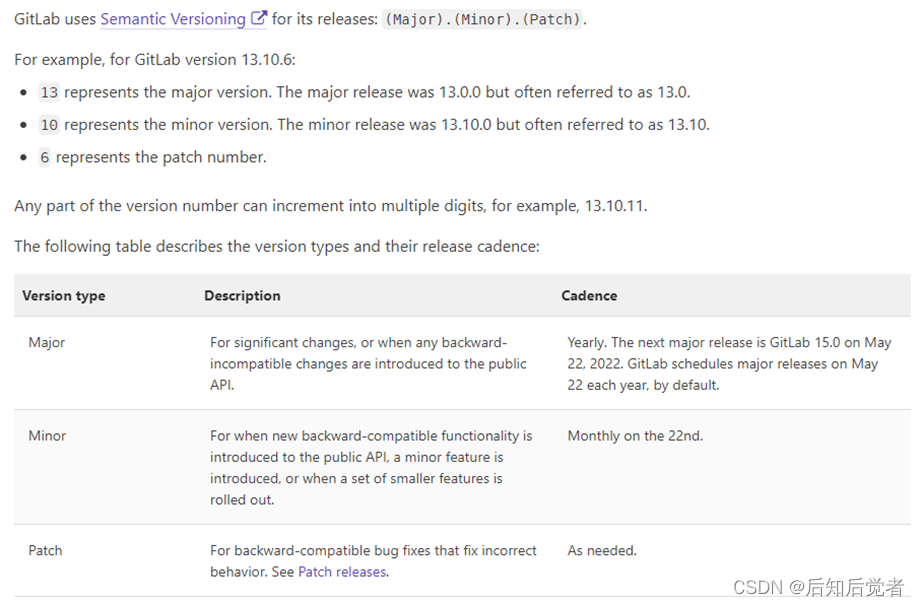
1、Gitlab版本结构
2、下载Gitlab安装包
参考官网https://docs.gitlab.com/ee/update/index.html#upgrade-paths给出的升级跨度版本,一个版本一个版本的升级,不可跨大版本升级,因为某些版本可能新增了数据库表结构或者配置之类的。
8.11.Z -> 8.12.0 -> 8.17.7 -> 9.5.10 -> 10.8.7 -> 11.11.8 -> 12.0.12 -> 12.1.17 -> 12.10.14 -> 13.0.14 -> 13.1.11 -> 13.8.8 -> 13.12.15 -> 14.0.12 -> 14.3.6 -> 14.9.5 -> 14.10.Z -> 15.0.Z -> latest 15.Y.Z
通常每个大版本的最小Minor和最大Minor版本是必经的,但也不是完全绝对。比如我们现在用的Gitlab版本是10.0.0-ee,想升级到14.10.5-ee,可以按以下版本依次升级(已验证):
10.0.0->10.8.7 -> 11.11.8 -> 12.0.12 -> 12.10.14 -> 13.0.14 -> 13.12.15 -> 14.0.12 ->
14.3.6 -> 14.9.5 ->14.10.5
依次下载从10.8.7的安装包。
3、备份与恢复
3.1 备份
GitLab 12.2 或更高版本:
gitlab-backup create GitLab
12.1 及更早版本:
gitlab-rake gitlab:backup:create
这里我们目前的gitlab版本是10.0.0-ee,所以备份命令如下:
gitlab-rake gitlab:backup:create
备份好的数据在没改备份路径的情况下,默认的目录是:/var/opt/gitlab/backups

其中1659449917_2022_08_02_14.0.12-ee即为此次备份的版本号。
配置文件需要单独备份
/etc/gitlab 目录下的gitlab.rb gitlab-secrets.json包含敏感数据,需手动备份这两个配置文件;
gitlab.rb
gitlab-secrets.json
3.2 恢复
先停止服务(防止新数据写入)
gitlab-ctl  stop  unicorn
gitlab-ctl  stop  sidekiq
gitlab-ctl  stop  nginx
恢复数据
gitlab-rake gitlab:backup:restore BACKUP=备份版本号
4、升级
先停止服务(防止新数据写入)
gitlab-ctl  stop  unicorn
gitlab-ctl  stop  sidekiq
gitlab-ctl  stop  nginx
** 按以下Gitlab版本顺序依次进行升级操作**
10.0.0->10.8.7 -> 11.11.8 -> 12.0.12 -> 12.10.14 -> 13.0.14 -> 13.12.15 -> 14.0.12 ->
14.3.6 -> 14.9.5 ->14.10.5
每升级一个版本都要重启gitlab登陆页面看看,有没有问题,确定无误后才能继续升级下一个版本。
升级命令
# rpm -Uvh gitlab-ee-10.8.7-ee.0.el7.x86_64.rpm
# gitlab-ctl  reconfigure
# gitlab-ctl  restart


 261
261


 被折叠的 条评论
为什么被折叠?
被折叠的 条评论
为什么被折叠?
 到【灌水乐园】发言


