 系统登录功能详解


 本文详细介绍了系统登录功能的实现过程,包括登录界面设计、登录验证、密码修改、验证码生成及自动登录等功能。通过具体代码展示了AdminDao接口及其实现类、AdminService接口及其实现类的使用,以及验证码工具类的创建。
登录功能虽然简单,涉及到的知识点还挺多的,主要包括登录功能、登录后注销功能,验证码功能,自动登录功能等,分两节来讲。
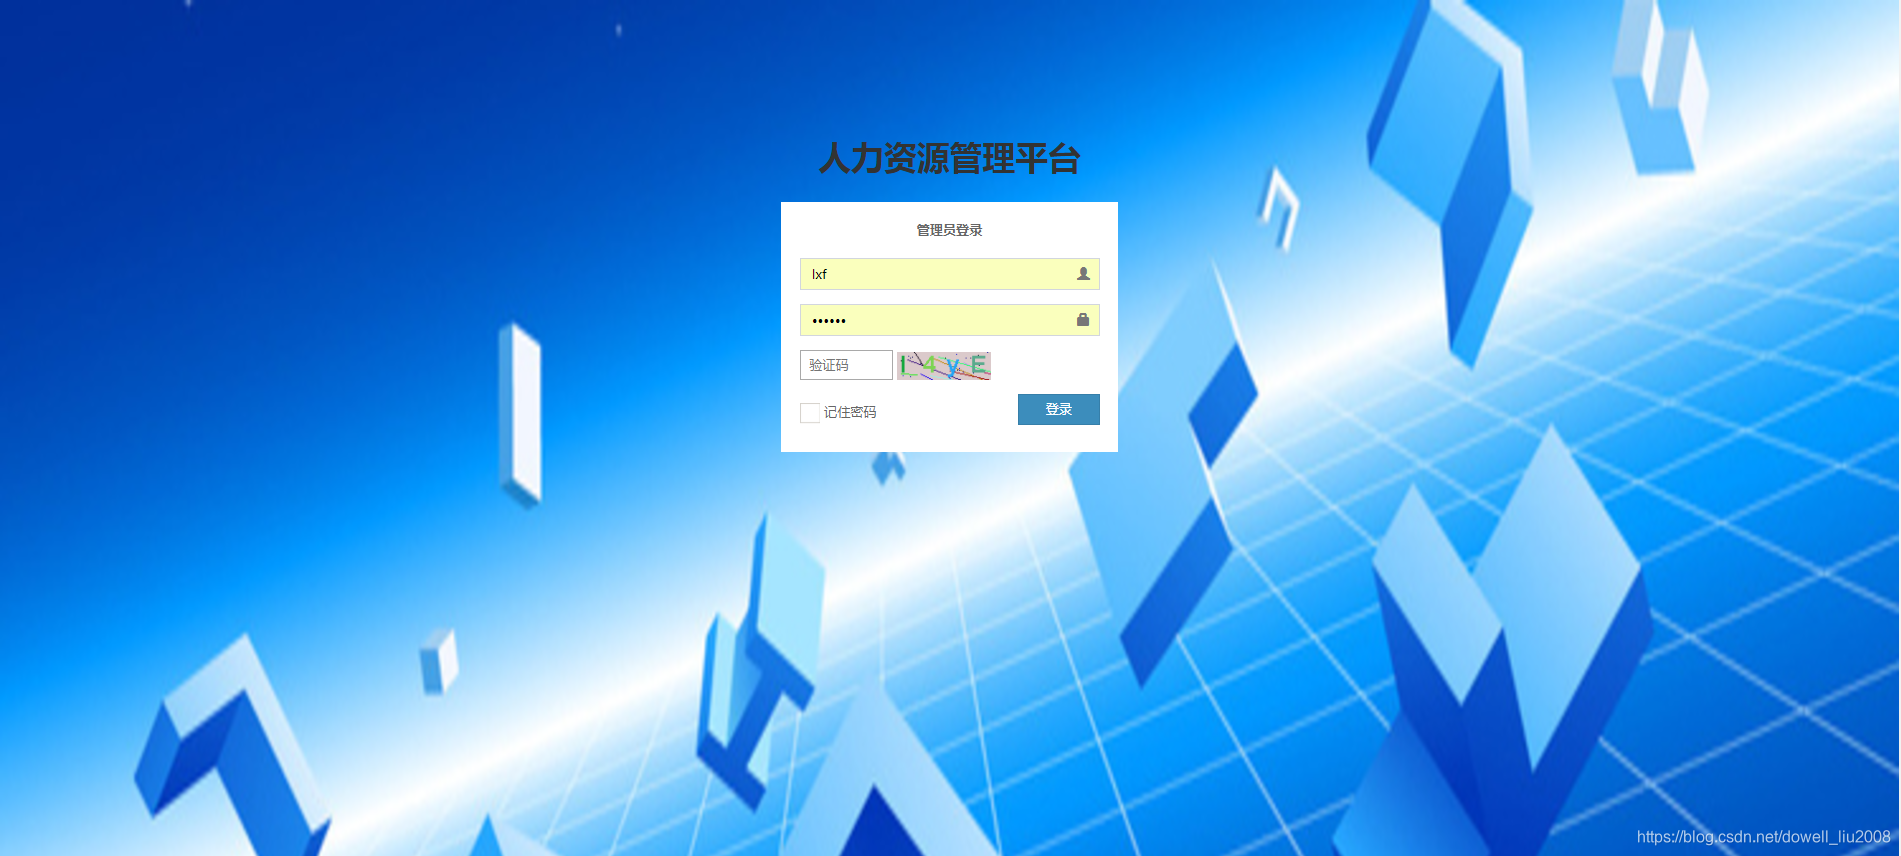
一、界面效果
本系统的界面是在AdminLTE2-itcast的基础进行修改的,源码在码云和github里面都有,码云地址:https://gitee.com/docafe/adminlte2-itcast,gihub地址:https://github.com/itheima2017/adminlte2-itheima,在此非常感谢黑马。
1、登录界面如下:
2、登录成功后的界面如下

二、 登录功能
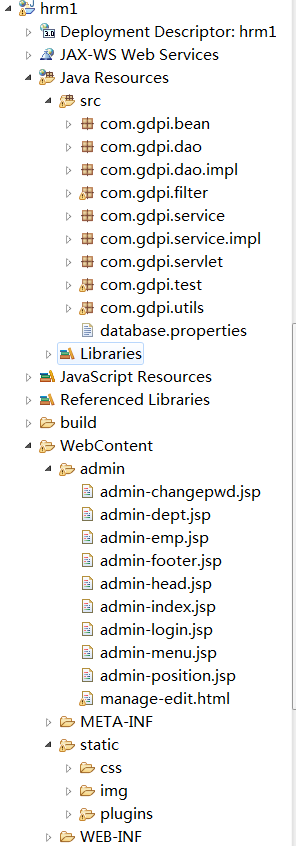
1、项目结构
2、AdminDao接口与实现类
接口
package com.gdpi.dao;
import com.gdpi.bean.Admin;
public interface AdminDao {
	// 根据用户名和密码查询
	public boolean queryByNameAndPwd(Admin admin);
	// 修改密码
	public int updatePwd(Admin admin);
}
实现类
package com.gdpi.dao.impl;
import java.sql.ResultSet;
import com.gdpi.bean.Admin;
import com.gdpi.dao.AdminDao;
import com.gdpi.utils.DBUtil;
public class AdminDaoImpl implements AdminDao {
	DBUtil dBUtil = null;

	public AdminDaoImpl() {
		dBUtil = new DBUtil();
	}
	@Override
	public boolean queryByNameAndPwd(Admin admin) {
		Object[] obj = new Object[] { admin.getAdminName(), admin.getPassword() };
		String sql = "select * from admin where adminName=?and password=?";
		ResultSet rs = dBUtil.excuteQuery(sql, obj);
		try {
			if (rs.next()) {
				return true;
			}

		} catch (Exception e) {
			e.printStackTrace();
		} finally {
			dBUtil.release();
		}
		return false;
	}
	@Override
	public int updatePwd(Admin admin) {
		 String sql="update admin set password=? where adminName=? ";
		Object[] obj = new Object[] { admin.getPassword(), admin.getAdminName() };
		int count = 0;
		try {
			count = dBUtil.excuteUpdate(sql, obj);
		} finally {
			dBUtil.release();
		}
		return count;
	}
}
2、AdminService接口与实现类
接口
package com.gdpi.service;
import com.gdpi.bean.Admin;
public interface AdminService {
	public boolean loginCheck(Admin admin);
	public boolean changePwd(Admin admin);
}
实现类
package com.gdpi.service.impl;
import com.gdpi.bean.Admin;
import com.gdpi.dao.AdminDao;
import com.gdpi.dao.impl.AdminDaoImpl;
import com.gdpi.service.AdminService;
public class AdminServiceImpl implements AdminService {
	AdminDao adminDao = null;

	public AdminServiceImpl() {
		adminDao = new AdminDaoImpl();
	}
	@Override
	public boolean loginCheck(Admin admin) {
		if (adminDao.queryByNameAndPwd(admin)) {
			return true;
		}
		return false;
	}
	@Override
	public boolean changePwd(Admin admin) {
		if (adminDao.updatePwd(admin) > 0) {
			return true;
		}
		return false;
	}
}
3、验证码工具类
验证码借助网上大神的,地址:https://www.cnblogs.com/feiyun126/p/4081254.html
package com.gdpi.utils;

import java.awt.Color;
import java.awt.Font;
import java.awt.Graphics;
import java.awt.image.BufferedImage;
import java.io.IOException;
import java.io.OutputStream;
import java.util.Random;

import javax.imageio.ImageIO;


public class CreateImageCode {
    // 图片的宽度。
    private int width = 160;
    // 图片的高度。
    private int height = 40;
    // 验证码字符个数
    private int codeCount = 4;
    // 验证码干扰线数
    private int lineCount = 20;
    // 验证码
    private String code = null;
    // 验证码图片Buffer
    private BufferedImage buffImg = null;
    Random random = new Random();

    public CreateImageCode() {
        creatImage();
    }

    public CreateImageCode(int width, int height) {
        this.width = width;
        this.height = height;
        creatImage();
    }

    public CreateImageCode(int width, int height, int codeCount) {
        this.width = width;
        this.height = height;
        this.codeCount = codeCount;
        creatImage();
    }

    public CreateImageCode(int width, int height, int codeCount, int lineCount) {
        this.width = width;
        this.height = height;
        this.codeCount = codeCount;
        this.lineCount = lineCount;
        creatImage();
    }

    // 生成图片
    private void creatImage() {
        int fontWidth = width / codeCount;// 字体的宽度
        int fontHeight = height - 5;// 字体的高度
        int codeY = height - 8;

        // 图像buffer
        buffImg = new BufferedImage(width, height, BufferedImage.TYPE_INT_RGB);
        Graphics g = buffImg.getGraphics();
        //Graphics2D g = buffImg.createGraphics();
        // 设置背景色
        g.setColor(getRandColor(200, 250));
        g.fillRect(0, 0, width, height);
     // 设置字体
        //Font font1 = getFont(fontHeight);
        Font font = new Font("Fixedsys", Font.BOLD, fontHeight);
        g.setFont(font);

        // 设置干扰线
        for (int i = 0; i < lineCount; i++) {
            int xs = random.nextInt(width);
            int ys = random.nextInt(height);
            int xe = xs + random.nextInt(width);
            int ye = ys + random.nextInt(height);
            g.setColor(getRandColor(1, 255));
            g.drawLine(xs, ys, xe, ye);
        }

        // 添加噪点
        float yawpRate = 0.01f;// 噪声率
        int area = (int) (yawpRate * width * height);
        for (int i = 0; i < area; i++) {
            int x = random.nextInt(width);
            int y = random.nextInt(height);

            buffImg.setRGB(x, y, random.nextInt(255));
        }


        String str1 = randomStr(codeCount);// 得到随机字符
        this.code = str1;
        for (int i = 0; i < codeCount; i++) {
            String strRand = str1.substring(i, i + 1);
            g.setColor(getRandColor(1, 255));
            // g.drawString(a,x,y);
            // a为要画出来的东西,x和y表示要画的东西最左侧字符的基线位于此图形上下文坐标系的 (x, y) 位置处

            g.drawString(strRand, i*fontWidth+3, codeY);
        }
    }

    // 得到随机字符
    private String randomStr(int n) {
        String str1 = "ABCDEFGHIJKLMNOPQRSTUVWXYZabcdefghijklmnopqrstuvwxyz1234567890";
        String str2 = "";
        int len = str1.length() - 1;
        double r;
        for (int i = 0; i < n; i++) {
            r = (Math.random()) * len;
            str2 = str2 + str1.charAt((int) r);
        }
        return str2;
    }

    // 得到随机颜色
    private Color getRandColor(int fc, int bc) {// 给定范围获得随机颜色
        if (fc > 255)
            fc = 255;
        if (bc > 255)
            bc = 255;
        int r = fc + random.nextInt(bc - fc);
        int g = fc + random.nextInt(bc - fc);
        int b = fc + random.nextInt(bc - fc);
        return new Color(r, g, b);
    }
    /**
     * 产生随机字体
     */
    private Font getFont(int size) {
        Random random = new Random();
        Font font[] = new Font[5];
        font[0] = new Font("Ravie", Font.PLAIN, size);
        font[1] = new Font("Antique Olive Compact", Font.PLAIN, size);
        font[2] = new Font("Fixedsys", Font.PLAIN, size);
        font[3] = new Font("Wide Latin", Font.PLAIN, size);
        font[4] = new Font("Gill Sans Ultra Bold", Font.PLAIN, size);
        return font[random.nextInt(5)];
    }
    // 扭曲方法
        private void shear(Graphics g, int w1, int h1, Color color) {
            shearX(g, w1, h1, color);
            shearY(g, w1, h1, color);
        }
        private void shearX(Graphics g, int w1, int h1, Color color) {
            int period = random.nextInt(2);
            boolean borderGap = true;
            int frames = 1;
            int phase = random.nextInt(2);
            for (int i = 0; i < h1; i++) {
                double d = (double) (period >> 1)
                        * Math.sin((double) i / (double) period
                                + (6.2831853071795862D * (double) phase)
                                / (double) frames);
                g.copyArea(0, i, w1, 1, (int) d, 0);
                if (borderGap) {
                    g.setColor(color);
                    g.drawLine((int) d, i, 0, i);
                    g.drawLine((int) d + w1, i, w1, i);
                }
            }

        }

        private void shearY(Graphics g, int w1, int h1, Color color) {
            int period = random.nextInt(40) + 10; // 50;
            boolean borderGap = true;
            int frames = 20;
            int phase = 7;
            for (int i = 0; i < w1; i++) {
                double d = (double) (period >> 1)
                        * Math.sin((double) i / (double) period
                                + (6.2831853071795862D * (double) phase)
                                / (double) frames);
                g.copyArea(i, 0, 1, h1, 0, (int) d);
                if (borderGap) {
                    g.setColor(color);
                    g.drawLine(i, (int) d, i, 0);
                    g.drawLine(i, (int) d + h1, i, h1);
                }

            }

        }
    public void write(OutputStream sos) throws IOException {
        ImageIO.write(buffImg, "png", sos);
        sos.close();
    }
    public BufferedImage getBuffImg() {
        return buffImg;
    }

    public String getCode() {
        return code.toLowerCase();
    }

    //使用方法
 /*public void getCode3(HttpServletRequest req, HttpServletResponse response,HttpSession session) throws IOException{
        // 设置响应的类型格式为图片格式
            response.setContentType("image/jpeg");
            //禁止图像缓存。
            response.setHeader("Pragma", "no-cache");
            response.setHeader("Cache-Control", "no-cache");
            response.setDateHeader("Expires", 0);
            CreateImageCode vCode = new CreateImageCode(100,30,5,10);
            session.setAttribute("code", vCode.getCode());
            vCode.write(response.getOutputStream());
     }*/
}
4、AdminServlet
@WebServlet("/admin/AdminServlet")
public class AdminServlet extends HttpServlet {
	private static final long serialVersionUID = 1L;

	protected void doGet(HttpServletRequest request, HttpServletResponse response)
			throws ServletException, IOException {
		String methodName = request.getParameter("method");
		try {
			// 利用反射获取方法
			Method method = getClass().getDeclaredMethod(methodName, HttpServletRequest.class,
					HttpServletResponse.class);
			// 例如:如果方法为protected,而非public,故必须进行此操作
			// method.setAccessible(true);
			// 执行相应的方法
			method.invoke(this, request, response);
		} catch (Exception e) {
			e.printStackTrace();
		}
	}

	protected void doPost(HttpServletRequest request, HttpServletResponse response)
			throws ServletException, IOException {
		// TODO Auto-generated method stub
		doGet(request, response);
	}

	// 管理员登录
	public void adminLogin(HttpServletRequest request, HttpServletResponse response)
			throws ServletException, IOException {
		// 获得前端页面的值
		String adminName = request.getParameter("adminName");
		String password = request.getParameter("password");
		String remember = request.getParameter("remember");
		String code = request.getParameter("code");
		// System.out.println("*******"+code);
		// 获得session
		HttpSession session = request.getSession();
		// 给对象赋值
		Admin admin = new Admin();
		admin.setAdminName(adminName);
		admin.setPassword(Md5Utils.MD5(password));
		AdminService adminService = new AdminServiceImpl();
		boolean flag = adminService.loginCheck(admin);

		// 从session中获得验证码
		String sessionCode = (String) session.getAttribute("code");
		// 判断验证码是否正确
		if (code.equalsIgnoreCase(sessionCode)) {
			if (flag) {

				session.setAttribute("admin", adminName);
				// 访问时间
				Date accessedTime = new Date(session.getLastAccessedTime());
				SimpleDateFormat format = new SimpleDateFormat("yyyy-MM-dd HH:mm:ss");
				session.setAttribute("visitTime", format.format(accessedTime));
				if ("rememberMe".equals(remember)) {
					// 将用户保存到Cookie中
					Cookie admin_cookie = new Cookie("cookieAdmin", adminName + "-" + Md5Utils.MD5(password));// 建立usercookie
					// user_cookie.setMaxAge(7*24*60*60);//保存一周7*24*60*60
					admin_cookie.setMaxAge(30);
					response.addCookie(admin_cookie);
				}
				response.sendRedirect("admin-index.jsp");
			} else {
				request.setAttribute("msg", "用户名或密码不正确!");
				request.getRequestDispatcher("admin-login.jsp").forward(request, response);

			}
		} else {
			request.setAttribute("msg", "验证码不正确!");
			request.getRequestDispatcher("admin-login.jsp").forward(request, response);
		}
	}
}
5、前端页面实现
<%@ page language="java" contentType="text/html; charset=utf-8"
	pageEncoding="utf-8"%>
<%@ taglib uri="http://java.sun.com/jsp/jstl/core" prefix="c"%>
<!DOCTYPE html>
<html>

<head>
<meta charset="utf-8">
<meta http-equiv="X-UA-Compatible" content="IE=edge">


<title>管理员登录</title>


<!-- Tell the browser to be responsive to screen width -->
<meta
	content="width=device-width,initial-scale=1,maximum-scale=1,user-scalable=no"
	name="viewport">
<link rel="stylesheet"
	href="${pageContext.request.contextPath}/static/plugins/bootstrap/css/bootstrap.min.css">
<link rel="stylesheet"
	href="${pageContext.request.contextPath}/static/plugins/font-awesome/css/font-awesome.min.css">
<link rel="stylesheet"
	href="${pageContext.request.contextPath}/static/plugins/ionicons/css/ionicons.min.css">
<link rel="stylesheet"
	href="${pageContext.request.contextPath}/static/plugins/adminLTE/css/AdminLTE.css">
<link rel="stylesheet" href="../static/plugins/iCheck/square/blue.css">
</head>

<body class="hold-transition login-page"
	style="background: #ffffff url('${pageContext.request.contextPath}/static/img/admin-login-back.jpg'); background-size: 100% 150%;">
	<div class="login-box">
		<div class="login-logo">
			<h1>人力资源管理平台后台</h1>
		</div>
		<!-- /.login-logo -->
		<div class="login-box-body">
			<p class="login-box-msg">管理员登录</p>

			<form
				action="${pageContext.request.contextPath}/admin/AdminServlet?method=adminLogin"
				method="post">
				<div class="form-group has-feedback">
					<input type="text" class="form-control" name="adminName"
						placeholder="用户名"> <span
						class="glyphicon glyphicon-envelope form-control-feedback"></span>
				</div>
				<div class="form-group has-feedback">
					<input type="password" class="form-control" name="password"
						placeholder="密码"> <span
						class="glyphicon glyphicon-lock form-control-feedback"></span>
				</div>
				<div class="form-group has-feedback">
					<input type="text" name="code" style="height: 32px; width: 100px"
						placeholder="  验证码"> <img id="srcImg"
						src="<c:url value='VerifyCodeServlet'/>" />
				</div>
				<%-- <div class="form-group has-feedback">
					<input type="text"  name="code" placeholder="  验证码" style="height:32px;width:100px"> <img id="srcImg"
						src="<c:url value='VerifyCodeServlet'/>" onclick="createCode()" />
				</div> --%>
				<div>
					<font color="red">${msg}</font>
				</div>
				<div class="row">
					<div class="col-xs-8">
						<div class="checkbox icheck">
							<label><input type="checkbox" name="remember"
								value="rememberMe"> 记住 下次自动登录</label>
						</div>
					</div>

					<!-- /.col -->
					<div class="col-xs-4">
						<button type="submit" class="btn btn-primary btn-block btn-flat">登录</button>
					</div>
					<!-- /.col -->
				</div>
			</form>

		</div>
		<!-- /.login-box-body -->
	</div>
	<!-- /.login-box -->

	<!-- jQuery 2.2.3 -->
	<!-- Bootstrap 3.3.6 -->
	<!-- iCheck -->
	<script
		src="${pageContext.request.contextPath}/static/plugins/jQuery/jquery-2.2.3.min.js"></script>
	<script
		src="${pageContext.request.contextPath}/static/plugins/bootstrap/js/bootstrap.min.js"></script>
	<script
		src="${pageContext.request.contextPath}/static/plugins/iCheck/icheck.min.js"></script>
	<script type="text/javascript">
		//更新验证码,使用js
		/* 	 function createCode() {
				var t = new Date().getTime();//防止页面缓存,使用时间搓
				var srcImg = document.getElementById("srcImg");
				srcImg.src = "${pageContext.request.contextPath}/admin/VerifyCodeServlet?" + t;
			}  */
		//实现验证码刷新,使用jquery
		$("#srcImg").click(
				function() {
					var t = new Date().getTime();//防止页面缓存,使用时间戳
					$("#srcImg").attr(
							'src',
							"${pageContext.request.contextPath}/admin/VerifyCodeServlet?"
									+ t);
				});

		$(function() {
			$('input').iCheck({
				checkboxClass : 'icheckbox_square-blue',
				radioClass : 'iradio_square-blue',
				increaseArea : '20%' // optional
			});
		});
	</script>
</body>

</html>


 555
555

 被折叠的 条评论
为什么被折叠?
被折叠的 条评论
为什么被折叠?
 到【灌水乐园】发言


