


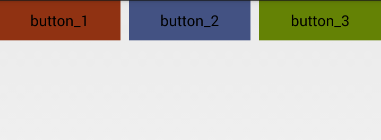
一、在LinearLayout里面设置3个Button
<LinearLayout
        android:id="@+id/buttons_container"
        android:layout_width="match_parent"
        android:layout_height="wrap_content"
        android:orientation="horizontal" >

        <Button
            android:id="@+id/btn_first"
            android:layout_width="0dp"
            android:layout_height="wrap_content"
            android:layout_marginRight="10dp"
            android:layout_weight="1"
            android:background="#903212"
            android:text="button_1" />

        <Button
            android:id="@+id/btn_second"
            android:layout_width="0dp"
            android:layout_height="wrap_content"
            android:layout_marginRight="10dp"
            android:layout_weight="1"
            android:background="#435283"
            android:text="button_2" />

        <Button
            android:id="@+id/btn_third"
            android:layout_width="0dp"
            android:layout_height="wrap_content"
            android:layout_weight="1"
            android:background="#648205"
            android:text="button_3" />
    </LinearLayout>
效果图为:
二、将Button3的visibility属性设置为gone,效果为
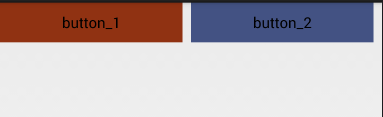
可以看出Button2的右边有间距,需要实现的是Button2右边紧挨屏幕
三、通过Linearlayout的divider属性来实现
在drawable目录下创建spacer_mudium.xml
<?xml version="1.0" encoding="utf-8"?>
<shape xmlns:android="http://schemas.android.com/apk/res/android"
    android:shape="rectangle">

    <size
        android:width="10dp"
        android:height="10dp" />

    <solid android:color="@android:color/transparent" />

</shape>
在LinearLayout设置showDividers和divider属性
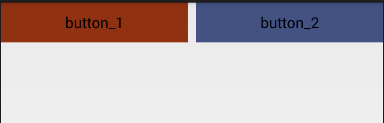
需要注意的:LinearLayout的divider属性是API 11 才加入的,如果要在低版本使用divider属性则需要用LinearLayoutCompat.


 2万+
2万+

 被折叠的 条评论
为什么被折叠?
被折叠的 条评论
为什么被折叠?
 到【灌水乐园】发言


