


关于项目
官方文档地址:
https://help.aliyun.com/document_detail/32008.html?spm=5176.doc31960.6.660.6Ate8V
项目介绍
这里将OSS的上传做成一个jar包,跟系统里的其他服务独立开来,其他项目可直接拿去用。
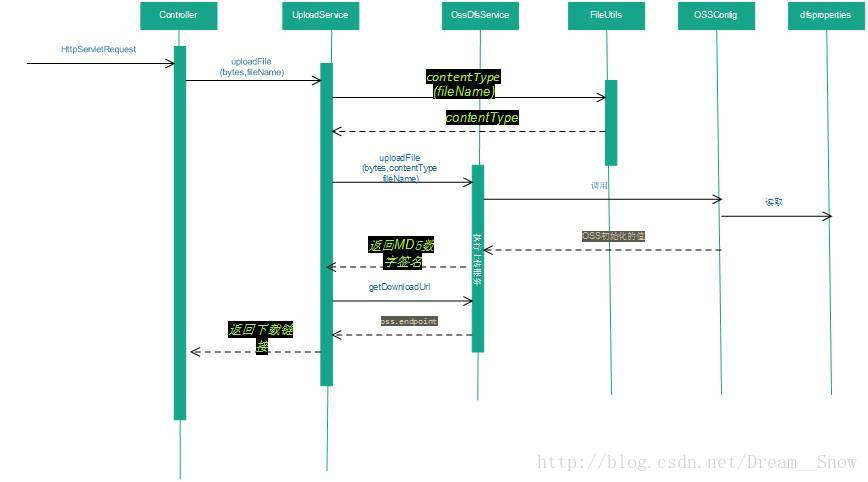
项目的执行流程:
项目的源码文件地址:
项目源代码地址:https://github.com/Howie1995/AliOSS
打包成jar
对应工程文件被直接打包成了Jar包文件,懒得自己写的同学点击这里,可以直接拿去用。
路径问题
jar包是一个单独文件,将配置文件打包进jar包的话读取方式和日常的输入流文件读取有些许不同:
//***反斜杠表示根目录,绝对路径
    private static final String CONFIG_PROPERTIES = "/dfs.properties";

    public static String getConfigResource(String key) throws IOException{
        Properties properties = new Properties();
        // 方法3:
        /*BufferedReader br = new BufferedReader(
                new InputStreamReader(ClassLoader.getSystemResourceAsStream(CONFIG_PROPERTIES)));*/
        //方法2:读取jar包内文件
        InputStream in = SystemConfig.class.getResourceAsStream(CONFIG_PROPERTIES);
        /*//方法1:
        InputStream is = this.getClass().getResourceAsStream(CONFIG_PROPERTIES);
        BufferedReader br = new BufferedReader(new InputStreamReader(is));*/
        properties.load(in);
        String value = properties.getProperty(key);
        //编码转换
        value = new String(value.getBytes("ISO-8859-1"),"UTF-8");
        in.close();
        return value;
    }
Maven下打包
用maven命令打包,在pom文件添加如下代码:
    <build>
        <plugins>
            <plugin>
                <artifactId>maven-compiler-plugin</artifactId>
                <version>2.3.2</version>
                <configuration>
                    <source>1.8</source>
                    <target>1.8</target>
                </configuration>
            </plugin>
           <!--  配置生成源码包 -->
            <plugin>
                <groupId>org.apache.maven.plugins</groupId>
                <artifactId>maven-source-plugin</artifactId>
                <version>3.0.1</version>
                <executions>
                    <execution>
                        <id>attach-sources</id>
                        <goals>
                            <goal>jar</goal>
                        </goals>
                    </execution>
                </executions>
            </plugin>
        </plugins>
    </build>
前端直接上传
以前的项目是直接在前端上传的,所以一起看了下!阿里也是支持这种方式,方式和AWS没有太大区别,可以说如出一辙了,为了安全起见,后端要做的就是根据前端发起的请求返回一个STS凭证,里面包含了上传文件需要的一系列参数;
    @Override
    public STSDTO getSTSToken() throws ServerException, ClientException {
        // TODO Auto-generated method stub
        STSDTO stsDto = new STSDTO();//存储信息的DTO,字段同下面的字段

        //可以写在properties配置文件中自己读取,方便变更
        String REGION_CN_SHANGHAI = "******";//OSS服务所在地区,例如:cn-shanghai
        String accessKeyId = "** your accessKeyId **";
        String accessKeySecret = "** your accessKeySecret **";
        String roleArn = "** your roleArn :在OSS控制台获取**";
        long durationSeconds = 900;//设置超时连接的时限
        String roleSessionName = "mandy-001";//和前端约定的信号
        ProtocolType protocolType = ProtocolType.HTTPS;


        IClientProfile profile = DefaultProfile.getProfile(REGION_CN_SHANGHAI, accessKeyId, accessKeySecret);
        DefaultAcsClient client = new DefaultAcsClient(profile);
        // 创建一个 AssumeRoleRequest 并设置请求参数
        final AssumeRoleRequest request = new AssumeRoleRequest();
        request.setVersion("2015-04-01");
        request.setMethod(MethodType.POST);
        request.setProtocol(protocolType);

        request.setRoleArn(roleArn);
        request.setRoleSessionName(roleSessionName);
        request.setPolicy(null);
        request.setDurationSeconds(durationSeconds);

        // 发起请求,并得到response
        final AssumeRoleResponse response = client.getAcsResponse(request);

        stsDto.setStatus("200");
        stsDto.setAccessKeyId(response.getCredentials().getAccessKeyId());
        stsDto.setAccessKeySecret(response.getCredentials().getAccessKeySecret());
        stsDto.setSecurityToken(response.getCredentials().getSecurityToken());
        stsDto.setExpiration(response.getCredentials().getExpiration());

        return stsDto;
}request的处理
关于对request的处理,找到一篇比较好的博文:https://yq.aliyun.com/articles/45248,分享一下
不过还是选择用了更简单的方法:
@RequestMapping(value="uploadFileByAliOSS",method = RequestMethod.POST)
public  JsonResult uplaodFileByAliOSS(HttpServletRequest request){
    //实例化uploadService
    uploadService = uploadService==null?new UploadService():uploadService;
    //从request中获取到传输文件的fileName、ContentType和byte流3个参数
    //1、获取contentType
    String contentType = request.getContentType();
    //2、转换成byte[]
    byte[] bytes = null;
    MultipartHttpServletRequest multipartRequest = (MultipartHttpServletRequest) request;
    Map<String,MultipartFile> fileMap = multipartRequest.getFileMap();
    if(fileMap.isEmpty()){
        //文件为空,返回
        return new JsonResult(Message.M4003);
    }
    for(String key:fileMap.keySet()){
        MultipartFile file = fileMap.get(key);
        if(file != null){
            if(file.isEmpty()){
                return new JsonResult(JsonResult.FAIL_STATUS,"文件大小不能为0KB,请重新选择");
        }
        try {
            bytes = file.getBytes();
        } catch (IOException e) {
        // TODO Auto-generated catch block
            e.printStackTrace();
        }
    }
}
    //3、获取fileName(原文件名)
    Iterator<String> itr = multipartRequest.getFileNames();
    CommonsMultipartFile multipartFile = null;
    String fileName = null;
    while(itr.hasNext()){
        String str = itr.next();
        multipartFile = (CommonsMultipartFile)multipartRequest.getFile(str);
        fileName = multipartFile.getOriginalFilename();     //原文件名
    }
    //String url = uploadService.uploadFile(bytes,contentType,fileName);
    String url = uploadService.uploadFile(bytes, fileName);//文件链接
    return new JsonResult(Message.M2000, "操作成功", url);
}


 876
876


 被折叠的 条评论
为什么被折叠?
被折叠的 条评论
为什么被折叠?
 到【灌水乐园】发言


