


尊重原创,转载请注明出处:http://blog.csdn.net/dreamsever/article/details/76615281
圆形图片ImageView以及圆角ImageView,我相信大家在网上都可以找到,但是有时候像弹窗类型的图片效果怎么实现呢?既有圆角,下面或者上下左右还有一个小的下角凸出来,关键是给人的感觉还像是把这个图片切成这个样子的。我尝试使用Android中shape给它加一个框来实现这种效果但是没办法出现下面的角。最终我选择了自定义
废话不多说先看效果图:

关键代码就是一个自定义的ImageView:
/**
 * 弹窗气泡效果的ImageView
 * Created by dream on 17/8/1.
 */

public class PopupImageView extends android.support.v7.widget.AppCompatImageView{

    private Paint paint;
    private Path muskPath;
    private int roundRadius;//圆角半径
    private int angleHeight;//下角高度
    private float percent=0.3f;//下角在底部的左边占据百分比
    private Bitmap mRectMask;
    private Xfermode mXfermode;

    public PopupImageView(Context context) {
        this(context, null);
    }

    public PopupImageView(Context context, @Nullable AttributeSet attrs) {
        this(context, attrs, 0);
    }

    public PopupImageView(Context context, @Nullable AttributeSet attrs, int defStyleAttr) {
        super(context, attrs, defStyleAttr);
        init(attrs);
    }

    private void init(AttributeSet attrs) {
        paint=new Paint();
        paint.setColor(Color.RED);
        paint.setAntiAlias(true);
        TypedArray typedArray = getContext().obtainStyledAttributes(attrs, R.styleable.PopupImageView);
        roundRadius = typedArray.getDimensionPixelOffset(R.styleable.PopupImageView_roundRadius,0);
        angleHeight = typedArray.getDimensionPixelOffset(R.styleable.PopupImageView_angleHeight,0);
        percent = typedArray.getFloat(R.styleable.PopupImageView_anglePercent,0);
        // 关键方法
        mXfermode = new PorterDuffXfermode(PorterDuff.Mode.DST_IN);
    }

    @Override
    protected void onMeasure(int widthMeasureSpec, int heightMeasureSpec) {
        super.onMeasure(widthMeasureSpec, heightMeasureSpec);
    }

    @Override
    protected void onDraw(Canvas canvas) {
        int id = canvas.saveLayer(0, 0, canvas.getWidth(), canvas.getHeight(), null, Canvas.ALL_SAVE_FLAG);
        super.onDraw(canvas);
        Drawable drawable = getDrawable();
        if (null != drawable) {
            createMask();
            // 关键方法
            paint.setXfermode(mXfermode);
            canvas.drawBitmap(mRectMask, 0, 0, paint);
            paint.setXfermode(null);
            canvas.restoreToCount(id);
        }

    }

    /**
     * 获取上层蒙层
     */
    private void createMask() {
        if (mRectMask==null){
            int maskWidth = getMeasuredWidth();
            int maskHeight = getMeasuredHeight();
            mRectMask = Bitmap.createBitmap(maskWidth, maskHeight, Bitmap.Config.ARGB_8888);
            Canvas canvas = new Canvas(mRectMask);

            muskPath=new Path();
            muskPath.moveTo(roundRadius,0);
            muskPath.lineTo(maskWidth-roundRadius,0);
            muskPath.arcTo(new RectF(maskWidth-roundRadius*2,0,maskWidth,roundRadius*2),270,90);
            muskPath.lineTo(maskWidth,maskHeight-roundRadius-angleHeight);
            muskPath.arcTo(new RectF(maskWidth-roundRadius*2,maskHeight-roundRadius*2-angleHeight,maskWidth,maskHeight-angleHeight),0,90);
            muskPath.lineTo(maskWidth*percent+angleHeight,maskHeight-angleHeight);
            muskPath.lineTo(maskWidth*percent,maskHeight);
            muskPath.lineTo(maskWidth*percent-angleHeight,maskHeight-angleHeight);
            muskPath.lineTo(roundRadius,maskHeight-angleHeight);
            muskPath.arcTo(new RectF(0,maskHeight-roundRadius*2-angleHeight,roundRadius*2,maskHeight-angleHeight),90,90);
            muskPath.lineTo(0,roundRadius);
            muskPath.arcTo(new RectF(0,0,roundRadius*2,roundRadius*2),180,90);

            canvas.drawPath(muskPath,paint);

        }
    }
}
attr:
<declare-styleable name="PopupImageView">
   <attr name="roundRadius" format="dimension"/>
   <attr name="angleHeight" format="dimension"/>
   <attr name="anglePercent" format="float"/>
</declare-styleable>
使用:
<com.test.second.view.PopupImageView
        android:layout_width="100dp"
        android:layout_height="100dp"
        app:roundRadius="5dp"
        app:angleHeight="4dp"
        app:anglePercent="0.25"
        android:scaleType="fitXY"
        android:layout_centerInParent="true"
        android:src="@mipmap/afa"/>
如果你仅仅想实现上面的效果,那么上面的代码直接拿去就好了。假如上面的效果还不够满足你的需求或者你还想知其所以然,你可以看看下面的简单讲解也许可以给你一些启发。
原理简单讲解
这里的难点就两个,一个是Xfermode是什么鬼干嘛用的,一个是Path的绘制与计算
1、关于Xfermode 以及paint.setXfermode(mXfermode)
如果你想深入了解Xfermode一下我推荐两篇博客:
http://www.jianshu.com/p/d11892bbe055
http://blog.csdn.net/tianjian4592/article/details/44783283/
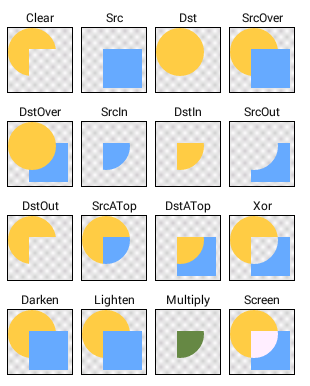
当然网上也有很多篇关于Xfermode的博客,没看懂还可以百度去看看其他人的。“setXfermode这个方法用于设置图像的过渡模式,所谓过渡是指图像的饱和度、颜色值等参数的计算结果的图像表现“。这句话有点难理解,其实这个方法的作用就是画笔绘制的时候决定上下两张图的重叠显示的效果。比如我们想要显示圆角图片,那么我们就需要一个圆角的蒙板,只显示蒙板与图片重叠的部分,其他部分透明或不可见,这里我们使用了PorterDuff.Mode.DST_IN。
Dst是下面的图,也就是先画的图;Source是上面的图,也就是后面要画的图。下图可以看出蓝色方块是上面的图,黄色的圆是下面的图,当采用DST_IN时只显示了黄色的圆角,也即是下面的图与上面的图重合部分且显示下面的图,上面的图透明。我们采用的也是PorterDuff.Mode.DST_IN,这样应该就可以了解为什么显示的是圆角图片了
2、Path的绘制与计算
这个我可以脸皮厚的说“无他, 但手熟尔。“吗
其实这里我们只需要画一个圆角的蒙板,准确的说还有一个小角。绘制path就是将一个点一个点的连起来,准备工具:画布,画笔,圆角半径,小角高度,path对象,好开始
Canvas canvas = new Canvas(mRectMask);
muskPath=new Path();
muskPath.moveTo(roundRadius,0);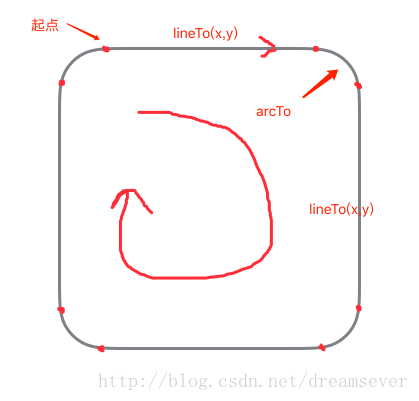
看了上面这张图你应该就清楚的知道画这个Path的套路了,还有下面的小角,
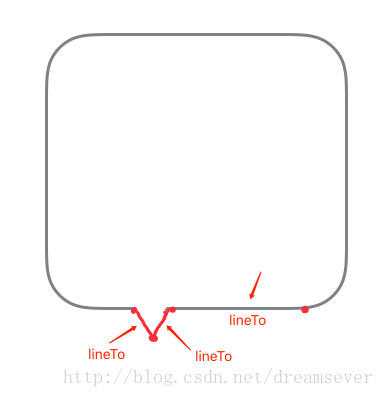
关于Path的lineTo(),arcTo()方法的作用我建议自己查阅资料理解,还有也许你的需求是小角面朝左边,我相信当你看懂这里Path的绘制你就可以自己做出来像左边或右边的效果。
---end


 397
397

 被折叠的 条评论
为什么被折叠?
被折叠的 条评论
为什么被折叠?
 到【灌水乐园】发言


