


前言
市面上关于认证授权的框架已经比较丰富了,大都是关于单体应用的认证授权,在分布式架构下,使用比较多的方案是--<应用网关>,网关里集中认证,将认证通过的请求再转发给代理的服务,这种中心化的方式并不适用于微服务,这里讨论另一种方案--<认证中心>,利用jwt去中心化的特性,减轻认证中心的压力,有理解错误的地方,欢迎拍砖,以免误人子弟,有点干货,但是不多

需求背景
一个项目拆分为若干个微服务,根据业务形态,大致分为以下几种工程1.纯前端应用示例,一个简单的H5活动页面,商户仅仅需要登录,就可以参与活动2.前后端分离应用示例,如xxx后台,xxxApi,由一个前端项目+一个后端项目组成3.客户端应用示例,控制台项目,如任务调度,挂机服务现在有N个项目,每个项目又由N个微服务组成,微服务之间需要一套统一的权限管理,它需要同时满足商户(客户)在多个项目间无感切换,也需要满足开发者应用之间调用的认证授权示例,xxx开放平台,一般有两个角色,商家和开发者, 开发者创建应用,研发,上线应用, 商家申请应用,使用应用开发者A,注册成为xxx开放平台的开发者,创建了一个测试应用,测试应用依赖其它应用的某些能力(如,短信,短链....),申请获得这些能力后,开发完成,将测试应用发布到应用市场,商家B,申请开通了测试应用和XXX应用,它可以无感的在两个应用间切换(单点登录)
OAuth2.0
OAuth 引入了一个授权层,用来分离两种不同的角色:客户端和资源所有者。......资源所有者同意以后,资源服务器可以向客户端颁发令牌。客户端通过令牌,去请求数据。OAuth 2.0 规定了四种获得令牌的流程。你可以选择最适合自己的那一种,向第三方应用颁发令牌。下面就是这四种授权方式。
-
授权码(authorization-code)
-
隐藏式(implicit)
-
密码式(password)
-
客户端凭证(client credentials)
演示效果
-
https://localhost:9001 应用A implicit模式
-
https://localhost:9002 应用B implicit模式
-
https://localhost:9003 应用C authorization-code模式
解决的问题
-
单点登录
-
单点退出
-
统一登录中心(通行证)
-
用户身份鉴权
-
服务的最小作用域为api
找个靠谱点的开源认证授权框架
在.net里,比较靠前的两个框架(IdentityServer4,OpenIddict),这两个都实现了OAuth2.0,相较而言对IdentityServer4更加熟悉点,就基于这个开始了,顺便扫盲,听说后面不开源了,不过对于我来说并没有影响,现有的功能已经完全够用了
IdentityServer4 网上的资料非常多,稍微爬点坑就能搭建起来,并将OAuth2.0的4种认证模式都体验一遍,这里就不多介绍了,这里强烈推荐Skoruba.IdentityServer4.Admin 这个开源项目,方便熟悉ids4里的各种配置,有助于理解
踏坑第一步,弄个自定义的登录页面
把数据持久化到数据库,登录用的是Identity,这个可以根据自己的需求自行拓展,不用也行,我这里还是用的原来的表,只是重写了登录逻辑,方便后面拓展更多的登录方式,看着挺简单,其实一点也不复杂
/// <summary>
/// 登录
/// </summary>
/// <param name="model"></param>
/// <returns></returns>
[HttpPost]
public async Task<IActionResult> Login(LoginRequest model)
{
    model.ReturnUrl = model.ReturnUrl ?? "/";
    var user = await _context.Users.FirstOrDefaultAsync(m => m.UserName == model.UserName && m.PasswordHash == model.Password.Sha256());
    if (user != null)
    {
        AuthenticationProperties props = new AuthenticationProperties
        {
            IsPersistent = true,
            ExpiresUtc = DateTimeOffset.UtcNow.Add(TimeSpan.FromDays(1))
        };
        Claim[] claim = new Claim[] {
            new Claim(ClaimTypes.Role, "admin"),
            new Claim(ClaimTypes.Name, user.UserName),
            new Claim(ClaimTypes.MobilePhone, user.PhoneNumber ?? "-"),
            new Claim("userId", user.Id),
            new Claim("phone",user.PhoneNumber ?? "-")
        };

        await HttpContext.SignInAsync(new IdentityServer4.IdentityServerUser(user.Id) { AdditionalClaims = claim }, props);
        return Ok(Model.Response.JsonResult.Success(message:"登录成功",returnUrl: model.ReturnUrl));
    }
    return Ok(Model.Response.JsonResult.Error(message: "登录失败", returnUrl: model.ReturnUrl));
}
@{
Layout = null;
}
<body>
<div class="login-container">
<h2>登录</h2>
<form id="myForm">
<label for="username">用户名:</label>
<input type="text" id="userName" name="userName" value="test" required>
<label for="password">密码:</label>
<input type="password" id="password" name="password" value="123456" required>
<button type="submit">登录</button>
</form>
</div>
</body>
<script src="/js/jquery.min.js"></script>
<script src="/js/jquery.unobtrusive-ajax.js"></script>
<script>
document.getElementById("myForm").addEventListener("submit", function (event) {
event.preventDefault(); // 阻止表单默认提交行为
var inputs = document.querySelectorAll("form input[required]");
var hasError = false;
// 遍历所有required的input元素
inputs.forEach(function (input) {
if (input.checkValidity() === false) {
// 如果验证失败,标记错误并阻止AJAX请求
input.classList.add("error"); // 你可以添加一个错误样式
hasError = true;
} else {
input.classList.remove("error"); // 清除错误样式
}
});
if (!hasError) {
// 如果没有错误,执行AJAX请求
performAjaxRequest();
}
});
function performAjaxRequest() {
const urlParams = new URLSearchParams(window.location.search);
const returnUrl = urlParams.get('ReturnUrl') || '';
let param = {
"userName": $("#userName").val(),
"password": $("#password").val(),
"returnUrl": returnUrl
}
$.post("/account/login", param, function (data) {
console.log(data)
if (data.code != "0") {
alert(data.message)
} else {
window.location.href = data.returnUrl;
}
})
}
</script>
<style>
body {
font-family: Arial, sans-serif;
background-color: #f0f2f5;
display: flex;
justify-content: center;
align-items: center;
height: 100vh;
margin: 0;
}
.login-container {
background-color: white;
padding: 20px;
border-radius: 5px;
box-shadow: 0 2px 5px rgba(0, 0, 0, 0.1);
}
input[type="text"], input[type="password"] {
width: 100%;
padding: 10px;
margin-bottom: 15px;
border: 1px solid #ddd;
border-radius: 3px;
}
button {
width: 100%;
padding: 10px;
background-color: #007bff;
color: white;
border: none;
border-radius: 3px;
cursor: pointer;
}
button:hover {
background-color: #0056b3;
}
</style>踏坑第二步,单点登录
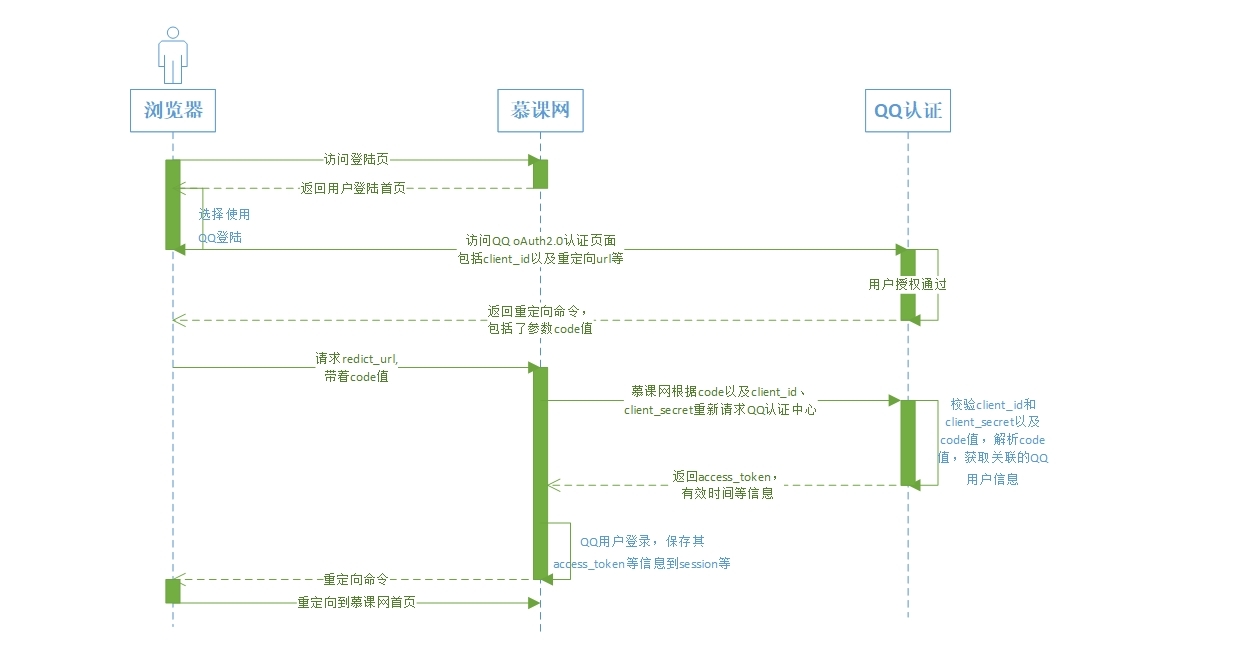
implicit这个网上有示例,照着抄就可以了,基本没有坑
var config = {
    authority: "https://localhost:6201",
    client_id: "3",
    redirect_uri: "https://localhost:9001/callback.html",
    //这里别写错
    response_type: "id_token token",
    post_logout_redirect_uri: "https://localhost:9001/logout.html",
    scope: "openid profile api" //范围一定要写,不然access_token访问资源会401
};
<script src="/js/oidc-client.js"></script>
<script src="/js/config.js"></script>
<script>
mgr.signinRedirectCallback().then(function () {
window.location = "/index.html";
}).catch(function (e) {
console.log(e);
});
</script>client_credentials
这个有大坑,网上90%的文档都是错的,然后抄来抄去,或者说我的oidc-client.js 版本不对,这里要加入点自己的理解
var config = {
    authority: "https://localhost:6201",
    client_id: "20231020001",
    redirect_uri: "https://localhost:9003/signin-oidc.html",
    //这里别写错,
    response_type: "code",
    post_logout_redirect_uri: "https://localhost:9003/logout.html",
    scope: "openid offline_access api testScope" //范围一定要写,不然access_token访问资源会401
};
对比这两个模式,验证码模式返回的是code,并不是access_token,所以还用上面的回调页面,肯定报错,熟悉OAuth2.0的同学,都知道缺少一个通过code换取access_token步骤,这里我们从新写回调页面,核心代码就是获取url上的code,然后换取access_token,再将凭证信息写入到缓存
var urlParams = getURLParams();
    let url = "https://localhost:5002/api/authorization_code";
    var param = {...urlParams,"redirect_uri":config.redirect_uri}
    console.log(url)
    $.post(url,param,function(data){
        console.log(data)
        if(data.code != "0"){
            alert(data.message)
        }else{
            let user = new User(data.data);
            console.log(user)
            mgr.storeUser(user).then(function(e){
            window.location.href="https://localhost:9003"
        })
        }
    })

    function getURLParams() {
        const searchURL = location.search; // 获取到URL中的参数串
        const params = new URLSearchParams(searchURL);
        const valueObj = Object.fromEntries(params); // fromEntries是es10提出来的方法polyfill和babel都不转换这个方法
        return valueObj;
    }
真正的坑点在oidc-client.js写入凭证,各种GPT提问,最终弄出来,再弄不出来,我就要考虑手动写入缓存了,但是为了单点登录里统一管理凭证,还是选择用oidc-client.js内置的方法
//重新定义用户对象
    var User = function () {
    function User(_ref) {
        var id_token = _ref.id_token,
            session_state = _ref.session_state,
            access_token = _ref.access_token,
            token_type = _ref.token_type,
            scope = _ref.scope,
            profile = _ref.profile,
            expires_at = _ref.expires_in,
            state = _ref.state;
        this.id_token = id_token;
        this.session_state = session_state;
        this.access_token = access_token;
        this.token_type = token_type;
        this.scope = scope;
        this.profile = profile;
        this.expires_at = expires_at;
        this.state = state;
    }

    User.prototype.toStorageString = function toStorageString() {
        return JSON.stringify({
            id_token: this.id_token,
            session_state: this.session_state,
            access_token: this.access_token,
            token_type: this.token_type,
            scope: this.scope,
            profile: this.profile,
            expires_at: this.expires_at
        });
    };

    User.fromStorageString = function fromStorageString(storageString) {
        return new User(JSON.parse(storageString));
    };
    return User;
}();
踏坑第三步,单点退出
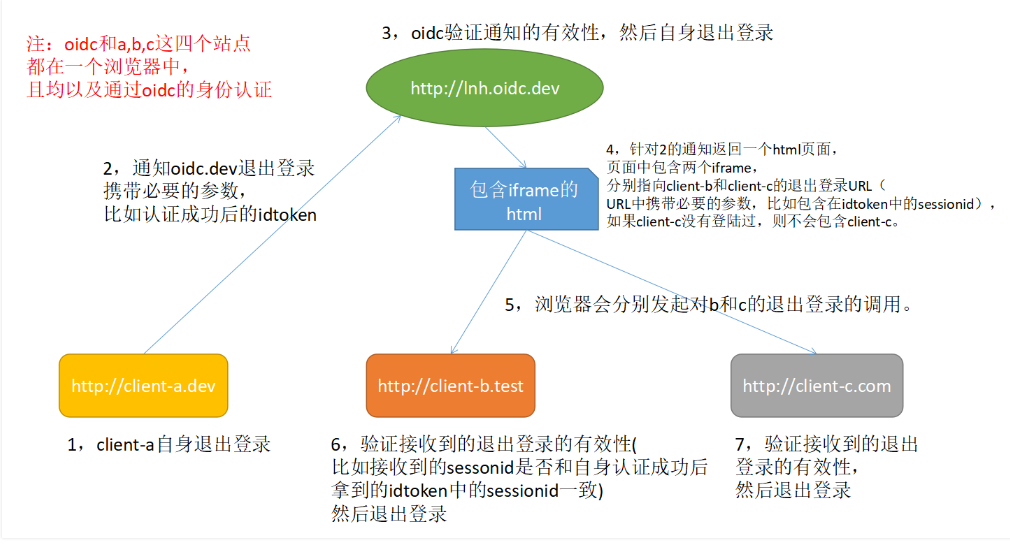
不出意外,肯定是有坑的,细心的同学已经发现应用C,单点退出失败了,我们来盘一下这里的逻辑在ids4里面,客户端会配置两个退出通道,FrontChannelLogoutUri(前端退出通道),BackChannelLogoutUri(后端退出通道),怎么调用这个取决于项目,我们这里主要是web项目,所以配置前端退出通道就可以了,实现也很简单,应用退出的时候,重定向到认证中心的统一退出页面,认证中心退出成功后,再使用iframe调用其它应用配置的前端退出通道
统一退出流程图
public async Task<IActionResult> Logout(string logoutId)
{
    await _signInManager.SignOutAsync();
    var refererUrl = Request.Headers["Referer"].ToString();
    if (string.IsNullOrEmpty(refererUrl))
    {
        refererUrl = "/account/login";
    }
    var frontChannelLogoutUri = await _configDbContext.Clients.AsNoTracking().Where(m => m.Enabled).Where(m=>!string.IsNullOrEmpty(m.FrontChannelLogoutUri)).Select(m=>m.FrontChannelLogoutUri).ToListAsync();
    ViewBag.FrontChannelLogoutUri = frontChannelLogoutUri;
    ViewBag.RefererUrl = refererUrl;
    return View();
}回到前面应用C没有正常退出的原因,仔细观察,原来oidc-client.js默认的存储策略是将凭证存储在SessionStorage,在浏览器里每个页签的SessionStorage都是独立的,所以iframe里调用退出页面,是无法清除当前页面的凭证的,解决方案就是修改oidc-client.js默认的存储策略,改为LocalStorage,问题解决
class LocalStorageStateStore extends Oidc.WebStorageStateStore {
    constructor() {
        super(window.localStorage);
    }
}

//配置信息
var config = {
    ...
    userStore: new LocalStorageStateStore({ store: localStorage })
    ...
};
踏坑第四步,访问受保护的资源
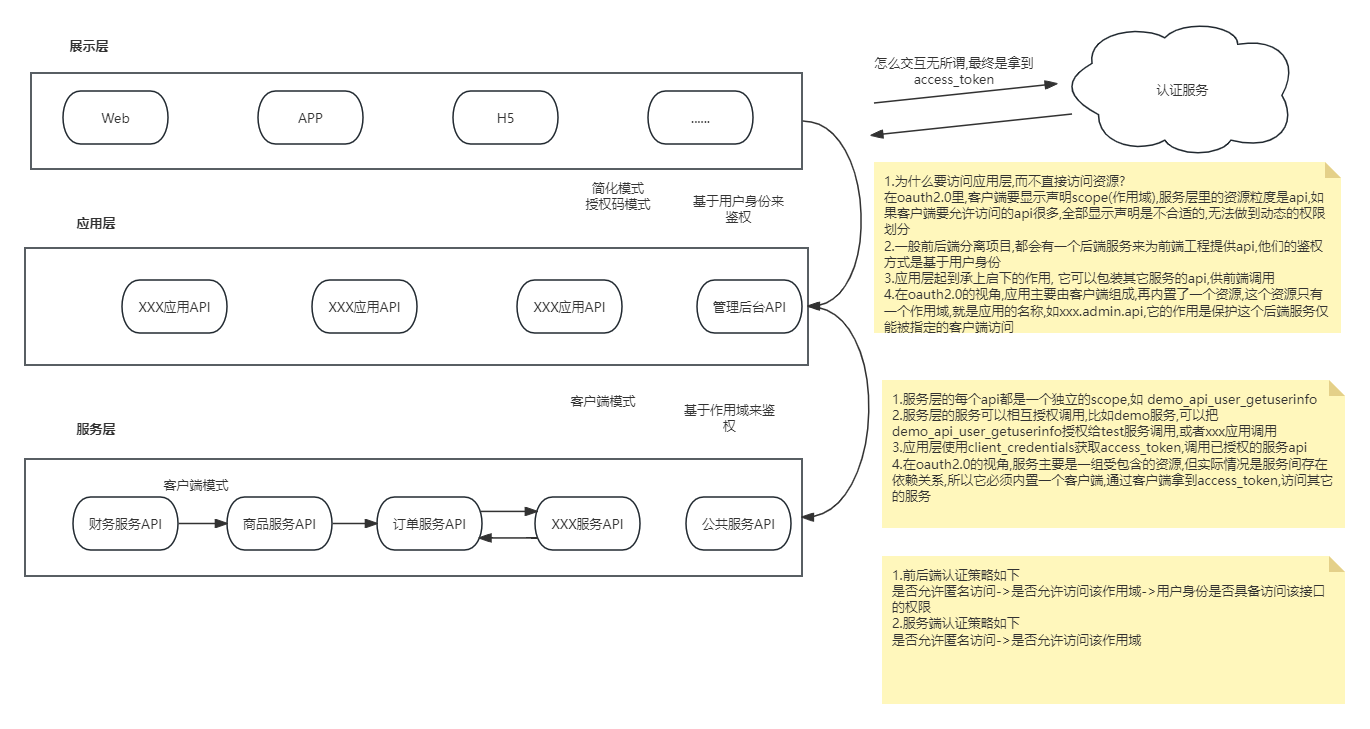
客户端拿到了access_token,只要客户端包含对应的作用域,就能访问对应的api,不出意外,这里肯定要出点幺蛾子,前面都是铺垫,好戏才刚刚开始问题出在作用域上,同一个客户端,配置了client credentials 与 authorization-code,它们获取的作用域是不一样的,这里对应不同的场景authorization-code 这里涉及到登录,那么作用域一般包含openId,phone.... 用户身份相关的信息,属于前端调用,access_token对用户可见,这里我用前端作用域代替,且作用域必须显示声明(也就是在前端配置文件里写死,可以翻翻上面的config里scope属性)client credentials 不涉及登录,可以理解成后端调用,access_token对用户不可见,这里我用后端作用域代替
那它们的意义(粒度)也是完全不同的,作用域可以有多种用途,所以通过authorization-code获取的access_token,不能直接访问受保护的资源,而是应该调用它的后端服务,这里作用域的意义是指服务本身,config.scope = 'openId a.api b.api',然后再通过凭证里携带的用户身份标识,做具体接口的鉴权通过client credentials获取的access_token,它的作用域意义是指资源服务的具体api,这里我画了个图,便于理解
文章转载自:提伯斯


 1062
1062

 被折叠的 条评论
为什么被折叠?
被折叠的 条评论
为什么被折叠?
 到【灌水乐园】发言


