


没图我说个XX
目标人群:没有基础的安卓初学者
知识点:Layout布局介绍及ImageView的简单介绍
目标:简单了Layout的相关知识、并在模拟器上显示出一张图片
简介
本章会简单的介绍如何在布局文件中添加一个ImageView控件,并令其显示一张图片
正文
1.首先介绍下线性布局和相对布局的知识
LinearLayout是线性布局,它的子控件以横向或纵向的方式排列。
RelativeLayout是相对布局,它的子控件指定它相对于其父元素或兄弟元素的位置,这是实际布局中最常用的布局方式之一。
听起来有些拗口,实际使用过程中记住两点即可:LinearLayout确定的是方向,RelativeLayout确定的是位置。
2.一个来自官方文档的简单LinearLayout示例如下
<?xml version="1.0" encoding="utf-8"?>
<LinearLayout xmlns:android="http://schemas.android.com/apk/res/android"
android:layout_width="match_parent"
android:layout_height="match_parent"
android:paddingLeft="16dp"
android:paddingRight="16dp"
android:orientation="vertical" >
<EditText
android:layout_width="match_parent"
android:layout_height="wrap_content"
android:hint="@string/to" />
<EditText
android:layout_width="match_parent"
android:layout_height="wrap_content"
android:hint="@string/subject" />
<EditText
android:layout_width="match_parent"
android:layout_height="0dp"
android:layout_weight="1"
android:gravity="top"
android:hint="@string/message" />
<Button
android:layout_width="100dp"
android:layout_height="wrap_content"
android:layout_gravity="right"
android:text="@string/send" />
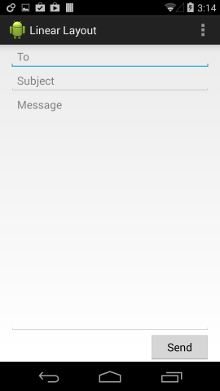
</LinearLayout>上面的xml文件定义了一个纵向的布局(android:orientation=”vertical”声明了方向),其中包涵了三个文本输入框以及一个按钮,效果图如下所示
尝试着用上面的代码将上一章的activity_main.xml的内容替换掉,Build后看看在模拟器上的效果如何?
3.一个来自官方文档的简单RelativeLayout示例如下
<RelativeLayout xmlns:android="http://schemas.android.com/apk/res/android"
android:layout_width="match_parent"
android:layout_height="match_parent"
android:paddingLeft="16dp"
android:paddingRight="16dp" >
<EditText
android:id="@+id/name"
android:layout_width="match_parent"
android:layout_height="wrap_content"
android:hint="@string/reminder" />
<Spinner
android:id="@+id/dates"
android:layout_width="0dp"
android:layout_height="wrap_content"
android:layout_below="@id/name"
android:layout_alignParentLeft="true"
android:layout_toLeftOf="@+id/times" />
<Spinner
android:id="@id/times"
android:layout_width="96dp"
android:layout_height="wrap_content"
android:layout_below="@id/name"
android:layout_alignParentRight="true" />
<Button
android:layout_width="96dp"
android:layout_height="wrap_content"
android:layout_below="@id/times"
android:layout_alignParentRight="true"
android:text="@string/done" />
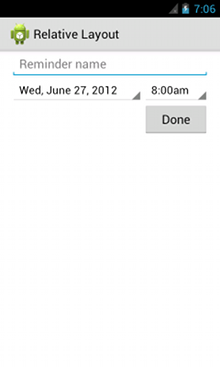
</RelativeLayout>上面的xml代码定义了一个相对布局,其中包涵了一个文本输入框、两个选择列表及一个按钮,效果图如下所示
不难看出,同LinearLayout相比,RelativeLayout更加的灵活,也更加的复杂。在上面的代码中,需要着重了解的内容是:
android:layout_alignParentLeft 当值为“true”时, 同父控件的左侧对齐
android:layout_alignParentRight 当值为“true”时, 同父控件的右侧对齐
android:layout_below 位于给出的ID对应控件的底部
android:layout_toLeftOf 位于给出的ID对应控件的左侧
android:id 任何一个控件都可以有一个与之关联的Integer类型的ID,当应用被编译时,这个ID被引用为一个整数,但是在布局XML文件中,这个属性的值作为一个字符串存在的,在布局文件中为每一个控件都定义一个ID是一个好习惯,尤其是对RelativeLayout中的子控件来讲。
- 除此之外RelativeLayout的子控件还有许多的layout属性可以设置,具体的内容,请参考这里
4.打开activity_main.xml文件,使用如下代码将原来的内容替换掉
<LinearLayout xmlns:android="http://schemas.android.com/apk/res/android"
android:layout_width="match_parent"
android:orientation="vertical"
android:layout_height="match_parent">
<TextView
android:text="@string/hello_world"
android:layout_width="wrap_content"
android:textColor="@color/red"
android:layout_height="wrap_content" />
<ImageView
android:layout_width="wrap_content"
android:src="@drawable/ic_launcher"
android:layout_height="wrap_content" />
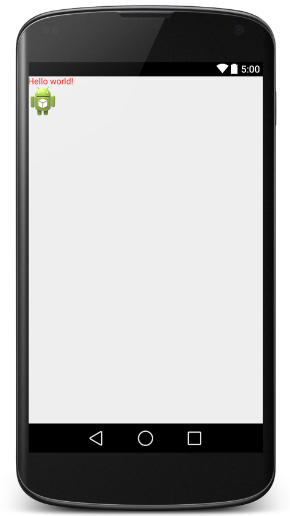
</LinearLayout>同之前的内容相比较,我们会发现,多出了一个ImageView控件,通常用于安卓开发中的图片显示功能。
android:src=”@drawable/ic_launcher”一句表示,此控件引用了一张来自资源文件中,名为ic_launcher的图片。
在模拟器中运行的结果应如下图所示


 902
902


 被折叠的 条评论
为什么被折叠?
被折叠的 条评论
为什么被折叠?
 到【灌水乐园】发言


