


本套博文所有篇章,以SSM架构来完成一个CMS新闻/文章管理系统的demo,帮助大家来学习ssm,先来说一下预期要使用的技术
SSM后端web框架,有spring、spring mvc、 mybatis
前端样式框架使用Bootstrap
前端js框架使用Jquery
前端基础页面使用JSP编写,以及JAVA的标签库
前端富文本编辑器kindeditor
其他技术redis kafka es
这里首先说明一下,由于本系列博文所用的Demo是本作者2020年写的一个Demo,所以在涉及到代码的时候,每个模块都是整体复制上去的,所以不要看到一堆代码就蒙了,当下能理解就理解,理解不了,后期业务逻辑用到的时候会说
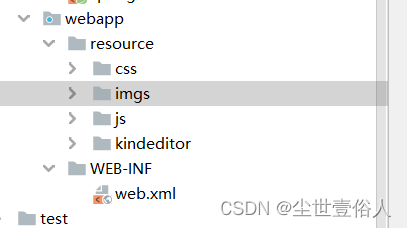
首先在web虚拟更路径下建立一个文件夹,存放开发中用到的所有静态资源,并将jquery和bootstrap放到相应路径下
前台今天资源准备好后,我们要再为数据库中的数据准备bean实体,,首先是文章Bean
package com.wy.bean;

import java.io.Serializable;
import java.util.Date;

/**
 *
 * @ClassName: Article
 * @Description: 文章内容表
 * @author: charles
 * @date: 2020年3月3日 上午11:25:22
 */
public class Article implements Serializable {

	/**
	 * @fieldName: serialVersionUID
	 * @fieldType: long
	 * @Description: TODO
	 */
	private static final long serialVersionUID = 1L;
	private Integer id;//主键
	private String title;//文章标题
	private String summary;//文章摘要
	private String content;//文章内容
	private String picture;//文章的标题图片

	private Integer channelId;//所属栏目ID
	private Integer categoryId;//所属分类ID
	private Integer userId;//文章发布人ID

	private Integer hits;//  点击量
	private Integer hot;//是否热门文章   1:热门     , 0 :一般文章
	private Integer status;//文章审核状态     0:待审        1:审核通过     -1: 审核未通过
	private Integer deleted;// 删除状态 0:正常,1:逻辑删除
	private Date created;// 文章发布时间
	private  Date  updated;// 文章修改时间

	private String contentType ;//文章内容类型  0:html  1:json
	private Channel channel;
	private Category category;
	private User user;


	private String keywords;//文章关键词
	private String original;//文章来源


	public String getKeywords() {
		return keywords;
	}
	public void setKeywords(String keywords) {
		this.keywords = keywords;
	}
	public String getOriginal() {
		return original;
	}
	public void setOriginal(String original) {
		this.original = original;
	}

	public Integer getId() {
		return id;
	}
	public void setId(Integer id) {
		this.id = id;
	}
	public String getTitle() {
		return title;
	}
	public void setTitle(String title) {
		this.title = title;
	}
	public String getSummary() {
		return summary;
	}
	public void setSummary(String summary) {
		this.summary = summary;
	}
	public String getContent() {
		return content;
	}
	public void setContent(String content) {
		this.content = content;
	}
	public String getPicture() {
		return picture;
	}
	public void setPicture(String picture) {
		this.picture = picture;
	}
	public Integer getChannelId() {
		return channelId;
	}
	public void setChannelId(Integer channelId) {
		this.channelId = channelId;
	}
	public Integer getCategoryId() {
		return categoryId;
	}
	public void setCategoryId(Integer categoryId) {
		this.categoryId = categoryId;
	}
	public Integer getUserId() {
		return userId;
	}
	public void setUserId(Integer userId) {
		this.userId = userId;
	}
	public Integer getHits() {
		return hits;
	}
	public void setHits(Integer hits) {
		this.hits = hits;
	}
	public Integer getHot() {
		return hot;
	}
	public void setHot(Integer hot) {
		this.hot = hot;
	}
	public Integer getStatus() {
		return status;
	}
	public void setStatus(Integer status) {
		this.status = status;
	}
	public Integer getDeleted() {
		return deleted;
	}
	public void setDeleted(Integer deleted) {
		this.deleted = deleted;
	}
	public Date getCreated() {
		return created;
	}
	public void setCreated(Date created) {
		this.created = created;
	}
	public Date getUpdated() {
		return updated;
	}
	public void setUpdated(Date updated) {
		this.updated = updated;
	}
	public Channel getChannel() {
		return channel;
	}
	public void setChannel(Channel channel) {
		this.channel = channel;
	}
	public Category getCategory() {
		return category;
	}
	public void setCategory(Category category) {
		this.category = category;
	}
	public User getUser() {
		return user;
	}
	public void setUser(User user) {
		this.user = user;
	}
	public String getContentType() {
		return contentType;
	}
	public void setContentType(String contentType) {
		this.contentType = contentType;
	}
	@Override
	public String toString() {
		return "Article [id=" + id + ", title=" + title + ", summary=" + summary + ", content=" + content + ", picture="
				+ picture + ", channelId=" + channelId + ", categoryId=" + categoryId + ", userId=" + userId + ", hits="
				+ hits + ", hot=" + hot + ", status=" + status + ", deleted=" + deleted + ", created=" + created
				+ ", updated=" + updated + ", contentType=" + contentType + ", channel=" + channel + ", category="
				+ category + ", user=" + user + ", keywords=" + keywords + ", original=" + original + "]";
	}

}
第二个是文章栏目Bean
package com.wy.bean;

import java.io.Serializable;

/**
 *
 * @ClassName: Channel
 * @Description: 文章栏目表
 * @author: charles
 * @date: 2020年3月3日 上午11:21:30
 */
public class Channel implements Serializable{

	/**
	 * @fieldName: serialVersionUID
	 * @fieldType: long
	 * @Description: TODO
	 */
	private static final long serialVersionUID = 1L;
	private Integer id;//主键
	private String name;//栏目的名称
	private String description;//描述
	private String icon;//栏目图标
	private Integer sorted;//排序
	public Integer getId() {
		return id;
	}
	public void setId(Integer id) {
		this.id = id;
	}
	public String getName() {
		return name;
	}
	public void setName(String name) {
		this.name = name;
	}
	public String getDescription() {
		return description;
	}
	public void setDescription(String description) {
		this.description = description;
	}
	public String getIcon() {
		return icon;
	}
	public void setIcon(String icon) {
		this.icon = icon;
	}
	public Integer getSorted() {
		return sorted;
	}
	public void setSorted(Integer sorted) {
		this.sorted = sorted;
	}

}
第三个是文章子栏目Bean
package com.wy.bean;
/**
 *
 * @ClassName: Category
 * @Description: 栏目的子分类
 * @author: charles
 * @date: 2020年3月3日 上午11:23:13
 */
public class Category {

	private Integer id;//主键
	private String name;//
	private Integer channelId;//所属栏目的ID
	private Integer sorted;//排序

	private Channel channel;//

	public Integer getId() {
		return id;
	}

	public void setId(Integer id) {
		this.id = id;
	}

	public String getName() {
		return name;
	}

	public void setName(String name) {
		this.name = name;
	}


	public Integer getChannelId() {
		return channelId;
	}

	public void setChannelId(Integer channelId) {
		this.channelId = channelId;
	}

	public Integer getSorted() {
		return sorted;
	}

	public void setSorted(Integer sorted) {
		this.sorted = sorted;
	}

	public Channel getChannel() {
		return channel;
	}

	public void setChannel(Channel channel) {
		this.channel = channel;
	}

}
第四个是系统配置Bean
package com.wy.bean;

import java.io.Serializable;

/**
 *
 * @ClassName: Settings
 * @Description: 系统配置表
 * @author: charles
 * @date: 2020年3月3日 上午11:39:58
 */
public class Settings implements Serializable {
	/**
	 * @fieldName: serialVersionUID
	 * @fieldType: long
	 * @Description: TODO
	 */
	private static final long serialVersionUID = 1L;
	private Integer id;
	private String siteDomain;
	private String siteName;
	private Integer article_list_size;//文章没页显示的条目
	private Integer slide_size;//显示多少个广告
	private String adminUsername;//
	private String  admin_password;
	public Integer getId() {
		return id;
	}
	public void setId(Integer id) {
		this.id = id;
	}
	public String getSiteDomain() {
		return siteDomain;
	}
	public void setSiteDomain(String siteDomain) {
		this.siteDomain = siteDomain;
	}
	public String getSiteName() {
		return siteName;
	}
	public void setSiteName(String siteName) {
		this.siteName = siteName;
	}
	public Integer getArticle_list_size() {
		return article_list_size;
	}
	public void setArticle_list_size(Integer article_list_size) {
		this.article_list_size = article_list_size;
	}
	public Integer getSlide_size() {
		return slide_size;
	}
	public void setSlide_size(Integer slide_size) {
		this.slide_size = slide_size;
	}
	public String getAdminUsername() {
		return adminUsername;
	}
	public void setAdminUsername(String adminUsername) {
		this.adminUsername = adminUsername;
	}
	public String getAdmin_password() {
		return admin_password;
	}
	public void setAdmin_password(String admin_password) {
		this.admin_password = admin_password;
	}

}
第五个是广告Bean
package com.wy.bean;

import java.io.Serializable;

/**
 *
 * @ClassName: Slide
 * @Description: 广告表
 * @author: charles
 * @date: 2020年3月3日 上午11:36:20
 */
public class Slide implements Serializable{

	/**
	 * @fieldName: serialVersionUID
	 * @fieldType: long
	 * @Description: TODO
	 */
	private static final long serialVersionUID = 1L;
	private Integer id;//主键
	private String title;//广告的文字说明
	private String picture;//广告的图片地址
	private String url;//点击广告进入的广告详情
	public Integer getId() {
		return id;
	}
	public void setId(Integer id) {
		this.id = id;
	}
	public String getTitle() {
		return title;
	}
	public void setTitle(String title) {
		this.title = title;
	}
	public String getPicture() {
		return picture;
	}
	public void setPicture(String picture) {
		this.picture = picture;
	}
	public String getUrl() {
		return url;
	}
	public void setUrl(String url) {
		this.url = url;
	}

}
最后一个是用户Bean
package com.wy.bean;

import java.io.Serializable;
import java.util.Date;

/**
 *
 * @ClassName: User
 * @Description: 用户
 * @author: charles
 * @date: 2020年3月31日 上午10:36:18
 */
public class User  implements Serializable{

	/**
	 * @fieldName: serialVersionUID
	 * @fieldType: long
	 * @Description: TODO
	 */
	private static final long serialVersionUID = 1L;


	private Integer id;
	private String username;//用户名
	private String password;//密码
	private String rePassword;//密码
	private String nickname;//昵称
	private Integer gender;//性别  0:女 1:男
	private Date birthday;//生日
	private Integer locked;//是否禁用 0:正常 1:禁用   。如果禁用则用户不能登录系统
	private Date created;//注册时间
	private Date updated;//修改时间

	private String role;//用户角色: 0:普通注册用户  1:管理员
	public Integer getId() {
		return id;
	}
	public void setId(Integer id) {
		this.id = id;
	}
	public String getUsername() {
		return username;
	}
	public void setUsername(String username) {
		this.username = username;
	}
	public String getPassword() {
		return password;
	}
	public void setPassword(String password) {
		this.password = password;
	}
	public String getRePassword() {
		return rePassword;
	}
	public void setRePassword(String rePassword) {
		this.rePassword = rePassword;
	}
	public String getNickname() {
		return nickname;
	}
	public void setNickname(String nickname) {
		this.nickname = nickname;
	}
	public Integer getGender() {
		return gender;
	}
	public void setGender(Integer gender) {
		this.gender = gender;
	}
	public Date getBirthday() {
		return birthday;
	}
	public void setBirthday(Date birthday) {
		this.birthday = birthday;
	}
	public Integer getLocked() {
		return locked;
	}
	public void setLocked(Integer locked) {
		this.locked = locked;
	}
	public Date getCreated() {
		return created;
	}
	public void setCreated(Date created) {
		this.created = created;
	}
	public Date getUpdated() {
		return updated;
	}
	public void setUpdated(Date updated) {
		this.updated = updated;
	}
	public String getRole() {
		return role;
	}
	public void setRole(String role) {
		this.role = role;
	}
	@Override
	public String toString() {
		return "User [id=" + id + ", username=" + username + ", password=" + password + ", nickname=" + nickname
				+ ", gender=" + gender + ", birthday=" + birthday + ", locked=" + locked + ", created=" + created
				+ ", updated=" + updated + ", role=" + role + "]";
	}
	@Override
	public int hashCode() {
		final int prime = 31;
		int result = 1;
		result = prime * result + ((id == null) ? 0 : id.hashCode());
		result = prime * result + ((username == null) ? 0 : username.hashCode());
		return result;
	}
	@Override
	public boolean equals(Object obj) {
		if (this == obj)
			return true;
		if (obj == null)
			return false;
		if (getClass() != obj.getClass())
			return false;
		User other = (User) obj;
		if (id == null) {
			if (other.id != null)
				return false;
		} else if (!id.equals(other.id))
			return false;
		if (username == null) {
			if (other.username != null)
				return false;
		} else if (!username.equals(other.username))
			return false;
		return true;
	}


}
上面这些Bean实体Bean对应的数据库在知识点1中可以找到,总结一下目前我们准备了六个数据实体分别是,文章、文章所属栏目、文章所属子栏目、系统配置、广告、用户
现在我们要开发首页功能,本次的Demo是CMS,那么在首页上我们肯定需要展示信息,也就是Article,并且携带的还有文章所属的父、子栏目,以及在本次的Demo中会有一个叫热点的栏目,当首页点击热点的时候出现热点广告,那么我们就要对应的写出这些实体的Dao层,首先是Article的Dao层开发
package com.wy.dao;

import java.util.List;

import org.apache.ibatis.annotations.Param;

import com.wy.bean.Article;

public interface ArticleMapper {
	/**
	 * 添加文章 方法
	 * @param article
	 * @return
	 */
	Integer insertArticle(Article article);

	/**
	 * 查询方法
	 * @param article 先使用文章对象,后期如有需要在更改
	 * @return
	 */
	List<Article> selectArticle(@Param("article")Article article);

	/**
	 * 单个查询
	 * @param id
	 * @return
	 */
	Article select(@Param("id")Integer id);

	/**
	 * 修改
	 * @param article
	 * @return
	 */
	int update(Article article);

	/**
	 * 查询文章
	 * @param article
	 * @return
	 */
	List<Article> getSections(@Param("article")Article article);

	/**
	 * 查询添加的是那篇文章
	 * @param title
	 * @return
	 */
	List<Integer> addId(@Param("title")String title);

	/**
	 * 滚局id添加
	 * @param addId
	 * @param content
	 */
	void addContent(@Param("addId")int addId,@Param("content") String content,@Param("type") String type);
}
以及对应的Mapperxml
<?xml version="1.0" encoding="UTF-8"?>
<!DOCTYPE mapper
PUBLIC "-//mybatis.org//DTD Mapper 3.0//EN"
"http://mybatis.org/dtd/mybatis-3-mapper.dtd">
<!--mybatis 映射文件的根标签    namespace:命名空间-->
<mapper namespace="com.wy.dao.ArticleMapper">
	<insert id="insertArticle">
		insert into cms_article
     	(title,summary,content,picture,channel_id,category_id,user_id,
     	hits,hot,status,deleted,created,updated,keywords,original,content_type)
     	values(#{title},#{summary},#{content},#{picture},#{channelId},
     	#{categoryId},#{userId},#{hits},#{hot},#{status},#{deleted},#{created},
     	#{updated},#{keywords},#{original},#{contentType})
	</insert>

	<resultMap type="com.wy.bean.Article" id="articleResultMap">
		<id column="id" property="id" />
		<!-- 基本信息 -->
		<result column="title" property="title" />
		<result column="content" property="content" />
		<result column="picture" property="picture" />
		<result column="channel_Id" property="channelId" />
		<result column="category_Id" property="categoryId" />
		<result column="user_Id" property="userId" />
		<result column="hits" property="hits" />
		<result column="status" property="status" />
		<result column="deleted" property="deleted" />
		<result column="created" property="created" />
		<result column="updated" property="updated" />
		<result column="hot" property="hot" />
		<result column="content_Type" property="contentType" />
		<result column="keywords" property="keywords" />
		<result column="original" property="original" />
		<!-- 封装一对一的关系对象 -->
		<association property="channel" javaType="com.wy.bean.Channel"
			select="selectByChannelId" column="channel_id" />
		<association property="category" javaType="com.wy.bean.Category"
			select="selectByCategoryId" column="category_id" />
		<association property="user" javaType="com.wy.bean.User"
			select="selectByUserId" column="user_id" />
	</resultMap>

	<select id="selectByChannelId" resultType="com.wy.bean.Channel">
		select * from cms_channel where id =#{channel_id}
	</select>

	<select id="selectByCategoryId" resultType="com.wy.bean.Category">
		select * from cms_category where id =#{category_id}
	</select>

	<select id="selectByUserId" resultType="com.wy.bean.User">
		select * from cms_user where id =#{user_id}
	</select>

	<select id="selectArticle" resultMap="articleResultMap">
		select  * from cms_article
		<where>
			<if test="article.userId!=null">
				user_id = #{article.userId}
			</if>
			<!-- 根据文章的审核状态 -->
			<if test="article.status!=null">
				and status =#{article.status}
			</if>
			<!-- 按照删除状态 0:未删除 1:删除 -->
			<if test="article.deleted!=null">
			  	and deleted =#{article.deleted}
			</if>
			<!-- 根据文章的标题 -->
			<if test="article.title!=null and article.title!=''">
				and title like "%"#{article.title} "%"
			</if>
			<!-- 首页查询 -->
			<if test="article.channelId!=null">
				and channel_id = #{article.channelId}
			</if>
			<if test="article.categoryId!=null">
				and category_id = #{article.categoryId}
			</if>
			<!-- 热点文章 -->
			<if test="article.hot!=null">
				and hot =#{article.hot}
			</if>
		</where>
		order by created desc
	</select>

	<select id="select" resultMap="articleResultMap">
		select * from cms_article where id =#{id}
	</select>

	<!-- 修改文章 -->
	<update id="update">
		update cms_article
		<trim prefix="set" suffix="where id = #{id}" suffixOverrides=",">
			<if test="title!=null and title!=''">
				title =#{title},
			</if>
			<if test="status!=null">
				status =#{status},
			</if>
			<if test="hot!=null">
				hot =#{hot},
			</if>
		</trim>
	</update>

	<!-- 查询某类篇文 -->
	<select id="getSections" resultMap="articleResultMap">
		select b.* from
		section as a LEFT JOIN cms_article as b
		on a.article_id=b.id
		<where>
			<if test="article.title!=null and article.title!=''">
				like b.title "%" #{article.title} "%"
			</if>
		</where>
	</select>

	<select id="addId" resultType="int">
		select b.id from
		section as a LEFT JOIN cms_article as b
		on a.article_id=b.id where b.title like '%${title}%'
	</select>

	<insert id="addContent">
		insert into section(article_id,section_content,section_type) value(#{addId},#{content},#{type})
	</insert>
</mapper>
第二个是栏目的Dao,父子栏目在本Demo中融合写在一个Dao中
package com.wy.dao;

import java.util.List;

import com.wy.bean.Category;
import com.wy.bean.Channel;

/**
 *
 * @ClassName: ChannelMapper
 * @Description: 栏目和分类的mapper
 * @author: charles
 * @date: 2020年4月2日 上午10:43:51
 */
public interface ChannelMapper {
	/**
	 *
	 * @Title: selects
	 * @Description: 查询所有的栏目
	 * @return
	 * @return: List<Channel>
	 */
	List<Channel> selects();
	/**
	 *
	 * @Title: selectsByChannelId
	 * @Description: 根据栏目ID 查询所有的分类
	 * @param channelId
	 * @return
	 * @return: List<Category>
	 */
	List<Category> selectsByChannelId(Integer channelId);

}
以及对应的xml
<?xml version="1.0" encoding="UTF-8"?>
<!DOCTYPE mapper PUBLIC "-//mybatis.org//DTD Mapper 3.0//EN"
 "http://mybatis.org/dtd/mybatis-3-mapper.dtd" >
<mapper namespace="com.wy.dao.ChannelMapper">
	<select id="selects" resultType="com.wy.bean.Channel">
		select * from cms_channel

	</select>
	<select id="selectsByChannelId" resultType="com.wy.bean.Category">

		select * from cms_category where channel_id =#{channelId}

	</select>


</mapper>
最后是广告的Dao
package com.wy.dao;

import java.util.List;

import com.wy.bean.Slide;

public interface SlideMapper {

	/**
	 * 查询所有广告
	 * @return
	 */
	List<Slide> getAll();
}
以及对应的xml
<?xml version="1.0" encoding="UTF-8"?>
<!DOCTYPE mapper PUBLIC "-//mybatis.org//DTD Mapper 3.0//EN"
 "http://mybatis.org/dtd/mybatis-3-mapper.dtd" >
<mapper namespace="com.wy.dao.SlideMapper">
	<select id="getAll" resultType="com.wy.bean.Slide">
		select * from cms_slide
	</select>
</mapper>
Dao层开发结束后,就是Service层的开发,同样对应了四个数据主题的Bean,首先是文章的Service
package com.wy.service;

import java.util.List;

import com.wy.bean.Article;

public interface ArticleService {
	/**
	 * 添加文章 方法
	 * @param article
	 * @return
	 */
	Integer insertArticle(Article article);

	/**
	 * 查询方法
	 * @param article 先使用文章对象,后期如有需要在更改
	 * @return
	 */
	List<Article> selectArticle(Article article,Integer pageNum,Integer pageSize);

	/**
	 * 查询单个的文章
	 * @param id
	 * @return
	 */
	Article select(Integer id);

	/**
	 *
	 * @Title: update
	 * @Description: 修改文章
	 * @param article
	 * @return
	 * @return: int
	 */
	int update(Article article);

	/**
	 * 查询军事文章
	 * @param article
	 * @return
	 */
	List<Article> getSections(Article article,Integer pageNum);

	/**
	 * 添加
	 *
	 */
	void add(String title,String content);
}
以及对应的实现类
package com.wy.service;

import java.util.List;

import org.springframework.beans.factory.annotation.Autowired;
import org.springframework.stereotype.Service;

import com.github.pagehelper.PageHelper;
import com.wy.bean.Article;
import com.wy.dao.ArticleMapper;

@Service
public class ArticleServiceImpl implements ArticleService{
	@Autowired
	private ArticleMapper articleDao;

	@Override
	public Integer insertArticle(Article article) {
		return articleDao.insertArticle(article);
	}

	@Override
	public List<Article> selectArticle(Article article,Integer pageNum,Integer pageSize) {
		PageHelper.startPage(pageNum, pageSize);
		List<Article> allArticle = articleDao.selectArticle(article);
		return allArticle;
	}

	@Override
	public Article select(Integer id) {
		return articleDao.select(id);
	}

	@Override
	public int update(Article article) {
		return articleDao.update(article);
	}

	@Override
	public List<Article> getSections(Article article,Integer pageNum) {
		PageHelper.startPage(pageNum, 3);
		List<Article> sections = articleDao.getSections(article);
		return sections;
	}

	@Override
	public void add(String title,String content) {
		//查询追加那篇文章
		List<Integer> id=articleDao.addId(title);
		int addId=id.get(0);
		//默认类型
		//添加内容
		articleDao.addContent(addId,content,"html");
	}
}
第二个是栏目的Service层
package com.wy.service;

import java.util.List;

import com.wy.bean.Category;
import com.wy.bean.Channel;

public interface ChannelService {
	/**
	 *
	 * @Title: selects
	 * @Description: 查询所有的栏目
	 * @return
	 * @return: List<Channel>
	 */
	List<Channel> selects();
	/**
	 *
	 * @Title: selectsByChannelId
	 * @Description: 根据栏目ID 查询所有的分类
	 * @param channelId
	 * @return
	 * @return: List<Category>
	 */
	List<Category> selectsByChannelId(Integer channelId);
}
以及对应的实现类
package com.wy.service;

import java.util.List;


import javax.annotation.Resource;

import org.springframework.stereotype.Service;

import com.wy.bean.Category;
import com.wy.bean.Channel;
import com.wy.dao.ChannelMapper;

@Service
public class ChannelServiceImpl implements ChannelService {
	@Resource
	private ChannelMapper channelMapper;

	@Override
	public List<Channel> selects() {
		// TODO Auto-generated method stub
		return channelMapper.selects();
	}

	@Override
	public List<Category> selectsByChannelId(Integer channelId) {
		// TODO Auto-generated method stub
		return channelMapper.selectsByChannelId(channelId);
	}

}
最后是广告的Service层
package com.wy.service;

import java.util.List;

import com.wy.bean.Slide;

public interface SlideService {
	/**
	 * 查询所有广告
	 * @return
	 */
	List<Slide> getAll();
}
以及对应的实现类
package com.wy.service;

import java.util.List;

import javax.annotation.Resource;

import org.springframework.stereotype.Service;

import com.wy.bean.Slide;
import com.wy.dao.SlideMapper;

@Service
public class SlideServiceImpl implements SlideService {

	@Resource
	private SlideMapper slideMapper;

	@Override
	public List<Slide> getAll() {
		return slideMapper.getAll();
	}

}
到此,大家就应该可以总结出SSM的dao层service层如何开发了,Dao层由于我们配置文件中已经写了所处的包,所以不需要任何注释,只需要保证拥有名字相同的接口和XML映射即可,而service层则需要在实现类上标注属于service,当然Dao其实有一个默认的路径但是一般很少有人使用默认的那种方式,主要是那不安全
大家如果对Dao默认配置有兴趣的话,可以在网上查一查,不使用默认的dao路径,是因为默认情况下到层的XML文件是需要放在resource下的,是和包路径分开的,更要命的是,我们开发代码要注重的是数据的安全,如果你把XML文件放在了resource下,对前端来说就变成了一个静态资源,很有可能被网络渗透的人员拿到,从而暴露了你数据库的库表结构
到此基本的准备以及完成,现在就是让我们写的这些代码动起来,前面说了我们先开发首页,因此我们要准备一个IndexController,作为首页的模块,并在模块中拿到数据跳转首页
package com.wy.controller;

import java.util.List;


import javax.annotation.Resource;

import org.springframework.stereotype.Controller;
import org.springframework.ui.Model;
import org.springframework.web.bind.annotation.RequestMapping;
import org.springframework.web.bind.annotation.RequestParam;

import com.github.pagehelper.PageInfo;
import com.wy.bean.Article;
import com.wy.bean.Category;
import com.wy.bean.Channel;
import com.wy.bean.Slide;
import com.wy.service.ArticleService;
import com.wy.service.ChannelService;
import com.wy.service.SlideService;

/**
 *
 * @ClassName: IndexController
 * @Description: cms首页控制器
 * @author: charles
 * @date: 2020年4月7日 上午10:39:01
 */
@Controller
public class IndexController {

	@Resource
	private  ChannelService channelService;

	@Resource
	private ArticleService articleService;

	@Resource
	private SlideService slideService;

	/**
	 *
	 * @Title: index
	 * @Description: 进入首页
	 * @return
	 * @return: String
	 */
	@RequestMapping("index.do")
	public String index(Model model,Article article,@RequestParam(defaultValue="1")Integer pageNum) {
		//封装查询条件
		model.addAttribute("article", article);
		//查询所有的栏目
		List<Channel> channels = channelService.selects();
		model.addAttribute("channels", channels);
		//栏目ID 不为空 也就是说当前页面焦点不是热点,那么就要查询其下分类
		if(article.getChannelId()!=null){
			List<Category> categorys = channelService.selectsByChannelId(article.getChannelId());
			model.addAttribute("categorys", categorys);
		}else{
			//如果栏目id是空的那么就代表这查询的是热点,为热点查询广告
			List<Slide> slides = slideService.getAll();
			model.addAttribute("slides", slides);
			//当没有栏目id时限制只出现热点文章
			article.setHot(1);
		}
		//无论是什么情况控制查询文章不是被逻辑删除的
		article.setDeleted(0);
		//不能查询非审核之后的文章
		article.setStatus(1);
		//查询符合条件的所有文章
		List<Article> selectArticle = articleService.selectArticle(article, pageNum, 6);
		PageInfo info=new PageInfo<>(selectArticle);
		model.addAttribute("info", info);
		//查询五条最新的文章
		Article latest = new Article();
		latest.setDeleted(0);
		//不能查询非审核之后的文章
		latest.setStatus(1);
		List<Article> newArticles = articleService.selectArticle(latest, 1, 5);
		PageInfo lastArticles=new PageInfo<>(newArticles);
		model.addAttribute("lastArticles", lastArticles);
		return "index/index";
	}
}
大家要特别注意的是最后返回的是return "index/index";,之所以写成这样,是有原因的,如果大家跟随了知识点1准备项目,应该会在mvc配置文件中看到一个视图解析器的配置,这个配置的作用就是要将所有跳转回页面的返回值,前后拼接上相应的字符串,把它变成前端的某个路径,本Demmo中返回到前端的安全路径下,从而前端开发将页面也保存在WEB-INF这个文件夹下,这也是为了后端接口的安全,因为前端的这个路径是一个安全路径,通过浏览器或者其他方式直接访问的时候是没有办法抵达的,只有通过后端往前端去跳转时才允许访问,而且访问后前端浏览器也不会暴露真实的页面路径
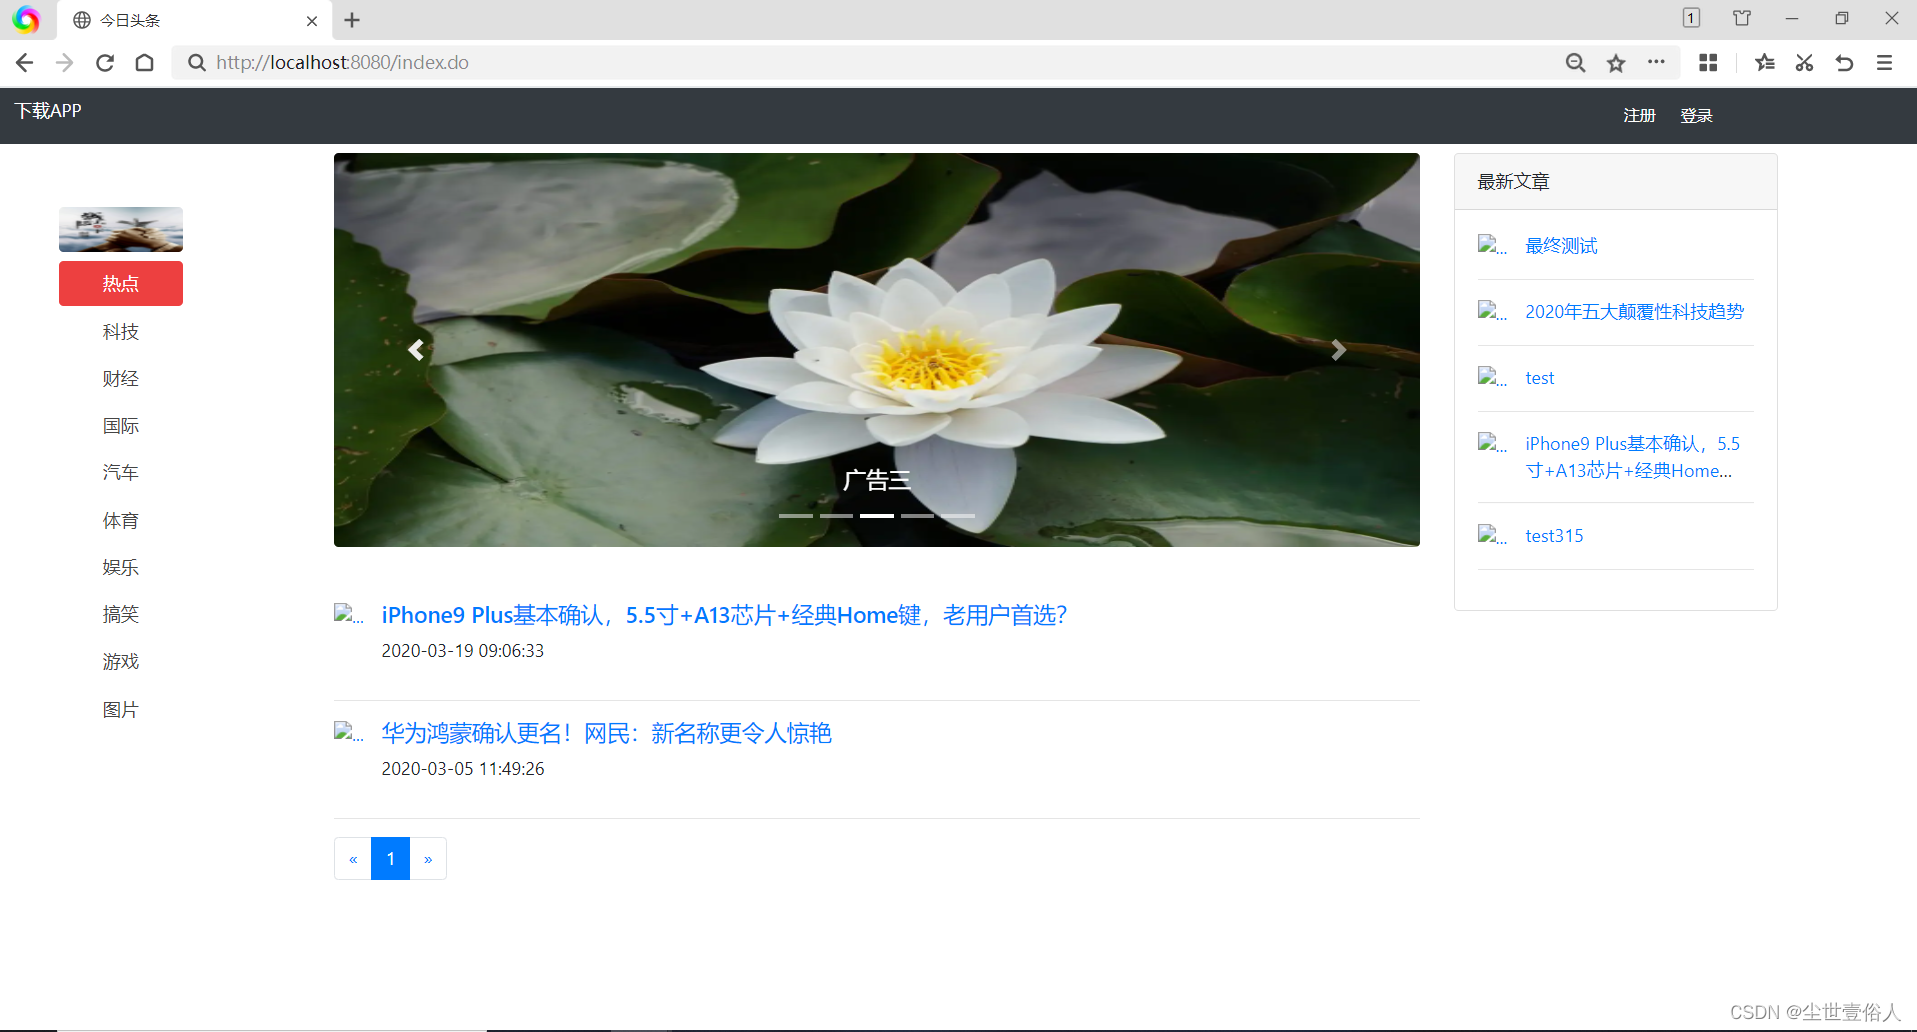
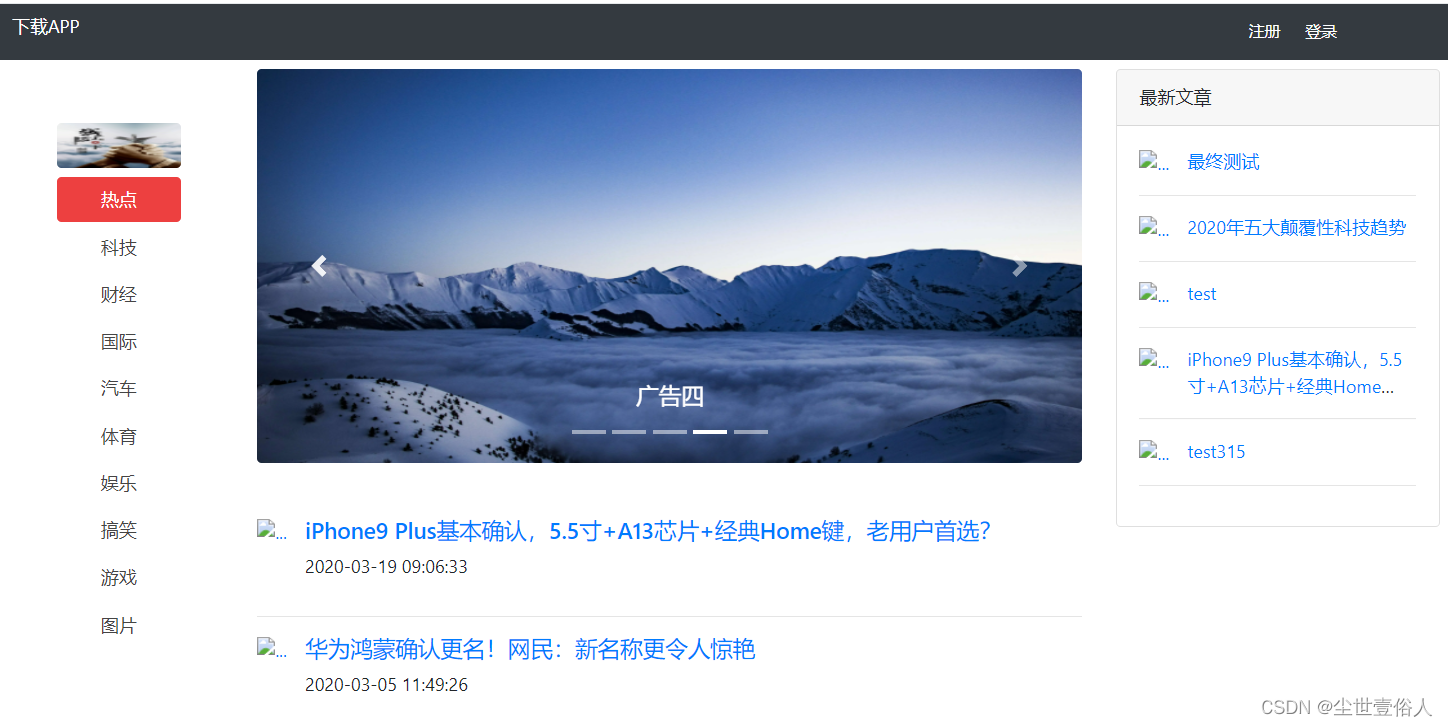
至于代码中说道的热点不理解的没关系,给大家看一下首页的效果就明白了,我们首页要开发成下图这个样子
现在我们就去开发一个前端页面,首先去前端与web.xml同级下创建一个view文件夹之后开发的所有页面我们都将放在这个文件夹下
之后我们创建一个路径为/view/index/index.jsp的文件,并按照对比上面的效果图书写如下代码,下面代码中的布局类代码比如网格的div等都是在bootstrap官网上可以找到的,包括各个值是什么意思官网都有,去自己查着看 https://v4.bootcss.com/docs/layout/overview/
<%@ page language="java" contentType="text/html; charset=UTF-8"
pageEncoding="UTF-8"%>
<%@ taglib prefix="c" uri="http://java.sun.com/jsp/jstl/core"%>
<%@ taglib prefix="fmt" uri="http://java.sun.com/jsp/jstl/fmt"%>
<!DOCTYPE html>
<html>
<head>
<meta charset="UTF-8">
<!-- 声明视窗 指定缩放比例1:1 防止不同的设备访问后缩放异常 -->
<meta name="viewport" content="width=device-width, initial-scale=1.0">
<title>今日头条</title>
<link href="/resource/css/bootstrap.min.css" rel="stylesheet">
<link href="/resource/css/index.css" rel="stylesheet">
<script type="text/javascript" src="/resource/js/jquery-3.2.1.js"></script>
<!--popper是bootstrap-js中的弹窗、提示、下拉菜单需要的插件,bootstrap-js一般和bootstrap-css一起导入用来实现效果,但是这个它的js必须导入jquery -->
<script type="text/javascript" src="/resource/js/popper.min.js"></script>
<script type="text/javascript" src="/resource/js/bootstrap.min.js"></script>
<style type="text/css">
.ex{
/*如何处理元素内的空白部分*/
white-space:initial;
/*超出部分隐藏*/
overflow : hidden;
text-overflow: ellipsis;
display: -webkit-box;
-webkit-line-clamp: 2;
-webkit-box-orient: vertical;
}
</style>
</head>
<body>
<!-- 最外面一个大盒子,是bootstrap的网格 -->
<div class="container-fluid">
<!-- 网页头部的黑框 -->
<div class="row" style="height: 50px">
<!-- 黑框左侧放个文字也可以是一个logo -->
<div class="col-md-10 bg-dark pt-2">
<font color="white">下载APP</font>
</div>
<!-- 黑框右侧的内容 -->
<div class="col-md-2 bg-dark pt-2">
<!-- 如果没有登录 -->
<c:if test="${sessionScope.user==null }">
<button class="btn btn-link btn-sm text-decoration-none "
data-toggle="modal" data-target="#exampleModal" onclick="reg()">
<font color="white">注册</font>
</button>
<button class="btn btn-link btn-sm text-decoration-none"
data-toggle="modal" data-target="#exampleModal" onclick="login()">
<font color="white">登录</font>
</button>
</c:if>
<!-- 如果登录 -->
<c:if test="${sessionScope.user!=null }">
<div class="btn-group dropleft">
<button type="button" class="btn btn-dark btn-sm dropdown-toggle"
data-toggle="dropdown" aria-haspopup="true" aria-expanded="false">${sessionScope.user.username }</button>
<div class="dropdown-menu">
<!-- Dropdown menu links -->
<ul>
<li><a href="/my/index.do">个人中心</a></li>
<li><a href="/passport/logout.do">注销</a></li>
</ul>
</div>
</div>
</c:if>
</div>
</div>
<!-- 网页头部黑框结束 -->
<!--黑框下面的主体内容 -->
<div class="row mt-2">
<!-- 左侧栏目菜单 -->
<div class="col-md-2 mt-5">
<ul>
<li><img alt="" src="/resource/imgs/logo.jpg" class="rounded" style="width: 110px;height: 40px"></li>
<li class="mt-2"><a class="channel-item ${article.channelId==null?"active":"" }" href="/index.do">热点</a></li>
<c:forEach items="${channels}" var="channel">
<li><a class="channel-item ${article.channelId==channel.id?"active":"" }" href="/index.do?channelId=${channel.id}">${channel.name }</a></li>
</c:forEach>
</ul>
</div>
<!-- 中间内容 -->
<div class="col-md-7" style="height: 700px">
<!-- 轮播图的显示 显示的条件是当前焦点是热点栏目 -->
<c:if test="${article.channelId==null }">
<div id="carouselExampleCaptions" class="carousel slide" data-ride="carousel">
<ol class="carousel-indicators">
<c:forEach items="${slides}" varStatus="i">
<li data-target="#carouselExampleCaptions" data-slide-to="${i.index }" class="active"></li>
</c:forEach>
</ol>
<div class="carousel-inner">
<c:forEach items="${slides}" var="slide" varStatus="i">
<div class="carousel-item ${i.index==0?"active":"" }">
<img style="height: 350px" src="/pic/${slide.picture }" class="d-block w-100 rounded" alt="...">
<div class="carousel-caption d-none d-md-block">
<h5>${slide.title }</h5>
</div>
</div>
</c:forEach>
</div>
<a class="carousel-control-prev" href="#carouselExampleCaptions"
role="button" data-slide="prev"> <span
class="carousel-control-prev-icon" aria-hidden="true"></span> <span
class="sr-only">Previous</span>
</a>
<a class="carousel-control-next" href="#carouselExampleCaptions"
role="button" data-slide="next">
<span class="carousel-control-next-icon" aria-hidden="true"></span> <span
class="sr-only">Next</span>
</a>
</div>
</c:if>
<!-- 栏目分类的显示 如果不是热点则展示子栏目-->
<c:if test="${article.channelId!=null }">
<div>
<ul class="subchannel">
<li class="sub-item ${article.categoryId==null?"sub-selected":"" }"><a href="/index.do?channelId=${article.channelId }">全部</a></li>
<c:forEach items="${categorys}" var="category">
<li class="sub-item ${article.categoryId==category.id?"sub-selected":"" }"><a href="/index.do?channelId=${article.channelId}&categoryId=${category.id }">${category.name }</a></li>
</c:forEach>
</ul>
</div>
</c:if>
<!-- 栏目先的文章 :内容代码共用如果后期有差别,那么提前将代码分开放在if标签中 -->
<div class="mt-5">
<!-- 无序列表 -->
<ul class="list-unstyled">
<c:forEach items="${info.list}" var="article">
<li class="media">
<a href="/detail.do?id=${article.id}" target="_blank"><img style="width: 100px;height: 80px" src="/pic/${article.picture }" class="mr-3 rounded" alt="..."></a>
<div class="media-body">
<h5 class="mt-0 mb-1"><a href="/detail.do?id=${article.id}" target="_blank">${article.title }</a></h5>
<p class="pt-1">
<fmt:formatDate value="${article.created }" pattern="yyyy-MM-dd HH:mm:ss"/>
</p>
</div>
</li>
<hr>
</c:forEach>
</ul>
</div>
<!-- 分页 -->
<div>
<jsp:include page="/WEB-INF/view/common/bookstappages.jsp"></jsp:include>
</div>
</div>
<!-- 右侧边栏:显示最新的五条新闻 -->
<div class="col-md-3">
<!-- 卡片样式 -->
<div class="card" style="width: 18rem;">
<div class="card-header">最新文章</div>
<div class="card-body">
<!-- 列表样式 -->
<ul class="list-unstyled">
<c:forEach items="${lastArticles.list}" var="lastArticle">
<li class="media">
<a href="/detail.do?id=${lastArticle.id}" target="_blank"><img src="/pic/${lastArticle.picture }" class="mr-3 rounded" alt="..." style="width: 60px;height: 60px"></a>
<div class="media-body ex">
<a href="/detail.do?id=${lastArticle.id}" target="_blank"> ${lastArticle.title }</a>
</div>
</li>
<hr>
</c:forEach>
</ul>
</div>
</div>
</div>
</div>
</div>
<!-- 登录注册的模态框 前面的视窗支持就是为了这个 -->
<div class="modal fade" id="exampleModal" tabindex="-1" role="dialog" aria-labelledby="exampleModalLabel" aria-hidden="true">
<div class="modal-dialog" role="document">
<div class="modal-content">
<div class="modal-header">
<h5 class="modal-title" id="exampleModalLabel"></h5>
<button type="button" class="close" data-dismiss="modal" aria-label="Close">
<span aria-hidden="true">×</span>
</button>
</div>
<div class="modal-body" id="modalbody">
</div>
</div>
</div>
</div>
<script type="text/javascript">
function goPage(pageNum) {
var channelId ="${article.channelId}";
var categoryId="${article.categoryId}";
location.href="/index.do?pageNum="+pageNum+"&channelId="+channelId+"&categoryId="+categoryId;
}
//注册
function reg() {
$("#title").text("用户注册");
$("#modalbody").load("/passport/reg.do");
}
function login() {
$("#title").text("用户登录");
$("#modalbody").load("/passport/login.do");
}
</script>
</body>
</html>
上面的代码书写完后,你会发现idea会提示你在151行左右有一个jsp指令拼接了一个页面,这个页面是独立出来了分页,我们现在来开发这个/view/common/bookstappages.jsp页面
<%@ page language="java" contentType="text/html; charset=UTF-8"
pageEncoding="UTF-8"%>
<%@ taglib prefix="c" uri="http://java.sun.com/jsp/jstl/core"%>
<div>
<nav aria-label="Page navigation example">
<ul class="pagination">
<!-- 如果没有记录则显示无记录 -->
<c:if test="${info.total==0}">
<i>暂无数据</i>
</c:if>
<!-- 如果有记录则显示显示 《 符号-->
<c:if test="${info.total!=0}">
<li class="page-item"><a class="page-link"
href="javascript:goPage(${info.prePage==0?1:info.prePage })"
aria-label="Previous"> <span aria-hidden="true">«</span>
</a></li>
</c:if>
<!-- 如果有记录 则展示 该组件items没有值则不会运行-->
<c:forEach items="${info.navigatepageNums}" var="n">
<li class="page-item ${n==info.pageNum?"active":""}">
<a class="page-link" href="javascript:goPage(${n})">${n}</a>
</li>
</c:forEach>
<!-- 如果有记录则显示显示 》 符号-->
<c:if test="${info.total!=0}">
<li class="page-item"><a class="page-link"
href="javascript:goPage(${info.nextPage ==0?info.pages:info.nextPage})"
aria-label="Next"> <span aria-hidden="true">»</span>
</a></li>
</c:if>
</ul>
</nav>
</div>
随后前端需要一个样式的代码,/resource/css/index.css
.channel-item:hover {
    animation-name: hvr-back-pulse;
    animation-duration: .2s;
    animation-timing-function: linear;
    animation-iteration-count: 1;
    background-color: #ed4040;
    color: #fff;
}

.channel-item:visited {
    color: #444;
}

a:active, a:hover {
    outline: 0;
    text-decoration: none;
}

a:visited {
    color: #999;
}
.channel-item {
    display: block;
    width: 110px;
    height: 40px;
    line-height: 40px;
    text-align: center;
    color: #444;
    border-radius: 4px;
    margin-bottom: 2px;
    transition-property: color,background-color;
}
.channel-item.active {
    background-color: rgb(237, 64, 64);
    color: rgb(255, 255, 255);
}
li {
	list-style: none;
}


.subchannel .sub-list {
    top: -50px;
    background: #fff;
    height: 38px;
  /*   border-bottom: 2px solid #f2f2f2; */
}

.subchannel .sub-item {
    line-height: 38px;
    font-size: 16px;
    display: inline-block;
    color: #444;
    margin-left: 33px;
    background: #fff;
}
.subchannel .sub-selected {
    color: #f85959;
    border-bottom: 2px solid #f85959;
}
.subchannel .sub-item:first-child {
    margin-left: 0!important;
}
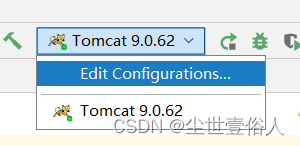
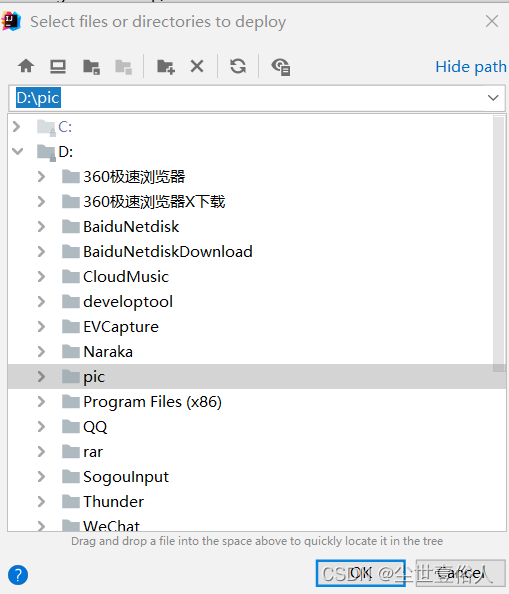
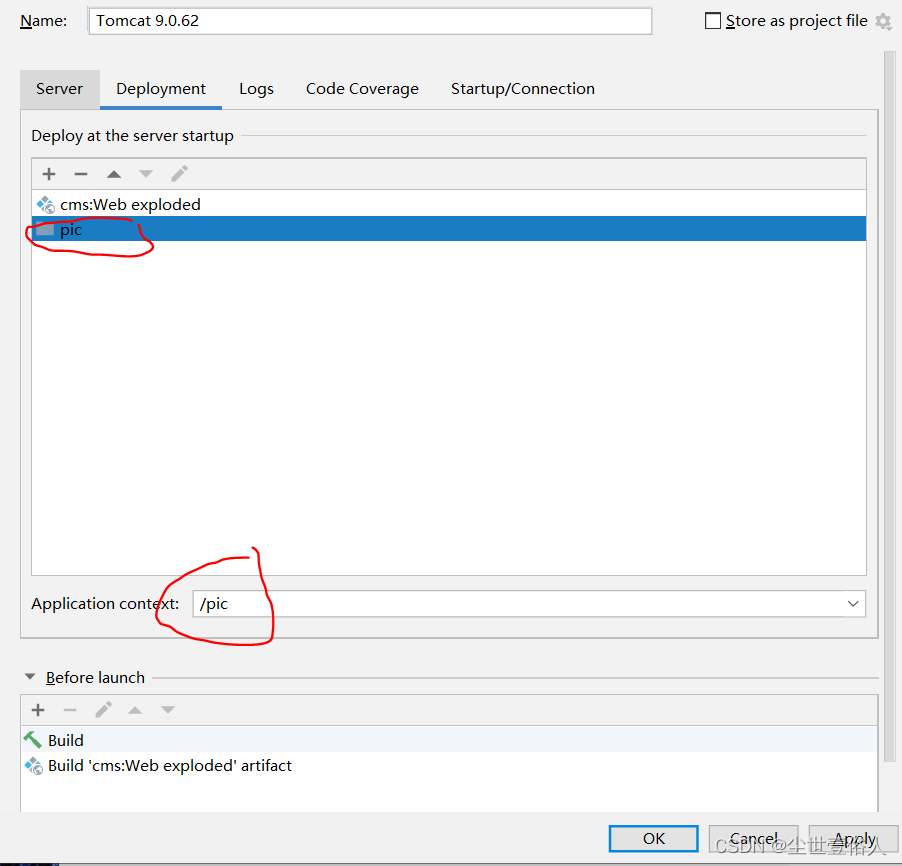
这时项目已经可以运行并展示效果了,但是当你运行之后,你会发现一个问题,广告展示不出来,这个是因为我们需要在idea中配置一个存放图片的本地路径这个路径在正式开发中是不需要的,应为正式开发中,所有的图片会存放在一个专门的图片服务器上,数据库中保存着访问路径,但是我们现在没有这样的图片服务器所以需要展示用过本地的路径配置一个代替,点击Tomcat的配置界面
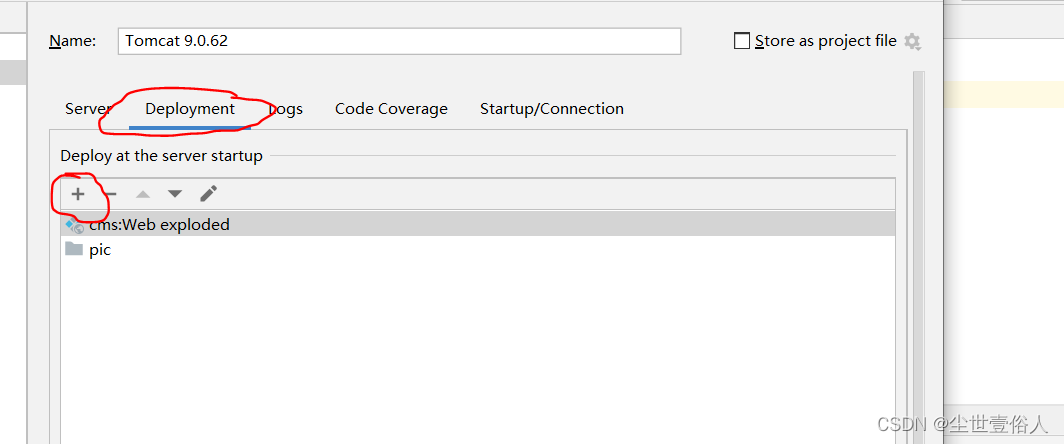
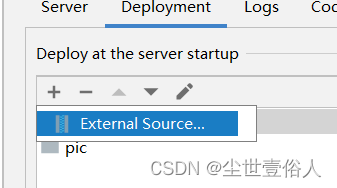
弹出的页面中选择一个本地路径存放照片
设置它的访问路径,要和首页代码里的访问路径一样
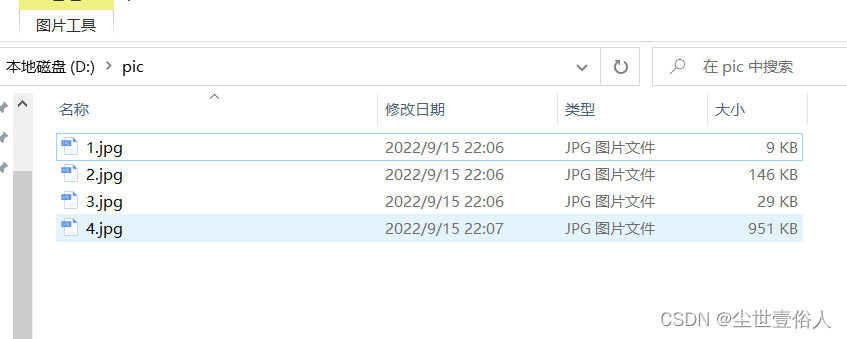
随后在这个路径下保存一些图片,随后在数据库中的cms_slide表中,改成你的图片名字

这个时候你在重启项目访问首页就可以看到效果了
到此首页的主体功能开发完成,此时你的项目可以完成不同栏目的切换查看,其他功能暂无完善
本项目目前以上传github :https://github.com/wangyang159/cmsdemo


 1474
1474


 被折叠的 条评论
为什么被折叠?
被折叠的 条评论
为什么被折叠?
 到【灌水乐园】发言


