


简介
定义:Matrix 是一个矩阵,主要功能是坐标映射,数值转换。
Matrix 特点 :
-
作用范围更广,Matrix在View,图片,动画效果等各个方面均有运用,相比与之前讲解等画布操作应用范围更广。
-
更加灵活,画布操作是对Matrix的封装,Matrix作为更接近底层的东西,必然要比画布操作更加灵活。
-
封装很好,Matrix本身对各个方法就做了很好的封装,让开发者可以很方便的操作Matrix。
-
难以深入理解,很难理解中各个数值的意义,以及操作规律,如果不了解矩阵,也很难理解前乘,后乘。
方法表
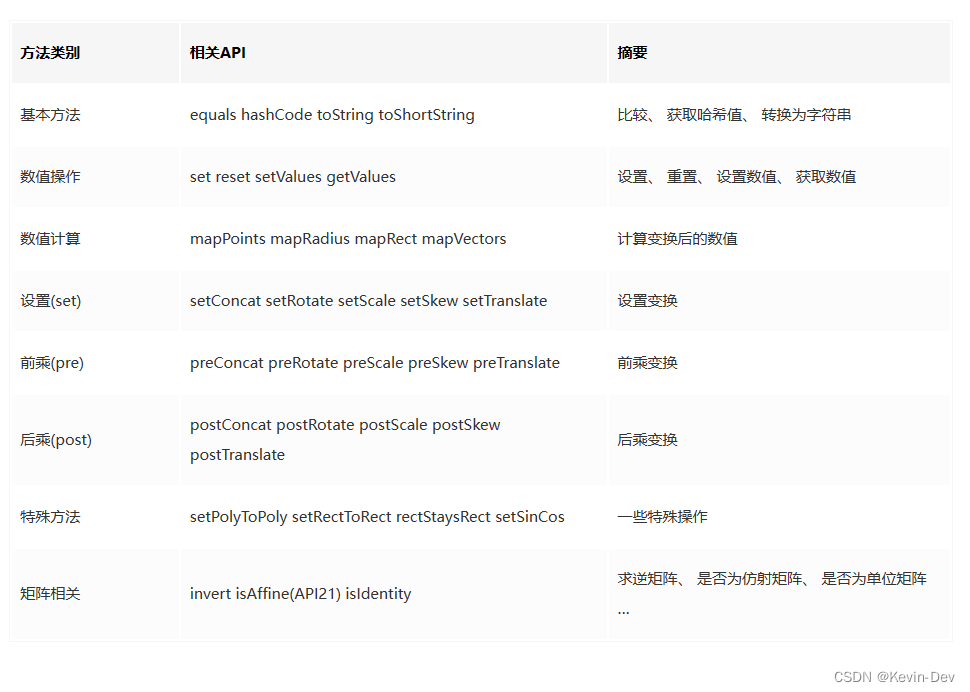
Matrix 方法详解
1. 构造方法
- 无参构造
Matrix matrix = new Matrix();
- 有参构造
Matrix matrix = new Matrix(src);
src : 一个已经存在的矩阵作为参数
2. 基本方法
-
equals()
比较两个Matrix的数值是否相同。 -
hashCode()
获取Matrix的哈希值。 -
toString()
将Matrix转换为字符串: Matrix{[1.0, 0.0, 0.0][0.0, 1.0, 0.0][0.0, 0.0, 1.0]} -
toShortString()
将Matrix转换为短字符串: [1.0, 0.0, 0.0][0.0, 1.0, 0.0][0.0, 0.0, 1.0]
3. 数值操作
-
set()
没有返回值,有一个参数,作用是将参数Matrix的数值复制到当前Matrix中。如果参数为空,则重置当前Matrix,相当于reset()。 -
reset()
重置当前Matrix(将当前Matrix重置为单位矩阵)。 -
setValues (float[] values)
setValues 的参数是浮点型的一维数组,长度需要大于 9,拷贝数组中的前 9 位数值赋值给当前Matrix。 -
getValues (float[] values)
很显然,getValues和setValues是一对方法,参数也是浮点型的一维数组,长度需要大于 9,将Matrix中的数值拷贝进参数的前 9 位中。
4. 数值计算
mapPoints
void mapPoints (float[] pts)
void mapPoints (float[] dst, float[] src)
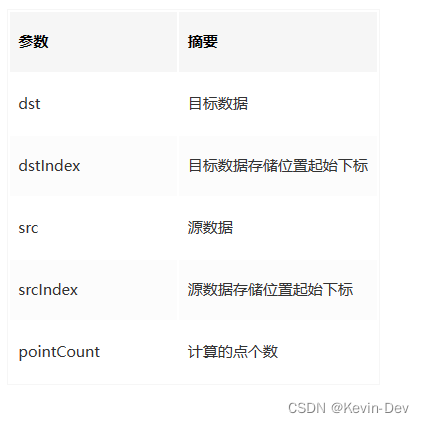
void mapPoints (float[] dst, int dstIndex,float[] src, int srcIndex, int pointCount)
(1) void mapPoints (float[] pts) 方法仅有一个参数,pts 数组作为参数传递原始数值,计算结果仍存放在 pts 中。
示例:
// 初始数据为三个点 (0, 0) (80, 100) (400, 300)
float[] pts = new float[]{0, 0, 80, 100, 400, 300};

// 构造一个matrix,x坐标缩放0.5
Matrix matrix = new Matrix();
matrix.setScale(0.5f, 1f);

// 输出pts计算之前数据
Log.i(TAG, "before: "+ Arrays.toString(pts));

// 调用map方法计算
matrix.mapPoints(pts);

// 输出pts计算之后数据
Log.i(TAG, "after : "+ Arrays.toString(pts));
输出结果:
before: [0.0, 0.0, 80.0, 100.0, 400.0, 300.0]
after : [0.0, 0.0, 40.0, 100.0, 200.0, 300.0]
(2) void mapPoints (float[] dst, float[] src) ,src 作为参数传递原始数值,计算结果存放在 dst 中,src 不变。
示例:
// 初始数据为三个点 (0, 0) (80, 100) (400, 300)
float[] src = new float[]{0, 0, 80, 100, 400, 300};
float[] dst = new float[6];

// 构造一个matrix,x坐标缩放0.5
Matrix matrix = new Matrix();
matrix.setScale(0.5f, 1f);

// 输出计算之前数据
Log.i(TAG, "before: src="+ Arrays.toString(src));
Log.i(TAG, "before: dst="+ Arrays.toString(dst));

// 调用map方法计算
matrix.mapPoints(dst,src);

// 输出计算之后数据
Log.i(TAG, "after : src="+ Arrays.toString(src));
Log.i(TAG, "after : dst="+ Arrays.toString(dst));
输出结果:
before: src=[0.0, 0.0, 80.0, 100.0, 400.0, 300.0]
before: dst=[0.0, 0.0, 0.0, 0.0, 0.0, 0.0]
after : src=[0.0, 0.0, 80.0, 100.0, 400.0, 300.0]
after : dst=[0.0, 0.0, 40.0, 100.0, 200.0, 300.0]
(3) void mapPoints (float[] dst, int dstIndex,float[] src, int srcIndex, int pointCount) 可以指定只计算一部分数值。
示例:
// 初始数据为三个点 (0, 0) (80, 100) (400, 300)
float[] src = new float[]{0, 0, 80, 100, 400, 300};
float[] dst = new float[6];

// 构造一个matrix,x坐标缩放0.5
Matrix matrix = new Matrix();
matrix.setScale(0.5f, 1f);

// 输出计算之前数据
Log.i(TAG, "before: src="+ Arrays.toString(src));
Log.i(TAG, "before: dst="+ Arrays.toString(dst));

// 调用map方法计算(最后一个2表示两个点,即四个数值,并非两个数值)
matrix.mapPoints(dst, 0, src, 2, 2);

// 输出计算之后数据
Log.i(TAG, "after : src="+ Arrays.toString(src));
Log.i(TAG, "after : dst="+ Arrays.toString(dst));
输出结果:
before: src=[0.0, 0.0, 80.0, 100.0, 400.0, 300.0]
before: dst=[0.0, 0.0, 0.0, 0.0, 0.0, 0.0]
after : src=[0.0, 0.0, 80.0, 100.0, 400.0, 300.0]
after : dst=[40.0, 100.0, 200.0, 300.0, 0.0, 0.0]
mapRadius
float mapRadius (float radius)
测量半径,由于圆可能会因为画布变换变成椭圆,所以此处测量的是平均半径。
示例:
float radius = 100;
float result = 0;

// 构造一个matrix,x坐标缩放0.5
Matrix matrix = new Matrix();
matrix.setScale(0.5f, 1f);

Log.i(TAG, "mapRadius: "+radius);

result = matrix.mapRadius(radius);

Log.i(TAG, "mapRadius: "+result);
输出结果:
mapRadius: 100.0
mapRadius: 70.71068
mapRect
boolean mapRect (RectF rect)

boolean mapRect (RectF dst, RectF src)
(1) boolean mapRect (RectF rect) 测量rect并将测量结果放入rect中,返回值是判断矩形经过变换后是否仍为矩形。
RectF rect = new RectF(400, 400, 1000, 800);

// 构造一个matrix
Matrix matrix = new Matrix();
matrix.setScale(0.5f, 1f);
matrix.postSkew(1,0);

Log.i(TAG, "mapRadius: "+rect.toString());

boolean result = matrix.mapRect(rect);

Log.i(TAG, "mapRadius: "+rect.toString());
Log.e(TAG, "isRect: "+ result);
输出结果:
mapRadius: RectF(400.0, 400.0, 1000.0, 800.0)
mapRadius: RectF(600.0, 400.0, 1300.0, 800.0)
isRect: false
(2) boolean mapRect (RectF dst, RectF src) 测量src并将测量结果放入dst中,返回值是判断矩形经过变换后是否仍为矩形,和之前没有什么太大区别。
mapVectors
void mapVectors (float[] vecs)

void mapVectors (float[] dst, float[] src)

void mapVectors (float[] dst, int dstIndex, float[] src, int srcIndex, int vectorCount)
示例:
float[] src = new float[]{1000, 800};
float[] dst = new float[2];

// 构造一个matrix
Matrix matrix = new Matrix();
matrix.setScale(0.5f, 1f);
matrix.postTranslate(100,100);

// 计算向量, 不受位移影响
matrix.mapVectors(dst, src);
Log.i(TAG, "mapVectors: "+Arrays.toString(dst));

// 计算点
matrix.mapPoints(dst, src);
Log.i(TAG, "mapPoints: "+Arrays.toString(dst));
输出结果:
mapVectors: [500.0, 800.0]
mapPoints: [600.0, 900.0]
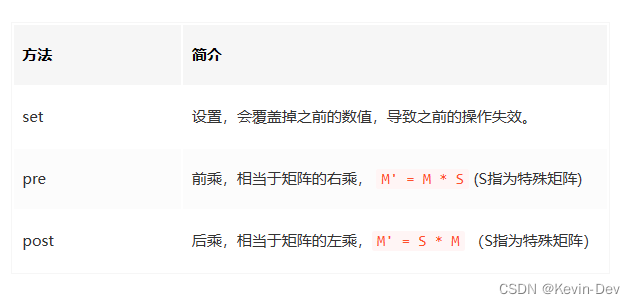
5. set、pre 与 post
对于四种基本变换 平移(translate)、缩放(scale)、旋转(rotate)、 错切(skew) 它们每一种都三种操作方法,分别为 设置(set)、 前乘(pre) 和 后乘 (post)。而它们的基础是Concat,通过先构造出特殊矩阵然后用原始矩阵Concat特殊矩阵,达到变换的结果。
6. 特殊方法
setPolyToPoly
boolean setPolyToPoly (
        float[] src,    // 原始数组 src [x,y],存储内容为一组点
        int srcIndex,   // 原始数组开始位置
        float[] dst,    // 目标数组 dst [x,y],存储内容为一组点
        int dstIndex,   // 目标数组开始位置
        int pointCount) // 测控点的数量 取值范围是: 0到4
Poly全称是Polygon,多边形的意思,了解了意思大致就能知道这个方法是做什么用的了,应该与PS中自由变换中的扭曲有点类似。
示例:
public class MatrixSetPolyToPolyTest extends View {

    private Bitmap mBitmap;             // 要绘制的图片
    private Matrix mPolyMatrix;         // 测试setPolyToPoly用的Matrix

    public MatrixSetPolyToPolyTest(Context context) {
        super(context);

        initBitmapAndMatrix();
    }

    private void initBitmapAndMatrix() {
        mBitmap = BitmapFactory.decodeResource(getResources(),
                R.drawable.poly_test);

        mPolyMatrix = new Matrix();


        float[] src = {0, 0,                                    // 左上
                mBitmap.getWidth(), 0,                          // 右上
                mBitmap.getWidth(), mBitmap.getHeight(),        // 右下
                0, mBitmap.getHeight()};                        // 左下

        float[] dst = {0, 0,                                    // 左上
                mBitmap.getWidth(), 400,                        // 右上
                mBitmap.getWidth(), mBitmap.getHeight() - 200,  // 右下
                0, mBitmap.getHeight()};                        // 左下

        // 核心要点
        mPolyMatrix.setPolyToPoly(src, 0, dst, 0, src.length >> 1); // src.length >> 1 为位移运算 相当于处以2

        // 此处为了更好的显示对图片进行了等比缩放和平移(图片本身有点大)
        mPolyMatrix.postScale(0.26f, 0.26f);
        mPolyMatrix.postTranslate(0,200);
    }

    @Override
    protected void onDraw(Canvas canvas) {
        super.onDraw(canvas);

        // 根据Matrix绘制一个变换后的图片
        canvas.drawBitmap(mBitmap, mPolyMatrix, null);
    }
}
setRectToRect
boolean setRectToRect (RectF src,           // 源区域
                RectF dst,                  // 目标区域
                Matrix.ScaleToFit stf)      // 缩放适配模式
示例代码:
public class MatrixSetRectToRectTest extends View {

    private static final String TAG = "MatrixSetRectToRectTest";

    private int mViewWidth, mViewHeight;

    private Bitmap mBitmap;             // 要绘制的图片
    private Matrix mRectMatrix;         // 测试etRectToRect用的Matrix

    public MatrixSetRectToRectTest(Context context) {
        super(context);

        mBitmap = BitmapFactory.decodeResource(getResources(), R.drawable.rect_test);
        mRectMatrix = new Matrix();
    }

    @Override
    protected void onSizeChanged(int w, int h, int oldw, int oldh) {
        super.onSizeChanged(w, h, oldw, oldh);
        mViewWidth = w;
        mViewHeight = h;

    }

    @Override
    protected void onDraw(Canvas canvas) {
        super.onDraw(canvas);

        RectF src= new RectF(0, 0, mBitmap.getWidth(), mBitmap.getHeight() );
        RectF dst = new RectF(0, 0, mViewWidth, mViewHeight );

        // 核心要点
        mRectMatrix.setRectToRect(src,dst, Matrix.ScaleToFit.CENTER);

        // 根据Matrix绘制一个变换后的图片
        canvas.drawBitmap(mBitmap, mRectMatrix, new Paint());
    }
}
-
rectStaysRect
判断矩形经过变换后是否仍为矩形,假如Matrix进行了平移、缩放则画布仅仅是位置和大小改变,矩形变换后仍然为矩形,但Matrix进行了非90度倍数的旋转或者错切,则矩形变换后就不再是矩形了,这个很好理解,不过多赘述,顺便说一下,前面的mapRect方法的返回值就是根据rectStaysRect来判断的。 -
setSinCos
// 方法一
void setSinCos (float sinValue,     // 旋转角度的sin值
                float cosValue)     // 旋转角度的cos值

// 方法二
void setSinCos (float sinValue,     // 旋转角度的sin值
                float cosValue,     // 旋转角度的cos值
                float px,           // 中心位置x坐标
                float py)           // 中心位置y坐标
示例:
Matrix matrix = new Matrix();
// 旋转90度
// sin90=1
// cos90=0
matrix.setSinCos(1f, 0f);

Log.i(TAG, "setSinCos:"+matrix.toShortString());

// 重置
matrix.reset();

// 旋转90度
matrix.setRotate(90);

Log.i(TAG, "setRotate:"+matrix.toShortString());
输出结果:
setSinCos:[0.0, -1.0, 0.0][1.0, 0.0, 0.0][0.0, 0.0, 1.0]
setRotate:[0.0, -1.0, 0.0][1.0, 0.0, 0.0][0.0, 0.0, 1.0]


 1312
1312


 被折叠的 条评论
为什么被折叠?
被折叠的 条评论
为什么被折叠?
 到【灌水乐园】发言


