#############################bond############################################
1,添加网卡,并进行初始化
如图四

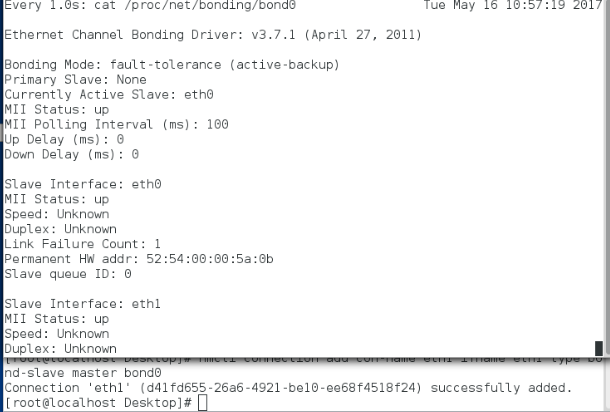
2,添加bond型的ip
nmcli connection add con-name bond0 ifname bond0 type bond mode active-backup ip4 172.25.254.135/24
3,添加bond型的物理设备eth0和eth1
nmcli connection add con-name eth0 ifname eth0 type bond-slave master bond0
nmcli connection add con-name eth1 ifname eth1 type bond-slave master bond0
ifconfig eth0 down ##eth0关闭
ifconfig eth0 up ##eth0启用
如图一,二:

###如果一个设备坏了,另一个自动补上
如图三
#######################team###########################
1,
team 也是链路聚合的一种方式
最多支持8块网卡
支持模式:
1)广播模式
2)轮询
3)主备
4)负载均衡
2,配置
nmcli connection add type team con-name team0ifname team0 config '{"runner":{"name":"activebackup"}} ip4 172.25.254.135/24
nmcli connection add con-name eth0 ifname eth0 type team-slave master team0
nmcli connection add con-name eth1 ifname eth1 type team-slave master team0
3,测试
监控命令:
watch -n 1 teamdctl team0 stat
物理网卡状态:
ifconfig eth0 down
ifconfig eth0 up
####################网桥#################################################
1,配置方式
vim /etc/sysconfig/network-scripts/ifcfg-enp0s25
DEVICE=enp0s25 ##设备名称
ONBOOT=yes ##开启服务设备自动激活
BOOTPROTO=none ##网卡工作状态
BRIDGE=br0 ##网卡开启的网桥接口
vim /etc/sysconfig/network-scripts/ifcfg-br0
DEVICE=br0
ONBOOT=yes
BOOTPROTO=none
IPADDR=172.25.254.135
NETMASK=255.255.255.0
TYPE=Bridge ##网络接口类型是桥接
systemctl stop NetworkManager
systemctl restart network
systemctl start NetworkManager
ifconfig
可以看到br0
#####命令管理方式
##添加
systemctl stop NetworkManager
brctl show
brctl addbr br0 ##添加br0
brctl addif br0 eth0 ##给br0添加物理网络接口eth0
ifconfig eth0 up ##eth0恢复
ifconfig br0 172.25.254.x netmask 255.255.255.0 ##设定ip及子网掩码
brctl show
测试:
ping 172.25.254.250
##删除
ifconfig eth0 down ##eth0 关闭
brctl delif br0 eth0 ##删除eth0 物理网络接口
brctl delbr br0 ##删除br0
brctl show
############ipv6###########################
1,internet proto version 6
ipv4 32/2 地址枯竭 子网掩码24 16 8
ipv6 128/2 子网掩码 16 32 48 64 80
128/2 -------> 128/8 16 -----> 0-f
2017:0:0:0:f:0:0:1
2017::f:0:0:1
2017:0:0:0:f::1
0000------>ffff
相关的文件:
less /usr/share/doc/initscripts-9.49.17/sysconfig.txt
2,添加ip及子网掩码
vim /etc/sysconfig/network-scripts/ifcfg-eth0
DEVICE=eth0
ONBOOT=yes
BOOTPROTO=none
IPADDR=172.25.254.135
NETMASK=255.255.255.0
IPV6INIT=yes
IPV6_AUTOCONF=no
IPV6ADDR=2017::x/64
systemctl restart network
3,测试
ping6 2017::x/64


 1423
1423

 被折叠的 条评论
为什么被折叠?


