


Day55-LNMP架构原理及实战精讲
1.什么是LNMP?
2010年前 LAMP Linux、Apache、MySQL、PHP(1999-2017,兄弟连 2-3个亿)
2010年后 LNMP,Linux Nginx MySQL(MariaDB) PHP/Python
LEMP,Linux Nginx(engine x) MySQL(MariaDB) PHP/Python
JAVA LNTM,Linux Nginx tomcat MySQL
大约在2010年以前,互联网公司最常用的经典Web服务环境组合就是LAMP(即Linux、Apache、MySQL、PHP),近几年随着NginxWeb服务的逐渐流行,又出现了新的Web服务环境组合——LNMP或LEMP,其中LNMP全称为Linux、Nginx、MySQL、PHP等首字母的缩写,而LEMP中的E也表示Nginx,它是取自Nginx名字的发音(engine x)。
2.LNMP架构工作原理流程解析
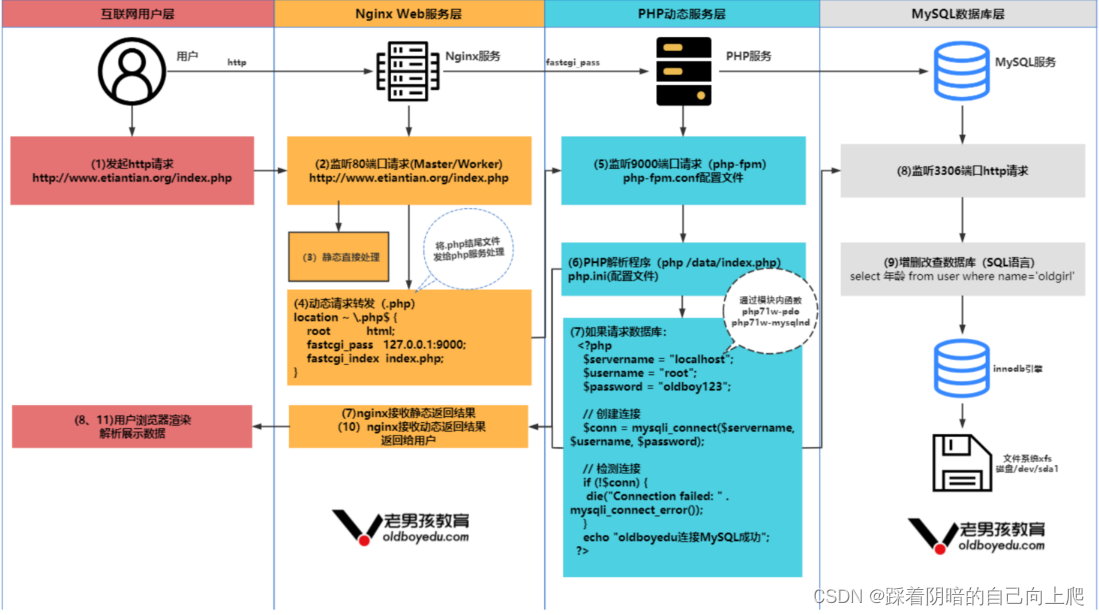
用户请求http://etiantian.org/index.php ,对于Nginx服务而言,是无法处理index.php这样的动态脚本的,那么Nginx该如何配置,使得支持处理这样的动态请求呢?
当用户发起 Http 请求,请求首先被 Nginx 接收,Nginx 通过 Location 规则进行匹配,将用户请求的动态内容,通过 fastcgi 协议传到给后端的 php应用服务处理。具体如下图所示。
3.LNMP架构环境安装部署
- 使用官方仓库安装Nginx
#yum install nginx -y 可能优先使用epel里的源,怎么确保我们配置的官方优先。
[root@web01 ~]# rpm -qa yum-plugin-priorities
yum-plugin-priorities-1.1.31-54.el7_8.noarch

[root@web02 ~]# yum install yum-plugin-priorities -y
[root@web01 ~]# cat /etc/yum.repos.d/nginx.repo
[nginx-stable]
name=nginx stable repo
baseurl=http://nginx.org/packages/centos/$releasever/$basearch/
gpgcheck=0
priority=1 #增加优先参数,使得官方源优先epel源。

#安装Nginx
[root@web01 ~]# yum install nginx -y
- 配置Nginx进程运行的用户
[root@web01 ~]# useradd -u1111 www -s /sbin/nologin -M
[root@web01 ~]# sed -i '/^user/c user www;' /etc/nginx/nginx.conf
[root@web01 ~]# grep "^user" /etc/nginx/nginx.conf
- 启动Nginx,并将Nginx加入开机自启
[root@web01 ~]# systemctl start nginx
[root@web01 ~]# systemctl enable nginx
[root@web01 ~]# lsof -i :80 #查看端口对应的服务
[root@web01 ~]# nginx -v #查看版本
nginx version: nginx/1.20.1
[root@web01 ~]# curl 10.0.0.7 #welcome to Nginx 表示正常。
- 使用第三方扩展源安装php7.1
#(1)配置PHP安装源
[root@web01 tools]# wget https://mirror.webtatic.com/yum/el7/webtatic-release.rpm --no-check-certificate
[root@web01 tools]# yum install epel-release
[root@web01 tools]# rpm -Uvh webtatic-release.rpm #安装PHP第三方源/etc/yum.repos.d/epel.repo
[root@web01 tools]# rpm -ql epel-release
/etc/yum.repos.d/epel-testing.repo
/etc/yum.repos.d/epel.repo
[root@web01 tools]# rpm -ql webtatic-release-7-3
/etc/yum.repos.d/webtatic.repo

#PHP下载地址:
https://us-east.repo.webtatic.com/yum/el7/x86_64/
https://uk.repo.webtatic.com/yum/el7/x86_64/

#如果上述安装源有问题可以使用下面的配置看看
[root@web01 ~]# cat /etc/yum.repos.d/php.repo
[webtatic-php]
name = php Repository
baseurl = http://us-east.repo.webtatic.com/yum/el7/x86_64/
gpgcheck = 0

#(2)安装PHP及相关插件
#2.1)卸载旧版本的php
[root@web01 tools]# rpm -e $(rpm -qa|grep php)
[root@web01 tools]# rpm -qa|grep php
#2.2)安装PHP及相关插件
yum install php71w php71w-cli php71w-common php71w-devel php71w-embedded php71w-gd -y
yum install php71w-mcrypt php71w-mbstring php71w-pdo php71w-xml php71w-fpm php71w-mysqlnd -y
yum install php71w-opcache php71w-pecl-memcached php71w-pecl-redis php71w-pecl-mongodb -y
#2.3)更多php的插件
[root@web01 server]# yum list|grep php71
mod_php71w.x86_64                        7.1.33-1.w7                   @webtatic
php71w-cli.x86_64                        7.1.33-1.w7                   @webtatic
php71w-common.x86_64                     7.1.33-1.w7                   @webtatic
php71w-devel.x86_64                      7.1.33-1.w7                   @webtatic
php71w-embedded.x86_64                   7.1.33-1.w7                   @webtatic
php71w-fpm.x86_64                        7.1.33-1.w7                   @webtatic
php71w-gd.x86_64                         7.1.33-1.w7                   @webtatic
php71w-mbstring.x86_64                   7.1.33-1.w7                   @webtatic
php71w-mcrypt.x86_64                     7.1.33-1.w7                   @webtatic
php71w-mysqlnd.x86_64                    7.1.33-1.w7                   @webtatic
php71w-opcache.x86_64                    7.1.33-1.w7                   @webtatic
php71w-pdo.x86_64                        7.1.33-1.w7                   @webtatic
php71w-pear.noarch                       1:1.10.4-1.w7                 @webtatic
php71w-pecl-igbinary.x86_64              2.0.5-1.w7                    @webtatic
php71w-pecl-memcached.x86_64             3.0.4-1.w7                    @webtatic
php71w-pecl-mongodb.x86_64               1.5.3-1.w7                    @webtatic
php71w-pecl-redis.x86_64                 3.1.6-1.w7                    @webtatic
php71w-process.x86_64                    7.1.33-1.w7                   @webtatic
php71w-xml.x86_64                        7.1.33-1.w7                   @webtatic
php71w-bcmath.x86_64                     7.1.33-1.w7                   webtatic
php71w-dba.x86_64                        7.1.33-1.w7                   webtatic
php71w-enchant.x86_64                    7.1.33-1.w7                   webtatic
php71w-imap.x86_64                       7.1.33-1.w7                   webtatic
php71w-interbase.x86_64                  7.1.33-1.w7                   webtatic
php71w-intl.x86_64                       7.1.33-1.w7                   webtatic
php71w-ldap.x86_64                       7.1.33-1.w7                   webtatic
php71w-mysql.x86_64                      7.1.33-1.w7                   webtatic
php71w-odbc.x86_64                       7.1.33-1.w7                   webtatic
php71w-pdo_dblib.x86_64                  7.1.33-1.w7                   webtatic
php71w-pecl-apcu.x86_64                  5.1.9-1.w7                    webtatic
php71w-pecl-apcu-devel.x86_64            5.1.9-1.w7                    webtatic
php71w-pecl-geoip.x86_64                 1.1.1-1.w7                    webtatic
php71w-pecl-igbinary-devel.x86_64        2.0.5-1.w7                    webtatic
php71w-pecl-imagick.x86_64               3.4.3-1.w7                    webtatic
php71w-pecl-imagick-devel.x86_64         3.4.3-1.w7                    webtatic
php71w-pecl-xdebug.x86_64                2.6.1-1.w7                    webtatic
php71w-pgsql.x86_64                      7.1.33-1.w7                   webtatic
php71w-phpdbg.x86_64                     7.1.33-1.w7                   webtatic
php71w-pspell.x86_64                     7.1.33-1.w7                   webtatic
php71w-recode.x86_64                     7.1.33-1.w7                   webtatic
php71w-snmp.x86_64                       7.1.33-1.w7                   webtatic
php71w-soap.x86_64                       7.1.33-1.w7                   webtatic
php71w-tidy.x86_64                       7.1.33-1.w7                   webtatic
php71w-xmlrpc.x86_64                     7.1.33-1.w7                   webtatic

###企业场景中由开发人员给你编译的参数(他开发的软件)。可以比他多,不能少。
#2.4) 安装php7版本的软件【本地】
[root@web01 ~]# unzip php.zip #提前去官方下载好,然后执行
下面的安装
[root@web01 ~]# yum localinstall php/*.rpm -y
- 配置php-fpm用户与Nginx的运行用户保持一致
[root@web01 ~]# sed -i '/^user/c user = www' /etc/php-fpm.d/www.conf
[root@web01 ~]# sed -i '/^group/c group = www' /etc/php-fpm.d/www.conf
[root@web01 blog]# egrep "^user|^group" /etc/php-fpm.d/www.conf
user = www
group = www
- 启动php-fpm,并将其加入开机自启
[root@web01 ~]# systemctl start php-fpm
[root@web01 ~]# systemctl enable php-fpm
[root@web01 tools]# lsof -i :9000
COMMAND   PID USER   FD   TYPE DEVICE SIZE/OFF NODE NAME
php-fpm 60081 root    7u  IPv4 220660      0t0  TCP localhost:cslistener (LISTEN)
php-fpm 60082  www    9u  IPv4 220660      0t0  TCP localhost:cslistener (LISTEN)
php-fpm 60083  www    9u  IPv4 220660      0t0  TCP localhost:cslistener (LISTEN)
php-fpm 60084  www    9u  IPv4 220660      0t0  TCP localhost:cslistener (LISTEN)
php-fpm 60085  www    9u  IPv4 220660      0t0  TCP localhost:cslistener (LISTEN)
php-fpm 60086  www    9u  IPv4 220660      0t0  TCP localhost:cslistener (LISTEN)
[root@web01 tools]# ps -ef|grep php-fpm
root      60081      1  0 19:54 ?        00:00:00 php-fpm: master process (/etc/php-fpm.conf)
www       60082  60081  0 19:54 ?        00:00:00 php-fpm: pool www
www       60083  60081  0 19:54 ?        00:00:00 php-fpm: pool www
www       60084  60081  0 19:54 ?        00:00:00 php-fpm: pool www
www       60085  60081  0 19:54 ?        00:00:00 php-fpm: pool www
www       60086  60081  0 19:54 ?        00:00:00 php-fpm: pool www
root      60481  31924  0 19:55 pts/0    00:00:00 grep --color=auto php-fpm
- 安装Mariadb数据库
[root@web01 ~]# yum install mariadb-server mariadb -y
- 启动Mariadb数据库, 并加入开机自动
[root@web01 ~]# systemctl start mariadb
[root@web01 ~]# systemctl enable mariadb
[root@web01 blog]# mysql
Welcome to the MariaDB monitor. Commands end with ; or
\g.
Type 'help;' or '\h' for help. Type '\c' to clear the
current input statement.
MariaDB [(none)]> quit
Bye
- 给Mariadb配置登陆密码,并是新密码进行登录数据库
[root@web01 ~]# mysqladmin password 'oldboy123'
[root@web01 ~]# mysql -uroot -poldboy123
[root@web01 ~]# mysqladmin -uroot -p'oldboy' password 'oldboy123'#有密码更改密码
4. LNMP架构配置及整体测试实战
在将Nginx与PHP集成过程中, 需要先了解 Fastcgi代理配置语法
1.设置fastcgi服务器的地址,该地址可以指定为域名或IP地址以及端口
Syntax: fastcgi_pass address;
Default: —
Context: location, if in location
#语法示例
fastcgi_pass localhost:9000;
2.设置fastcgi默认的首页文件,需要结合fastcgi_param一起设置
Syntax: fastcgi_index name;
Default: —
Context: http, server, location
3.通过fastcgi_param设置变量,并将设置的变量传递到后端的fastcgi服务器
Syntax: fastcgi_param parameter value [if_not_empty];
Default: —
Context: http, server, location
#语法示例
fastcgi_index index.php;
fastcgi_param SCRIPT_FILENAME
$document_root$fastcgi_script_name;
4.通过图形方式展示fastcgi_index与fastcgi_param作用。
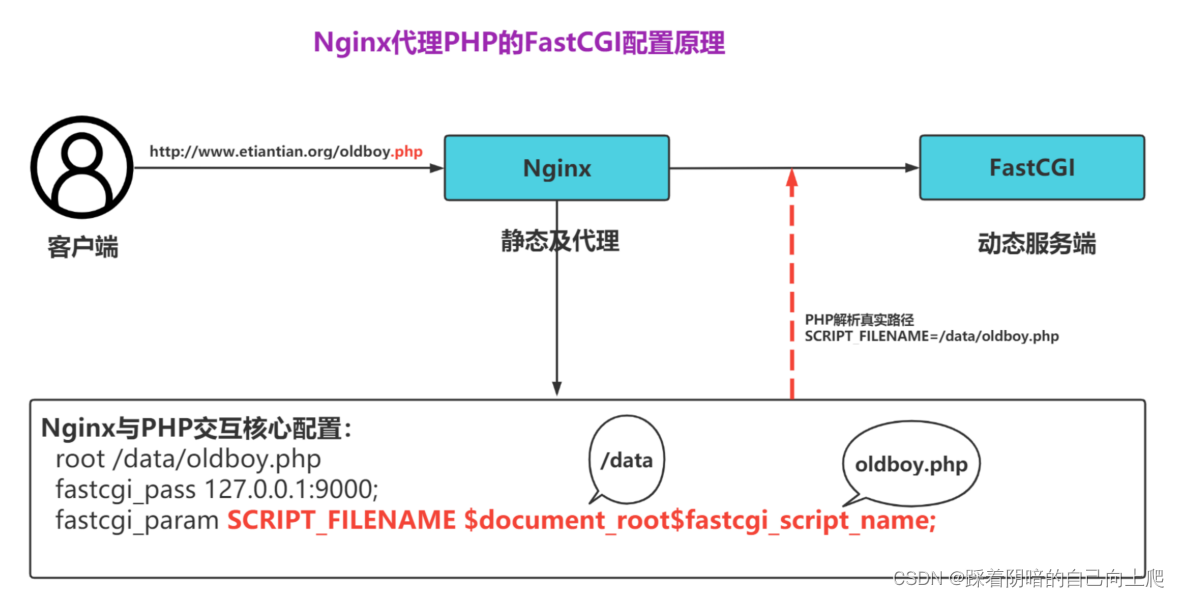
5.最终Nginx连接Fastcgi服务器配置如下
[root@web01 ~]# cat /etc/nginx/conf.d/blog.etiantian.org.conf
server {
        server_name blog.etiantian.org;
        listen 80;
        root /data/blog;
        index index.php index.html;

        location ~ \.php$ {
            #root /data/blog;
            fastcgi_pass 127.0.0.1:9000;
            fastcgi_index index.php;
            fastcgi_param SCRIPT_FILENAME
            $document_root$fastcgi_script_name;
            include fastcgi_params;
            }
}
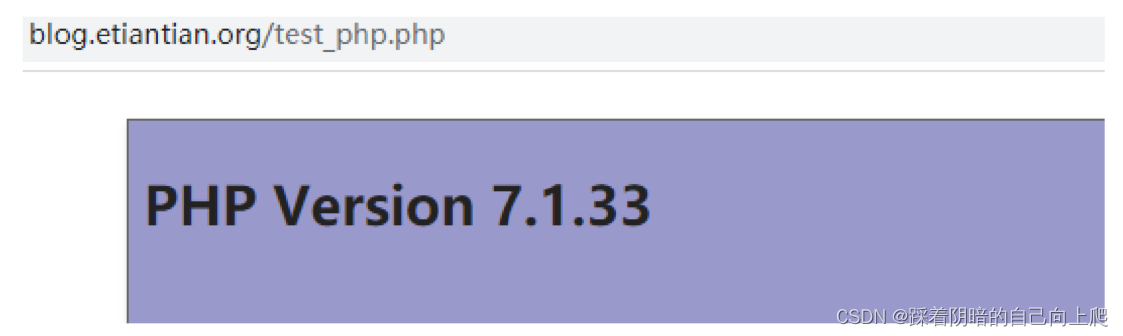
6.在/data目录下创建test_php.php文件
[root@web01 ~]# mkdir /data/blog -p
[root@web01 tools]# chown -R www.www /data/blog/
[root@web01 ~]# cat /data/blog/test_php.php
<?php
phpinfo();
?>
#测试能否通过浏览器访问,访问成功如下图
7 在/data目录下创建test_mysql.php文件,填入对应的数据库IP、用户名、密码
[root@web01 ~]# cat /data/blog/test_mysql.php
<?php
      $servername = "localhost";
      $username = "root";
      $password = "oldboy123";

      // 创建连接
      $conn = mysqli_connect($servername, $username,$password);
      // 检测连接
      if (!$conn) {
              die("Connection failed: " . mysqli_connect_error());
      }
      echo "php连接MySQL数据库成功,oldboy77期";
?>
8 最后通过浏览器访问http://blog.etiantian.org/test_mysql.php文件

5. 超越企业级标准搭建和优化blog软件
5.1 部署博客blog软件
1.配置Nginx虚拟主机站点,域名为blog.etiantian.org。
1) #1.nginx具体配置信息
   [root@web01 nginx]# cat /etc/nginx/conf.d/blog.etiantian.org.conf
   server {
       listen 80;
       server_name blog.etiantian.org;
       root /data/blog; #正常站点目录
       access_log  /var/log/nginx/mirrors.etiantian.org.access.log.gz main gzip=9 buffer=32k flush=5s;

   location / {
       index index.php index.html; #阿里云镜像首页
   }
   location ~ \.php$ {
       fastcgi_pass 127.0.0.1:9000;
       # 将请求转给9000端口的应用程序处理
       fastcgi_index index.php;
       fastcgi_param SCRIPT_FILENAME $document_root$fastcgi_script_name;
       # 告诉php我们需要被解析的文件在哪个目录,是哪个文件
       include fastcgi_params;
       }
}
2.重启nginx服务
[root@web01 ~]# nginx -t
[root@web01 ~]# systemctl reload nginx
3.获取blog软件,解压并部署wordress
[root@web01 ~]# mkdir /data/blog
[root@web01 ~]# cd /server/tools
[root@web01 tools]# wget https://cn.wordpress.org/latest-zh_CN.tar.gz ##最好php7.4
[root@web01 tools]# tar xf latest-zh_CN.tar.gz
[root@web01 tools]# mv wordpress/* /data/blog/
[root@web01 tools]# chown -R www.www /data/blog/ #此方法问题很大,仅用于学习测试环境
#扩展:企业级应用实战案例:科学授权站点目录权限和属组方法(老男孩运维思想)。
#(1)生产授权方案(新手可不用):
[root@web01 blog]# chown -R root.root /data/blog
[root@web01 blog]# mkdir -p /data/blog/uploads
[root@web01 blog]# chown -R www.www /data/blog/uploads #此目录可能米有。
[root@web01 blog]# ll wp-content/
plugins ##blog增加功能 root.root
themes ##blog主题皮肤 root.root
uploads ##上传目录www.www

#(2)LNMP企业级核心安全优化思想:
chown -R www.www /data/blog/uploads/ #安全隐患很大。
#黑客会放Webshell.php木马到/data/blog/upload/来遍历文件插入广告或者提权root。
#执行放的webshell,http://xx/upload/webshell.php ##轮询站点,改所有站点文件,嵌入它的广告

#网站安全防护露点:
对外:http,https(控制这里),没办法白名单。
对内:ssh(禁止对外访问),可以白名单。

#针对80端口安全防护限制:
1.php程序控制,上传的程序扩展名不能是.php,.sh等等

2.访问/data/blog/upload/(*.php return 403)
location /upload/\.php$ {
return 403
}

3.挂载NFS
mount,noexec,nosuid

4.通过架构,限制动态请求方法
location /upload/
禁止GET,不能浏览。
解决方法:动静分离
动态:location /upload/
禁止GET,不能浏览。
静态:没有PHP环境
location /upload/

4.配置waf防火墙或者开发第三方安全模块(比如还可以控制sql语句执行等)

5.永远确保站点权限最优
#工作启动Nginx脚本:start_nginx.sh
chown -R root.root /data/blog
chown -R www.www /data/blog/uploads
#启动前做站点目录,权限和用户做检查。
#检测:权限、用户和组不对,自测、报警。。省略检测脚本100行。提供思路
systemctl reload nginx
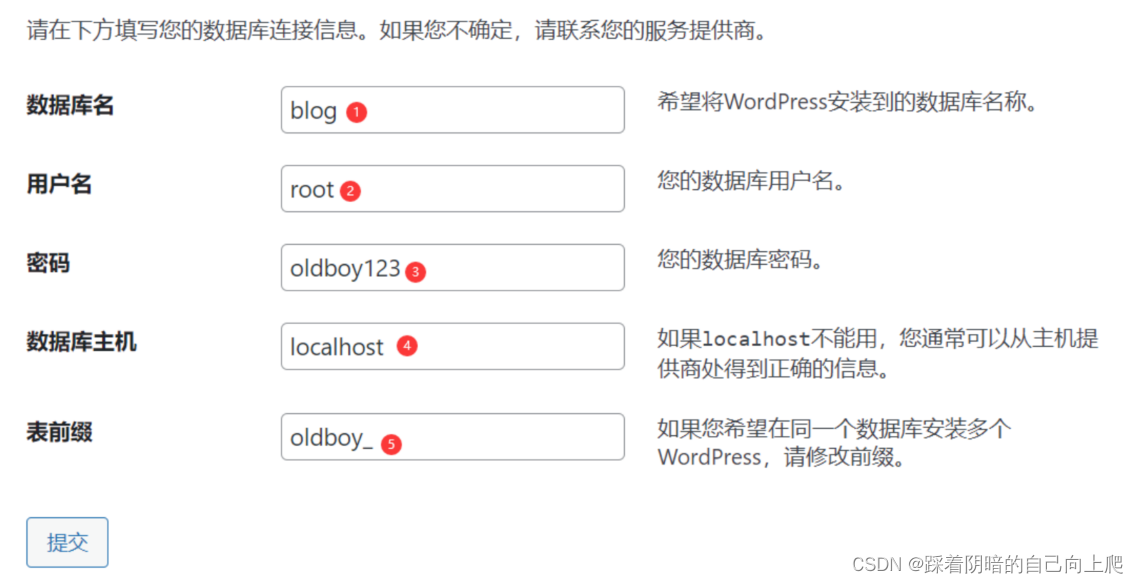
4.因blog需要使用数据库, 所以需要建立blog数据库
[root@web01 ~]# mysql -uroot -poldboy123
mysql> create database blog;
mysql> exit;
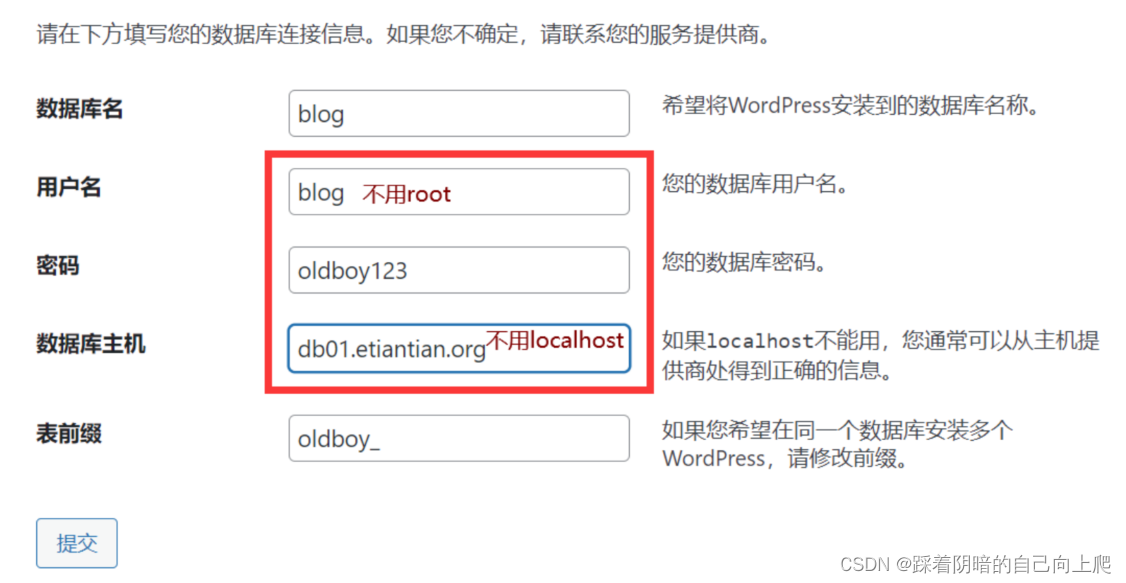
##使用上述方法,通过浏览器访问blog的配置如下图
#扩展:企业级应用实战案例:采用异地db01.etiantian.org方式访问数据库,而不是本机localhost(老男孩运维思想)。
MariaDB [(none)]> create database blog; #创建blog数据库

MariaDB [(none)]> show databases; #查看
+--------------------+
| Database           |
+--------------------+
| information_schema |
| blog               |
| mysql              |
| performance_schema |
| test               |
+--------------------+
5 rows in set (0.00 sec)

MariaDB [(none)]> show create database blog;
+----------+-----------------------------------------------------------------+
| Database | Create Database                                                 |
+----------+-----------------------------------------------------------------+
| blog     | CREATE DATABASE `blog` /*!40100 DEFAULT CHARACTER SET latin1 */ |
+----------+-----------------------------------------------------------------+
1 row in set (0.00 sec)

MariaDB [(none)]> grant all privileges on blog.* to blog@'172.16.1.%' identified by 'oldboy123';#创建用户密码并授权。

MariaDB [(none)]> flush privileges;
Query OK, 0 rows affected (0.00 sec)

#####
# all privileges为所有权限:
# 本次科学权限:select,delete,insert,update,create,alter
# 工作中生产线应该:select,delete,insert,update,针对数据内容
# create,alter 表结构,库结构。   # 一定一定由DBA或运维控制。

# 企业故障案例:
# 表结构被开发修改了,导致运维背锅。
# 最终比对备份的表结构和上线数据库表结构,发现开发改了表结构。
# 解决办法:收回select,delete,insert,update以外的权限由DBA控制。

# 上述配置网页链接数据库出现故障,解决办法如下:
[root@web01 blog]# mysql -uroot -poldboy123
MariaDB [(none)]> #删除无用的用户
MariaDB [(none)]> drop user ''@'localhost';
MariaDB [(none)]> drop user ''@'web01';
MariaDB [(none)]> drop user 'root'@'web01';
MariaDB [(none)]> drop user 'root'@'::1';
MariaDB [(none)]> select user,host from mysql.user;
+------+--------------------------+
| user | host |
+------+--------------------------+
| root | 127.0.0.1 |
| root | localhost |
+------+--------------------------+
4 rows in set (0.00 sec)
#重新授权
MariaDB [(none)]> drop user 'blog'@'172.16.1.%';
MariaDB [(none)]> grant all privileges on blog.* to 'blog'@'172.16.1.%' identified by 'oldboy123';
MariaDB [(none)]> flush privileges;
MariaDB [(none)]> quit
#退出测试,如果能登录表示OK。
[root@web01 blog]# mysql -ublog -poldboy123 -h172.16.1.7
MariaDB [(none)]>
#修改/etc/hosts为如下
[root@web01 blog]# grep db01 /etc/hosts
172.16.1.7 db01 db01.etiantian.org #db01.etiantian.org为连接数据库的域名。
5.通过浏览器访问blog, 并部署该产品
5.2 部署知乎软件Wecenter
1.配置Nginx虚拟主机站点,域名为zh.etiantian.org
[root@web01 ~]# cat /etc/nginx/conf.d/zh.etiantian.org.conf
server {
listen 80;
server_name zh.etiantian.org;
root /data/zh;
index index.php index.html;
location ~ \.php$ {
root /data/zh;
fastcgi_pass 127.0.0.1:9000;
fastcgi_index index.php;
fastcgi_param SCRIPT_FILENAME $document_root$fastcgi_script_name;
include fastcgi_params;
}
}
2.重启nginx服务
[root@web01 ~]# nginx -t
[root@web01 ~]# systemctl reload nginx
3.下载Wecenter产品,部署并授权
[root@web02 ~]# cd /server/tools
[root@web02 tools]# wget http://ahdx.down.chinaz.com/201605/WeCenter_v3.2.1.zip
[root@web02 tools]# unzip WeCenter_v3.2.1.zip
[root@web02 tools]# mv UPLOAD/ /data/zh
[root@web02 tools]# chown -R www.www /data/zh/
4.wecenter产品也需要使用数据库, 所以需要手动建立数据库
[root@web02 tools]# mysql -uroot -poldboy123 #登陆数据库
MariaDB [(none)]> create database zh; #创建zh数据库
MariaDB [(none)]> grant all privileges on zh.* to
'zh'@'172.16.1.%' identified by 'oldboy123'; #创建zh用
户,通过172访问数据库。
MariaDB [(none)]> flush privileges;
MariaDB [(none)]> exit
5.通过浏览器访问zh.etiantian.org,并通过网页配置


 232
232


 被折叠的 条评论
为什么被折叠?
被折叠的 条评论
为什么被折叠?
 到【灌水乐园】发言


