


Day04-ES集群的文档读写流程,底层存储原理,filebeat的input组件常用组件实战案例及tomcat和nginx日志采集实战
0、昨日内容回顾:
-
索引模板
创建索引的一种方式。在创建索引时,若未指定索引的配置,则会根据索引模板创建对应的索引。 -
DSL语句:(DBA方向要重点掌握)
- 全文检索: match
- 精确匹配: match_phrase
- 全量匹配: match_all
- 排序: sort
- order
- desc
- asc
- order
- 查看指定字段: _source
- 判断文档是否存在某个字段: exists
- 数据分页:
- from: 查看第几页: (页码数 - 1) * size
- size: 每页显示几条数据
- 语法高亮
- highlight
- post_tags
- pre_tags
- fields
- highlight
- 多条件查询: bool
- must: 必要条件,必须满足。
- must_not: 非必要条件,必须不满足。
- should: 可选条件。
- minimum_should_match
- 百分比
- 数字
4个条件满足3个如何写呢?
minimum_should_match: 3
minimum_should_match: 75%
- 百分比
- minimum_should_match
- 过滤查询:
- filter:
- range:
- lt
- gt
- lte
- gte
- range:
- filter:
- 聚合查询:
- min
- max
- sum
- avg
- terms
- 权重案例
-
ES集群迁移(_reindex)的API
-
ES集群(_cluster)的api
- reroute
- state
- stats
- allocation
- …
-
kibana:
KQL语句
今日内容预告:
- ES原理篇
- Python操作ES
- filebeat环境搭建
- filebeat快速入门
- input
… - output
…
- input
1、ES集群原理
原表数据:
文章ID 文章context
1001 My name is Jason Yin, I love linux, … 10w+
1002 My name is oldboy, I love sixiangke, … 20w+
1003 I love kafka, … 30w+
倒排索引技术:(倒排表)
My:
	- 1001	20 count	: 8分
	- 1002  300 count 	:  100分
	...
name
	- 1001
	- 1002
	..
is
Jason
Yin
I
love
linux
	- 1001  100c
	- 1010  20c
	...
	hash(1001) % primary-shard ----> shard-number[...]
sixiangke
kafka
...

用户搜索: 什么是Linux

中文分词:
	什么是Linux

什么
是
Linux
面试题: 分片底层时如何工作的?
答: 分片底层对应的是一个Lucene库,而Lucene底层使用倒排索引技术实现。
1.1 索引原理
1.1.1 正排索引(正向索引)
我们MySQL为例,用id字段存储博客文章的编号,用context存储文件的内容。
CREATE TABLE blog (id INT PRIMARY KEY AUTO_INCREMENT, context TEXT);
INSERT INTO blog VALUES (1,'I am Jason Yin, I love Linux ...')
此时,如果我们查询文章内容包含"Jason Yin"的词汇的时候,就比较麻烦了,因为要进行全表扫描。
SELECT * FROM blog WHERE context LIKE 'Jason Yin';
1.1.2 倒排索引(反向索引)
ES使用一种称为"倒排索引"的结构,它适用于快速的全文检索。
倒排索引中有以下三个专业术语:
词条:
指的是最小的存储和查询单元,换句话说,指的是您想要查询的关键字(词)。
对应英文而言通常指的是一个单词,而对于中文而言,对应的是一个词组。
词典(字典):
它是词条的集合,底层通常基于"Btree+"和"HASHMap"实现。
倒排表:
记录了词条出现在什么位置,出现的频率是什么。
倒排表中的每一条记录我们称为倒排项。
倒排索引的搜索过程:
(1)首先根据用户需要查询的词条进行分词后,将分词后的各个词条字典进行匹配,验证词条在词典中是否存在;
(2)如果上一步搜索结果发现词条不在字典中,则结束本次搜索,如果在词典中,就需要去查看倒排表中的记录(倒排项);
(3)根据倒排表中记录的倒排项来定位数据在哪个文档中存在,而后根据这些文档的"_id"来获取指定的数据;
综上所述,假设有10亿篇文章,对于mysql不创建索引的情况下,会进行全表扫描搜索"Jason Yin"。而对于ES而言,其只需要将倒排表中返回的id进行扫描即可,而无须进行全量查询。
1.2 集群角色

角色说明:
		c :
			Cold data
		d :
			data node
		f :
			frozen node
		h :
			hot node
		i :
			ingest node
		l :
			machine learning node
		m :
			master eligible node
		r :
			remote cluster client node
		s :
			content node
		t :
			transform node
		v :
			voting-only node
		w :
			warm node
		-  :
			coordinating node only

常用的角色说明:
    data node:
        指的是存储数据的节点。
        node.data: true

    master node:
        控制ES集群,并维护集群的状态(cluster state,包括节点信息,索引信息等,ES集群每个节点都有一份)。
        node.master: true

    coordinating:
        协调节点可以处理请求的节点,ES集群所有的节点均为协调节点,该角色无法取消。
1.2.1 master角色和data角色分离实战
(1)停止所有节点的ES服务
systemctl stop es7
(2)所有节点清空数据
rm -rf /oldboyedu/{data,logs}/es7/* /tmp/*
(3)修改配置文件
[root@elk101.oldboyedu.com ~]# yy /oldboyedu/softwares/es7/elasticsearch-7.17.5/config/elasticsearch.yml
...
cluster.initial_master_nodes: ["elk103.oldboyedu.com"]
node.data: true
node.master: false

[root@elk102.oldboyedu.com ~]# yy /oldboyedu/softwares/es7/elasticsearch-7.17.5/config/elasticsearch.yml
...
cluster.initial_master_nodes: ["elk103.oldboyedu.com"]
node.data: true
node.master: false

[root@elk103.oldboyedu.com ~]# yy /oldboyedu/softwares/es7/elasticsearch-7.17.5/config/elasticsearch.yml
...
cluster.initial_master_nodes: ["elk103.oldboyedu.com"]
node.data: false
node.master: true
(4)启动集群
systemctl start es7
(5)验证配置
[root@elk103.oldboyedu.com ~]# curl 10.0.0.101:9200/_cat/nodes
10.0.0.102 39 72 26 0.52 0.27 0.14 cdfhilrstw - elk102.oldboyedu.com
10.0.0.101 50 74 22 0.54 0.25 0.13 cdfhilrstw - elk101.oldboyedu.com
10.0.0.103 48 78 23 1.13 0.57 0.24 ilmr       * elk103.oldboyedu.com
(6)创建索引测试,观察elk103是否能够存储分片。
PUT 10.0.0.101:9200/oldboyedu-linux85
{
    "settings":{
        "number_of_shards": 10,
        "number_of_replicas":0
    }
}
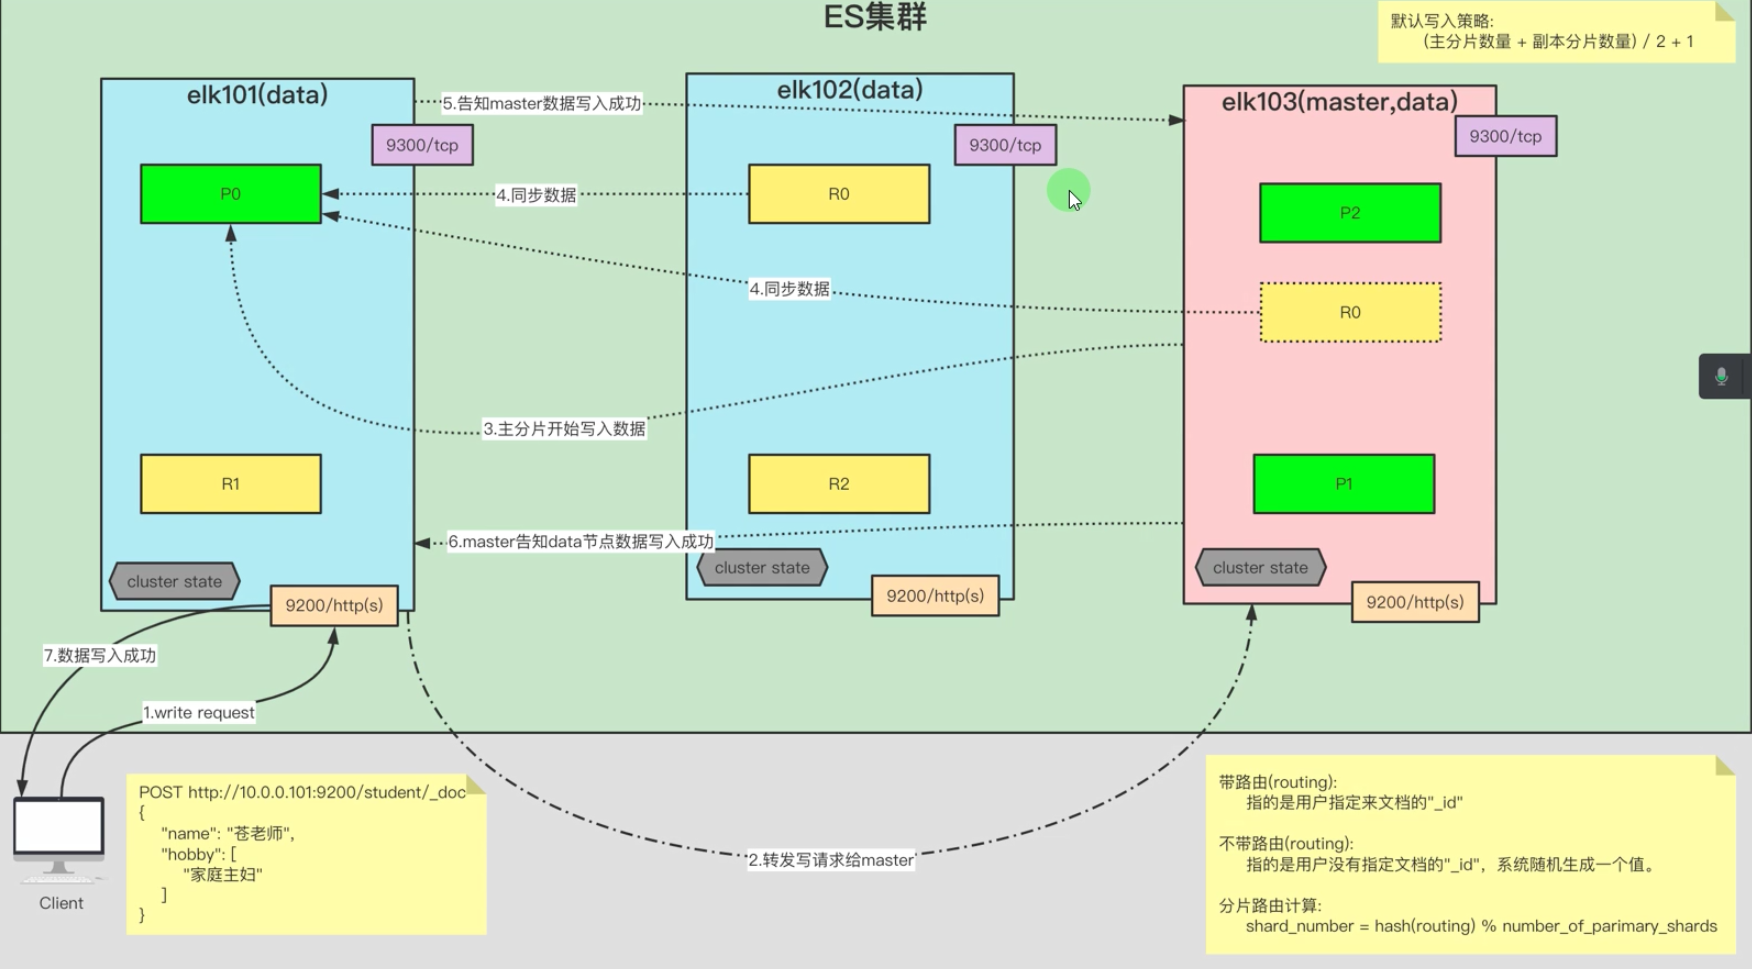
1.3 ES文档的写入流程图解
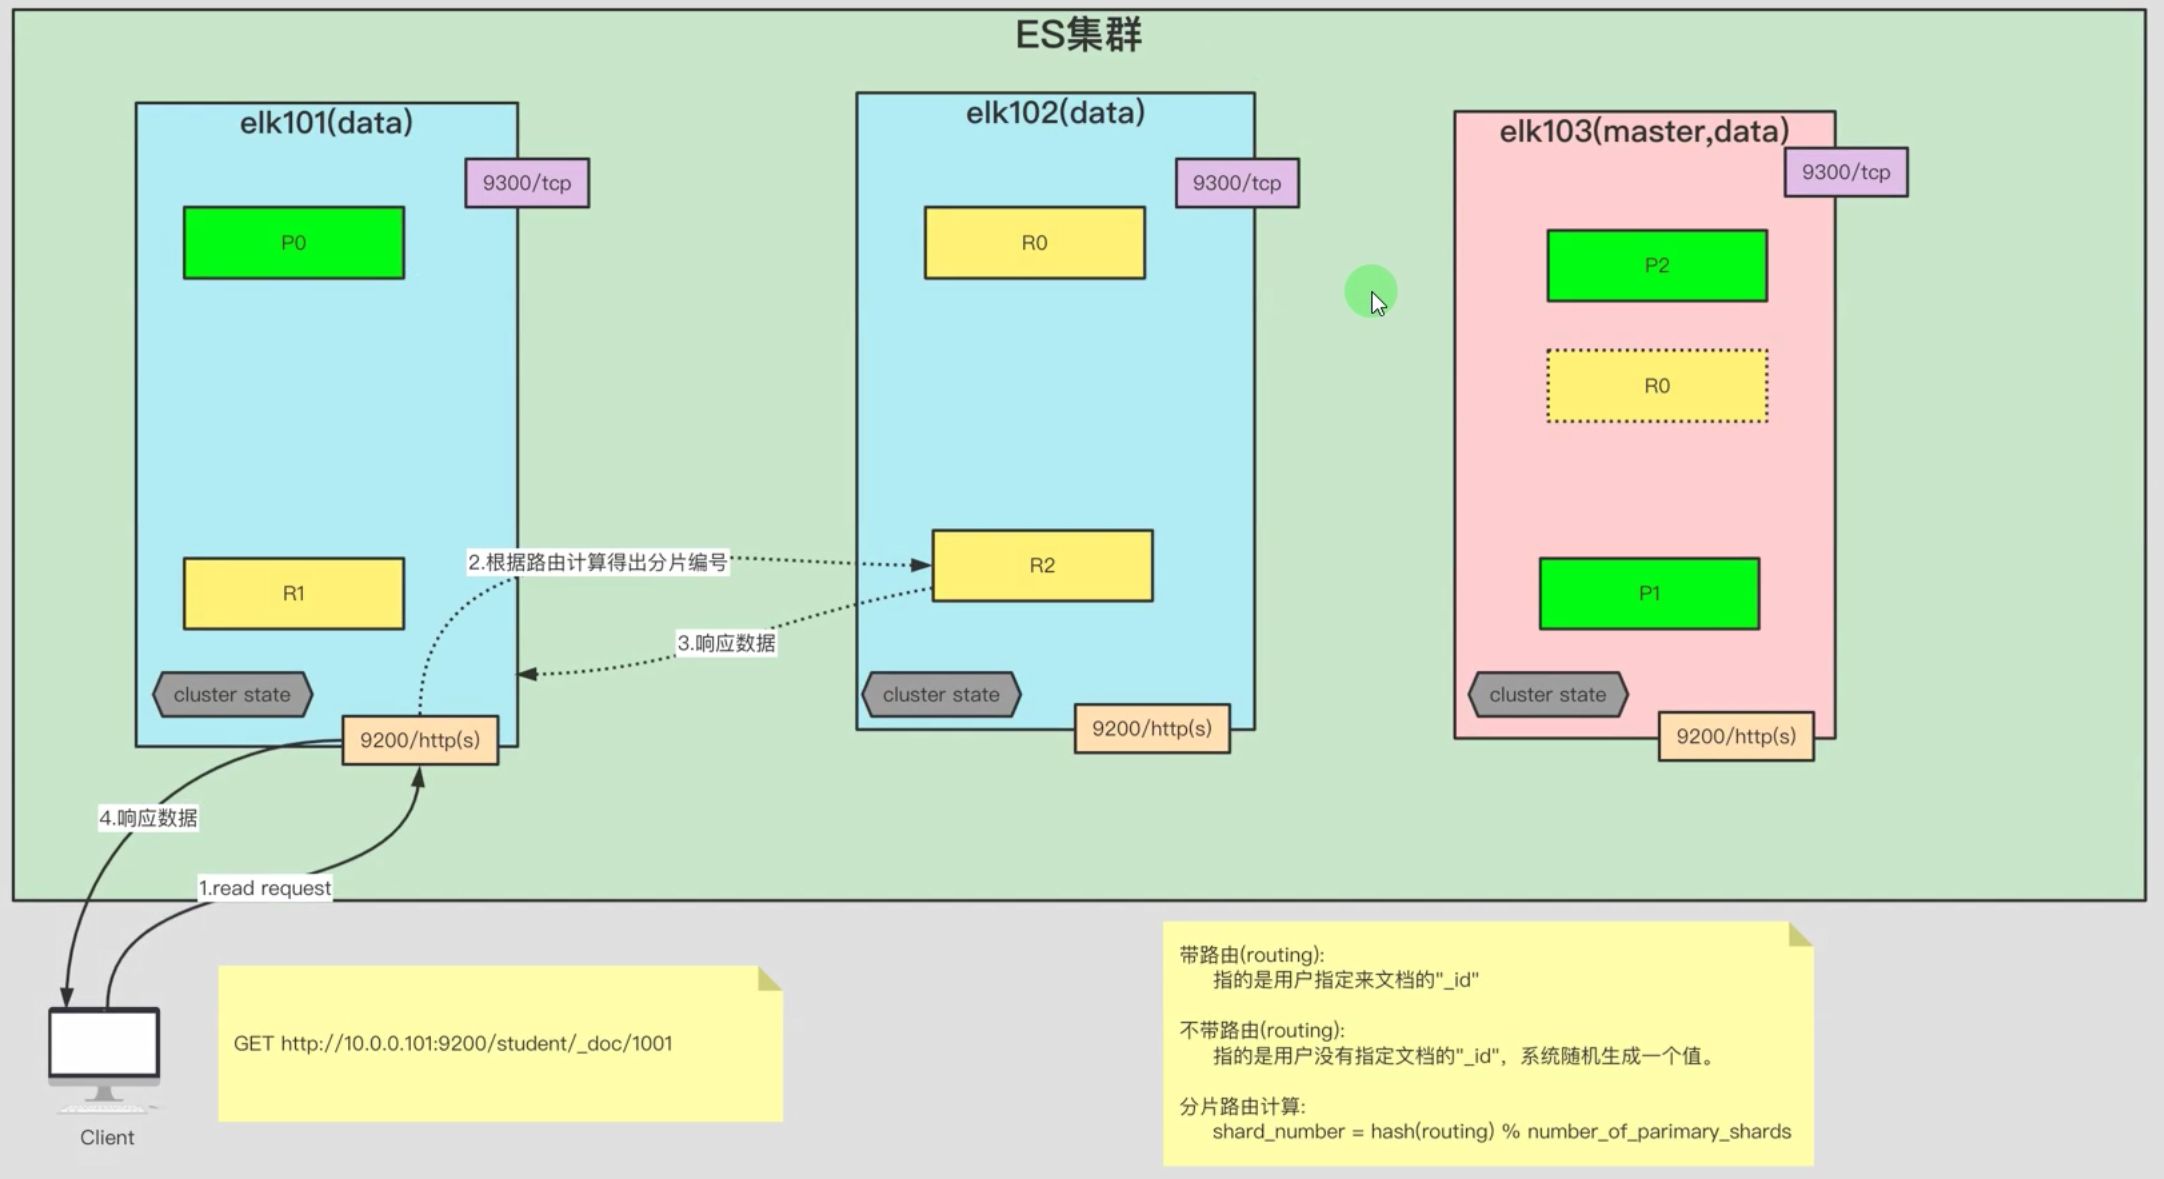
1.4 ES文档的读取流程图解
1.4.1 单个文档读取
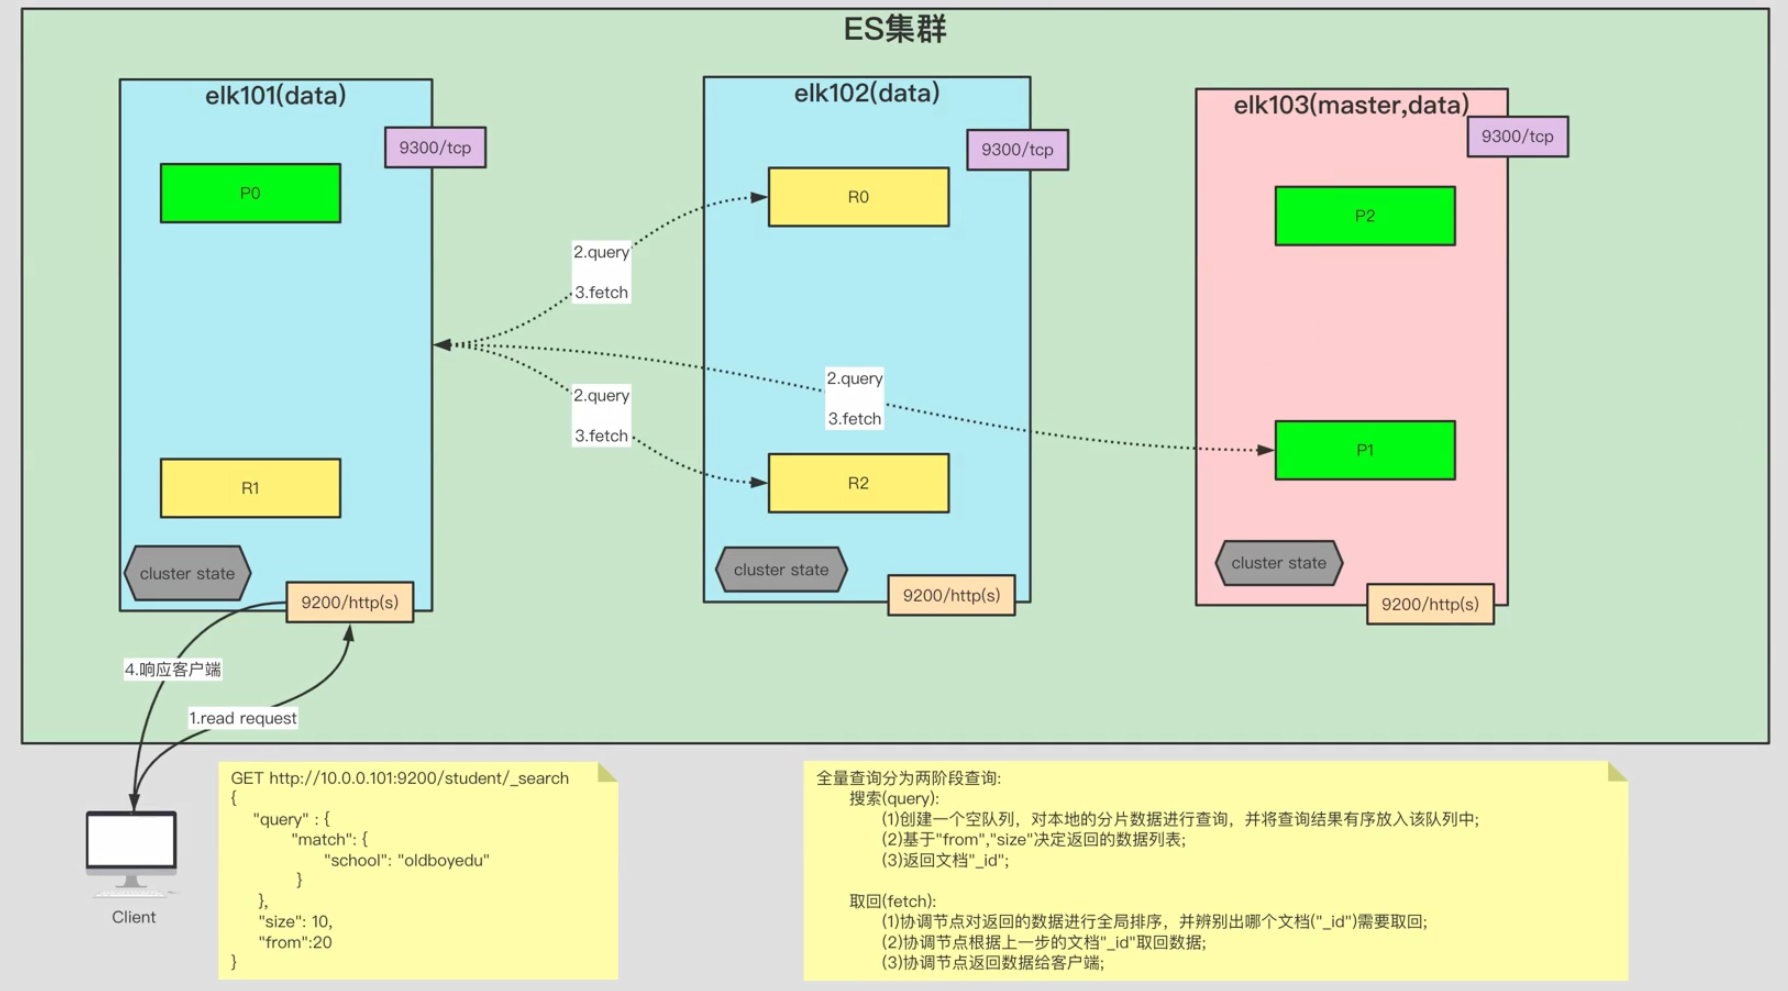
1.4.2 文档的全量查询
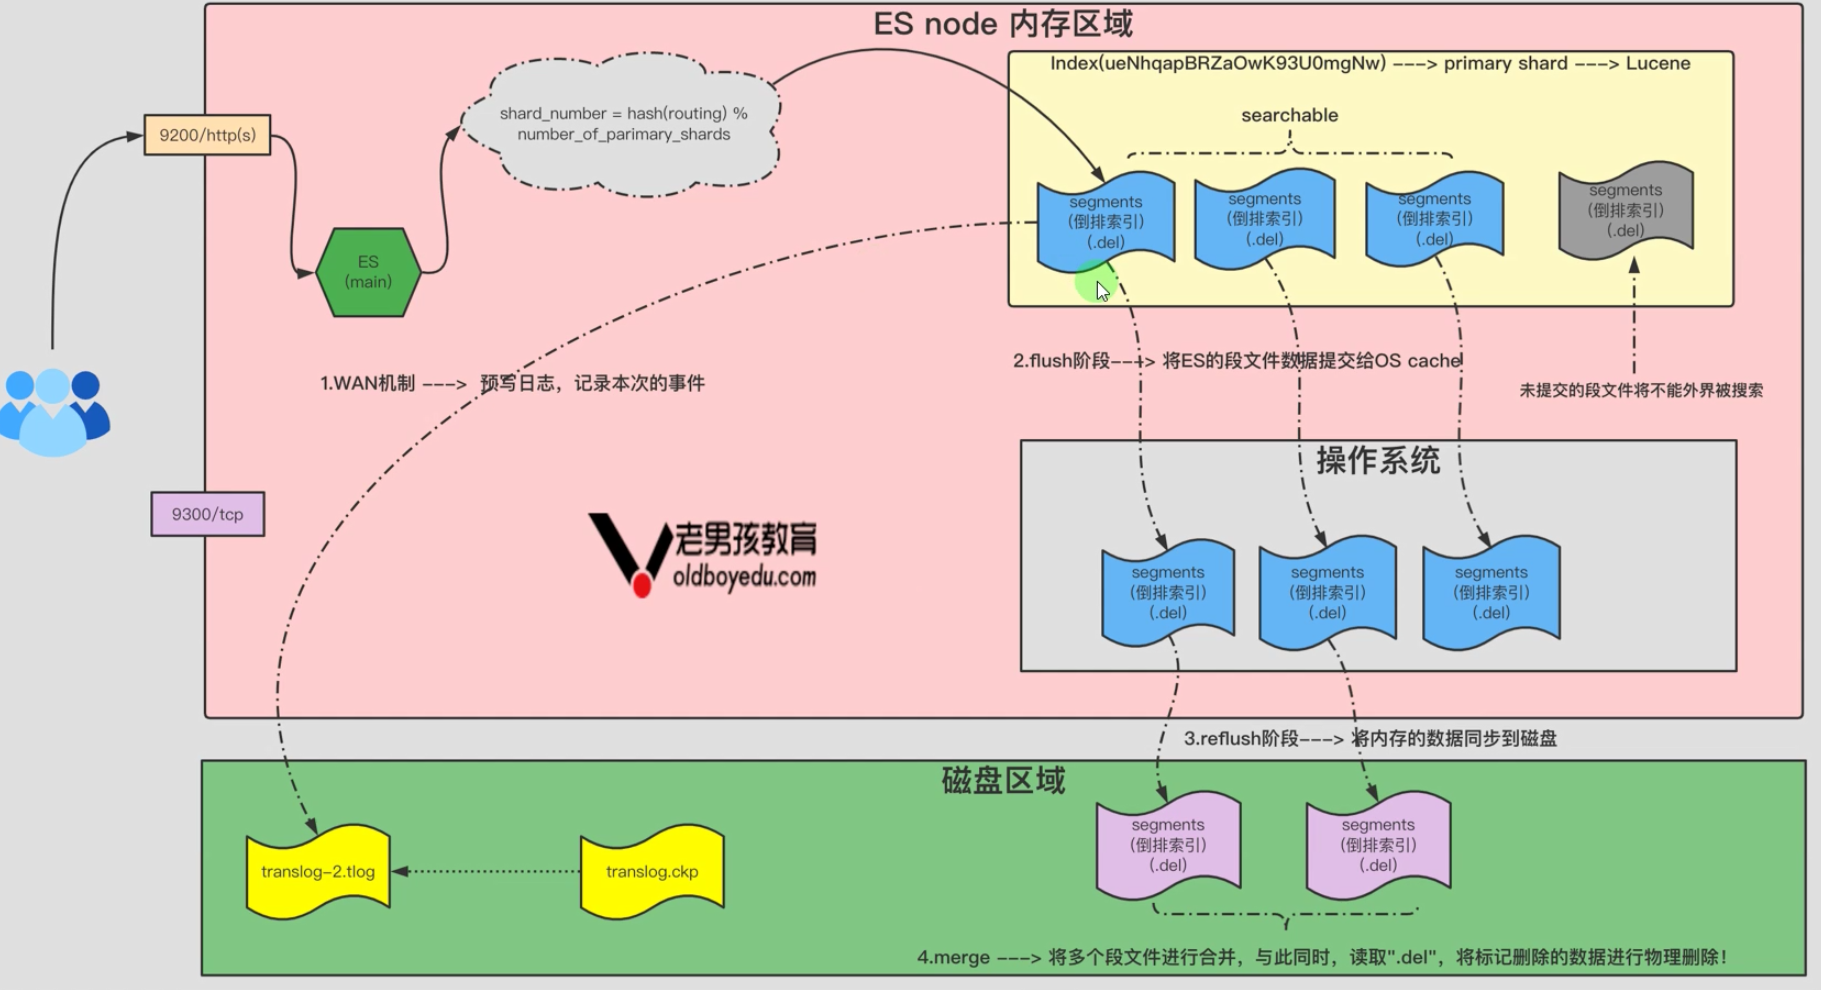
1.5 ES底层存储原理剖析
1 ABCDE123
2 abc321
3 haha001
(.del)
2 02 (DEL)
2、Filebeat
2.1 基于rpm安装filebeat
(1)下载filebeat软件包
wget http://192.168.15.253/ElasticStack/day04-/filebeat-7.17.5-x86_64.rpm
(2)安装filebeat
rpm -ivh filebeat-7.17.5-x86_64.rpm
(3)验证filebeat安装是否成功
filebeat -h
2.2 基于二进制安装filebeat
(1)下载filebeat软件包
wget http://192.168.15.253/ElasticStack/day04-/filebeat-7.17.5-linux-x86_64.tar.gz
(2)解压软件包
tar xf filebeat-7.17.5-linux-x86_64.tar.gz -C /oldboyedu/softwares/
(3)验证filebeat安装是否成功
cd /oldboyedu/softwares/filebeat-7.17.5-linux-x86_64/
ln -svf `pwd`/filebeat /usr/local/sbin/
filebeat -h
2.3 创建filebeat的配置文件初体验
(1)创建工作目录
cd /oldboyedu/softwares/filebeat-7.17.5-linux-x86_64
mkdir config
(2)编写配置文件
[root@elk103.oldboyedu.com filebeat-7.17.5-linux-x86_64]# cat config/01-stdin-to-console.yaml
# 配置filebeat的输入端
filebeat.inputs:
  # 指定输入端的类型为标准输入
- type: stdin


# 指定filebeat的输出端为console
output.console:
  # 表示输出的内容以漂亮的格式显示
  pretty: true
(3)启动filebeat的实例
filebeat -e -c config/01-stdin-to-console.yaml
2.4 filbeat的input插件之tcp案例
(1)编写配置文件
[root@elk103.oldboyedu.com filebeat-7.17.5-linux-x86_64]# cat config/02-tcp-to-console.yaml
filebeat.inputs:
  # 指定类型为tcp
- type: tcp
  # 定义tcp监听的主机和端口
  host: 0.0.0.0:8888

# 指定filebeat的输出端为console
output.console:
  # 表示输出的内容以漂亮的格式显示
  pretty: true
(2)启动filebeat实例
[root@elk103.oldboyedu.com filebeat-7.17.5-linux-x86_64]# filebeat -e -c config/02-tcp-to-console.yaml
(3)客户端测试
[root@elk101.oldboyedu.com ~]# yum -y install nc telnet
[root@elk101.oldboyedu.com ~]# telnet 10.0.0.103 8888
[root@elk101.oldboyedu.com ~]# echo "AAAAAAAAAAA" | nc 10.0.0.103 8888
2.5 filbeat的input插件之log案例
(1)编写配置文件
[root@elk103.oldboyedu.com filebeat-7.17.5-linux-x86_64]# cat config/03-log-to-console.yaml
filebeat.inputs:
  # 指定输入类型是log
- type: log
  # 指定文件路径
  paths:
    - /tmp/oldboyedu-linux85/*.log
    - /tmp/oldboyedu-linux85/*/*.json
    # 注意,两个*可以递归匹配
    - /tmp/oldboyedu-linux85/**/*.exe

# 指定filebeat的输出端为console
output.console:
  # 表示输出的内容以漂亮的格式显示
  pretty: true
(2)启动filebeat实例
[root@elk103.oldboyedu.com filebeat-7.17.5-linux-x86_64]# filebeat -e -c config/03-log-to-console.yaml
(3)测试数据
略。
- 上午内容回顾:
- ES集群的原理
- ES文档的写入流程
- ES文档的读取流程
- ES底层存储原理对应的是Lucene的工作机制
- filebeat的部署
- 常用的input插件
- stdin
- tcp
- log
- ES集群的原理
面试题:下午4点filebeat崩溃,4-5的数据未收集到ES集群。ES集群只有下午5点以后的数据和4点之前的数据。
请问如何找回4-5点数据,请说出思路即可。
2.6 input的通用字段案例
filebeat input插件的通用字段(common options):
- enabled:
		是否启用该组件,有true和false,默认值为true。当设置为false时,表示该input组件不会被加载执行!
- tags:
	给每条数据添加一个tags标签列表。

- fields
	给数据添加字段。

- fields_under_root
	该值默认值为false,将自定义的字段放在一个"fields"的字段中。若设置为true,则将fields的KEY放在顶级字段中。

- processors:
	定义处理器,对源数据进行简单的处理。

参考链接:
		https://www.elastic.co/guide/en/beats/filebeat/7.17/defining-processors.html
综合案例:
[root@elk103.oldboyedu.com filebeat-7.17.5-linux-x86_64]# cat config/04-input_common_options-to-console.yaml
filebeat.inputs:
- type: log
  paths:
    - /tmp/oldboyedu-linux85/*.log
    - /tmp/oldboyedu-linux85/*/*.json
    - /tmp/oldboyedu-linux85/**/*.exe
  # 是否启用该类型,默认值为true。
  enabled: false
- type: tcp
  enabled: true
  host: "0.0.0.0:8888"
  # 给数据打标签,会在顶级字段多出来多个标签
  tags: ["jiaoshi05","linux85","oldboyedu"]
  # 给数据添加KEY-VALUE类型的字段,默认是放在"fields"中的
  fields:
    school: oldboyedu
    class: linux85
    classroom: jiaoshi07
    ip: 219.141.136.10
    port: 13306
  # 若设置为true时,则将fields添加的自定义字段放在顶级字段中,默认值为false。
  fields_under_root: true
  # 定义处理器,过滤指定的数据
  processors:
    # 删除消息是以linux开头的事件(event)
  - drop_event:
      when:
        regexp:
          message: "^linux"
    # 消息包含error内容事件(event)就可以删除自定义字段或者tags。无法删除内置的字段.
  - drop_fields:
      when:
        contains:
          message: "error"
      fields: ["class","tags"]
      ignore_missing: false
    # 修改字段的名称
  - rename:
      fields:
          # 源字段
        - from: "school"
          # 目标字段
          to: "学校"
        - from: "log"
          to: "日志"
    # 转换数据,将字段的类型转换对应的数据类型,并存放在指定的字段中,本案例将其放在"oldboyedu-linux85"字段中
  - convert:
      fields:
        - {from: "ip", to: "oldboyedu-linux85.jiaoshi07_ip", type: "ip"}
        - {from: "port", to: "oldboyedu-linux85.jiaoshi07_port", type: "integer"}

# 指定filebeat的输出端为console
output.console:
  # 表示输出的内容以漂亮的格式显示
  pretty: true
2.7 包含指定数据采集,排除指定数据采集及json格式数据采集案例
[root@elk103.oldboyedu.com filebeat-7.17.5-linux-x86_64]# cat config/05-log-to-console.yaml
filebeat.inputs:
- type: log
  paths:
    - /tmp/oldboyedu-linux85/*
  # 排除以log结尾的文件
  exclude_files: ['\.log$']
  # 只采集包含指定信息的数据
  # include_lines: ['linux']
  # 只要包含特定的数据就不采集该事件(event)
  # exclude_lines: ['^linux']
  # 将message字段的json数据格式进行解析,并将解析的结果放在顶级字段中
  json.keys_under_root: true
  # 如果解析json格式失败,则会将错误信息添加为一个"error"字段输出
  json.add_error_key: true

# 指定filebeat的输出端为console
output.console:
  # 表示输出的内容以漂亮的格式显示
  pretty: true
2.8 使用filebeat采集nginx日志
(1)搭建nginx环境
1.1 添加yum源
cat > /etc/yum.repos.d/nginx.repo <<'EOF'
[nginx-stable]
name=nginx stable repo
baseurl=http://nginx.org/packages/centos/$releasever/$basearch/
gpgcheck=1
enabled=1
gpgkey=https://nginx.org/keys/nginx_signing.key
module_hotfixes=true

[nginx-mainline]
name=nginx mainline repo
baseurl=http://nginx.org/packages/mainline/centos/$releasever/$basearch/
gpgcheck=1
enabled=0
gpgkey=https://nginx.org/keys/nginx_signing.key
module_hotfixes=true
EOF
1.2 安装nginx
yum -y install nginx
systemctl start nginx
(2)使用filebeat采集nginx日志
[root@elk103.oldboyedu.com filebeat-7.17.5-linux-x86_64]# cat config/06-log_nginx-to-console.yaml
filebeat.inputs:
- type: log
  paths:
    - /var/log/nginx/access.log*

output.console:
  # 表示输出的内容以漂亮的格式显示
  pretty: true

[root@elk103.oldboyedu.com filebeat-7.17.5-linux-x86_64]# filebeat -e -c config/06-log_nginx-to-console.yaml
2.9 使用filebeat采集nginx的json格式日志
(1)修改nginx的配置文件
# vim /etc/nginx/nginx.conf

...
    # log_format  main  '$remote_addr - $remote_user [$time_local] "$request" '
    #                   '$status $body_bytes_sent "$http_referer" '
    #                   '"$http_user_agent" "$http_x_forwarded_for"';
    # access_log  /var/log/nginx/access.log  main;

log_format oldboyedu_nginx_json '{"@timestamp":"$time_iso8601",'
                          '"host":"$server_addr",'
                          '"clientip":"$remote_addr",'
                          '"SendBytes":$body_bytes_sent,'
                          '"responsetime":$request_time,'
                          '"upstreamtime":"$upstream_response_time",'
                          '"upstreamhost":"$upstream_addr",'
                          '"http_host":"$host",'
                          '"uri":"$uri",'
                          '"domain":"$host",'
                          '"xff":"$http_x_forwarded_for",'
                          '"referer":"$http_referer",'
                          '"tcp_xff":"$proxy_protocol_addr",'
                          '"http_user_agent":"$http_user_agent",'
                          '"status":"$status"}';

access_log  /var/log/nginx/access.log  oldboyedu_nginx_json;
(2)热加载nginx
systemctl reload nginx
> /var/log/nginx/access.log   # 清空
(3)测试访问nginx
curl http://10.0.0.103/
(4)filebeat采集nginx的json格式日志
[root@elk103.oldboyedu.com filebeat-7.17.5-linux-x86_64]# cat config/07-log_nginx_json-to-console.yaml
filebeat.inputs:
- type: log
  paths:
    - /var/log/nginx/access.log*
  json.keys_under_root: true
  json.add_error_key: true

output.console:
  # 表示输出的内容以漂亮的格式显示
  pretty: true
(5)启动filebeat实例
[root@elk103.oldboyedu.com filebeat-7.17.5-linux-x86_64]# filebeat -e -c config/07-log_nginx_json-to-console.yaml
2.10 使用filebeat采集tomcat访问日志
(1)安装tomcat
1.1 下载tomcat软件包
wget http://192.168.15.253/ElasticStack/day04-/apache-tomcat-9.0.73.tar.gz
1.2 解压软件包
tar xf apache-tomcat-9.0.73.tar.gz -C /oldboyedu/softwares/
(2)修改tomcat的配置文件
cd /oldboyedu/softwares/apache-tomcat-9.0.73/conf
cp server.xml{,.bak}
vim server.xml
...(切换到行尾修改,大概是在133-149之间)
<Host name="tomcat.oldboyedu.com" appBase="webapps"
unpackWARs="true" autoDeploy="true">
<Valve className="org.apache.catalina.valves.AccessLogValve" directory="logs"
prefix="tomcat.oldboyedu.com_access_log" suffix=".txt"
pattern="{"clientip":"%h","ClientUser":"%l","authenticated":"%u","AccessTime":"%t","request":"%r","status":"%s","SendBytes":"%b","Query?string":"%q","partner":"%{Referer}i","http_user_agent":"%{User-Agent}i"}"/>
</Host>
(3)配置环境变量并启动tomcat服务
[root@elk103.oldboyedu.com logs]# cat /etc/profile.d/tomcat.sh
#!/bin/bash

export TOMCAT_HOME=/oldboyedu/softwares/apache-tomcat-9.0.73
export PATH=$PATH:$TOMCAT_HOME/bin

[root@elk103.oldboyedu.com logs]# source /etc/profile.d/tomcat.sh

[root@elk103.oldboyedu.com logs]# catalina.sh start
(4)使用filebeat采集tomcat日志
[root@elk103.oldboyedu.com filebeat-7.17.5-linux-x86_64]# cat config/08-log_tomcat-to-console.yaml
filebeat.inputs:
- type: log
  paths:
    - /oldboyedu/softwares/apache-tomcat-9.0.73/logs/tomcat.oldboyedu.com_access_log*.txt
  json.keys_under_root: true
  json.add_error_key: true


output.console:
  # 表示输出的内容以漂亮的格式显示
  pretty: true

[root@elk103.oldboyedu.com filebeat-7.17.5-linux-x86_64]# filebeat -e -c config/08-log_tomcat-to-console.yaml
采集tomcat的错误日志多行匹配案例
[root@elk103.oldboyedu.com filebeat-7.17.5-linux-x86_64]# cat config/09-log-tomcat_error-to-es.yaml
filebeat.inputs:
- type: log
  paths:
    - /oldboyedu/softwares/apache-tomcat-9.0.73/logs/catalina*
      multiline.type: pattern
      multiline.pattern: '^\d{2}'
      multiline.negate: true
      multiline.match: after

# 指定输出端为ES集群
output.elasticsearch:
  hosts: ["http://10.0.0.101:9200","http://10.0.0.102:9200","http://10.0.0.103:9200"]

[root@elk103.oldboyedu.com filebeat-7.17.5-linux-x86_64]# ./filebeat -e -c config/09-log-tomcat_error-to-es.yaml
今日作业:
(1)完成课堂练习并整理思维导图;
(2)使用filebeat采集ES服务的启动日志写入ES集群;
(3)使用filebeat采集docker日志并写入ES集群;


 2169
2169

 被折叠的 条评论
为什么被折叠?
被折叠的 条评论
为什么被折叠?
 到【灌水乐园】发言


