


作者:谢小小XH
原文地址:https://blog.csdn.net/xierhacker/article/details/53103979
tensorflow 1.0出来了,API和以前有了一些不一样,所以这里把把之前的代码迁移到新的上面去。(2017.2.27)
对于一些性质有了新的认识。补充一些新的东西
这一部分内容的所有完整代码以及notebook,都可以在我的Github:LearningTensorFlow/2.constant_and_Variable/ 找到。
一.概览
还记的上节TensorFlow学习(一):感受一下 的hello word的例子吗?是不是出现了一些新的编程思路和一个函数类等等。我们学任何一门编程语言的时候,都会讲一些量的操作,因为这是基本。这节的主要任务就是熟悉最基本的一些量怎么来定义。
先列出来,然后一个一个细讲。
类:
1.Tensor
2.Variable
函数
1.constant()
2.初始化变量的一些函数
3.placeholder()
二.类讲解
Ⅰ.Tensor(tf.Tensor)
官方文档:tf.Tensor
其中GitHub中的示例都是自己写的,有兴趣的可以看一下,更加详细的把握这个最基本的数据结构的性质。
Tensor类应该是最基本最核心的数据结构了,他表示的是一个操作的输出,但是他并不接收操作输出的值,而是提供了在TensorFlow的Session中计算这些值的方法。
Tensor类主要有两个目的:
1.一个Tensor能够作为一个输入来传递给其他的操作(Operation),由此构造了一个连接不同操作的数据流,使得TensorFLow能够执行一个表示很大,多步骤计算的图。
2.在图被“投放”进一个Session中后,Tensor的值能够通过把Tensor传到Seesion.run()这个函数里面去得到结果。相同的,也可以用t.eval()这个函数,其中的t就是你的tensor啦,这个函数可以算是tf.get_default_session().run(t)的简便写法。
下面会有详细例子。这里有很多的东西是后面的看不懂怎么办?看下面的例子,有讲解,不懂的硬记下来先。因为这篇文章同时有其他类和函数的讲解,你看完这篇文章就都能够理解了。
from __future__ import print_function,division
import tensorflow as tf

#build a graph
print("build a graph")
a=tf.constant([[1,2],[3,4]])
b=tf.constant([[1,1],[0,1]])
print("a:",a)
print("b:",b)
print("type of a:",type(a))
c=tf.matmul(a,b)
print("c:",c)
print("\n")
#construct a 'Session' to excute the graph
sess=tf.Session()

# Execute the graph and store the value that `c` represents in `result`.
print("excuted in Session")
result_a=sess.run(a)
result_a2=a.eval(session=sess)
print("result_a:\n",result_a)
print("result_a2:\n",result_a2)

result_b=sess.run(b)
print("result_b:\n",result_b)

result_c=sess.run(c)
print("result_c:\n",result_c)
- 1
- 2
- 3
- 4
- 5
- 6
- 7
- 8
- 9
- 10
- 11
- 12
- 13
- 14
- 15
- 16
- 17
- 18
- 19
- 20
- 21
- 22
- 23
- 24
- 25
- 26
- 27
- 28
结果
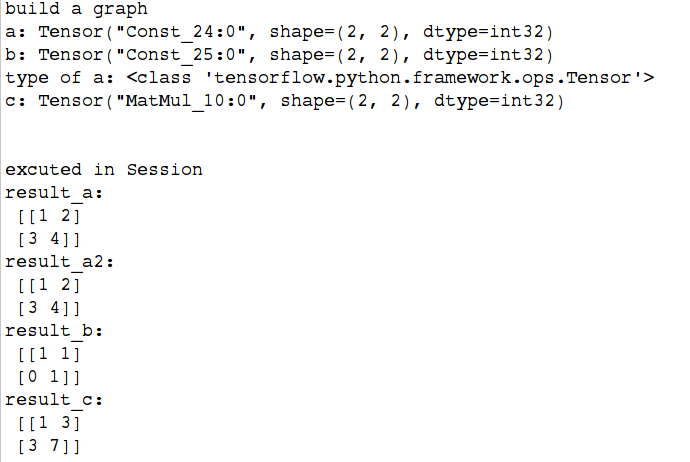
还是像上一节说的,整个程序分为3个过程,首先是建造计算图,一开始就用
constant()函数弄了两个tensor分别是a和b(下面有对于constant函数的介绍),然后我们试图直接输出a和b,认为能够输出两个矩阵(至少我们以前的编程经验就是这样),但是输出并不是两个矩阵,而是各自度对应的tensor类型。然后我们通过print("type of a:",type(a))这句话来输出a的类型,果然是tensor类型(tensor类)。然后我们把a和b这两个tensor传递给tf.matmul()函数,这个函数是用来计算矩阵乘法的函数。返回的依然是tensor用c来接受。到这里为止,印证了之前说了,tensor里面并不负责储存值,想要得到值,得去Session中run。我们可以把这部分看做是创建了一个图但是没有运行这个图。
然后我们构造了一个Session的对象用来执行图,sess=tf.Session()。
最后就是在session里面执行之前的东西了,可以把一个tensor传递到session.run()里面去,得到其值。等价的也可以用result_a2=a.eval(session=sess)来得到。那么返回的结果是什么呢?比如result_c是一个什么东西呢?是numpy.ndarray。要是你熟悉numpy的话。
刚刚这里例子主要是形象的表示tensor到底是干嘛的,比抽象的去看要好。接下来就讲一下Tensor类的一些属性和函数成员。
属性:
device:表示tensor将被产生的设备名称
dtype:tensor元素类型
graph:这个tensor被哪个图所有
name:这个tensor的名称
op:产生这个tensor作为输出的操作(Operation)
shape:tensor的形状(返回的是tf.TensorShape这个表示tensor形状的类)
value_index:表示这个tensor在其操作结果中的索引
函数:
tf.Tensor.consumers():
作用:返回消耗这个tensor的操作列表
tf.Tensor.eval(feed_dict=None, session=None):
作用:
在一个Seesion里面“评估”tensor的值(其实就是计算),首先执行之前的所有必要的操作来产生这个计算这个tensor需要的输入,然后通过这些输入产生这个tensor。在激发tensor.eval()这个函数之前,tensor的图必须已经投入到session里面,或者一个默认的session是有效的,或者显式指定session.
参数:
feed_dict:一个字典,用来表示tensor被feed的值(联系placeholder一起看)
session:(可选) 用来计算(evaluate)这个tensor的session.要是没有指定的话,那么就会使用默认的session。
返回:
表示“计算”结果值的numpy ndarray
tf.Tensor.get_shape()
作用:
返回tensor的形状,类型是TensorShape。这个函数不用把图“投放”到session里面运行就能够得到形状,一般用来debug和得到一些早期的错误信息等等。
例子:
c = tf.constant([[1.0, 2.0, 3.0], [4.0, 5.0, 6.0]])
print(c.get_shape())
==> TensorShape([Dimension(2), Dimension(3)])

d = tf.constant([[1.0, 0.0], [0.0, 1.0], [1.0, 0.0], [0.0, 1.0]])
print(d.get_shape())
==> TensorShape([Dimension(4), Dimension(2)])

# Raises a ValueError, because `c` and `d` do not have compatible
# inner dimensions.
e = tf.matmul(c, d)

f = tf.matmul(c, d, transpose_a=True, transpose_b=True)
print(f.get_shape())
==> TensorShape([Dimension(3), Dimension(4)])
- 1
- 2
- 3
- 4
- 5
- 6
- 7
- 8
- 9
- 10
- 11
- 12
- 13
- 14
- 15
tf.Tensor.set_shape(shape)
作用:
设置更新这个tensor的形状,
Updates the shape of this tensor.

This method can be called multiple times, and will merge the given shape with the current shape of this tensor. It can be used to provide additional information about the shape of this tensor that cannot be inferred from the graph alone. For example, this can be used to provide additional information about the shapes of images:

_, image_data = tf.TFRecordReader(...).read(...)
image = tf.image.decode_png(image_data, channels=3)

# The height and width dimensions of `image` are data dependent, and
# cannot be computed without executing the op.
print(image.get_shape())
==> TensorShape([Dimension(None), Dimension(None), Dimension(3)])

# We know that each image in this dataset is 28 x 28 pixels.
image.set_shape([28, 28, 3])
print(image.get_shape())
==> TensorShape([Dimension(28), Dimension(28), Dimension(3)])
Args:

shape: A TensorShape representing the shape of this tensor.
Raises:

ValueError: If shape is not compatible with the current shape of this tensor.
Other Methods
- 1
- 2
- 3
- 4
- 5
- 6
- 7
- 8
- 9
- 10
- 11
- 12
- 13
- 14
- 15
- 16
- 17
- 18
- 19
- 20
- 21
- 22
- 23
- 24
- 25
对于上面这些函数和属性,我写了一个完整的示例,放在GitHub上面,因为太多了,就不贴了。
Ⅱ.Variable(tf.Variable)
通过构造一个Variable类的实例在图中添加一个变量(variable),
Variable()这个构造函数需要初始值,这个初始值可以是一个任何类型任何形状的Tensor,初始值的形状和类型决定了这个变量的形状和类型。构造之后,这个变量的形状和类型就固定了,他的值可以通过assign()函数(或者assign类似的函数)来改变。如果你想要在之后改变变量的形状,你就需要assign()函数同时变量的validate_shape=False
和任何的Tensor一样,通过Variable()创造的变量能够作为图中其他操作的输入使用。你也能够在图中添加节点,通过对变量进行算术操作。这里还是说的太抽象了,举个简单的例子来说明一下。
from __future__ import print_function,division
import numpy as np
import tensorflow as tf

#create a Variable
w=tf.Variable(initial_value=[[1,2],[3,4]],dtype=tf.float32)
x=tf.Variable(initial_value=[[1,1],[1,1]],dtype=tf.float32)
y=tf.matmul(w,x)
z=tf.sigmoid(y)
print(z)
init_op=tf.global_variables_initializer()


with tf.Session() as session:
    session.run(init_op)
    z=session.run(z)
    print(z)
- 1
- 2
- 3
- 4
- 5
- 6
- 7
- 8
- 9
- 10
- 11
- 12
- 13
- 14
- 15
- 16
- 17
结果:

属性:
device:这个变量的device
dtype:变量的元素类型
graph:存放变量的图
initial_value:这个变量的初始值
initializer :这个变量的初始化器
name:这个变脸的名字
**op:**The Operation of this variable.
函数
__init__(initial_value=None, trainable=True, collections=None, validate_shape=True, caching_device=None, name=None, variable_def=None, dtype=None, expected_shape=None, import_scope=None)
作用:
创建一个新的变量,初始值为initial_value(这个构造函数会创建两个操作(Op),一个变量OP和一个assignOp来设置变量为其初始化值)
参数:
initial_value: 一个Tensor类型或者是能够转化为Tensor的python对象类型。它是这个变量的初始值。这个初始值必须指定形状信息,不然后面的参数validate_shape需要设置为false。当然也能够传入一个无参数可调用并且返回制定初始值的对象,在这种情况下,dtype必须指定。
trainable: 如果为True(默认也为Ture),这个变量就会被添加到图的集合GraphKeys.TRAINABLE_VARIABLES.中去 ,这个collection被作为优化器类的默认列表。
collections:图的collection 键列表,新的变量被添加到这些collection中去。默认是[GraphKeys.GLOBAL_VARIABLES].
validate_shape: 如果是False的话,就允许变量能够被一个形状未知的值初始化,默认是True,表示必须知道形状。
caching_device: 可选,描述设备的字符串,表示哪个设备用来为读取缓存。默认是变量的device,
name: 可选,变量的名称
variable_def: VariableDef protocol buffer. If not None, recreates the Variable object with its contents. variable_def and the other arguments are mutually exclusive.
dtype: 如果被设置,初始化的值就会按照这里的类型来定。
expected_shape: TensorShape类型.要是设置了,那么初始的值会是这种形状
import_scope: Optional string. Name scope to add to the Variable. Only used when initializing from protocol buffer.
assign(value, use_locking=False)
作用:为变量指定一个新的值
参数:
value: Tensor,变量的新值
use_locking: 如果是True,If True, use locking during the assignment.
assign_add(delta, use_locking=False)
作用:为这个变量加上一个值
参数:
delta: Tensor,待加的值
use_locking: If True, use locking during the operation.
assign_sub(delta, use_locking=False)
作用:为这个变量减去一个值
参数:
delta: Tensor,待减的值
use_locking: If True, use locking during the operation.
count_up_to(limit)
Increments this variable until it reaches limit.
When that Op is run it tries to increment the variable by 1. If incrementing the variable would bring it above limit then the Op raises the exception OutOfRangeError.
If no error is raised, the Op outputs the value of the variable before the increment.
This is essentially a shortcut for count_up_to(self, limit).
Args:
limit: value at which incrementing the variable raises an error.
Returns:
A Tensor that will hold the variable value before the increment. If no other Op modifies this variable, the values produced will all be distinct.
eval(session=None)
作用:
在一个session里面,计算并且返回这个变量的值。这个不算是构造图的方法,它并不会添加一个操作到图里面。这个便捷方法需要一个包含这个变量的图投放到了一个session里面。要是没有sesssion,那么默认的就会使用默认的session。
参数:
session: 估算这个变量的Session
v = tf.Variable([1, 2])
init = tf.global_variables_initializer()

with tf.Session() as sess:
    sess.run(init)
    # Usage passing the session explicitly.
    print(v.eval(sess))
    # Usage with the default session.  The 'with' block
    # above makes 'sess' the default session.
    print(v.eval())
- 1
- 2
- 3
- 4
- 5
- 6
- 7
- 8
- 9
- 10
get_shape()
作用:返回变量的形状
initialized_value()
作用:
返回已经初始化变量的值.你应该使用这个函数来代替使用变量自己来初始化依赖这个变量的值的其他变量。
# Initialize 'v' with a random tensor.
v = tf.Variable(tf.truncated_normal([10, 40]))
# Use `initialized_value` to guarantee that `v` has been
# initialized before its value is used to initialize `w`.
# The random values are picked only once.
w = tf.Variable(v.initialized_value() * 2.0)
- 1
- 2
- 3
- 4
- 5
- 6
load(value, session=None)
作用:把新的值载入到变量里面
参数:
value: 新的变量值
session: 用来估算这个变量的Session,要是没有传递,就用默认的
v = tf.Variable([1, 2])
init = tf.global_variables_initializer()
from __future__ import  print_function,division
import numpy as np
import tensorflow as tf

v=tf.Variable(initial_value=[1,2])
init=tf.global_variables_initializer()

with tf.Session() as sess:
    sess.run(init)
    #显式地传递session到函数里面
    v.load(value=[3,4],session=sess)
    print(v.eval(session=sess))
- 1
- 2
- 3
- 4
- 5
- 6
- 7
- 8
- 9
- 10
- 11
- 12
read_value()
作用:返回这个变量的值,在当前的上下文中读取。返回的是一个含有这个值的Tensor
scatter_sub(sparse_delta, use_locking=False)
Subtracts IndexedSlices from this variable.
This is essentially a shortcut for scatter_sub(self, sparse_delta.indices, sparse_delta.values).
Args:
sparse_delta: IndexedSlices to be subtracted from this variable.
use_locking: If True, use locking during the operation.
Returns:
A Tensor that will hold the new value of this variable after the scattered subtraction has completed.
Raises:
ValueError: if sparse_delta is not an IndexedSlices.
set_shape(shape)
作用:改变变量形状
参数:
shape:新的形状
三.基本函数讲解
Ⅰ.“常量”函数
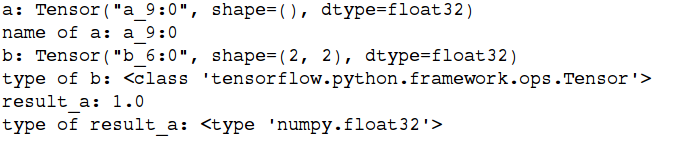
constant()函数应该是出镜率很高的函数之一了,所以这里放在基本函数讲解的第一个。这并不是类,而是一个函数,很多初学者容易误解。
tf.constant(value,dtype=None,shape=None,name=’Const’,verify_shape=False)
作用:创建一个常量tensor
参数:
value: 一个dtype类型(如果指定了)的常量值(列表)。要注意的是,要是value是一个列表的话,那么列表的长度不能够超过形状参数指定的大小(如果指定了)。要是列表长度小于指定的,那么多余的由列表的最后一个元素来填充。
dtype: 返回tensor的类型
shape: 返回的tensor形状。
name: tensor的名字
verify_shape: Boolean that enables verification of a shape of values.
例子:
# -*- coding: utf-8 -*-
from __future__ import print_function,division
import tensorflow as tf

#build graph
a=tf.constant(1.,name="a")
print("a:",a)
print("name of a:",a.name)
b=tf.constant(1.,shape=[2,2],name="b")
print("b:",b)
print("type of b:",type(b))

#construct session
sess=tf.Session()

#run in session
result_a=sess.run(a)
print("result_a:",result_a)
print("type of result_a:",type(result_a))
- 1
- 2
- 3
- 4
- 5
- 6
- 7
- 8
- 9
- 10
- 11
- 12
- 13
- 14
- 15
- 16
- 17
- 18
- 19
结果:
Ⅱ.变量与初始化的一些函数
tf.global_variables()
作用:返回全局变量(global variables)。(全局变量是在分布式环境的机器中共享的变量。)
Variable()构造函数或者get_variable()自动地把新的变量添加到 graph collectionGraphKeys.GLOBAL_VARIABLES中。这个函数返回这个collection中的内容。
tf.local_variables()
作用:返回局部变量(local variables)。(局部变量是不做存储用的,仅仅是用来临时记录某些信息的变量。 比如用来记录某些epoch数量等等。) local_variable() 函数会自动的添加新的变量到构造函数或者get_variable()自动地把新的变量添加到 graph collection
GraphKeys.LOCAL_VARIABLES中。这个函数返回这个collection中的内容。
tf.variables_initializer(var_list, name=’init’)
作用:
返回一个初始化一列变量的操作(Op)。要是你把图“投放进一个”session中后,你就能够通过run 这个操作来初始化变量列表var_list中的变量
参数:
var_list: 带初始化变量列表
name: 可选,操作的名称。
tf.global_variables_initializer()
补充:这个函数很重要,差不多经常碰得到,是替代以前老的tf.initialize_all_variables() 的新方法。
作用:
返回一个初始化所有全局变量的操作(Op)。要是你把图“投放进一个”session中后,你就能够通过run 这个操作来初始化所有的全局变量,本质相当于variable_initializers(global_variables())
tf.local_variables_initializer()
作用:
返回一个初始化所有局部变量的操作(Op)。要是你把图“投放进一个”session中后,你就能够通过run 这个操作来初始化所有的局部变量,本质相当于variable_initializers(local_variables())
Ⅲ.placeholder()
tf.placeholder(dtype, shape=None, name=None)
作用:
placeholder的作用可以理解为占个位置,我并不知道这里将会是什么值,但是知道类型和形状等等一些信息,先把这些信息填进去占个位置,然后以后用feed的方式来把这些数据“填”进去。返回的就是一个用来用来处理feeding一个值的tensor。
那么feed的时候一般就会在你之后session的run()方法中用到feed_dict这个参数了。这个参数的内容就是你要“喂”给那个placeholder的内容(看下例)。
参数:
dtype: 将要被fed的元素类型
shape:(可选) 将要被fed的tensor的形状,要是不指定的话,你能够fed进任何形状的tensor。
name:(可选)这个操作的名字
例子:
x = tf.placeholder(tf.float32, shape=(1024, 1024))
y = tf.matmul(x, x)

with tf.Session() as sess:
  print(sess.run(y))  # ERROR: will fail because x was not fed.
  rand_array = np.random.rand(1024, 1024)
  print(sess.run(y, feed_dict={x: rand_array}))  # Will succeed.
- 1
- 2
- 3
- 4
- 5
- 6
- 7
四.几个例子
https://www.tensorflow.org/versions/r0.11/get_started/basic_usage.html
上面基本把比较常用和基础的类和函数都分析了一遍,接下来就是通过文档中提供的基本用法把那些东西串联起来。
再重申一遍,使用TensorFlow的时候,你需要理解的一些tensorflow问题:
怎么用图表示计算;
在Session里面计算图;
用tensor表示数据;
用变量保持状态;
用feeds(联系placeholder)和fetches来从任意的操作(Operation)中“放入”或者“拿出”数据。
再回忆一下tensorflow的思想:首先是构造过程来“组装”一个图,然后是执行过程用session来执行图中的操作(ops)。那么下面就用一个综合的例子联系之前对于各个类的分析来加强一些对于tensorflow基础的理解。
例子一:常量和图
# -*- coding: utf-8 -*-

from __future__ import print_function,division
import tensorflow as tf

#building the graph

'''
创建一个常量操作(op)产生 1x2 矩阵,这个操作(op)作为一个节点添加到默认的图中,但是这里这个矩阵并不是一个值,而是一个tensor。
创建另外一个常量操作产生一个1x2 矩阵(解释如上)
'''
mat1=tf.constant([3.,3.],name="mat1")
mat2=tf.constant([4.,4.],name="mat2")

#matrix sum.
s=tf.add(mat1,mat2)

'''
这个默认的图(grapg)现在已经有3个节点了:两个constan()操作和一个add()操作。为了真正的得到这个和的值,你需要把这个图投放到一个session里面执行。
'''

# Launch the default graph.
sess = tf.Session()

'''
为了得到和的值,我们要运行add 操作(op),因此我们在session里面调用“run()”函数,把代表add op的输出结果s传到函数里面去。表明我们想从add()操作得到输出。
'''
result=sess.run(s)
print("result:",result)

# Close the Session when we're done.
sess.close()
- 1
- 2
- 3
- 4
- 5
- 6
- 7
- 8
- 9
- 10
- 11
- 12
- 13
- 14
- 15
- 16
- 17
- 18
- 19
- 20
- 21
- 22
- 23
- 24
- 25
- 26
- 27
- 28
- 29
- 30
- 31
- 32
结果:

分析:
见注释,其中出来几个操作的那些很重要。需要好好理解一下。
还有一种自动关闭session的写法:
with tf.Session() as sess:
  result = sess.run([product])
  print(result)
- 1
- 2
- 3
例子二:tensor和变量
参照之前的类和函数讲解
# -*- coding: utf-8 -*-

from __future__ import print_function,division
import tensorflow as tf

#building the graph

#Create a Variable, that will be initialized to the scalar value 0.
state=tf.Variable(0,name="state")
print("the name of this variable:",state.name)

# Create an Op to add 1 to `state`.
one = tf.constant(1)
new_value = tf.add(state, one)
update = tf.assign(state, new_value)

# Variables must be initialized by running an `init` Op after having
# launched the graph.  We first have to add the `init` Op to the graph.
init_op = tf.initialize_all_variables()

# Launch the graph and run the ops.
with tf.Session() as sess:
  # Run the 'init' op
  sess.run(init_op)
  # Print the initial value of 'state'
  print(sess.run(state))
  # Run the op that updates 'state' and print 'state'.
  for _ in range(3):
    sess.run(update)
    print("value of state:",sess.run(state))
- 1
- 2
- 3
- 4
- 5
- 6
- 7
- 8
- 9
- 10
- 11
- 12
- 13
- 14
- 15
- 16
- 17
- 18
- 19
- 20
- 21
- 22
- 23
- 24
- 25
- 26
- 27
- 28
- 29
- 30
结果:
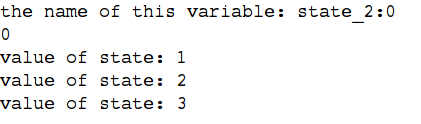
分析:
assign()的这个函数可以看前面的assign函数的解释,但是你现在肯定也知道,在seesion中run()之前,它不会真的执行assign的操作。
这里是一个循环操作,然后有在循环操作中的赋值过程,要是在神经网络中的话,你会有很多的权值需要存储然后不断循环更新等等,这里可以让你体会一下。
例三:fetches和feeds
这里很重要,因为很多新手在这里不理解
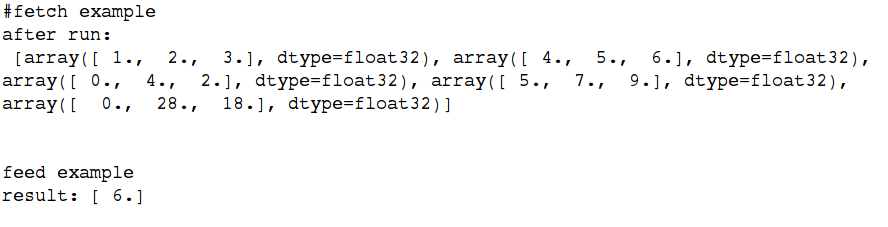
Fetches我不知道怎么翻译,所以还是就直接用fetches,表示一种取的动作,我们有时候需要在操作里面取一些输出,其实就是在执行图的过程中在run()函数里面传入一个tensor就行,然后就会输出tesnor的结果,比如上面的session.run(state)就可以当做一个fetch的动作啦。当然不仅仅限于fetch一个,你也可以fetch多个tensor。
feed我们知道是喂养的意思,这个又怎么理解呢?feed的动作一般和placeholder()函数一起用,前面说过,placeholder()起到占位的作用(参考前面的placeholder()函数),怎么理解呢?假如我有一个(堆)数据,但是我也许只知道他的类型,不知道他的值,我就可以先传进去一个类型,先把这个位置占着。等到以后再把数据“喂”给这个变量。
很抽象,那么举个例子
# -*- coding: utf-8 -*-

from __future__ import print_function,division
import tensorflow as tf

#fetch example
print("#fetch example")
a=tf.constant([1.,2.,3.],name="a")
b=tf.constant([4.,5.,6.],name="b")
c=tf.constant([0.,4.,2.],name="c")
add=a+b
mul=add*c

with tf.Session() as sess:
    result=sess.run([a,b,c,add,mul])
    print("after run:\n",result)

print("\n\n")

#feed example
print("feed example")
input1=tf.placeholder(tf.float32)
input2=tf.placeholder(tf.float32)
output=tf.mul(input1,input2)

with tf.Session() as session:
    result_feed=session.run(output,feed_dict={input1:[2.],input2:[3.]})
    print("result:",result_feed)
- 1
- 2
- 3
- 4
- 5
- 6
- 7
- 8
- 9
- 10
- 11
- 12
- 13
- 14
- 15
- 16
- 17
- 18
- 19
- 20
- 21
- 22
- 23
- 24
- 25
- 26
- 27
- 28
结果:
分析:


 884
884


 被折叠的 条评论
为什么被折叠?
被折叠的 条评论
为什么被折叠?
 到【灌水乐园】发言


