


spring-clound 学习打卡6:简单入门-统一的配置中心,Spring-clound-config 【Greenwich.SR1版本】
一、简介
传送门
https://github.com/unnunique/SpringCloundDakaLearning/tree/master/Chapter-6
首先对于任何一个应用,所有随着部署环境改变而要改变的配置,都不应该写死在代码里面。
也就是说,代码中的配置,要统一放到一个文件中管理。
而spring-clound 应用中,由于一个应用,可能对应着多个微服务,那么,每个微服务都有自己的配置文件。
有些配置文件是可以共用的,有些则是单个服务的特殊需求。
由此,对于这些配置文件的处理,Spring-Clound 有多种方式实现应用配置的统一管理。
二、首先,首先要编写和配置一个配置管理中心。
2.1 首先是pom 文件。
注意配置中心的jar 包依赖如下:
<dependency>
	<groupId>org.springframework.cloud</groupId>
	<artifactId>spring-cloud-config-server</artifactId>
</dependency>
完整pom 依赖如下:
<?xml version="1.0" encoding="UTF-8"?>
<project xmlns="http://maven.apache.org/POM/4.0.0"
         xmlns:xsi="http://www.w3.org/2001/XMLSchema-instance"
         xsi:schemaLocation="http://maven.apache.org/POM/4.0.0 http://maven.apache.org/xsd/maven-4.0.0.xsd">
    <parent>
        <artifactId>Chapter-6</artifactId>
        <groupId>com.sydney.dream.springclound</groupId>
        <version>1.0.0</version>
    </parent>
    <modelVersion>4.0.0</modelVersion>

    <artifactId>config</artifactId>

    <properties>
        <java.version>1.8</java.version>
        <spring-cloud.version>Greenwich.SR1</spring-cloud.version>
    </properties>

    <dependencies>
        <dependency>
            <groupId>org.springframework.cloud</groupId>
            <artifactId>spring-cloud-config-server</artifactId>
        </dependency>
        <dependency>
            <groupId>org.springframework.boot</groupId>
            <artifactId>spring-boot-starter-web</artifactId>
        </dependency>
        <dependency>
            <groupId>org.springframework.boot</groupId>
            <artifactId>spring-boot-starter-test</artifactId>
            <scope>test</scope>
        </dependency>
    </dependencies>

    <dependencyManagement>
        <dependencies>
            <dependency>
                <groupId>org.springframework.cloud</groupId>
                <artifactId>spring-cloud-dependencies</artifactId>
                <version>${spring-cloud.version}</version>
                <type>pom</type>
                <scope>import</scope>
            </dependency>
        </dependencies>
    </dependencyManagement>

    <build>
        <plugins>
            <plugin>
                <groupId>org.springframework.boot</groupId>
                <artifactId>spring-boot-maven-plugin</artifactId>
            </plugin>
        </plugins>
    </build>

</project>
2.2 properties 配置:
#spring.cloud.config.server.git.uri:配置git仓库地址
#spring.cloud.config.server.git.searchPaths:配置仓库路径
#spring.cloud.config.label:配置仓库的分支
#spring.cloud.config.server.git.username:访问git仓库的用户名, 公有仓库,可以不填
#spring.cloud.config.server.git.password:访问git仓库的用户密码, 公有仓库,可以不填
spring.application.name=config-server
server.port=8888

spring.cloud.config.server.git.uri=https://github.com/unnunique/SpringCloundDakaLearning
spring.cloud.config.server.git.searchPaths=Chapter-6/config-center
spring.cloud.config.label=master
spring.cloud.config.server.git.username=
spring.cloud.config.server.git.password=
2.3 app
注意添加 @EnableConfigServer 注解
package com.sydney.dream.chapter6.web;

import org.springframework.boot.SpringApplication;
import org.springframework.boot.autoconfigure.SpringBootApplication;
import org.springframework.cloud.config.server.EnableConfigServer;

/**
 *
 */
@SpringBootApplication
@EnableConfigServer
public class ConfigApp {
    public static void main(String[] args) {
        SpringApplication.run(ConfigApp.class, args);
    }
}
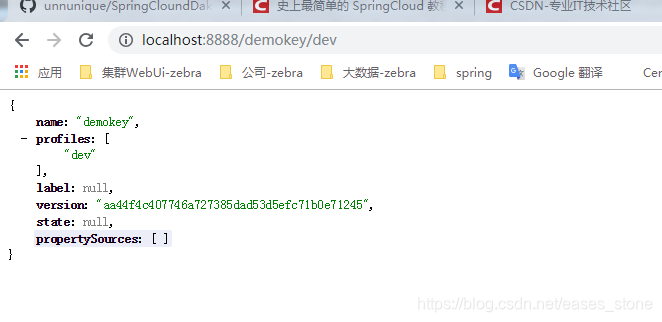
2.4 启动服务后,通过访问如下链接, 则可以测试服务是否配置成功。。
2.5 建立子module, 用于获取配置中心配置的例子。
2.5.1 pom 文件
<?xml version="1.0" encoding="UTF-8"?>
<project xmlns="http://maven.apache.org/POM/4.0.0"
         xmlns:xsi="http://www.w3.org/2001/XMLSchema-instance"
         xsi:schemaLocation="http://maven.apache.org/POM/4.0.0 http://maven.apache.org/xsd/maven-4.0.0.xsd">
    <parent>
        <groupId>org.springframework.boot</groupId>
        <artifactId>spring-boot-starter-parent</artifactId>
        <version>2.1.4.RELEASE</version>
        <relativePath/> <!-- lookup parent from repository -->
    </parent>
    <modelVersion>4.0.0</modelVersion>

    <artifactId>chapter-6-client</artifactId>

    <properties>
        <java.version>1.8</java.version>
        <spring-cloud.version>Greenwich.SR1</spring-cloud.version>
    </properties>

    <dependencies>
        <dependency>
            <groupId>org.springframework.boot</groupId>
            <artifactId>spring-boot-starter-web</artifactId>
        </dependency>

        <dependency>
            <groupId>org.springframework.cloud</groupId>
            <artifactId>spring-cloud-starter-config</artifactId>
        </dependency>
        <dependency>
            <groupId>org.springframework.boot</groupId>
            <artifactId>spring-boot-starter-actuator</artifactId>
        </dependency>
        <dependency>
            <groupId>org.springframework.cloud</groupId>
            <artifactId>spring-cloud-config-client</artifactId>
        </dependency>
        <!-- 因为父pom 中已经有了,所以,不用再重新引入一遍了。 -->
        <!--<dependency>
            <groupId>org.springframework.boot</groupId>
            <artifactId>spring-boot-starter-web</artifactId>
        </dependency>
        <dependency>
            <groupId>org.springframework.boot</groupId>
            <artifactId>spring-boot-starter-test</artifactId>
            <scope>test</scope>
        </dependency> -->
    </dependencies>

    <dependencyManagement>
        <dependencies>
            <dependency>
                <groupId>org.springframework.cloud</groupId>
                <artifactId>spring-cloud-dependencies</artifactId>
                <version>${spring-cloud.version}</version>
                <type>pom</type>
                <scope>import</scope>
            </dependency>
        </dependencies>
    </dependencyManagement>

    <build>
        <plugins>
            <plugin>
                <groupId>org.springframework.boot</groupId>
                <artifactId>spring-boot-maven-plugin</artifactId>
            </plugin>
        </plugins>
    </build>

</project>
2.5.2 propeties 文件
spring.application.name=app1
spring.cloud.config.label=master
spring.cloud.config.profile=dev
spring.cloud.config.uri= http://localhost:8888/
spring.cloud.config.request-read-timeout=6000000
server.port=8881
2.5.3 app
package com.sydney.dream.chapter6.client;


import org.springframework.boot.SpringApplication;
import org.springframework.boot.autoconfigure.SpringBootApplication;

@SpringBootApplication
public class ClientApp {
    public static void main(String[] args) {
        SpringApplication.run(ClientApp.class, args);
    }


}
Controller
${demokey}即为配置在远程上课key的值
package com.sydney.dream.chapter6.client;

import org.springframework.beans.factory.annotation.Value;
import org.springframework.web.bind.annotation.RequestMapping;
import org.springframework.web.bind.annotation.RestController;

@RestController
public class HiController {
    @Value("${demokey}")
    String demokey;
    @RequestMapping(value = "/hi")
    public String hi(){
        return demokey;
    }
}
2.6 启动子module
访问如下链接:
http://localhost:8881/hi
得到的响应如下:
demokey-dev
2.7 至此,demo 打卡完成。
常见问题:
1, 服务启动在6666 端口, 通过url 无法访问
有可能6666 端口被占用, 重新换个端口即可。
2, is not eligible for getting processed by all BeanPostProcessors (for example: not eligible for auto-proxying)
1, 可能 propeties 配置重复。
2, 可能pom 文件间依赖问题,
本文是pom 文件间依赖的问题。
2019-04-28 20:33:44.317  INFO 1804 --- [           main] c.c.c.ConfigServicePropertySourceLocator : Fetching config from server at : http://localhost:8888
2019-04-28 20:33:47.047  INFO 1804 --- [           main] c.c.c.ConfigServicePropertySourceLocator : Located environment: name=app1, profiles=[dev], label=master, version=aa44f4c407746a727385dad53d5efc71b0e71245, state=null
2019-04-28 20:33:47.048  INFO 1804 --- [           main] b.c.PropertySourceBootstrapConfiguration : Located property source: CompositePropertySource {name='configService', propertySources=[MapPropertySource {name='configClient'}, MapPropertySource {name='https://github.com/unnunique/SpringCloundDakaLearning/Chapter-6/config-center/app1-dev.properties'}]}
2019-04-28 20:33:47.057  INFO 1804 --- [           main] c.s.dream.chapter6.client.ClientApp      : No active profile set, falling back to default profiles: default
2019-04-28 20:33:48.026  INFO 1804 --- [           main] o.s.cloud.context.scope.GenericScope     : BeanFactory id=abbe48a3-433d-3930-a2f4-54bba3574488
2019-04-28 20:33:48.045  INFO 1804 --- [           main] trationDelegate$BeanPostProcessorChecker : Bean 'org.springframework.cloud.autoconfigure.ConfigurationPropertiesRebinderAutoConfiguration' of type [org.springframework.cloud.autoconfigure.ConfigurationPropertiesRebinderAutoConfiguration$$EnhancerBySpringCGLIB$$70437cb9] is not eligible for getting processed by all BeanPostProcessors (for example: not eligible for auto-proxying)
2019-04-28 20:33:49.491  INFO 1804 --- [           main] c.s.dream.chapter6.client.ClientApp      : Started ClientApp in 8.945 seconds (JVM running for 9.70
问题: 父 pom 文件依赖如下:
<?xml version="1.0" encoding="UTF-8"?>
<project xmlns="http://maven.apache.org/POM/4.0.0"
         xmlns:xsi="http://www.w3.org/2001/XMLSchema-instance"
         xsi:schemaLocation="http://maven.apache.org/POM/4.0.0 http://maven.apache.org/xsd/maven-4.0.0.xsd">
    <parent>
        <artifactId>parent</artifactId>
        <groupId>com.sydney.dream.springclound</groupId>
        <version>1.0.0</version>
    </parent>
    <modelVersion>4.0.0</modelVersion>

    <artifactId>Chapter-6</artifactId>
    <packaging>pom</packaging>
    <modules>
        <module>Client</module>
        <module>Config</module>
    </modules>

    <properties>
        <java.version>1.8</java.version>
        <spring-cloud.version>Greenwich.SR1</spring-cloud.version>
    </properties>

    <dependencies>
        <dependency>
            <groupId>org.springframework.cloud</groupId>
            <artifactId>spring-cloud-config-server</artifactId>
        </dependency>
        <dependency>
            <groupId>org.springframework.boot</groupId>
            <artifactId>spring-boot-starter-web</artifactId>
        </dependency>
        <dependency>
            <groupId>org.springframework.boot</groupId>
            <artifactId>spring-boot-starter-test</artifactId>
            <scope>test</scope>
        </dependency>
    </dependencies>

    <dependencyManagement>
        <dependencies>
            <dependency>
                <groupId>org.springframework.cloud</groupId>
                <artifactId>spring-cloud-dependencies</artifactId>
                <version>${spring-cloud.version}</version>
                <type>pom</type>
                <scope>import</scope>
            </dependency>
        </dependencies>
    </dependencyManagement>

    <build>
        <plugins>
            <plugin>
                <groupId>org.springframework.boot</groupId>
                <artifactId>spring-boot-maven-plugin</artifactId>
            </plugin>
        </plugins>
    </build>


</project>
子 pom 1 配置文件:
<?xml version="1.0" encoding="UTF-8"?>
<project xmlns="http://maven.apache.org/POM/4.0.0"
         xmlns:xsi="http://www.w3.org/2001/XMLSchema-instance"
         xsi:schemaLocation="http://maven.apache.org/POM/4.0.0 http://maven.apache.org/xsd/maven-4.0.0.xsd">
    <parent>
        <artifactId>Chapter-6</artifactId>
        <groupId>com.sydney.dream.springclound</groupId>
        <version>1.0.0</version>
    </parent>
    <modelVersion>4.0.0</modelVersion>

    <artifactId>config</artifactId>


</project>
子pom 2,
<?xml version="1.0" encoding="UTF-8"?>
<project xmlns="http://maven.apache.org/POM/4.0.0"
         xmlns:xsi="http://www.w3.org/2001/XMLSchema-instance"
         xsi:schemaLocation="http://maven.apache.org/POM/4.0.0 http://maven.apache.org/xsd/maven-4.0.0.xsd">
    <parent>
        <groupId>org.springframework.boot</groupId>
        <artifactId>spring-boot-starter-parent</artifactId>
        <version>2.1.4.RELEASE</version>
        <relativePath/> <!-- lookup parent from repository -->
    </parent>
    <modelVersion>4.0.0</modelVersion>

    <artifactId>chapter-6-client</artifactId>

    <properties>
        <java.version>1.8</java.version>
        <spring-cloud.version>Greenwich.SR1</spring-cloud.version>
    </properties>

    <dependencies>
        <dependency>
            <groupId>org.springframework.boot</groupId>
            <artifactId>spring-boot-starter-web</artifactId>
        </dependency>

        <dependency>
            <groupId>org.springframework.cloud</groupId>
            <artifactId>spring-cloud-starter-config</artifactId>
        </dependency>
        <dependency>
            <groupId>org.springframework.boot</groupId>
            <artifactId>spring-boot-starter-actuator</artifactId>
        </dependency>
        <dependency>
            <groupId>org.springframework.cloud</groupId>
            <artifactId>spring-cloud-config-client</artifactId>
        </dependency>
        <!-- 因为父pom 中已经有了,所以,不用再重新引入一遍了。 -->
        <!--<dependency>
            <groupId>org.springframework.boot</groupId>
            <artifactId>spring-boot-starter-web</artifactId>
        </dependency>
        <dependency>
            <groupId>org.springframework.boot</groupId>
            <artifactId>spring-boot-starter-test</artifactId>
            <scope>test</scope>
        </dependency> -->
    </dependencies>

    <dependencyManagement>
        <dependencies>
            <dependency>
                <groupId>org.springframework.cloud</groupId>
                <artifactId>spring-cloud-dependencies</artifactId>
                <version>${spring-cloud.version}</version>
                <type>pom</type>
                <scope>import</scope>
            </dependency>
        </dependencies>
    </dependencyManagement>

    <build>
        <plugins>
            <plugin>
                <groupId>org.springframework.boot</groupId>
                <artifactId>spring-boot-maven-plugin</artifactId>
            </plugin>
        </plugins>
    </build>

</project>
3, 读取不到配置中心的键值对。
比如提示找不到demokey, cannot find “${demoke}”
可能问题,两边的依赖的spring-boot-parent 不一致。
4, 如何动态刷新网页
4.1 在客户端的 项目properties 中 加上如下配置。
management.endpoints.web.exposure.include=refresh
4.2 在controller 中加入如下配置。
@RefreshScope
package com.sydney.dream.chapter6.client;

import org.springframework.beans.factory.annotation.Value;
import org.springframework.cloud.context.config.annotation.RefreshScope;
import org.springframework.web.bind.annotation.RequestMapping;
import org.springframework.web.bind.annotation.RestController;

@RestController
@RefreshScope
public class HiController {
    @Value("${demokey}")
    String demokey;
    @RequestMapping(value = "/hi")
    public String hi(){
        return demokey;
    }
}
4.3 修改githup 中的配置。
4.4 刷新配置
注意是post 请求
curl -X POST http://localhost:8881/actuator/refresh
4.5 访问如下链接,可以看到配置刷新了。
http://localhost:8881/hi
结果:
demokey-dev-test-reflesh1


 1366
1366

 被折叠的 条评论
为什么被折叠?
被折叠的 条评论
为什么被折叠?
 到【灌水乐园】发言


