Docker 基本概念
真实站点迁移过程:
静态站点
Nodejs 站点
WordPress(PHP)
一些必备技巧:开机启动、常用 Shell


我的简历:pea3nut.info,使用 Vuejs 构建的SPA单页应用,纯静态
我的博客:pea3nut.blog,使用著名的 WordPress 搭建(PHP+Apache+MySQL)
一个开源项目——Pxer:pxer.pea3nut.org,官网使用 Nodejs + Express SSR 搭建
下载:从 GitHub 下载代码,然后本地部署
开发:本地修改代码,测试
编译:编译前端项目,产出静态资源
上传:打开FTP软件,上传替换文件
测试:看看网站是否在线上工作正常
提交:将代码提交到 GitHub


手动部署成本太高,改错别字都很麻烦
一台服务器由于时间累积导致环境变得“脏乱差”
重装系统成本太高,难以迁移
上边就是你所需要了解的 Docker 全部基础知识,就这么简单。
Mac
Windows
Linux
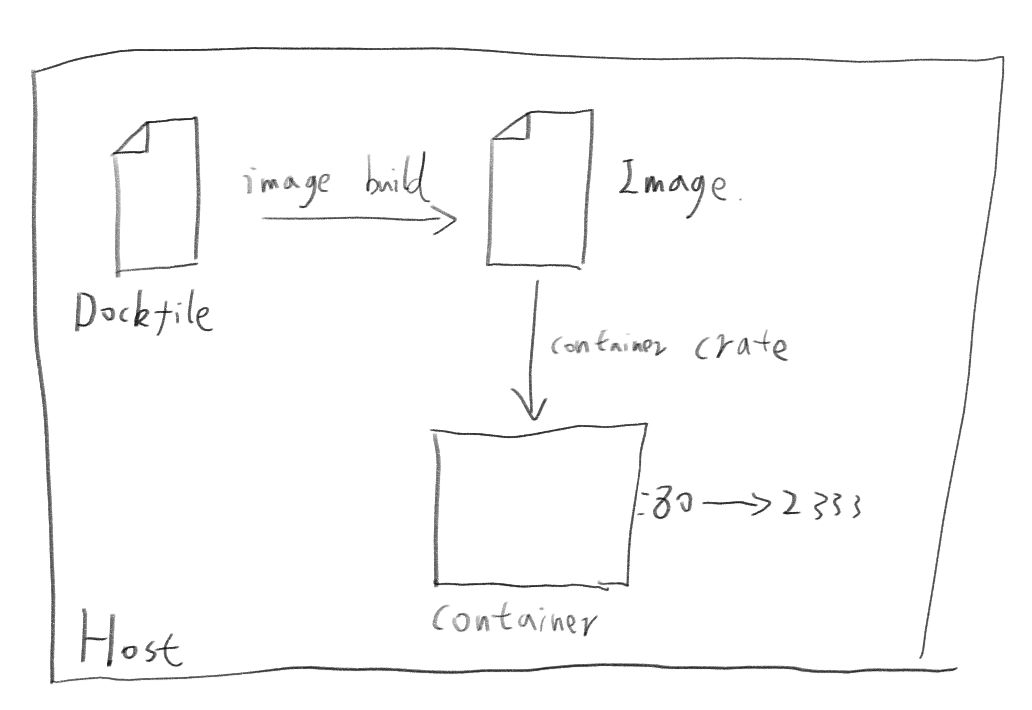
Dockerfile:纯文本文件
 |
 V
Image:类似于“Win7 纯净版.rar”
 |
 V
Container:一个完整操作系统
创建文件
<h1>Hello docker</h1>FROM nginx
COPY ./index.html /usr/share/nginx/html/index.html
EXPOSE 80hello-docker
|____index.html
|____Dockerfilecd hello-docker/ # 进入刚刚的目录
docker image build ./ -t hello-docker:1.0.0 # 打包镜像Sending build context to Docker daemon 3.072kB
Step 1/3 : FROM nginx
---> 5a3221f0137b
Step 2/3 : COPY ./index.html /usr/share/nginx/html/index.html
---> 1c433edd5891
Step 3/3 : EXPOSE 80
---> Running in c2ff9ec2e945
Removing intermediate container c2ff9ec2e945
---> f6a472c1b0a0
Successfully built f6a472c1b0a0
Successfully tagged hello-docker:1.0.0FROM nginx:基于哪个镜像
COPY ./index.html /usr/share/nginx/html/index.html:将宿主机中的 ./index.html 文件复制进容器里的 /usr/share/nginx/html/index.html
EXPOSE 80:容器对外暴露 80 端口
docker container create -p 2333:80 hello-docker:1.0.0
docker container start xxx # xxx 为上一条命令运行得到的结果docker container exec -it xxx /bin/bash # xxx 为容器ID写一个 Dockerfile
使用 docker image build 来将 Dockerfile 打包成镜像
使用 docker container create 来根据镜像创建一个容器
使用 docker container start 来启动一个创建好的容器


网址:pea3nut.info
源码:github/pea3nut-info
本地打包产出静态文件
手动通过 FTP 上传到服务器
git push 更新 GitHub 源码
执行 git push
自动检测到 GitHub 有代码更新,自动打包出一个 Docker 镜像
CI 编译完成后,SSH 登录 VPS,删掉现有容器,用新镜像创建一个新容器
不必再手动 FTP 上传文件
当我进行修改错别字这样的简单操作时,可以免测。改完直接 git push,而不必本地编译前端站点
language: node_js # Nodejs 环境
node_js:
  - "12"
services:
  - docker
before_install:
  - npm install # 安装前端编译依赖
script:
  - npm run build # 编译前端项目,产出静态文件
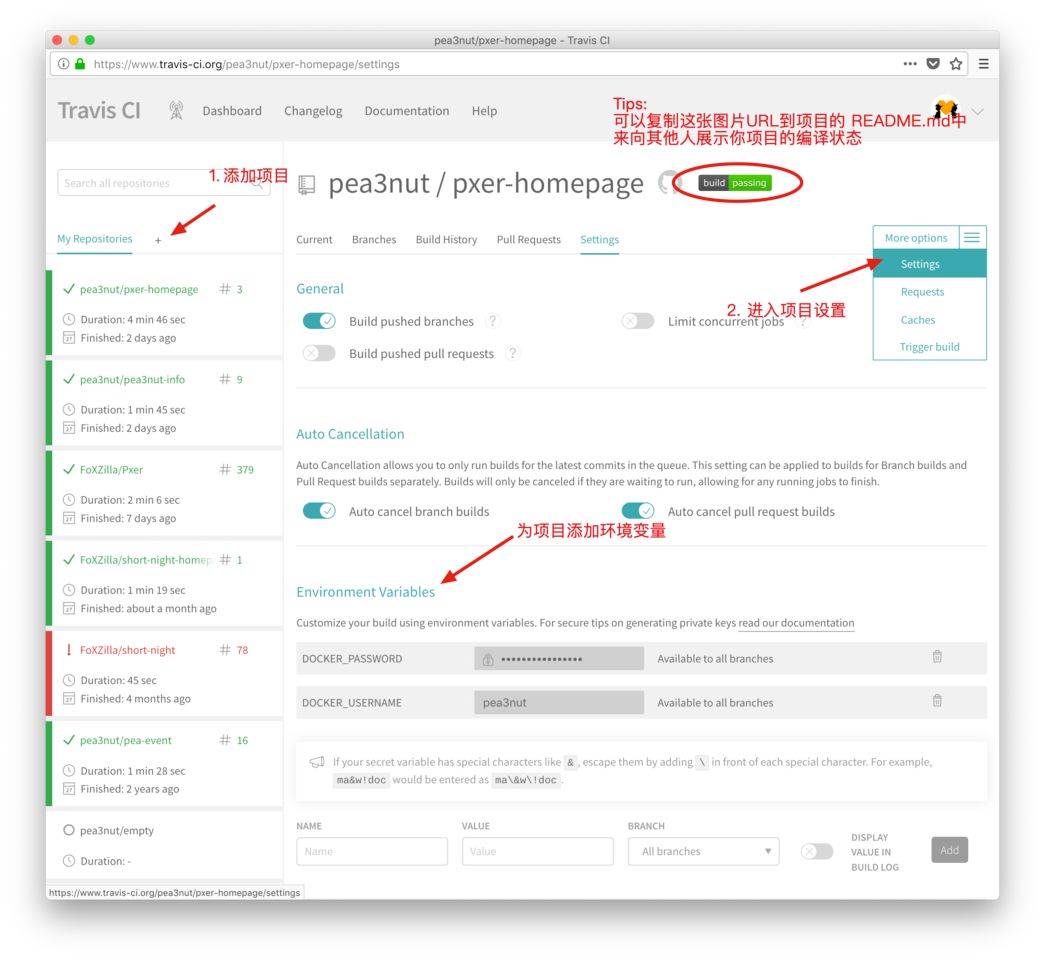
  - echo "$DOCKER_PASSWORD" | docker login -u "$DOCKER_USERNAME" --password-stdin
  - docker build -t pea3nut/pea3nut-info:latest .
  - docker push pea3nut/pea3nut-info:latest
FROM nginx
COPY ./dist/ /usr/share/nginx/html/
EXPOSE 80server {
listen 80;
server_name localhost;
location / {
root /usr/share/nginx/html;
index index.html index.htm;
proxy_set_header Host $host;
if (!-f $request_filename) {
rewrite ^.*$ /index.html break;
}
}
error_page 500 502 503 504 /50x.html;
location = /50x.html {
root /usr/share/nginx/html;
}
} FROM nginx
COPY ./dist/ /usr/share/nginx/html/
+ COPY ./vhost.nginx.conf /etc/nginx/conf.d/pea3nut-info.conf
EXPOSE 80docker image pull pea3nut/pea3nut-info:latest
docker container create -p 8082:80 pea3nut/pea3nut-info:latest
docker container start xxx # xxx 为上一条命令执行的返回值curl https://get.docker.com/ > install-docker.sh # 下载安装脚本
sh install-docker.sh # 执行安装脚本
apt update # 更新软件包
apt-get install nginx # 安装 Nginx
systemctl status nginx # 查看 Nginx 状态
server {
    listen 80;
    server_name pea3nut.info;
    location / {
        proxy_pass http://127.0.0.1:8082;
    }
}本地修改完成,执行 git push
等待 CI 编译完成
登录 VPS 服务器,执行:
docker image pull pea3nut/pea3nut-info:latest
docker container create -p 8082:80 pea3nut/pea3nut-info:latest # 得到 yyy
docker container stop xxx # xxx 为当前运行的容器ID,可用 docker container ls 查看
docker container start yyy # yyy 第二条命令返回值
网址:http://pxer.pea3nut.org/
源码:https://github.com/pea3nut/pxer-homepage
本地修改好前端文件
手动通过 FTP 上传到服务器
在服务器端重启 Nodejs 进程。若有环境依赖更新,需要在 VPS 服务器上同步更新依赖
git push更新 GitHub 源码
执行 git push
自动检测到 GitHub 有代码更新,自动打包出一个 Docker 镜像
CI 编译完成后,SSH 登录 VPS,删掉现有容器,用新镜像创建一个新容器
不必再手动 FTP 上传文件
不必手动维护服务器的 Nodejs 运行环境
编写 Dockerfile 文件
在 CI 时自动打包镜像
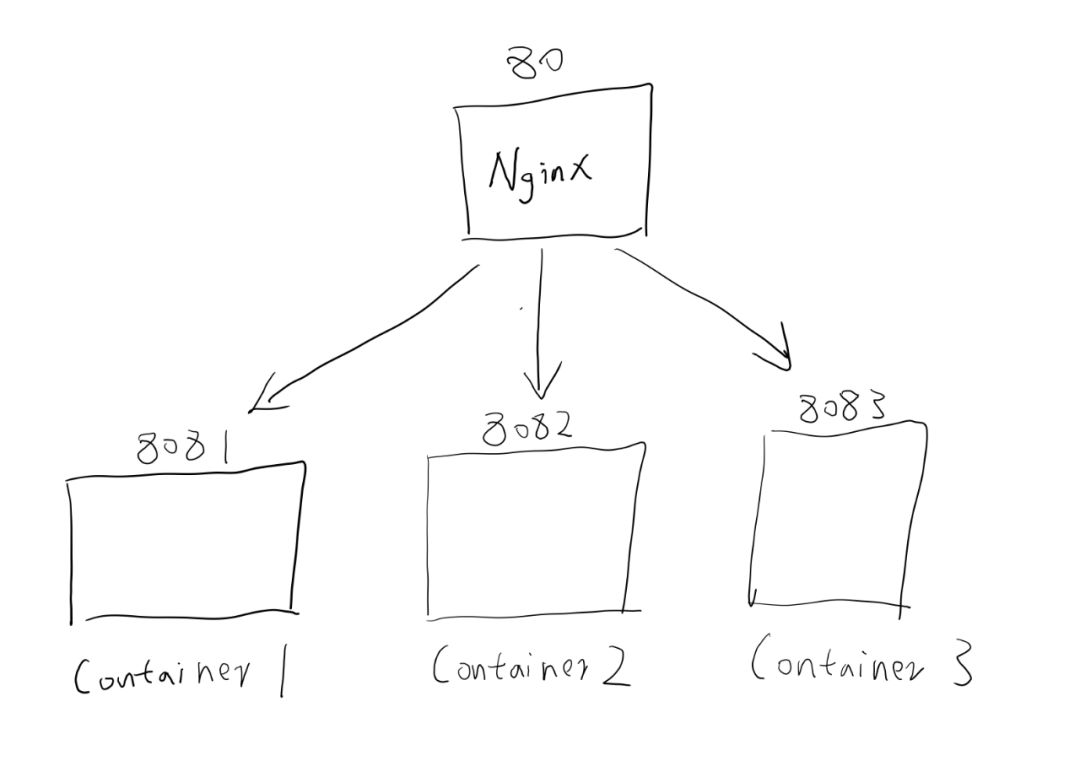
在 VPS 增加一个 Nginx 反向代理
docker-compose --helpcurl -L "https://github.com/docker/compose/releases/download/1.23.2/docker-compose-$(uname -s)-$(uname -m)" -o /usr/local/bin/docker-compose
chmode +x /usr/local/bin/docker-composeversion: "3.7" # 这个是配置文件的版本,不同的版本号声明方式会有细微的不同
services:
info:
container_name: pea3nut-info
image: pea3nut/pea3nut-info:latest
ports:
- "8082:80"
restart: on-failuredocker-compose up infodocker-compose pull info
docker-compose stop info
docker-compose rm info
docker-compose up -d info # -d 代表后台运行
网址:http://pea3nut.blog/
源码:非公开
我不想公开 MySQL 数据文件和网站内容(如图片)。若将这些打包进镜像,任何人都能 docker image pull 下载到镜像,然后取得镜像内的文件
当容器被删掉,存储的 MySQL 数据都将丢失
version: "3.7"
services:
    info:
        container_name: pea3nut-info
        image: pea3nut/pea3nut-info:latest
        ports:
            - "8082:80"
        restart: on-failure
+   blog:
+       container_name: pea3nut-blog
+       image: tutum/lamp:latest
+       ports:
+           - "8081:80"
+       volumes:
+           - ./blog/mysql-data:/var/lib/mysql
+           - ./blog/wordpress:/app
+       restart: on-failure
设置开机启动:https://www.cnblogs.com/digdeep/p/9760025.html
迁移后中文文件乱码:https://blog.csdn.net/shiyong1949/article/details/79462077

线上地址:http://pea3nut.info/
源码:https://github.com/pea3nut/pea3nut-info
CI 配置文件:https://github.com/pea3nut/pea3nut-info/blob/master/.travis.yml
Dockerfile:https://github.com/pea3nut/pea3nut-info/blob/master/Dockerfile
docker-compose:https://github.com/pea3nut/pea3nut-hub/blob/558c39b0ddef379c218d499f3ad576208db9e35d/docker-compose.yml#L17
Nginx 反向代理配置:https://github.com/pea3nut/pea3nut-hub/blob/558c39b0ddef379c218d499f3ad576208db9e35d/vhost.conf#L1
线上地址:http://pea3nut.blog
Dockerfile:https://github.com/pea3nut/pea3nut-hub/blob/558c39b0ddef379c218d499f3ad576208db9e35d/blog/Dockerfile
docker-compose:https://github.com/pea3nut/pea3nut-hub/blob/558c39b0ddef379c218d499f3ad576208db9e35d/docker-compose.yml#L3
Nginx 反向代理配置:https://github.com/pea3nut/pea3nut-hub/blob/558c39b0ddef379c218d499f3ad576208db9e35d/vhost.conf#L10
线上地址:pxer.pea3nut.org
源码:https://github.com/pea3nut/pxer-homepage/
CI 配置文件:https://github.com/pea3nut/pxer-homepage/blob/master/.travis.yml
Dockerfile:https://github.com/pea3nut/pxer-homepage/blob/master/Dockerfile
docker-compose:https://github.com/pea3nut/pea3nut-hub/blob/558c39b0ddef379c218d499f3ad576208db9e35d/docker-compose.yml#L46
Nginx 反向代理配置:https://github.com/pea3nut/pea3nut-hub/blob/558c39b0ddef379c218d499f3ad576208db9e35d/vhost.conf#L70
汇总部署配置的仓库:https://github.com/pea3nut/pea3nut-hub/

来源:知乎
原文:https://url.cn/5vdtCvZ
题图:来自谷歌图片搜索
版权:本文版权归原作者所有
投稿:欢迎投稿,邮箱: editor@hi-linux.com


你可能还喜欢
点击下方图片即可阅读
关于高性能负载均衡架构,这些知识点大多数人不知道!


 3万+
3万+

 被折叠的 条评论
为什么被折叠?


