


原文地址:
http://android-developers.blogspot.com/2016/06/notifications-in-android-n.html
Posted by Ian Lake, Developer Advocate
Android Notification经常是一种不成则败的交互方式。为了提供更好的用户体验,我们对Android N上的Notification进行了视觉上的更新,增强了对自定义视图的支持,并且扩展了它的功能,如直接回复,新的MessagingStyle和bundled notification。
Same notification, new look
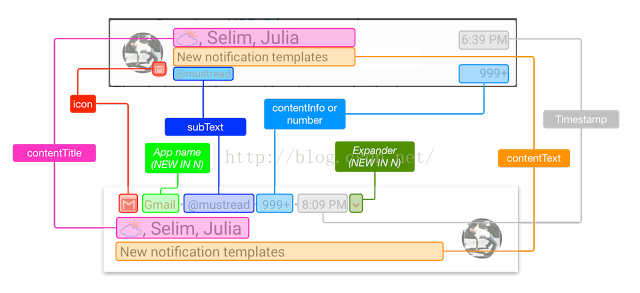
标题行信息的有用性比以往任何时候都为重要。但程序的目标是Android N时,默认情况下时间是隐藏起来的。如果你有一条对时间有严格要求的Notification(如邮件),你可以调用setShowWhen(true)来显示时间。此外,subtext取代了contenInfo和number:Android N中不会再显示number,只有在目标是Android N以前的版本且不显示subtext的情况下才会显示contentInfo。在所有的情况下,确保subtext的内容是相关的且有用的。例如,在用户只要一个账户时,就不要在subtext中加入账户的邮件地址。
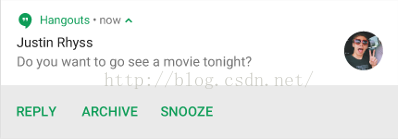
Notification action也重新设计了,action现在出现在Notification底部的工具栏中,该工具栏视觉上与Notification分离。
你会发现在新的Notification中icon消失了,相反,在Notification有限的空间中,更多的空间被分配给lable。然而,icon仍然被需要,在老版本的Android和Android Wear等设备中仍然可用。
如果你使用NotificationCompat.Builder创建Notification且标准style可用时,不需要额外的代码,系统默认的显示一个带有新的外观和触感的Notification。
Better Support for Custom Views
如果你打算使用自定义的RemoteViews创建自己的Notification,适应所有新的style将会是一个挑战。随着新的标题行,扩展功能,action和大型icon的布置作为独立的元素从text + title形式的Notification中独立出来,我们推荐新的DecoratedCustomViewStyle和DecoratedMediaCustomViewStyle来提供所有这些元素,使得你可以使用新的setCustomContentView()方法专注于内容部分。
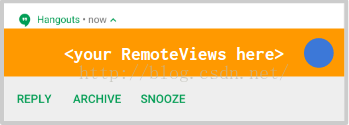
这也保证了将来Notification有新的外观和触感的改变时,你不需要改动代码,就能自动适应和使用新的Notification。
Direct Reply

// Where should direct replies be put in the intent bundle (can be any string)
private static final String KEY_TEXT_REPLY = "key_text_reply";

// Create the RemoteInput specifying this key
String replyLabel = getString(R.string.reply_label);
RemoteInput remoteInput = new RemoteInput.Builder(KEY_TEXT_REPLY)
        .setLabel(replyLabel)
        .build();
// Add to your action, enabling Direct Reply for it
NotificationCompat.Action action =
    new NotificationCompat.Action.Builder(R.drawable.reply, replyLabel, pendingIntent)
        .addRemoteInput(remoteInput)
        .setAllowGeneratedReplies(true)
        .build();
- 在Android M及之前的版本中(这些版本不支持Direct Reply),你得解锁屏幕,启动Activity并在输入框中接收用户回复,所以它应该指向Activity。
- 在Android N中,它可以指向Service(工作在一个独立的线程)或BroadcastReceiver(运行在UI线程),这样,就算是在锁屏状态,它们也可以在后台处理输入事件。
private CharSequence getMessageText(Intent intent) {
    Bundle remoteInput = RemoteInput.getResultsFromIntent(intent);
    if (remoteInput != null) {
        return remoteInput.getCharSequence(KEY_TEXT_REPLY);
    }
    return null;
 }
然而,如果你开发的是信息类应用,并且期望能看到上下文,你应该使用MessagingStyle,并把所有的消息添加进去。
MessagingStyle
我们通过展示一个正在进行的对话并在MessagingStyle中使用Direct Reply,优化了用户体验。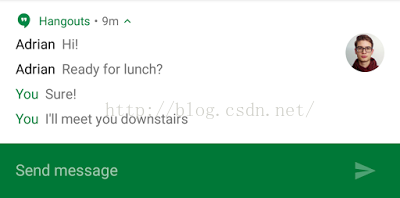
builder.setStyle(new NotificationCompat.MessagingStyle("Me")
    .setConversationTitle("Team lunch")
    .addMessage("Hi", timestampMillis1, null) // Pass in null for user.
    .addMessage("What's up?", timestampMillis2, "Coworker")
    .addMessage("Not much", timestampMillis3, null)
    .addMessage("How about lunch?", timestampMillis4, "Coworker"));
Bundled Notifications
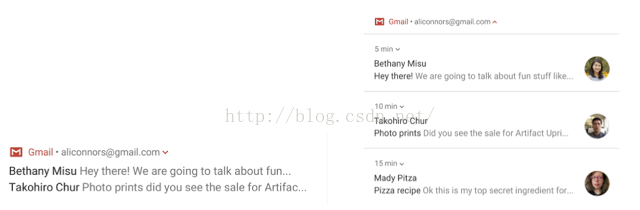
- 一个单一概括性的Notification(summary notification),在用户处理其他Notifications或用户想要一次性处理所有Notifications可用
- 展开上面Notification,在用户想要处理该组Notifications中的某一个Notification时可用


 753
753

 被折叠的 条评论
为什么被折叠?
被折叠的 条评论
为什么被折叠?
 到【灌水乐园】发言


