


1、安装前准备
| 安装环境 | 版本号 | 包名 |
| 操作系统 | centos 7.6 | centos 7.6 |
| Git | 2.31.1 | git-2.31.1.tar.gz |
| Gitlab | 13.9.4 | gitlab-ce-13.9.4-ce.0.el7.x86_64.rpm |
| jdk | 8 | jdk-8u271-linux-x64.tar.gz |
| gitlab-runner | 14.0.1 | gitlab-runner-14.0.1-1.x86_64.rpm |
| Maven | 3.8.6 | apache-maven-3.8.6-bin.tar.gz |
| sonarqube | 7.4 | sonarqube-7.4.zip |
gitlab相关安装源文件01
https://download.csdn.net/download/ecbeach/86781817
gitlab相关安装源文件02
https://download.csdn.net/download/ecbeach/86781838
官网包下载地址:
gitlab:https://mirrors.tuna.tsinghua.edu.cn/gitlab-ce/yum/el7/
gitlab-runner:https://mirrors.tuna.tsinghua.edu.cn/gitlab-runner/yum/el7/
git:https://github.com/git/git/archive/v2.17.0.tar.gz
maven:https://maven.apache.org/download.cgi
sonarqube:https://www.sonarqube.org/downloads/
sonarscanner:https://docs.sonarqube.org/latest/analysis/scan/sonarscanner/
2、gitlab安装
1.安装
rpm -i gitlab-ce-13.9.4-ce.0.el7.x86_64.rpm2.配置文件调整
vim /etc/gitlab/gitlab.rb


## 修改以下内容
external_url 'http://10.193.40.143:9090'
nginx['listen_port']=9090 #这行是注释掉了,直接打开即可3、重载配置及启动gitlab
gitlab-ctl reconfigure
gitlab-ctl restart

gitlab-ctl start # 启动所有 gitlab 组件;
gitlab-ctl stop # 停止所有 gitlab 组件;
gitlab-ctl restart # 重启所有 gitlab 组件;
gitlab-ctl status # 查看服务状态;
gitlab-ctl reconfigure # 启动服务;4、访问系统
5、gitlab API
#your_access_token 设置方式
gitlab右上角用户 --> Edit profile --> Access Tokens --> Add a personal access token#Pipelines API:https://www.bookstack.cn/read/gitlab-doc-zh/docs-347.md
http://ip/api/v4/projects/:id/pipelines#groups API:https://www.bookstack.cn/read/gitlab-doc-zh/docs-318.md
http://ip/api/v4/groups
http://ip/api/v4/groups/:id/projectscurl --header "PRIVATE-TOKEN: <your_access_token>" "https://gitlab.example.com/api/v4/groups/4"
2、git版本升级
当git版本过低的时候,会导致git runner拉取代码失败,需要进行相对应版本更新升级
查看服务器当前安装版本并升级
git --version

## 升级版本
mv /root/git-2.31.1.tar.gz /usr/local/src/
cd /usr/local/src/
tar -zxvf git-2.31.1.tar.gz
安装依赖组件
yum install curl-devel expat-devel gettext-devel openssl-devel zlib-devel gcc perl-ExtUtils-MakeMaker编译安装
make prefix=/usr/local/git all
make prefix=/usr/local/git install
如果安装完后的版本还没显示最新版本,复制新版本的执行文件覆盖就行
cp /usr/local/git/bin/* /usr/bin/3、git bash 使用
git init
git remote add origin http://10.193.40.143:9090/publish/publish.git
git remote -v
git remote remove origin
git config --global user.name "suzhiwen"
git branch -r
git pull origin prod


git init
git remote add origin1 http://10.193.40.143:9090/publish/publish.git
git add .
git commit -m "Initial commit"
git push -u origin1 master
查看分支情况并操作
git branch #列出本地已经存在的分支,并且当前分支会用*标记
git branch -r #查看远程版本库的分支列表
git branch -a #查看所有分支列表(包括本地和远程,remotes/开头的表示远程分支)
git branch -v #查看一个分支的最后一次提交
git branch --merged #查看哪些分支已经合并到当前分支
git branch --no-merged #查看所有未合并工作的分支
git remote update origin --prune #更新远程分支列表
git branch 新分支名称 #创建分支
git checkout 分支名称 #本地仓库切换分支
git checkout -b 新分支名称 #创建分支并切换到新分支
git push origin --delete dev #删除远程分支dev
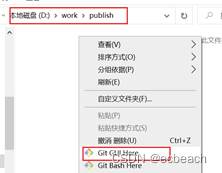
git branch -d dev #删除本地分支 dev打开文件夹
创建文件夹 publish 并用 Git GUI Here 进到对应命令行工具

初始化git仓库
git init
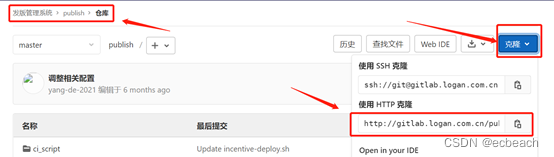
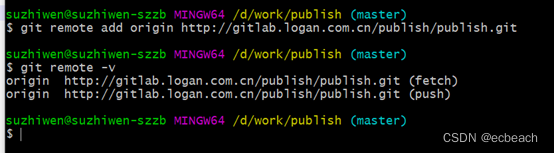
关联自己的git仓库地址
git remote add origin http://10.193.40.143:9090/publish/publish.git地址从gitlab仓库中提取
关联后可以通过 git remote –v 查看到当前关联的信息
也可以通过 git remote remove origin 删除当前的关联信息
身份认证(登录git)
git config --global user.name "xxx"
git config --global user.email "xxx@qq.com"
文件下拉
## 方法一:
git pull origin 远程分支名称:本地分支名称
git pull origin 远程分支名称    #默认拉到本地master分支
git pull origin prod

## 方法二:
git checkout -b "dev" "origin/dev"
查看分支情况:
git branch -r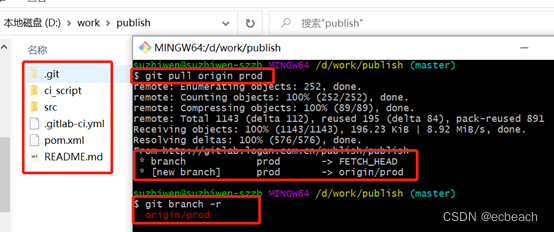
上传文件夹中的文件
## 此处为添加当前文件夹的全部内容
git add .

## 添加日志
git commit -m "Initial commit"

## push相应文件
git push origin 本地分支名称:远程分支名称
git push -u origin master

合并代码
执行将分支feature合并到master
1、拉取feature分支
git checkout -b "feature" "origin/feature"2、切换到master分支(多人合作开发的话,需先拉取远程仓库代码合并到本地)
git pull origin master
git checkout master3、在master分支执行合并feature分支操作
git merge feature4、查看状态
git status5、把合并后代码推送到git仓库
git push origin masterPS:
git branch --merged    #查看哪些分支已经合并到当前分支
git branch --no-merged   #查看所有未合并工作的分支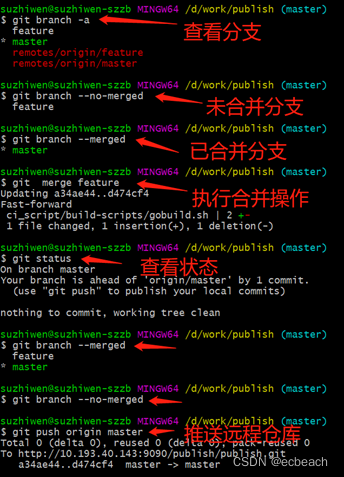
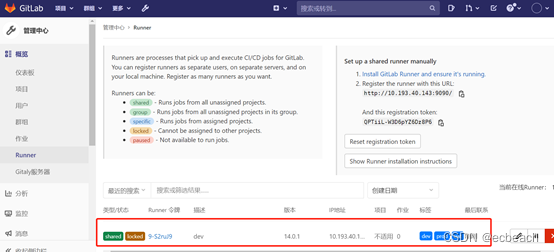
4、gitlab-runner安装
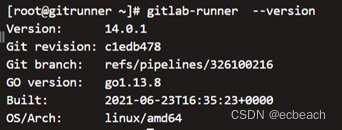
1、安装git runner
yum -y install gitlab-runner-14.0.1-1.x86_64.rpm2、获取GitLab的runner token
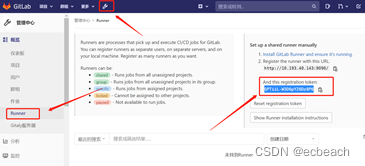
Token:QPTiiL-W3D6pYZ6Dz8P6
3、git runner注册到gitlab
gitlab-runner register --url http://10.193.40.143:9090/ --registration-token QPTiiL-W3D6pYZ6Dz8P6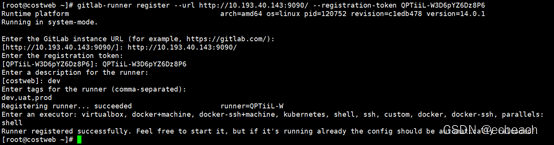
PS:注册过程中的tags内容必须与 .gitlab-ci.yml 配置的tags一致

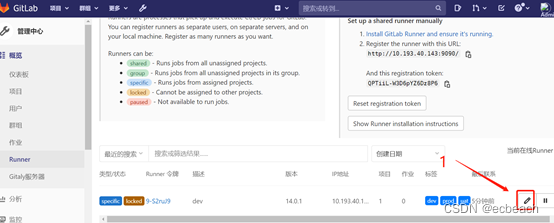
4、配置runner列表
原则上每个项目独立一个runner,即重新注册一个

5、git runner相关命令
systemctl status gitlab-runner
systemctl stop gitlab-runner
systemctl start gitlab-runner
systemctl restart gitlab-runner

gitlab-runner -h #查看帮助文档
# --user指定将用于执行构建的用户,--working-directory  指定将运行构建时数据存储的根目录
gitlab-runner install --user=gitlab-runner --working-directory=/home/gitlab-runner
gitlab-runner uninstall #停止运行并从服务中卸载GitLab Runner
gitlab-runner start     #启动GitLab Runner服务
gitlab-runner stop      #停止GitLab Runner服务
gitlab-runner restart   #重启GitLab Runner服务
gitlab-runner status #显示GitLab Runner服务的状态

gitlab-runner --debug <command>   #调试模式排查错误特别有用
gitlab-runner <command> --help    #获取帮助信息
gitlab-runner run       #普通用户模式,配置文件: ~/.gitlab-runner/config.toml
sudo gitlab-runner run  # 超级用户模式,配置文件:/etc/gitlab-runner/config.toml

gitlab-runner register  #默认交互模式下使用,非交互模式添加 --non-interactive
gitlab-runner list      #此命令列出了保存在配置文件中的所有运行程序
gitlab-runner verify    #此命令检查注册的runner是否可以连接,但不验证GitLab服务是否正在使用runner。 --delete 删除
gitlab-runner unregister   #该命令使用GitLab取消已注册的runner
gitlab-runner unregister --url http://gitlab.dev.com/ --token djiih23   #使用令牌注销
gitlab-runner unregister --name test-runner #使用名称注销(同名删除第一个)
gitlab-runner unregister --all-runners #注销所有runner
5、gitlab-runner使用
官方文档:https://docs.gitlab.com/ee/ci/variables/index.html
CI运行时账号:gitlab-runner 需要特别注意相关目录的权限
1、gitlab CI脚本
JAVA配置snoar:https://download.csdn.net/download/ecbeach/86781719
2、配置服务器免登录
1、(在gitrunner服务器)查看是否已存在本地公钥(切记在gitlab-runner用户下执行)
cat ~/.ssh/id_rsa.pub2、(在gitrunner服务器)生成一个新公钥(第一步检测到没有才需要生成)
ssh-keygen -t rsa -C "example@email.com"
3、(在gitrunner服务器)复制生成的公钥
cat ~/.ssh/id_rsa.pub
3、(在应用服务器)检查是否存在认证文件
cat ~/.ssh/authorized_keys4、(在应用服务器)写入gitrunner的公钥
vim ~/.ssh/authorized_keys
chmod 700 ~/.ssh
chmod 600 ~/.ssh/authorized_keys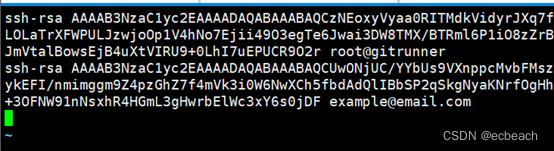
5、(在gitrunner服务器)验证是否实现免登录
ssh -o PasswordAuthentication=no -o StrictHostKeyChecking=no loganadmin@ip
3、maven安装
下载地址:https://maven.apache.org/download.cgi
## 1、创建目录
mkdir -p /usr/local/maven

## 2、解压
tar -zxvf apache-maven-3.8.6-bin.tar.gz -C /usr/local/maven

## 3、进入目录
cd /usr/local/maven/apache-maven-3.8.6/conf/

## 4、创建资源库目录同时授权(settings.xml中localRepository配置的路径)
mkdir -p /m2/repository
chmod 777 /m2/repository

## 5、编辑 settings.xml 文件
vi settings.xml

## 6、添加环境变量
vi /etc/profile
MAVEN_HOME=/usr/local/maven/apache-maven-3.8.6
PATH=$MAVEN_HOME/bin:$PATH
export MAVEN_HOME PATH

## 7、重新加载环境变量
source /etc/profile

## 8、测试验证
mvn -version
4、静态代码检测工具
1、sonarqube安装
1、创建目录并解压到目录中
mkdir -p /opt/modules/
unzip sonarqube-7.4.zip -d /opt/modules/2、创建专用用户及用户组并将目录进行权限变更(sonar只能用普通用户启动)
groupadd sonar
useradd -m -g sonar sonar
chown sonar:sonar -R /opt/modules/sonarqube-7.43、创建数据库,库名sonar,必须是utf8编码

4、配置sonar的数据库连接池
vim /opt/modules/sonarqube-7.4/conf/sonar.properties
5、启动sonar
su - sonar -c "/opt/modules/sonarqube-7.4/bin/linux-x86-64/sonar.sh start"访问: http://10.193.40.143:9000/
登录 admin : admin
2、sonarqube插件安装
P3C规则:https://github.com/rhinoceros/sonar-p3c-pmd/releases/tag/pmd-3.2.0-beta-with-p3c1.3.6-pmd6.10.0
中文包:https://github.com/xuhuisheng/sonar-l10n-zh/releases/tag/sonar-l10n-zh-plugin-1.24
分支管理:https://github.com/mc1arke/sonarqube-community-branch-plugin 1.0.2
1、通过界面进行安装
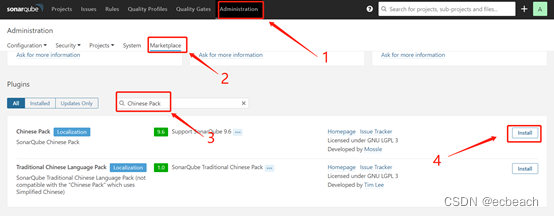
2、通过后台进行安装
2.1界面安装不了,需要去插件主页中下载对应版本的插件包
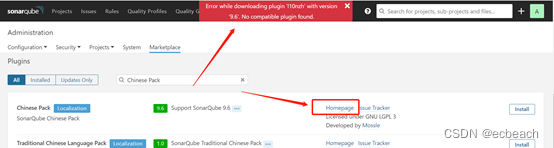
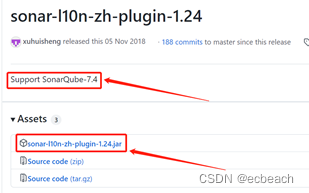
cd /opt/modules/sonarqube-7.4/extensions/plugins

wget https://github.com/xuhuisheng/sonar-l10n-zh/releases/download/sonar-l10n-zh-plugin-1.24/sonar-l10n-zh-plugin-1.24.jar2.2重启sonar
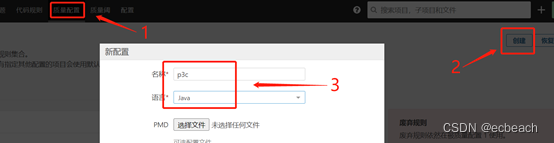
su - sonar -c "/opt/modules/sonarqube-7.4/bin/linux-x86-64/sonar.sh restart"2.3 配置P3C的JAVA默认规则


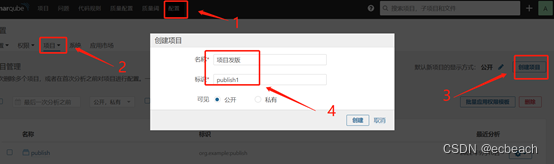
2.4创建项目
2.5 创建令牌
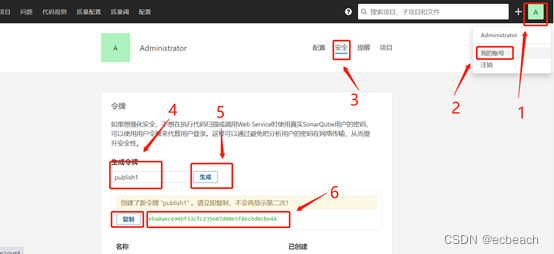
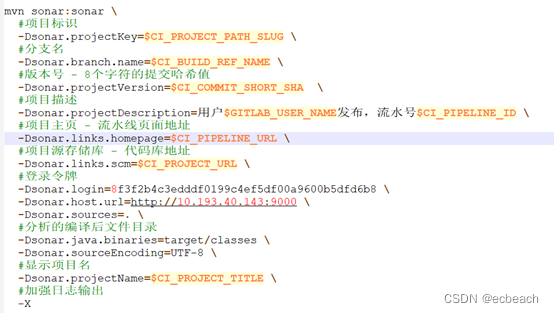
mvn sonar:sonar \
  -Dsonar.host.url=http://10.193.40.143:9000 \
  -Dsonar.login=eba0aec694bf33cfc235607d08e5f86cbd0cbe44
2.6 CMD命令下执行分析报告
mvn sonar:sonar -Dsonar.host.url=http://10.193.40.143:9000 -Dsonar.login=90194fc8a762c28edc8c57e62d744bb243defef6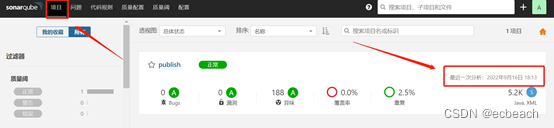
3、sonarqube整合gitrunner
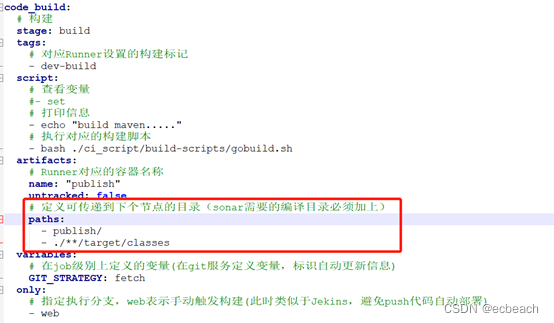
.gitlab-ci.yml
Sonar变量参考:https://blog.csdn.net/weixin_44410537/article/details/113770515
gitlab变量参考:https://blog.51cto.com/u_11045899/5344215
./ci_script/sonar-scripts/sonar_analyze.sh


 374
374


 被折叠的 条评论
为什么被折叠?
被折叠的 条评论
为什么被折叠?
 到【灌水乐园】发言


