


Blazor https://docs.microsoft.com/en-us/aspnet/core/blazor/?view=aspnetcore-5.0Blazor是一个使用.NET开发交互式Web UI客户端的框架( Blazor is a framework for building interactive client-side web UI with .NET.)
优势是:使用C#替代Javascript开发富交互式UI界面, 浏览器的广泛支持,可充分利用.NET库及生态。直接开发体验完成一个增、删、改、查的功能。
1:创建Blazor 项目:
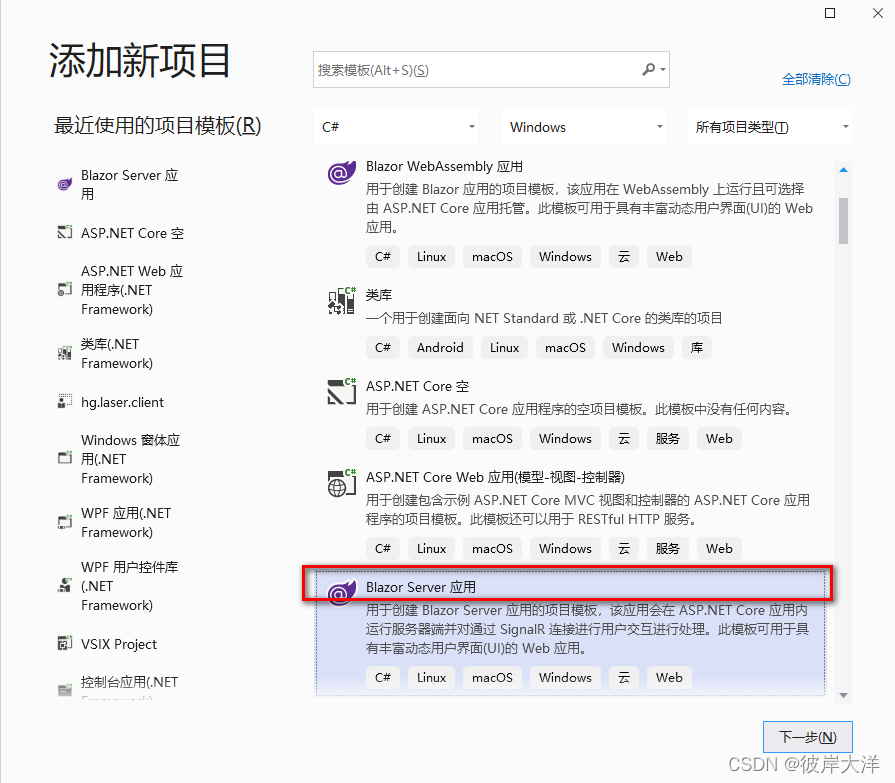
这里选择Blazor Server 应用,如图所示:还有一个Blazor WebAssembly项目。
区别可以参考“Blazor宿主模型”。 大白话解释:Blazor Server是客户端、服务器模式,使用SingleR通讯交换客户端数据。WebAssembly是把精简的.net运行时及Blazor项目编译后的文件发给浏览器端,App运行在浏览器端。
2: 项目模板的改造:
对步骤1利用模板创建的项目 稍微改造一下:使界面布局变成如下所示:
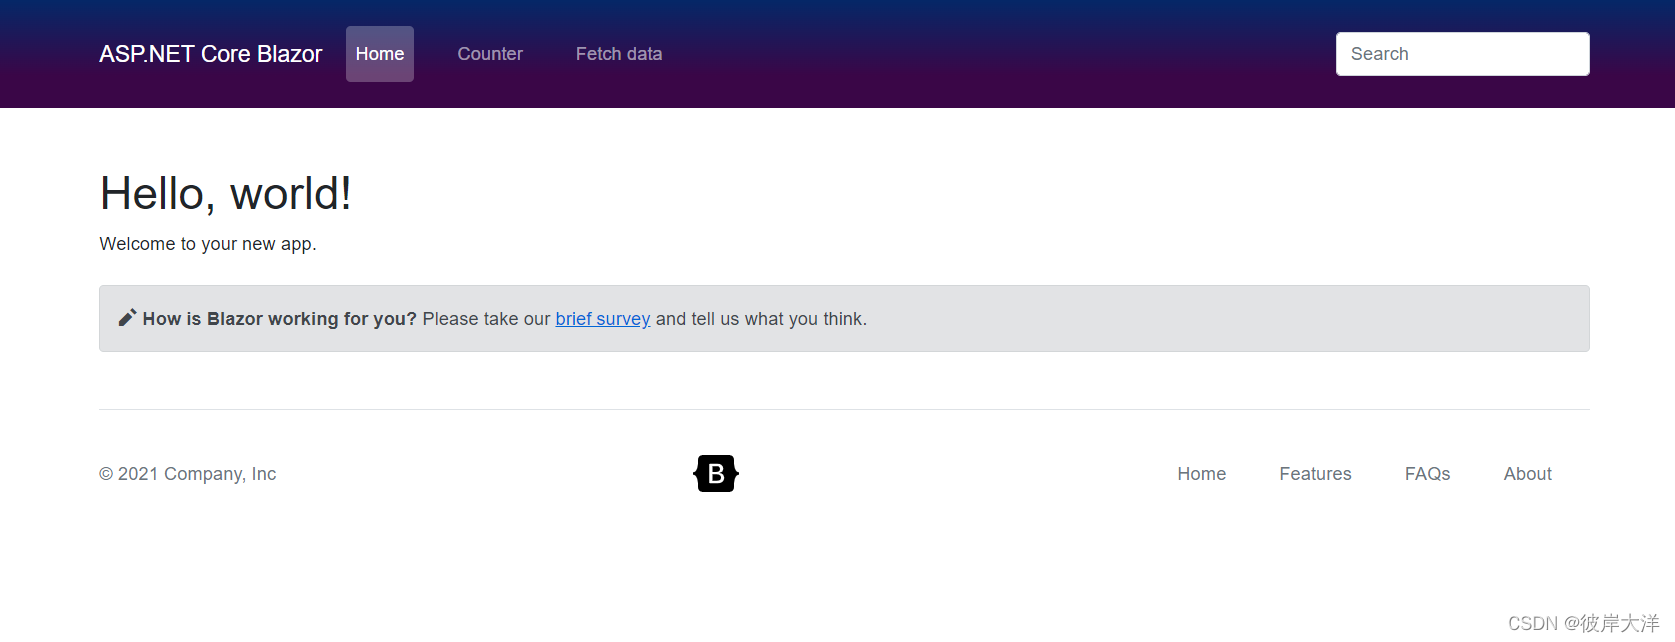
这里利用了BootStrap 5.0的样式:头部导航菜单,和底部的Footer,中间为页面内容部分。
3:增删改查操作:
Blazor 的开发类似Vue.js前端框架的组件开发,可充分利用组件复用的便捷。
这里模拟产品的CURD操作:
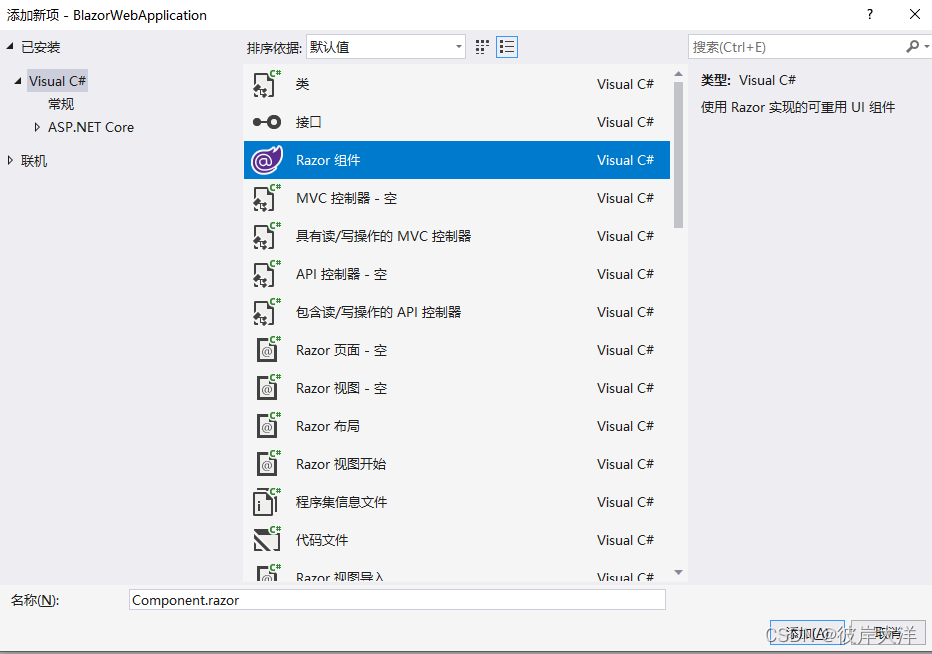
1:创建产品列表组件:
添加Razor组件,命名规则为组件名+Component.razor。
填入如下Razor语法代码:
@page指示页面路由,
@inject 指令代表Asp.net core Blazor 的依赖注入功能,由Blazor自动实例化此对象实例。
@page "/productlist";
@inject IProductRepository product;
<div>
<h4 class="top-row-title">产品列表</h4>
<div class="top-row-right">
<button type="button" class="btn btn-primary"><i class="bi bi-plus-square-fill"></i> 新增</button>
</div>
</div>
@if (productCollection != null && productCollection.Count() > 0)
{
<table class="table table-hover">
<thead>
<tr>
<td>编号</td>
<td>产品名称</td>
<td>单位</td>
<td>价格</td>
<td>描述</td>
</tr>
</thead>
<tbody>
@foreach (var p in productCollection)
{
<tr>
<td>@p.Id</td>
<td>@p.ProductName</td>
<td>@p.PackageUnit</td>
<td>@(Math.Round(p.Price,2))</td>
<td>@p.Description</td>
</tr>
}
</tbody>
</table>
}
else
{
<p>未检索到任何数据</p>
}
@code {
private IEnumerable<Product> productCollection;
protected override void OnInitialized()
{
base.OnInitialized();
productCollection = product.GetAll();
}
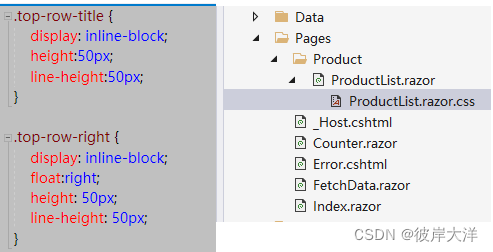
}在产品列表Razor组件页面中使用了 Blazor的CSS隔离特性:
IProductRepository的依赖注册为:
在项目的Startup.cs文件下:
public void ConfigureServices(IServiceCollection services)
        {
            services.AddRazorPages();
            services.AddServerSideBlazor();
            services.AddSingleton<WeatherForecastService>();
            services.AddSingleton<IProductRepository, LocalProductRepository>();
        }
public class LocalProductRepository : IProductRepository
{
List<Product> _products = new List<Product>();
public LocalProductRepository()
{
_products.AddRange(new[] {
new Product(){ Id=1, ProductName="产品1", PackageUnit="只", Description="产品1描述" },
new Product(){ Id=2, ProductName="产品2", PackageUnit="个", Description="产品2描述" },
new Product(){ Id=3, ProductName="产品3", PackageUnit="包", Description="产品3描述" },
});
}
public void Add(Product t)
{
if (_products.Any(x => x.ProductName.Equals(t.ProductName, StringComparison.OrdinalIgnoreCase))) return;
if (_products.Count == 0)
t.Id = 1;
else
{
var maxId = _products.Max(x => x.Id);
t.Id = maxId + 1;
}
_products.Add(t);
}
public void Delete(Product t)
{
var targetProduct = _products.FirstOrDefault(x => x.Id == t.Id);
if (targetProduct != null)
{
_products.Remove(targetProduct);
}
}
public IEnumerable<Product> GetAll()
{
return _products;
}
public Product GetProductById(int id)
{
return _products.FirstOrDefault(x => x.Id == id);
}
public void Insert(Product t)
{
_products.Add(t);
}
public void Update(Product t)
{
var p = GetProductById(t.Id);
if (p != null)
{
p.Description = t.Description;
p.PackageUnit = t.PackageUnit;
p.Price = t.Price;
p.ProductName = t.ProductName;
}
}
}添加导航链接:
<NavLink class="nav-link px-2 link-dark" href="productlist"> 产品列表</NavLink>预览:
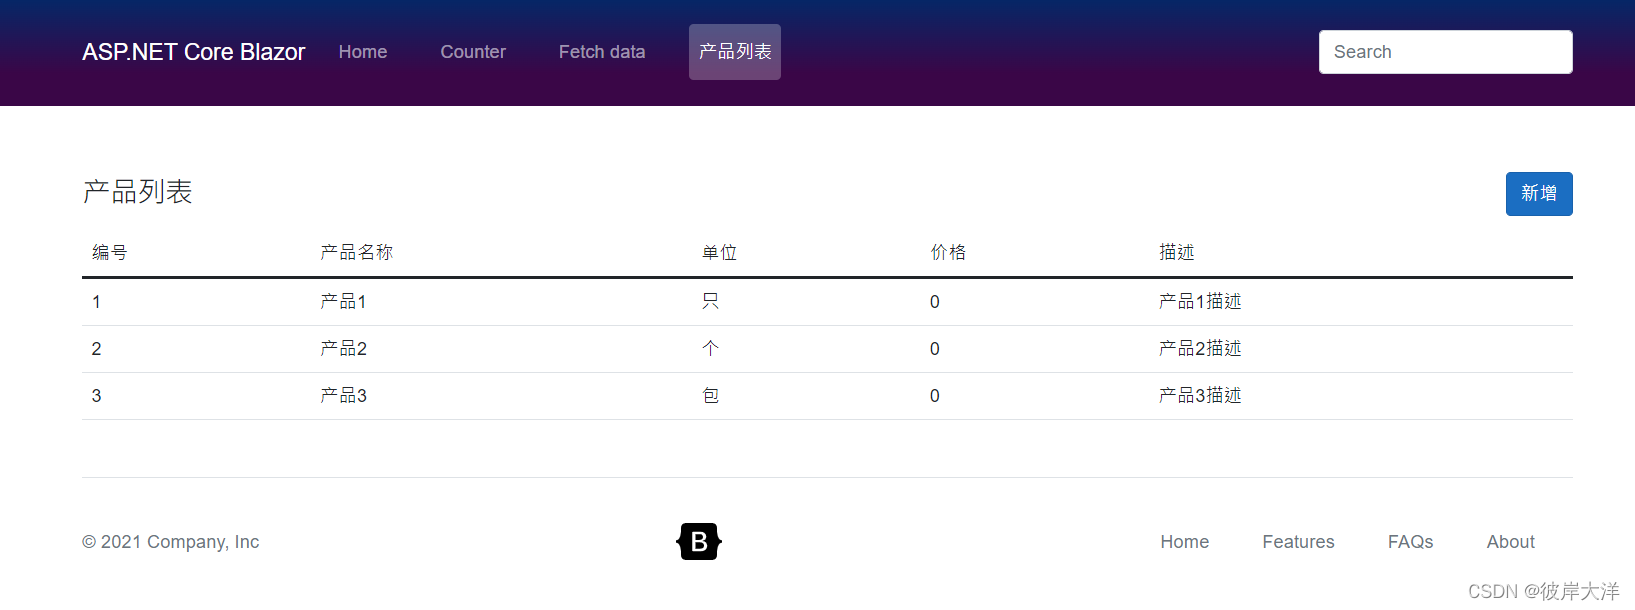 2:新增产品:
参考MSDN链接:ASP.NET Core Blazor 窗体和验证
AddProductComponent.razor
@page "/addproduct";
@inject IProductRepository productRepo;
@inject NavigationManager navigator;

<h3>新增产品</h3>

<EditForm Model="productModel" OnValidSubmit="HandleValidSubmit">
    <DataAnnotationsValidator />
    <ValidationSummary />
    <div class="mb-3 row">
        <label for="product-name" class="col-sm-2 col-form-label">产品名称</label>
        <div class="col-sm-10">
            <InputText id="product-name" class="form-control" @bind-Value="productModel.ProductName" />
        </div>
    </div>
    <div class="mb-3 row">
        <label for="product-price" class="col-sm-2 col-form-label">价格</label>
        <div class="col-sm-10">
            <InputNumber id="product-price" class="form-control" @bind-Value="productModel.Price" @bind-Value:format="f2" />
        </div>
    </div>
    <div class="mb-3 row">
        <label for="product-price" class="col-sm-2 col-form-label">包装单位</label>
        <div class="col-sm-10">
            <InputSelect id="productUnit" class="form-select" @bind-Value="productModel.PackageUnit">
                <option value="">请选择</option>
                @foreach (var item in packageUnits)
                {
                    <option value="@item">@item</option>
                }
            </InputSelect>
        </div>
    </div>
    <div class="mb-3 row">
        <label for="product-desc" class="col-sm-2 col-form-label">描述</label>
        <div class="col-sm-10">
            <InputText id="product-desc" class="form-control" @bind-Value="productModel.Description"  />
        </div>
    </div>
    <button type="submit" class="btn btn-primary">保存</button>
</EditForm>
@code {

    private Product productModel;
    private IList<string> packageUnits;
    protected override void OnInitialized()
    {
        base.OnInitialized();
        productModel = new Product();
        packageUnits = EumeHelper<PackageUnit>.GetKeys();
    }

    private void HandleValidSubmit()
    {
        productRepo.Add(productModel);
        navigator.NavigateTo("/productlist");
    }
}
Product添加验证特性:来自命名空间:System.ComponentModel.DataAnnotations
  public class Product
    {
        public int Id { get; set; }

        [Required(ErrorMessage = "产品名称不可为空")]
        [MaxLength(20,ErrorMessage = "产品名称超出许可长度")]
        public string ProductName { get; set; }

        [Required(ErrorMessage = "产品单位不可为空")]
        public string  PackageUnit { get; set; }

        [Required(ErrorMessage ="价格不可为空")]
        [Range(0,1000,ErrorMessage ="价格范围输入错误")]
        public decimal? Price { get; set; }

        public string Description { get; set; }
    }
效果预览: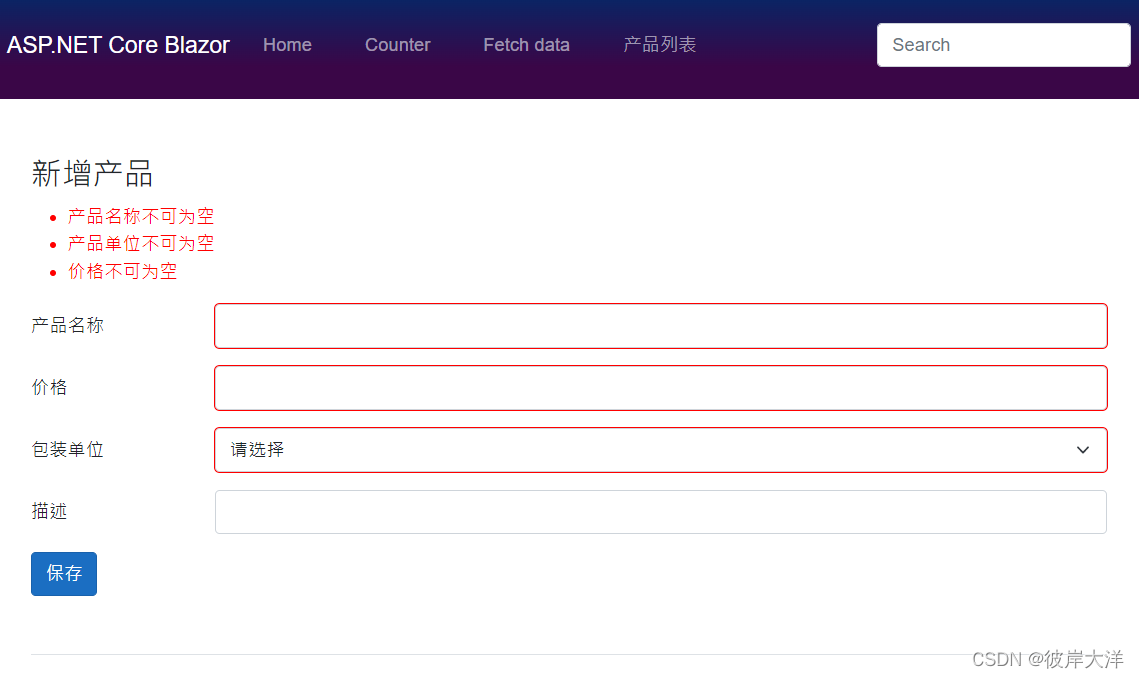
3:编辑、删除产品
在产品列表组件中添加一个操作列:
  <td width="140px">
     <button type="button" class="btn btn-link" @onclick="@(()=> { EditProduct(p.Id); })"><i class="bi bi-pencil-fill"></i></button>
     <button type="button" class="btn btn-link" style="color:red;" @onclick="@(()=> { Delete(p); })"><i class="bi bi-trash3-fill"></i></button>
  </td>
对应的code方法为:
  void EditProduct(int pid)
    {
        navigator.NavigateTo($"/editproduct/{pid}");
    }

    void Delete(Product p)
    {
        product.Delete(p);
    }
把新增组件复制修改为EditProductComponent.razor
@page "/editproduct/{productid:int?}";
@inject IProductRepository productRepo;
@inject NavigationManager navigator;

<h3>编辑产品</h3>

<EditForm Model="productModel" OnValidSubmit="HandleValidSubmit">
    <DataAnnotationsValidator />
    <ValidationSummary />
    <div class="mb-3 row">
        <label for="product-name" class="col-sm-2 col-form-label">产品名称</label>
        <div class="col-sm-10">
            <InputText id="product-name" class="form-control" @bind-Value="productModel.ProductName" />
        </div>
    </div>
    <div class="mb-3 row">
        <label for="product-price" class="col-sm-2 col-form-label">价格</label>
        <div class="col-sm-10">
            <InputNumber id="product-price" class="form-control" @bind-Value="productModel.Price" @bind-Value:format="f2" />
        </div>
    </div>
    <div class="mb-3 row">
        <label for="product-price" class="col-sm-2 col-form-label">包装单位</label>
        <div class="col-sm-10">
            <InputSelect id="productUnit" class="form-select" @bind-Value="productModel.PackageUnit">
                <option value="">请选择</option>
                @foreach (var item in packageUnits)
                {
                    <option value="@item">@item</option>
                }
            </InputSelect>
        </div>
    </div>
    <div class="mb-3 row">
        <label for="product-desc" class="col-sm-2 col-form-label">描述</label>
        <div class="col-sm-10">
            <InputText id="product-desc" class="form-control" @bind-Value="productModel.Description" />
        </div>
    </div>
    <button type="submit" class="btn btn-primary">更新</button>
</EditForm>
@code {

    [Parameter]
    public int ProductId { get; set; }
    private Product productModel;
    private IList<string> packageUnits;
    protected override void OnInitialized()
    {
        base.OnInitialized();

        packageUnits = EumeHelper<PackageUnit>.GetKeys();
    }

    private void HandleValidSubmit()
    {
        productRepo.Update(productModel);
        navigator.NavigateTo("/productlist");
    }

    protected override void OnParametersSet()
    {
        productModel = productRepo.GetProductById(ProductId);
        base.OnParametersSet();
    }
}其中传递参数的部分,参考ASP.NET Core Blazor 路由和导航
至此一个简单的功能就完成了。


 392
392

 被折叠的 条评论
为什么被折叠?
被折叠的 条评论
为什么被折叠?
 到【灌水乐园】发言


