


http 协议支持的认证方式:basic基本认证和digest摘要认证,下面将展示如何进行基于用户的basic 认证
basic 认证机制的实现
1.定义安全区域
在 /etc/httpd/conf/httpd.conf 定义安全区域
Directory /var/www/html/admin #"安全区域的路径'
 authType Basic
 options None
 authname "administrator private"
 authuserfile "/etc/httpd/conf.d/.htpasswd"  #"定义认证的用户名密码和文件'
 require valid-user  #"这里也可以写具体的用户名称,但是用户多的话比较麻烦'
  AllowOverride None
   </Directory>
2 创建安全区域
mkdir -p /var/www/html/admin #创建安全区域
[root@Centos6.9 html]#ll admin
-rw-r–r–. 1 root root 39 Sep 23 10:32 index.html3.提供账号和密码存储(文本文件)
使用专用命令完成此类文件的创建及用户管理
htpasswd
-c:自动创建文件,仅应该在文件不存在时使用
-m: md5格式加密
-s: sha格式加密
-D:删除指定用户
#用htpasswd 创建jerry 和tom 两个用户
htpasswd -c -m /etc/httpd/conf.d/.htpasswd jerry
[root@Centos6.9 app]#htpasswd -m /etc/httpd/conf.d/.htpasswd tom
New password:
Re-type new password:
Adding password for user tom
[root@Centos6.9 app]#cat /etc/httpd/conf.d/.htpasswd
jerry:$apr1$MtyXGJYN$mqfALlDq9Q/4bvi/oVJBK.
tom:$apr1$jtC1iK50$bZeJK5F2dt91HtZFsFTnX.
4 测试
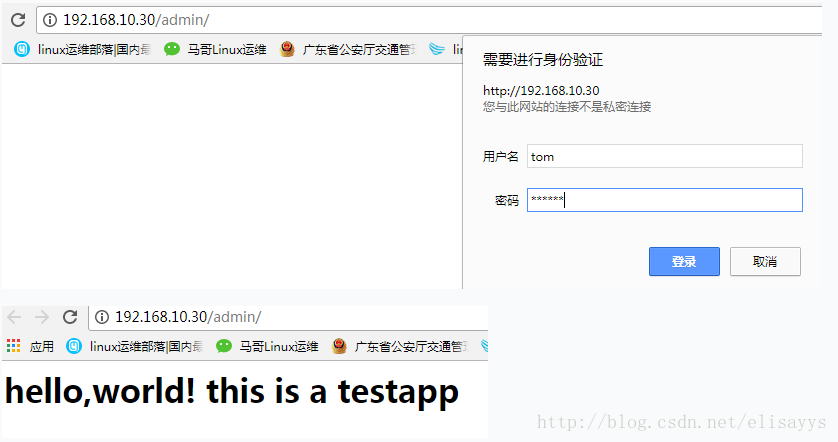
在电脑浏览器输入apache 服务器安全域的地址会看到提示用户输入信息,输入用户和密码后成功进入
这样我们已经成功实现了apach 基于用户basic 认证了,如果用组认证
方法类似。
5 basic 组认证
vim /etc/httpd/conf/httpd.conf 定义安全区域
Directory /var/www/html/admin   #安全区域的路径
 authType Basic
 options None
 authname "administrator private"
 authuserfile "/etc/httpd/conf.d/.htpasswd"  #定义认证的用户名密码和文件
 authgroupfile "/etc/httpd/conf.d/.htgroup"  #定义认证的组文件
 require group grp1 grp2 ...   #grp1 grp2 是组名称
  AllowOverride None
   </Directory>

组文件格式: groupname : user1 user ....
[root@Centos6.9 app]#vim /etc/httpd/conf.d/.htgroup
grp1:  tom jerry
虚拟主机
一个虚拟主机可以服务多个站点,每个站点可通过一个或者多个虚拟主机来实现。httpd 有三种类型虚拟主机:
基于ip
基于port 在实际中很少使用
基于fqdn
也可以混合使用,一般虚拟主机不要和中心主机混用
所以要使用虚拟主机,先禁用中心主机。禁用虚拟主机:注释DocumentRoot
定义虚拟主机方法:
1. 开启虚拟主机需要先关闭 Main server
vim /etc/httpd/conf/httpd.conf
#DocumentRoot "/var/www/html" #"注释或者删掉该行- 定义虚拟主机
NameVirtualHost 192.168.10.52:80  #"apache 2.2 这个一定要配置,apache 2.4 不需要"
<VirtualHost 192.168.10.52:80>
ServerName china.com
    DocumentRoot /vhost/web1/htdosc
</VirtualHost>

<VirtualHost 192.168.10.52:80>
ServerName china2.com
    DocumentRoot /vhost/web2/htdosc
</VirtualHost>
3 定义虚拟主机文件
[root@Centos6.9 html]#mkdir -p /vhost/web1/htdosc
[root@Centos6.9 html]#mkdir -p /vhost/web2/htdosc
再分别定义这里面的主页文件 index.html
vim /vhost/web1/htdosc/index.html
This is china.com test
vim /vhost/web2/htdosc/index.html
This is china2.com test2
4 客户端测试
客户端在用域名访问之前要确保能够正确解析 china.com 和 china2.com 两个域名。本次实验通过添加hosts 文件来实现解析。
[root@centos7 ~]#cat /etc/hosts
127.0.0.1   localhost localhost.localdomain localhost4 localhost4.localdomain4
192.168.10.52  china.com china2.com
之后进行测试:
[root@centos7 ]#curl  china.com
This is china.com test1
[root@centos7 ]#curl  china2.com
This is china2.com test2
这样基于域名的虚拟主机已经实现了。下面附上其他的配置实例:
基于IP的虚拟主机示例:
<VirtualHost 172.16.100.6:80>
ServerName www.a.com
DocumentRoot "/www/a.com/htdocs"
</VirtualHost>
<VirtualHost 172.16.100.7:80>
ServerName www.b.net
DocumentRoot "/www/b.net/htdocs"
</VirtualHost>
<VirtualHost 172.16.100.8:80>
ServerName www.c.org
DocumentRoot "/www/c.org/htdocs"
</VirtualHost>

基于端口的虚拟主机:可和基于IP的虚拟主机混和使用
listen 808
listen 8080
<VirtualHost 172.16.100.6:80>
ServerName www.a.com
DocumentRoot "/www/a.com/htdocs"
</VirtualHost>
<VirtualHost 172.16.100.6:808>
ServerName www.b.net
DocumentRoot "/www/b.net/htdocs"
</VirtualHost>
<VirtualHost 172.16.100.6:8080>
ServerName www.c.org
DocumentRoot "/www/c.org/htdocs"
</VirtualHost>
http2.4 配置方法:
<VirtualHost *:80>
ServerName www.a.com
DocumentRoot /vhost/a.com
<directory /vhost/a.com>
require all granted
</directory>
</VirtualHost>


 1515
1515

 被折叠的 条评论
为什么被折叠?
被折叠的 条评论
为什么被折叠?
 到【灌水乐园】发言


