


 CentOS 7安装MySQL
该部分所有的操作都要在root用户下:
1、 查看并卸载系统自带的mariadb-lib数据库
[root@master ~]# rpm -qa|grep mariadb
[root@master ~]# yum -y remove mariadb-libs-5.5.52-1.el7.x86_64
2、 解压mysql的安装包
将mysql文件上传到指定文件夹

[root@master ~]# cd /home/zkpk/resources/software/mysql/
[root@master ~]# unzip mysql-5.7.18-1.el7.x86_64.rpm-bundle.zip-C /root
3、 进入解压目录
[root@master ~]# cd mysql-5.7.18-1.el7.x86_64.rpm-bundle4、 安装mysql组件,在Shell命令行依次执行以下四个命令。
[root@master mysql-5.7.18-1.el7.x86_64.rpm-bundle]# rpm -ivh mysql-community-common-5.7.18-1.el7.x86_64.rpm
[root@master mysql-5.7.18-1.el7.x86_64.rpm-bundle]# rpm -ivh mysql-community-libs-5.7.18-1.el7.x86_64.rpm
[root@master mysql-5.7.18-1.el7.x86_64.rpm-bundle]# rpm -ivh mysql-community-client-5.7.18-1.el7.x86_64.rpm
[root@master mysql-5.7.18-1.el7.x86_64.rpm-bundle]# rpm -ivh mysql-community-server-5.7.18-1.el7.x86_64.rpm
注意:(1)如 果 遇 到 类 似 “ libnuma.so.1()(64bit) isneeded by mysql-‐community-‐server-‐5.7.18-‐1.el7.x86_64”错误,请输入以下命令安装缺失包:
[root@master ~]# yum install -y numactl
(2)如果遇到类似爆冲突,请清除多余 mysql 包,如清除 mysql---libs 包:
[root@master ~]# rpm e --nodeps mysql---libs
5、 启动mysql服务,并设置开机自启动
[root@master mysql-5.7.18-1.el7.x86_64.rpm-bundle]# systemctl start mysqld[root@master mysql-5.7.18-1.el7.x86_64.rpm-bundle]# systemctl enable mysqld
[root@master mysql-5.7.18-1.el7.x86_64.rpm-bundle]# systemctl daemon-reload
6、 查看mysql自动生成的root密码
[root@master mysql-5.7.18-1.el7.x86_64.rpm-bundle]# grep 'temporary password' /var/log/mysqld.log2018-02-25T21:07:58.009956Z 1 [Note] A temporary password is generated for root@localhost: w0hoN/tulY*V
7、 登录mysql(密码为上一步骤中查看的密码)
[root@master mysql-5.7.18-1.el7.x86_64.rpm-bundle]# mysql -uroot -p
Enter password:
Welcome to the MySQL monitor. Commands end with ; or \g.
Your MySQL connection id is 3
Server version: 5.7.18
Copyright (c) 2000, 2017, Oracle and/or its affiliates. All rights reserved.
Oracle is a registered trademark of Oracle Corporation and/or its
affiliates. Other names may be trademarks of their respective
owners.
Type 'help;' or '\h' for help. Type '\c' to clear the current input statement.
mysql>
8、 修改自己的root密码为“MyNewPass4!”
mysql> ALTER USER 'root'@'localhost' IDENTIFIED BY 'MyNewPass4!';
9、 修改mysql的密码策略
1).查看Mysql密码策略相关信息
mysql> show variables like '%password%';

2)关闭密码策略(向my.cnf文件中添加如下配置(/etc/my.cnf):)
[root@master ~]# vim /etc/my.cnf
validate_password = off
3)重启mysql服务使得服务配置生效
[root@master ~]# systemctl restart mysqld
10、 修改mysql密码为lyu
[root@master ~]# mysql -uroot -pmysql> ALTER USER 'root'@'localhost' IDENTIFIED BY 'lyu';
11、添加lyu用户并赋予远程登录权限
mysql>grant all on *.* to lyu@'%' identified by 'lyu';
mysql>grant all on *.* to lyu@'localhost' identified by 'lyu';
mysql>grant all on *.* to lyu@'master' identified by 'lyu';
mysql>flush privileges;
mysql>exit;
12、 配置mysql默认编码为utf-8
说明:修改/etc/my.cnf配置文件,在[mysqld]下添加编码配置
[root@master ~]# vim /etc/my.cnf
[mysqld]
character_set_server=utf8
init_connect='SET NAMES utf8'
1) 重新启动mysql服务
[root@master ~]# systemctl restart mysqld
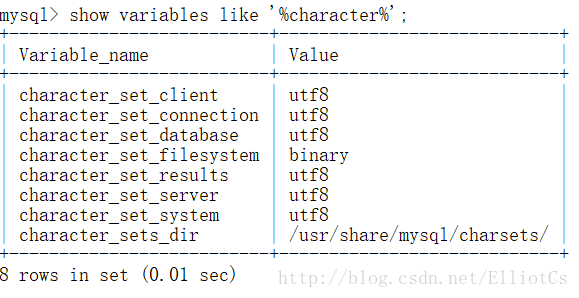
2) 查看数据库默认编码
[root@master ~]# mysql -uroot -p
mysql> show variables like '%character%';


 1544
1544


 被折叠的 条评论
为什么被折叠?
被折叠的 条评论
为什么被折叠?
 到【灌水乐园】发言


