


使用python进行PostgreSQL 数据库连接
PostgreSQL 数据库是最常用的关系型数据库之一,最吸引人的一点是它作为开源数据库且具有可拓展性,能够提供丰富的应用。运用python可以很简单的建立PostgreSQL 数据库连接,其中最受欢迎的就是psycopg。
1. 安装psycopg2
Psycopy是针对python的Postgres 数据库的适配模块,安装psycopg2可以整合python和Postgres 。使用cmd输入命令进行安装:
pip install psycopg2
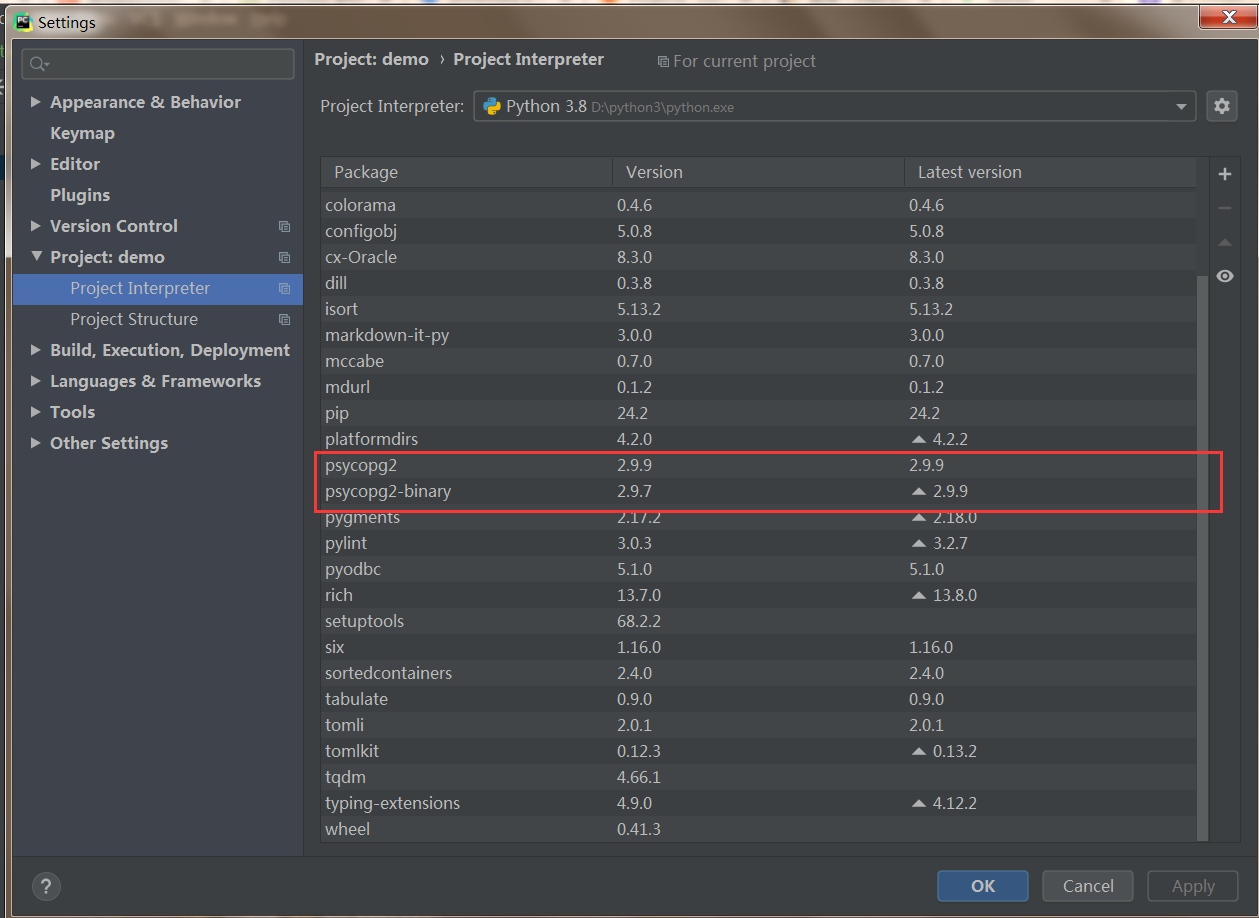
也可以在pycharm中查找psycopg2安装包:
2. 图形化连接数据库
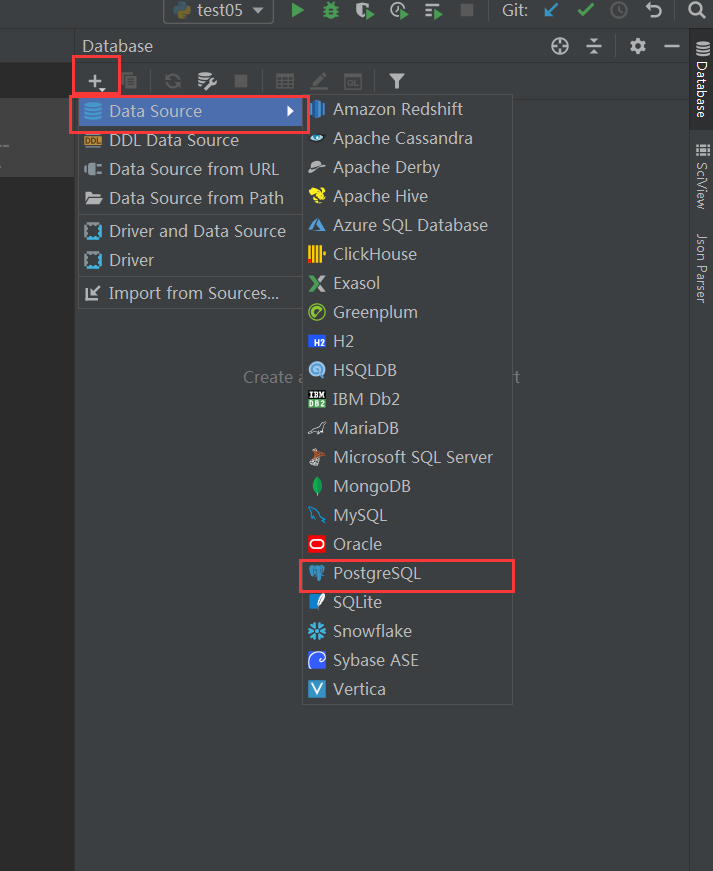
在pycharm中选择Database,点击左上角的+添加数据库,选择postgresql:
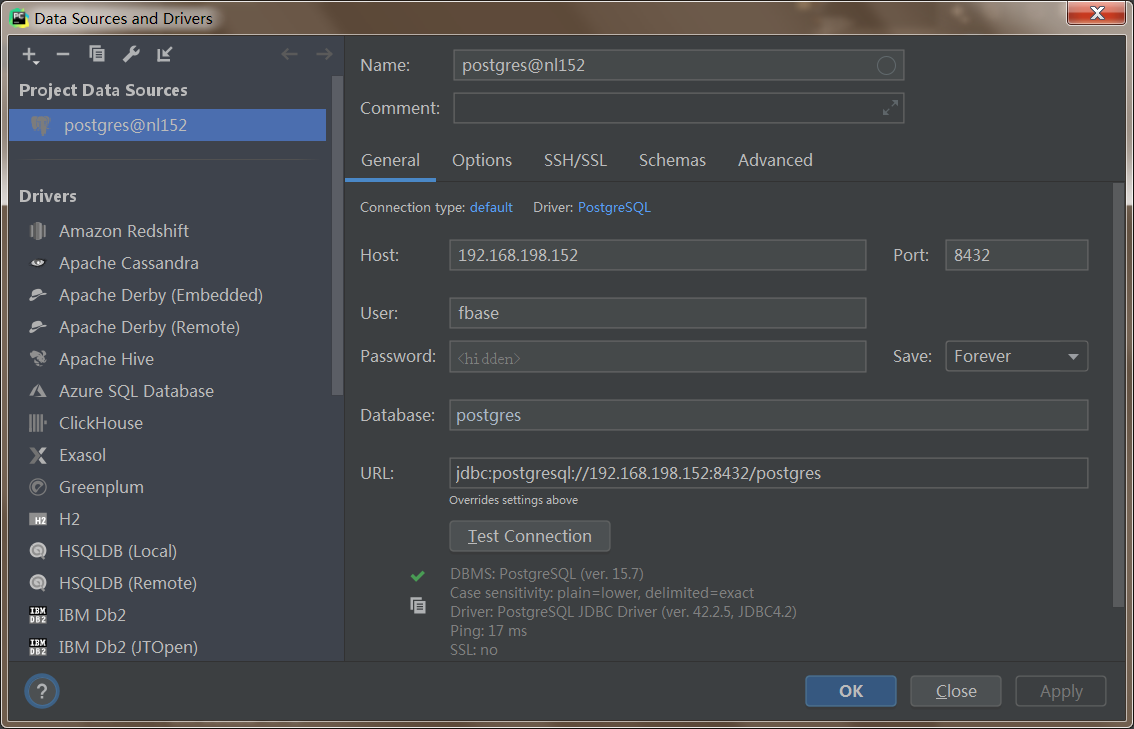
创建数据库连接后点击apply,数据库会显示在右侧窗格中。
3. 代码连接数据库
3.1 不使用配置文件
下面使用 psycopy2.connect()方法连接到postgresql数据库。通过调用cursor类中的execute()方法对数据库进行操作。在execute()中用SQL语句创建表。使用commit()将数据发送到数据库服务器,最后使用close()关闭数据库。commit()能够对数据库进行改变,且不可逆。
connect() 方法的参数一般包括:
-
database: 要连接的数据库名称
-
user:连接数据库的用户名
-
password: 连接数据库的密码
-
host: 数据库端口的地址,一般为 “localhost”,或者主机的IP地址
-
port: 门户 默认为5432.
import psycopg2
con = psycopg2.connect(database=“postgres”,
user=“fbase”,
password=“123456”,
host=“192.168.198.152”,
port=“8432”)
print(con)
print(“Database opened successfully”)
cur = con.cursor()
cur.execute(‘SELECT version()’)
db_version = cur.fetchone()
print(db_version)
con.close()
运行结果如下:

3.2 使用配置文件
可以使用配置文件来存储所有连接参数。
database.ini文件的内容如下:
[postgresql]
host = 192.168.198.152
database = postgres
user = fbase
password = 123456
port = 8432
下面的config()函数会读取database.ini文件并返回连接参数。该config()函数放置在config.py文件中:
from configparser import ConfigParser


def config(filename='../../resource/database.ini', section='postgresql'):
    # create a parser
    parser = ConfigParser()
    # read config file
    parser.read(filename)

    # get section, default to postgresql
    db = {}
    if parser.has_section(section):
        params = parser.items(section)
        for param in params:
            db[param[0]] = param[1]
    else:
        raise Exception('Section {0} not found in the {1} file'.format(section, filename))

    return db
下面的connect()函数连接到suppliers数据库并打印出 PostgreSQL 数据库版本。
import psycopg2

from demo.pgdemo.config import config


def connect():
    """ Connect to the PostgreSQL database server """
    conn = None
    try:
        # read connection parameters
        params = config()

        # connect to the PostgreSQL server
        print('Connecting to the PostgreSQL database...')
        conn = psycopg2.connect(**params)

        # create a cursor
        cur = conn.cursor()

        # execute a statement
        print('PostgreSQL database version:')
        cur.execute('SELECT version()')

        # display the PostgreSQL database server version
        db_version = cur.fetchone()
        print(db_version)

        # close the communication with the PostgreSQL
        cur.close()
    except (Exception, psycopg2.DatabaseError) as error:
        print(error)
    finally:
        if conn is not None:
            conn.close()
            print('Database connection closed.')


if __name__ == '__main__':
    connect()
怎么运行的。
- 首先,从
database.ini文件中读取数据库连接参数。 - 接下来,通过调用
connect()函数创建一个新的数据库连接。 - 然后,新建一个
cursor并执行SQL语句来获取 PostgreSQL 数据库版本。 - 之后,通过调用游标对象的
fetchone()方法读取结果集。 - 最后,通过调用
cursor和connection对象的close()方法关闭与数据库服务器的通信。
4. DML语句测试
4.1 创建表
使用SQL(Structured Query Language)语句CREATE TABLE添加新的表:
import psycopg2

# 建立数据库连接
con = psycopg2.connect(database="postgres",
                       user="fbase",
                       password="123456",
                       host="192.168.198.152",
                       port="8432")
print("Database opened successfully")
# 调用游标对象
cur = con.cursor()
# 用cursor中的execute 使用DDL语句创建一个名为 STUDENT 的表,指定表的字段以及字段类型
cur.execute('''
       CREATE TABLE IF NOT EXISTS STUDENT
      (ADMISSION INT PRIMARY KEY     NOT NULL,
      NAME           TEXT            NOT NULL,
      AGE            INT             NOT NULL,
      COURSE        CHAR(50),
      DEPARTMENT        CHAR(50));''')

# 提交更改,增添或者修改数据只会必须要提交才能生效
con.commit()
con.close()
结果查看:
postgres=# d
        List of relations
 Schema |  Name   | Type  | Owner
--------+---------+-------+-------
 public | student | table | fbase
(1 row)
4.2 表插入数据
使用INSERT INTO 在以经生成的表中插入数据
import psycopg2

# 建立数据库连接
con = psycopg2.connect(database="postgres",
                       user="fbase",
                       password="123456",
                       host="192.168.198.152",
                       port="8432")
print("Database opened successfully")
# 调用游标对象
cur = con.cursor()
# 在表中插入一条数据
cur.execute("INSERT INTO STUDENT (ADMISSION,NAME,AGE,COURSE,DEPARTMENT) "
            "VALUES (3420, 'John', 18, 'Computer Science', 'ICT')")

# 提交更改,增添或者修改数据只会必须要提交才能生效
con.commit()
con.close()
结果查看:
postgres=# select * from student ;
 admission | name | age |                       course                       |                     department
-----------+------+-----+----------------------------------------------------+----------------------------------------------------
      3420 | John |  18 | Computer Science                                   | ICT
(1 row)
4.3 表更新数据
同样使用SQL语句更新目标字段,使用commit()更新数据库
import psycopg2

# 建立数据库连接
con = psycopg2.connect(database="postgres",
                       user="fbase",
                       password="123456",
                       host="192.168.198.152",
                       port="8432")
print("Database opened successfully")
# 调用游标对象
cur = con.cursor()
# 更新表中的数据
cur.execute("UPDATE student set name = 'joe' WHERE admission = 3420")

# 提交更改,增添或者修改数据只会必须要提交才能生效
con.commit()
con.close()
结果查看:
postgres=# select * from student ;
 admission | name | age |                       course                       |                     department
-----------+------+-----+----------------------------------------------------+----------------------------------------------------
      3420 | John |  18 | Computer Science                                   | ICT
(1 row)

postgres=# select * from student ;
 admission | name | age |                       course                       |                     department
-----------+------+-----+----------------------------------------------------+----------------------------------------------------
      3420 | joe  |  18 | Computer Science                                   | ICT
(1 row)
4.4 表删除数据
同样使用SQL语句更新目标字段,使用commit()更新数据库
import psycopg2

# 建立数据库连接
con = psycopg2.connect(database="postgres",
                       user="fbase",
                       password="123456",
                       host="192.168.198.152",
                       port="8432")
print("Database opened successfully")
# 调用游标对象
cur = con.cursor()
# 删除表中的数据
cur.execute("DELETE FROM student WHERE admission = 3420")

# 提交更改,增添或者修改数据只会必须要提交才能生效
con.commit()
con.close()
结果查看:
postgres=# select * from student ;
 admission | name | age |                       course                       |                     department
-----------+------+-----+----------------------------------------------------+----------------------------------------------------
      3420 | joe  |  18 | Computer Science                                   | ICT
(1 row)

postgres=# select * from student ;
 admission | name | age | course | department
-----------+------+-----+--------+------------
(0 rows)
5. DQL语句测试
5.1 查看表中的数据
同样使用SQL语句更新目标字段,使用commit()更新数据库
import psycopg2

# 建立数据库连接
con = psycopg2.connect(database="postgres",
                       user="fbase",
                       password="123456",
                       host="192.168.198.152",
                       port="8432")
print("Database opened successfully")
# 调用游标对象
cur = con.cursor()
# 删除表中的数据
cur.execute("SELECT * FROM student")

rows = cur.fetchall()
for row in rows:
    print("ADMISSION =", row[0])
    print("NAME =", row[1])
    print("AGE =", row[2])
    print("COURSE =", row[3])
    print("DEPARTMENT =", row[4], "
")

# 提交更改,增添或者修改数据只会必须要提交才能生效
con.commit()
con.close()
结果查看:
D:python3python.exe D:/project/python/demo/demo/pgdemo/dql_select_1.py
Database opened successfully
ADMISSION = 3420
NAME = John
AGE = 18
COURSE = Computer Science
DEPARTMENT = ICT
w[3])
    print("DEPARTMENT =", row[4], "
")

# 提交更改,增添或者修改数据只会必须要提交才能生效
con.commit()
con.close()
结果查看:
D:python3python.exe D:/project/python/demo/demo/pgdemo/dql_select_1.py
Database opened successfully
ADMISSION = 3420
NAME = John
AGE = 18
COURSE = Computer Science
DEPARTMENT = ICT


 2万+
2万+

 被折叠的 条评论
为什么被折叠?
被折叠的 条评论
为什么被折叠?
 到【灌水乐园】发言


