


序言
经过一段时间对于flink学习且画了一些源码流程相关的图,决定开一个flink源码分析的专栏,该专栏以flink on yarn的 Per-job模式为基础,基于flink1.12.0,以官方SocketWindowWordCount例子来分析一个任务从提交到运行的流程源码分析。那么话不多,直接开始吧。
首先我们正常情况下,在该模式下的提交flink任务的脚本入下:
flink run -t yarn-per-job -c org.apache.flink.streaming.examples.socket.SocketWindowWordCount examples/streaming/SocketWindowWordCount.jar --port 9231
因为该命令肯定是在bin目录下执行的,所以我们直接去找bin目录下的flink文件。

我们发现入下内容:
exec $JAVA_RUN $JVM_ARGS $FLINK_ENV_JAVA_OPTS "${log_setting[@]}" -classpath "`manglePathList "$CC_CLASSPATH:$INTERNAL_HADOOP_CLASSPATHS"`" org.apache.flink.client.cli.CliFrontend "$@"
也就是说提交作业的入口是CliFrontend,其运行方式和我们当时用cmd学习运行的第一个HelloWorld的java程序一样,就是通过java 类名来启动一个jvm进程, 所以在源码中找到该类的main函数开始分析:
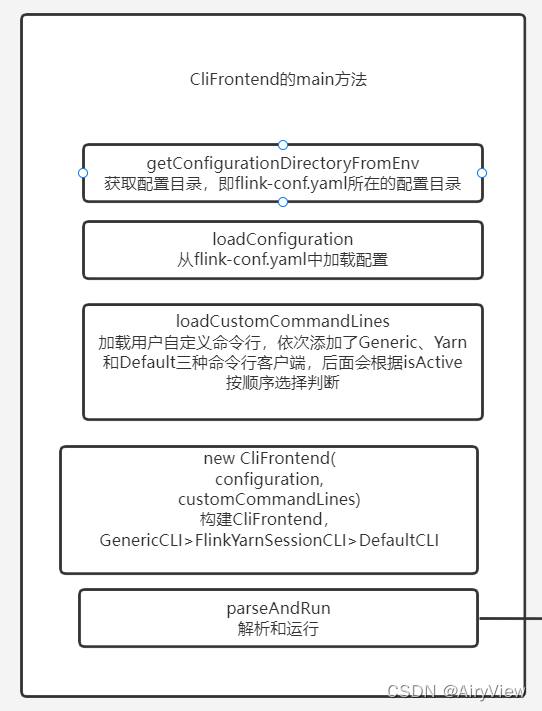
1.CliFrontend#main
ps:上面大标题这种写法表示:类名#函数名,后面都是同理哦(想要快捷到这里,在idea中,先用Ctrl+N输入类名到达指定类,然后用Ctrl+F12输入函数方法名即可到达指定方法),然后我分析每个函数主要是分析重点(这里的重点是指点进去后内部的有相当重要的信息,而不是只是看个函数名就知全意了)不会分析每一步。
	public static void main(final String[] args) {
		EnvironmentInformation.logEnvironmentInfo(LOG, "Command Line Client", args);

		// 1. find the configuration directory
		final String configurationDirectory = getConfigurationDirectoryFromEnv();

		// 2. load the global configuration
		final Configuration configuration = GlobalConfiguration.loadConfiguration(configurationDirectory);

		// 3. load the custom command lines
		final List<CustomCommandLine> customCommandLines = loadCustomCommandLines(
			configuration,
			configurationDirectory);

		try {
			final CliFrontend cli = new CliFrontend(
				configuration,
				customCommandLines);

			SecurityUtils.install(new SecurityConfiguration(cli.configuration));
			int retCode = SecurityUtils.getInstalledContext()
					.runSecured(() -> cli.parseAndRun(args));
			System.exit(retCode);
		}
		catch (Throwable t) {
			final Throwable strippedThrowable = ExceptionUtils.stripException(t, UndeclaredThrowableException.class);
			LOG.error("Fatal error while running command line interface.", strippedThrowable);
			strippedThrowable.printStackTrace();
			System.exit(31);
		}
	}
2.CliFrontend#parseAndRun->CliFrontend#run
	protected void run(String[] args) throws Exception {
		LOG.info("Running 'run' command.");

		final Options commandOptions = CliFrontendParser.getRunCommandOptions();
		final CommandLine commandLine = getCommandLine(commandOptions, args, true);

		// evaluate help flag
		if (commandLine.hasOption(HELP_OPTION.getOpt())) {
			CliFrontendParser.printHelpForRun(customCommandLines);
			return;
		}

		final CustomCommandLine activeCommandLine =
				validateAndGetActiveCommandLine(checkNotNull(commandLine));

		final ProgramOptions programOptions = ProgramOptions.create(commandLine);

		final List<URL> jobJars = getJobJarAndDependencies(programOptions);

		final Configuration effectiveConfiguration = getEffectiveConfiguration(
				activeCommandLine, commandLine, programOptions, jobJars);

		LOG.debug("Effective executor configuration: {}", effectiveConfiguration);

		final PackagedProgram program = getPackagedProgram(programOptions, effectiveConfiguration);

		try {
			executeProgram(effectiveConfiguration, program);
		} finally {
			program.deleteExtractedLibraries();
		}
	}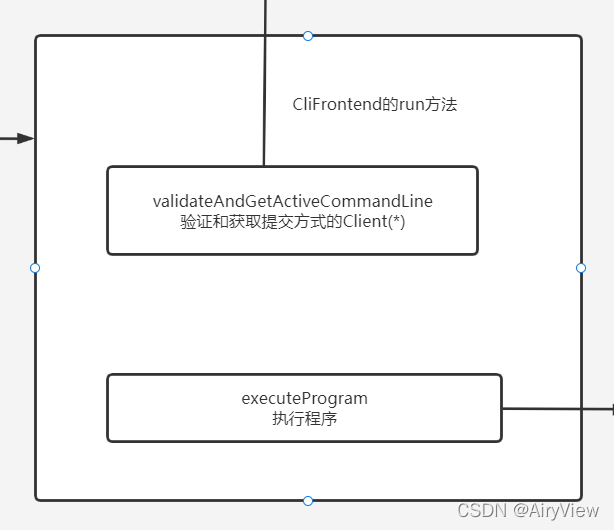
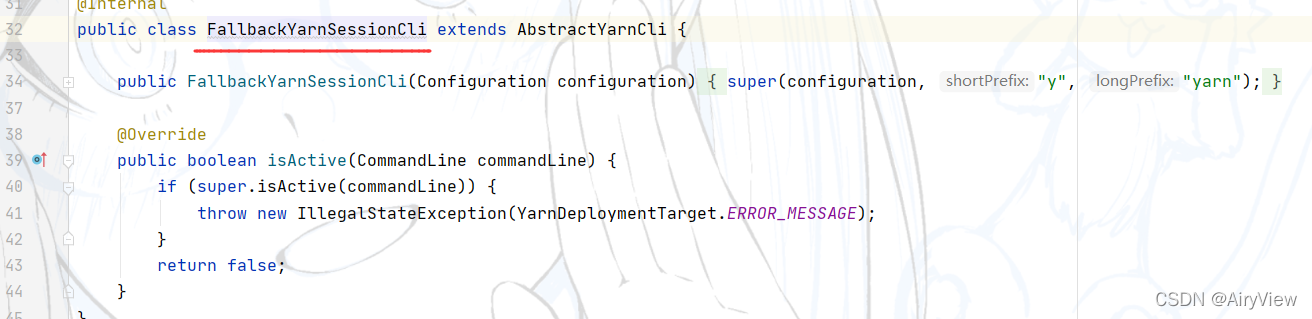
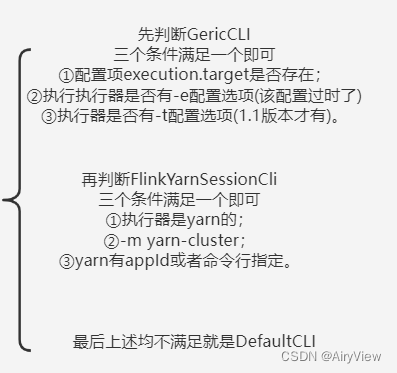
3.CliFrontend#validateAndGetActiveCommandLine
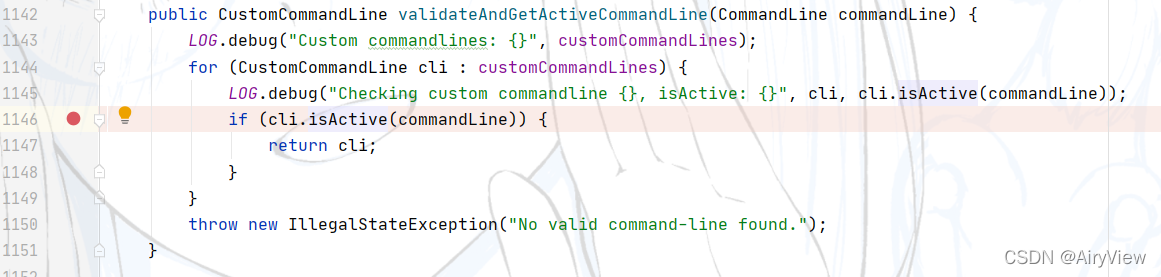
其中验证的方式是通过isActive函数来判断,点击isActive函数,发现其实一个接口声明的方法,需要找到其实现类。
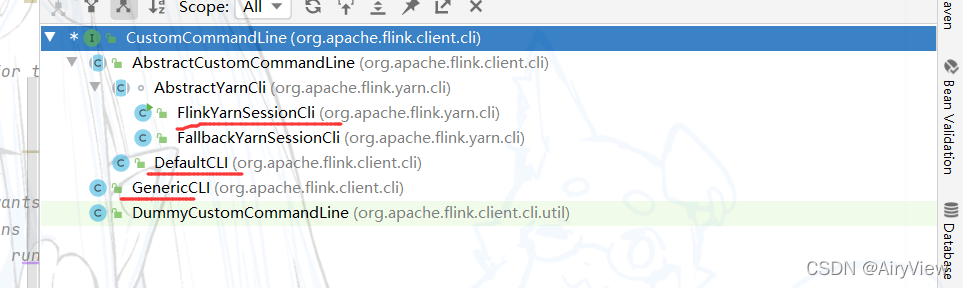
分别如下:

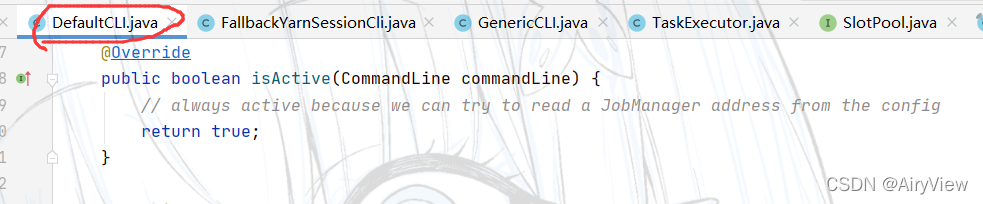
因为之前说过已经依次添加了GenericCLI>FlinkYarnSessionCLI>DefaultCLI三种客户端,那么for就会让它们依次调用isActive进行判断,根据上面的代码分析逻辑如下:
分析完validateAndGetActiveCommandLine后,继续看下面的executeProgram
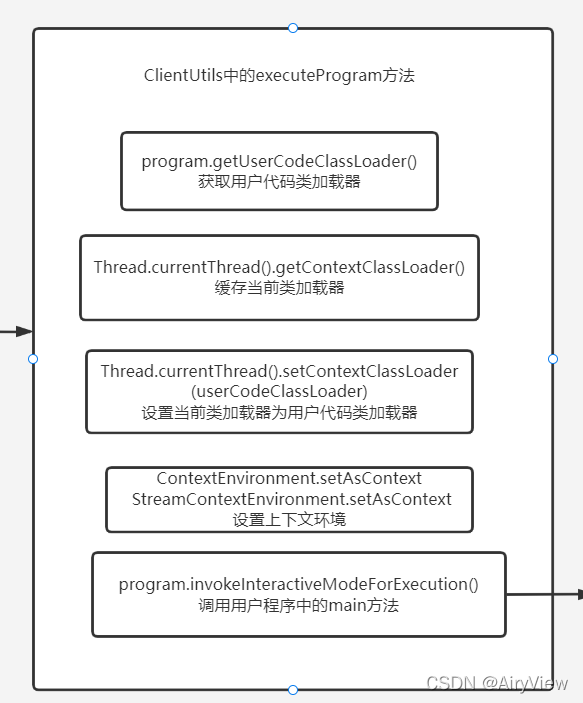
4.CliFrontend#executeProgram->ClientUtils#executeProgram
	public static void executeProgram(
			PipelineExecutorServiceLoader executorServiceLoader,
			Configuration configuration,
			PackagedProgram program,
			boolean enforceSingleJobExecution,
			boolean suppressSysout) throws ProgramInvocationException {
		checkNotNull(executorServiceLoader);
		final ClassLoader userCodeClassLoader = program.getUserCodeClassLoader();
		final ClassLoader contextClassLoader = Thread.currentThread().getContextClassLoader();
		try {
			Thread.currentThread().setContextClassLoader(userCodeClassLoader);

			LOG.info("Starting program (detached: {})", !configuration.getBoolean(DeploymentOptions.ATTACHED));

			ContextEnvironment.setAsContext(
				executorServiceLoader,
				configuration,
				userCodeClassLoader,
				enforceSingleJobExecution,
				suppressSysout);

			StreamContextEnvironment.setAsContext(
				executorServiceLoader,
				configuration,
				userCodeClassLoader,
				enforceSingleJobExecution,
				suppressSysout);

			try {
				program.invokeInteractiveModeForExecution();
			} finally {
				ContextEnvironment.unsetAsContext();
				StreamContextEnvironment.unsetAsContext();
			}
		} finally {
			Thread.currentThread().setContextClassLoader(contextClassLoader);
		}
} 
5.PackagedProgram#invokeInteractiveModeForExecution->PackagedProgram#callMainMethod
	private static void callMainMethod(Class<?> entryClass, String[] args) throws ProgramInvocationException {
		Method mainMethod;
		if (!Modifier.isPublic(entryClass.getModifiers())) {
			throw new ProgramInvocationException("The class " + entryClass.getName() + " must be public.");
		}

		try {
			mainMethod = entryClass.getMethod("main", String[].class);
		} catch (NoSuchMethodException e) {
			throw new ProgramInvocationException("The class " + entryClass.getName() + " has no main(String[]) method.");
		} catch (Throwable t) {
			throw new ProgramInvocationException("Could not look up the main(String[]) method from the class " +
				entryClass.getName() + ": " + t.getMessage(), t);
		}

		if (!Modifier.isStatic(mainMethod.getModifiers())) {
			throw new ProgramInvocationException("The class " + entryClass.getName() + " declares a non-static main method.");
		}
		if (!Modifier.isPublic(mainMethod.getModifiers())) {
			throw new ProgramInvocationException("The class " + entryClass.getName() + " declares a non-public main method.");
		}

		try {
			mainMethod.invoke(null, (Object) args);
		} catch (IllegalArgumentException e) {
			throw new ProgramInvocationException("Could not invoke the main method, arguments are not matching.", e);
		} catch (IllegalAccessException e) {
			throw new ProgramInvocationException("Access to the main method was denied: " + e.getMessage(), e);
		} catch (InvocationTargetException e) {
			Throwable exceptionInMethod = e.getTargetException();
			if (exceptionInMethod instanceof Error) {
				throw (Error) exceptionInMethod;
			} else if (exceptionInMethod instanceof ProgramParametrizationException) {
				throw (ProgramParametrizationException) exceptionInMethod;
			} else if (exceptionInMethod instanceof ProgramInvocationException) {
				throw (ProgramInvocationException) exceptionInMethod;
			} else {
				throw new ProgramInvocationException("The main method caused an error: " + exceptionInMethod.getMessage(), exceptionInMethod);
			}
		} catch (Throwable t) {
			throw new ProgramInvocationException("An error occurred while invoking the program's main method: " + t.getMessage(), t);
		}
	}
这个方法就是首先判断类是否是public,然后获取其中的main方法,判断main方法是否static、是否public,最后开始执行用户的main方法,因为我们之前说过以官方的SocketWindowWordCount为例子来分析,所以假设用户即我们自己编写了这段SocketWindowWordCount代码,要去flink上执行,这里就是执行这段代码的main方法了
6.SocketWindowWordCount#main
public static void main(String[] args) throws Exception {

		// the host and the port to connect to
		final String hostname;
		final int port;
		try {
			final ParameterTool params = ParameterTool.fromArgs(args);
			hostname = params.has("hostname") ? params.get("hostname") : "localhost";
			port = params.getInt("port");
		} catch (Exception e) {
			System.err.println("No port specified. Please run 'SocketWindowWordCount " +
				"--hostname <hostname> --port <port>', where hostname (localhost by default) " +
				"and port is the address of the text server");
			System.err.println("To start a simple text server, run 'netcat -l <port>' and " +
				"type the input text into the command line");
			return;
		}

		// get the execution environment
		final StreamExecutionEnvironment env = StreamExecutionEnvironment.getExecutionEnvironment();

		// get input data by connecting to the socket
		DataStream<String> text = env.socketTextStream(hostname, port, "\n");

		// parse the data, group it, window it, and aggregate the counts
		DataStream<WordWithCount> windowCounts = text

				.flatMap(new FlatMapFunction<String, WordWithCount>() {
					@Override
					public void flatMap(String value, Collector<WordWithCount> out) {
						for (String word : value.split("\\s")) {
							out.collect(new WordWithCount(word, 1L));
						}
					}
				})

				.keyBy(value -> value.word)
				.window(TumblingProcessingTimeWindows.of(Time.seconds(5)))

				.reduce(new ReduceFunction<WordWithCount>() {
					@Override
					public WordWithCount reduce(WordWithCount a, WordWithCount b) {
						return new WordWithCount(a.word, a.count + b.count);
					}
				});

		// print the results with a single thread, rather than in parallel
		windowCounts.print().setParallelism(1);

		env.execute("Socket Window WordCount");
	}
至于怎么执行用户代码,将算子串联起来形成流图、作业图以及执行图等等,见下一期,听说关注、点赞、收藏有助于催更哦
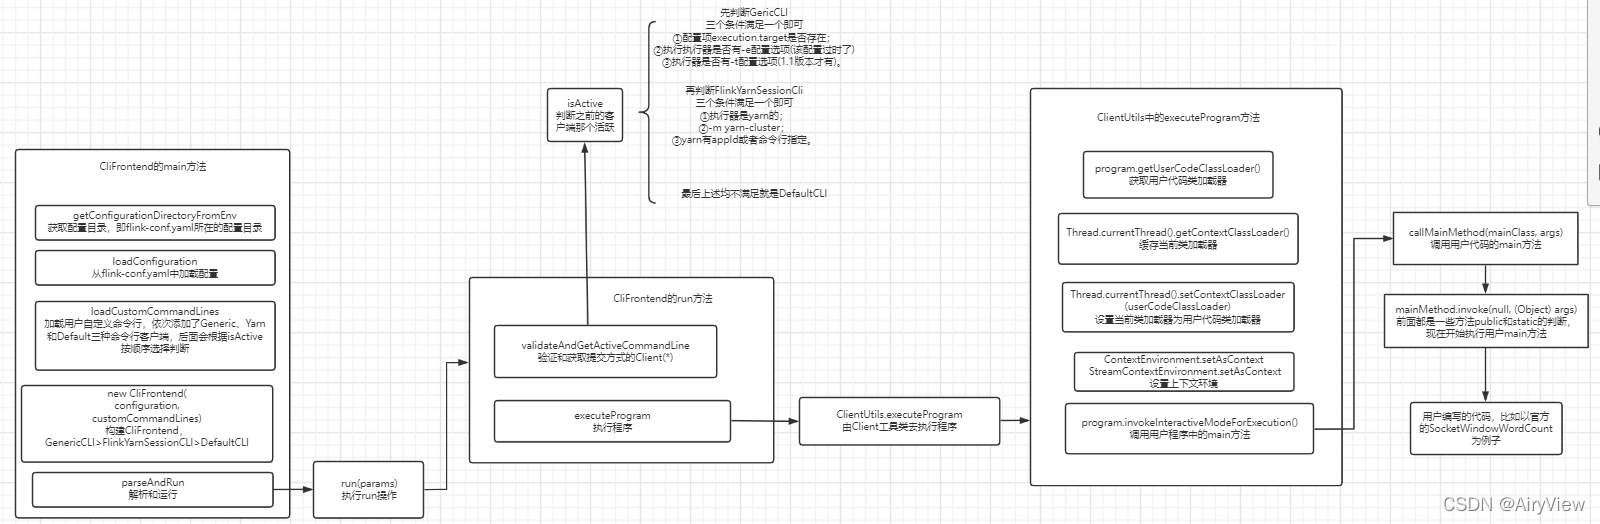
这一期部分的整体图预览如下:
总览


 426
426


 被折叠的 条评论
为什么被折叠?
被折叠的 条评论
为什么被折叠?
 到【灌水乐园】发言


