


1.修改 Grid 表中行的 URL
如果你想要详细定义 Grid 表中行的 URL, 比如,当用户点击 Grid 表中的任意一行,它将跳转到指定的页面,可以添加如下方法到 Grid.php 文件中
public function getRowUrl($row)
    {
        return $this->getUrl('*/*/edit', array('id' => $row->getData('web_id')));
    }
URL 就是你 controller 中的 editAction 方法,它将行的 web_id 号作为参数进行传递
2 . 列_下拉框 – Drop Down Column Type
假设,你想要在 Grid 表中添加一个下拉框,比如你想要添加如下图片中显示的:
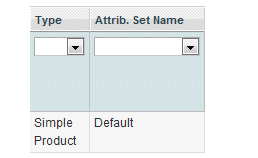
$this->addColumn('dropdown1',array(
                'header'=>Mage::helper('employee')->__('Description'),
                'align'=>'left',
                'index'=>'status',
                'type'=>'options',
                'width'=>'20px',
                'options'=>array('0'=>'disable','1'=>'enable'),
            )

        );
3.批量操作 – Mass Actions
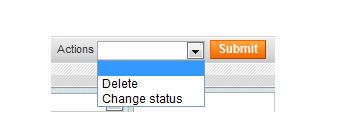
批量操作功能十分有用,并且使用频率也非常高, 下图所展示的就是批量操作
 // 批量操作
    protected function _prepareMassaction()
    {
        $this->setMassactionIdField('employee_id'); //设置 form id
        $a = $this->getMassactionBlock();
        $a->setFormFieldName('employee123'); // 设置 post 表单 接收时,也用这个字段

        $this->getMassactionBlock()->addItem('delete', array(
            'label'    =>   Mage::helper('employee')->__('Delete'),
            'url'      =>   $this->getUrl('*/*/massDelete'),  //给 URL 指定了一个方法
            'confirm'  =>    Mage::helper('employee')->__('Are you sure?'), //这个就是在提交前的 confirm 提示框效果,做再次确认
        ));

        $statuses = Mage::getSingleton('employee/status')->getOptionArray();

        //array_unshift($statuses, array('label'=>'', 'value'=>''));
        $this->getMassactionBlock()->addItem('status', array(
            'label' => Mage::helper('employee')->__('Change status'),
            'url'   => $this->getUrl('*/*/massStatus', array('_current'=>true)),
            'additional' => array(
                'visibility'    =>  array(
                    'name'   =>  'status',
                    'type'   =>  'select',
                    'class'  =>  'required-entry',
                    'label'  =>  Mage::helper('employee')->__('Status'),
                    'values' =>  $statuses
                )
            )
        ));
        return $this;
    }
控制器中:
public function massDeleteAction() {
$ids = $this->getRequest()->getParam('employee123');
if(!is_array($ids)) {
Mage::getSingleton('adminhtml/session')->addError(Mage::helper('adminhtml')->__('Please select item(s)'));
} else {
try {
foreach ($ids as $id) {
$employee = Mage::getModel('employee/web')->load($id);
$employee->delete();
}
Mage::getSingleton('adminhtml/session')->addSuccess(
Mage::helper('adminhtml')->__(
'Total of %d record(s) were successfully deleted', count($ids)
)
);
} catch (Exception $e) {
Mage::getSingleton('adminhtml/session')->addError($e->getMessage());
}
}
$this->_redirect('*/*/index');
}4.如果想你在 Grid 表中添加 导入/导出 选项,如下图所展示:

我们只需要将这两行代码添加至 _prepareColumns() 方法中
// 增加导入导出功能
        $this->addExportType('*/*/exportCsv', Mage::helper('employee')->__('CSV'));
        $this->addExportType('*/*/exportXml', Mage::helper('employee')->__('XML'));
同样你需要在 controller 中为此添加对应的方法
public function exportCsvAction()
    {
        $fileName = 'employee.csv';
        $grid  = $this->getLayout()->createBlock('employee/adminhtml_employee_grid');
        $this->_prepareDownloadResponse($fileName, $grid->getCsvFile());
    }

    public function exportXmlAction()
    {
        $fileName = 'employee.xml';
        $grid  = $this->getLayout()->createBlock('employee/adminhtml_employee_grid');
        $this->_prepareDownloadResponse($fileName, $grid->getXml());
    }
5.Grid 表 ==> 列中的搜索和过滤 – Custom Search/Filter For a Column
Grid 表中有那么单独一列,你希望搜索功能以不同的方式工作。例如它的 collection 是多表联查的集合,对于列的索引,你希望搜索功能工作起来不同或完全不工作

你需要在 Grid.php 中重写这个 protected 方法 _addColumnFilterToCollection($column):
自定义过滤逻辑:
protected function _addColumnFilterToCollection($column)
{
if ($this->getCollection()) {
if ($column->getId() == 'websites') {
$this->getCollection()->joinField('websites',
'catalog/product_website',
'website_id',
'product_id=entity_id',
null,
'left');
}
}
return parent::_addColumnFilterToCollection($column);
}6.基于 Ajax 的 Grid
在你 Grid 中, 如果你希望 搜索/分页 和其他一些操作都是基于 Ajax 工作,那么你就要在你的 Grid.php 文件中的 __construct() 方法中添加:
$this->setSaveParametersInSession(true);
$this->setUseAjax(true);
并同时添加另外一个方法:
public function getGridUrl()
{
    return $this->getUrl('*/*/grid', array('_current'=>true));
}
这个 URL 将会被称作 Ajax 请求,为了获得 Grid 的内容,你需要在 EmployeeContrller.php 文件中添加:
public function gridAction()
{
    $this->loadLayout();
    $this->getResponse()->setBody(
        $this->getLayout()->createBlock('employee/adminhtml_employee_grid')->toHtml()
    );
}
7.在 Grid 中添加不同的按钮
在默认的 Grid 表中,你只有一个 “Add” 按钮,就像我们所演示的 “Add Employee”,如果你需要添加多个按钮时,如下图:

真的要做到,那么我们需要修改 Excellence/Employee/Block/Adminhtml/Employee.php 文件中的 __construct() 方法:public function __construct()
{
$this->_controller = 'adminhtml_employee';
$this->_blockGroup = 'employee';
$this->_headerText = Mage::helper('employee')->__('Employee Manager');
$this->_addButtonLabel = Mage::helper('employee')->__('Add Employee');
$this->_addButton('button1', array(
'label' => Mage::helper('employee')->__('Button Label1'),
'onclick' => 'setLocation(\'' . $this->getUrl('*/*/button1') .'\')',
'class' => 'add',
));
$this->_addButton('button2', array(
'label' => Mage::helper('employee')->__('Button Label2'),
'onclick' => 'setLocation(\'' . $this->getUrl('*/*/button2') .'\')',
'class' => 'remove',
));
parent::__construct();
}8.改变默认分页的 Size
你需要在 Grid.php 文件中重写 _preparePage() 这个方法,
protected function _preparePage()
{
    $this->getCollection()->setPageSize(
                $this->getParam($this->getVarNameLimit(), $this->_defaultLimit)
    );
    $this->getCollection()->setCurPage(
                $this->getParam($this->getVarNamePage(), $this->_defaultPage)
    );
}
现在你可以根据你自己的需要设置 $this->_defaultLimit 和 $this->_defaultPage9.为 Grid 表中的行添加不同的选项
如图所示:
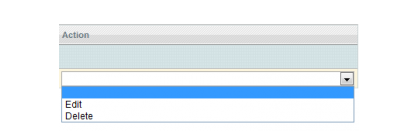
$this->addColumn('action',
            array(
                'header'   =>   Mage::helper('employee')->__('Action'),
                'type'     =>   'action',
                'getter'   =>   'getWebId',
                'actions'  =>   array(
                    array(
                        'caption' =>  Mage::helper('employee')->__('Edit'),
                        'url'     =>  $this->getUrl("*/*/edit"),
                        'field'   =>  'id'
                    ),
                    array(
                        'caption' =>  Mage::helper('employee')->__('Delete'),
                        'url'     =>  $this->getUrl("*/*/delete"),
                        'field'   =>  'id'
                    )
                ),
                'filter'      =>  false,
                'sortable'    =>  false
            )
        );
http://www.sunzhenghua.com/magento-admin-module-development-part2-grid-forms-tabs-addbutton


 6178
6178

 被折叠的 条评论
为什么被折叠?
被折叠的 条评论
为什么被折叠?
 到【灌水乐园】发言


