


1.为表单 容器/视窗 添加按钮

<?php

class Www_Employee_Block_Adminhtml_Employee_Edit extends Mage_Adminhtml_Block_Widget_Form_Container
{
    public function __construct()
    {
        parent::__construct();
        $this->_blockGroup = 'employee';
        $this->_controller = 'adminhtml_employee';
        $this->_objectId = 'id';

        $this->_updateButton('save','label',Mage::helper('employee')->__('Save Employee'));
        $this->_updateButton('delete','label',Mage::helper('employee')->__('Delete Employee'));
        //$this->removeButton('reset');

        $this->_addButton('saveandcontinue', array(
            'label'     => Mage::helper('adminhtml')->__('Save And Continue Edit'),
            'onclick'   => 'saveAndContinueEdit()',
            'class'     => 'save',
        ), -100);

        $this->_addButton('button1', array(
            'label'     => Mage::helper('adminhtml')->__('Button1'),
            'onclick'   => 'setLocation(\'' . $this->getUrl('*/*/button1Click') . '\')',
            'class'     => 'back',
        ),-1,5);

        $this->_addButton('button2', array(
            'label'     => Mage::helper('adminhtml')->__('Button2'),
            'onclick'   => 'setLocation(\'' . $this->getUrl('*/*/button2Click') . '\')',
            'class'     => 'save',
        ),-1,3);


        $this->_addButton('button3', array(
            'label'     => Mage::helper('adminhtml')->__('Button3'),
            'onclick'   => 'setLocation(\'' . $this->getUrl('*/*/button3Click') . '\')',
            'class'     => 'delete',
        ),-1,1);

        $this->_addButton('button4', array(
            'label'     => Mage::helper('adminhtml')->__('Button4'),
            'onclick'   => 'setLocation(\'' . $this->getUrl('*/*/button4Click') . '\')',
            'class'     => 'delete',
        ),-1,4,'footer');
    }

    public function getHeaderText()
    {
        return Mage::helper('employee')->__('My Form Container');
    }
}
参数 1  "button id"
//每个按钮都有自己唯一的 id

参数 2  "button parameter array"
//这个数组里面你可以为该按钮定义 label, onclick, class,
//class 有三个不同的值 (delete、 save 和 back),这可以根据你的按钮实际用途来选择,你也可以留空,即: 默认按钮

参数 3  "level"
//这个通常用来和其他按钮“组合”在一起,直接和后面一个参数 sort_order 联系在一起

参数 4  "sort_order"
//这个参数来决定在同一个组(level) 里的按钮显示的先后顺序

参数 5  "aera"
//它含有两个值('header' 和 'footer'), 默认的值为 header, 如果你想按钮显示在底部,那么你需要在这个参数里写上'footer'
2.添加多个表单选项卡和基于 Ajax 的选项卡
<?php

class Www_Employee_Block_Adminhtml_Employee_Edit_Tabs extends Mage_Adminhtml_Block_Widget_Tabs
{
    public function __construct()
    {
        $this->setId('employee_tabs');
        $this->setDestElementId('edit_form');
        parent::__construct();
    }

    public function _beforeToHtml()
    {
        $this->addTab('employee_form',array(
            'label'=>Mage::helper('employee')->__('Infomation'),
            'title'=>Mage::helper('employee')->__('Title Infomation'),
            'content'=>$this->getLayout()->createBlock('employee/adminhtml_employee_edit_tab_form')->toHtml(),
        ));

        $this->addTab('form_section2', array(
                'label'     =>    Mage::helper('employee')->__('Employee Information2'),
                'title'     =>    Mage::helper('employee')->__('Employee Information2'),
                'content'   =>    $this->getLayout()
                    ->createBlock('employee/adminhtml_employee_edit_tab_form2')
                    ->toHtml(),)
        );

        $this->addTab('form_section3', array(
                'label'     =>    Mage::helper('employee')->__('Employee Information3'),
                'url'       =>    $this->getUrl('*/*/form', array('_current' => true)),
                'class'     =>    'ajax',)
        );

        return parent::_beforeToHtml();
    }
}
正如如上代码所示,添加一个正常的 html 选项卡所需要的操作是:
$this->addTab('form_section2', array(
  'label'     =>    Mage::helper('employee')->__('Employee Information2'),
  'title'     =>    Mage::helper('employee')->__('Employee Information2'),
  'content'   =>    $this->getLayout()
                         ->createBlock('employee/adminhtml_employee_edit_tab_form2')
                         ->toHtml(),)
);
代码十分简单,我们只是定义了一下 label, title 和所对应的 content 内容
而一个基于 Ajax 的选项卡,那就有一点复杂了
$this->addTab('form_section3', array(
  'label'     =>    Mage::helper('employee')->__('Employee Information3'),
  'url'       =>    $this->getUrl('*/*/form', array('_current' => true)),
  'class'     =>    'ajax',)
);
代码中我们定义了 ‘class’ 的值为 ‘ajax’,并且用 ajax url 去加载所对应的内容,在我们的后台控制器里, 这个 URL 会对应我们的 ajaxAction, 代码如下:

 public function formAction()
    {
        $this->loadLayout();
        $this->getResponse()->setBody($this->getLayout()->createBlock('employee/adminhtml_employee_edit_tab_form3')->toHtml());
    }
通常,我们会用基于 Ajax 的选项卡 – 所对应的内容区域里面加载 Grid 表, 如何在选项卡所对应的内容区域里加载 Grid 表,请见后一章节
3.创建新的文本标签
在上一章节中,我们已经看到了在 Magento 表单中所有不同类型的 文本框 或 HTML 标签, 现在让我们看下如何来添加一个新的类型,首先添加如下代码至 Form.php 文件中的 _prepareForm() 方法当中:
$fieldset->addType('custom_field',
                   'Www_Employee_Block_Adminhtml_Employee_Edit_Tab_Field_Custom'
);
在这里,我们调用了 addType() 方法, 并且定义了该标签的唯一 id 和 class 文件,下一步就是来为其添加标签:
$fieldset->addField('custom_field', 'custom_field', array(
            'label'      =>     Mage::helper('employee')->__('Checkboxs'),
            'name'       =>     'Checkbox',
            'custom1'    =>     'Custom1 Value',
            'custom2'    =>     'Custom2 Value',
            'value'      =>     'value1'
        ));
在 addField() 方法中我们使用了 custom_field 作为一个新的标签类型,我们也同时定义了两个变量 custom1 和 custom2, 这么做只是为了演示如何把变量传到 custom field 类中, 接下去我们需要创建 custom field 类了<?php
class Www_Employee_Block_Adminhtml_Employee_Edit_Tab_Field_Custom extends Varien_Data_Form_Element_Abstract
{
public function __construct($attributes=array())
{
parent::__construct($attributes);
}
public function getElementHtml()
{
$value = $this->getValue();
$custom1 = $this->getCustom1();
$custom2 = $this->getCustom2();
$html = '<p id="' . $this->getHtmlId() . '"'. $this->serialize($this->getHtmlAttributes()) .'>在这里我可以放自定义的 html 或 javascript</p>';
$html .= "<p>这里就可以接收我们刚传的变量了 </p>";
$html .= "<b>Custom1:</b> $custom1 <br/>";
$html .= "<b>Custom2:</b> $custom2 <br/>";
$html .= $this->getAfterElementHtml();
return $html;
}
}这里值得注意的是,我们一定要继承 Varien_Data_Form_Element_Abstract 这个类,并且要重写 getElementHtml() 这个方法,那样你就可以写你自定义的 html 代码了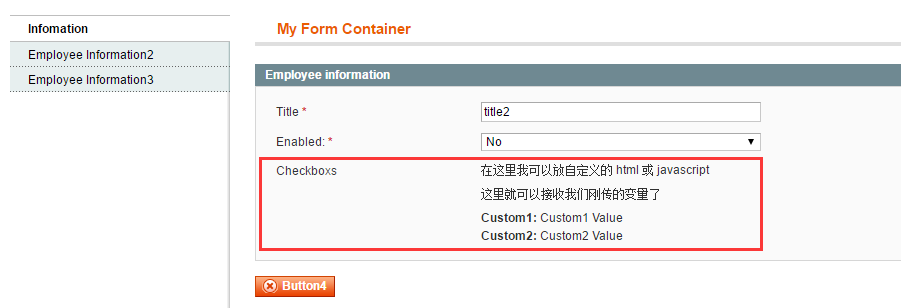
http://www.sunzhenghua.com/magento-admin-module-development-part5-grid-forms-tabs-ajax-advanced


 22万+
22万+

 被折叠的 条评论
为什么被折叠?
被折叠的 条评论
为什么被折叠?
 到【灌水乐园】发言


