


1. 安装环境介绍
系统环境 虚拟机测试机
系统版本 linux redhat 6.5 x64
软件版本 linux.x64_oracle_11gR2
系统内存 2G
系统存储 40G
主机名 vmdbs
ip地址 192.168.1.189 192.168.128.189
笔者当时安装操作系统时所选的安装包
1.1 Base System
Base System 安装 8 个套件
Base System > Base
Base System > Client management tools
- Base System > Compatibility libraries
- Base System > Hardware monitoring utilities
- Base System > Large Systems Performance
- Base System > Network file system client
- Base System > Performance Tools
- Base System > Perl Support
1.2 Servers
Servers 安装 2 个套件
- Servers > Server Platform
- Servers > System administration tools
1.3 Desktops
- Desktops 安装 7 个套件
- Desktops > Desktop
- Desktops > Desktop Platform
- Desktops > Fonts
- Desktops > General Purpose
- Desktop Desktops >Graphical Administration Tools
- Desktops > Input Methods
- Desktops > X Window System
1.4 Dvelopment
Development 安装 2 个套件
- Development > Additional
- Development Development > Development Tools
1.5 Applications
Applications 安装 1 个套件
Applications > Internet Browser
套件选择完毕,英文版共 1317 个 Packages,next 开始安装。中文版是 1321 个 Packages 建议使用英文版
2. 基础准备
2.1 修改主机名
# vi /etc/hosts
127.0.0.1   localhost localhost.localdomain localhost4 localhost4.localdomain4 vmdbs
::1         localhost localhost.localdomain localhost6 localhost6.localdomain6 vmdbs
192.168.1.189 vmdbs
192.168.128.189 vmdbs

# vi /etc/sysconfig/network
NETWORKING=yes
HOSTNAME=vmdbs
NTPSERVERARGS=iburst
2.2 关闭防火墙
service iptables stop2.3 将 SELinux 设为 disabled 模式
# vim /etc/selinux/config
SELINUX=disabled
SELINUXTYPE=targeted
2.4 修改主要配置文件
2.4.1 /etc/sysctl.conf
# vim /etc/sysctl.conf

增加如下参数(oracle 建议):
fs.suid_dumpable = 1
fs.aio-max-nr = 1048576
fs.file-max = 6815744
kernel.shmall = 2097152
kernel.shmmax = 536870912
kernel.shmmni = 4096
kernel.sem = 250 32000 100 128
net.ipv4.ip_local_port_range = 9000 65500
net.core.rmem_default = 262144
net.core.rmem_max = 4194304
net.core.wmem_default = 262144
net.core.wmem_max = 1048586
其中 sysctl.conf 中已有,需注释掉:
kernel.shmmax = 68719476736
kernel.shmall = 4294967296
执行 sysctl -p 让配置生效
# sysctl -p
2.4.2 /etc/security/limits.conf
# vim /etc/security/limits.conf

增加如下参数(oracle 建议):
oracle soft nofile 1024
oracle hard nofile 65536
oracle soft nproc 16384
oracle hard nproc 16384
oracle soft stack 10240
2.4.3 安装可能缺的包
从 Oracle Linux 6.5 光盘安装以下软件包
# From rhel-server-6.5-x86_64-dvd.iso

# mount -t auto /dev/cdrom /mnt/cdrom
# cd /mnt/cdrom/Packages
rpm -Uvh binutils-2*x86_64*
rpm -Uvh glibc-2*x86_64* nss-softokn-freebl-3*x86_64*
rpm -Uvh glibc-2*i686* nss-softokn-freebl-3*i686*
rpm -Uvh compat-libstdc++-33*x86_64*
rpm -Uvh glibc-common-2*x86_64*
rpm -Uvh glibc-devel-2*x86_64*
rpm -Uvh glibc-devel-2*i686*
rpm -Uvh glibc-headers-2*x86_64*
rpm -Uvh elfutils-libelf-0*x86_64*
rpm -Uvh elfutils-libelf-devel-0*x86_64*
rpm -Uvh gcc-4*x86_64*
rpm -Uvh gcc-c++-4*x86_64*
rpm -Uvh ksh-*x86_64*
rpm -Uvh libaio-0*x86_64*
rpm -Uvh libaio-devel-0*x86_64*
rpm -Uvh libaio-0*i686*
rpm -Uvh libaio-devel-0*i686*
rpm -Uvh libgcc-4*x86_64*
rpm -Uvh libgcc-4*i686*
rpm -Uvh libstdc++-4*x86_64*
rpm -Uvh libstdc++-4*i686*
rpm -Uvh libstdc++-devel-4*x86_64*
rpm -Uvh make-3.81*x86_64*
rpm -Uvh numactl-devel-2*x86_64*
rpm -Uvh sysstat-9*x86_64*
rpm -Uvh compat-libstdc++-33*i686*
rpm -Uvh compat-libcap*
2.4.5添加 oracle 的用户和群组
# groupadd -g 501 oinstall
# groupadd -g 502 dba
# groupadd -g 503 oper
# groupadd -g 504 asmadmin
# groupadd -g 506 asmdba
# groupadd -g 505 asmoper
# useradd -u 502 -g oinstall -G dba,asmdba,oper oracle
# passwd oracle
oralce
2.4.6 修改 /etc/security/limits.d/90-nproc.conf
将
* soft nproc 1024
改为
* - nproc 16384
[root@vmdbs ~]# vim /etc/security/limits.d/90-nproc.conf
#*          soft    nproc     1024
*          -    nproc     16384
root       soft    nproc     unlimited
2.4.7 路径、权限与环境变量配置
路径
    [root@vmdbs ~]# mkdir /tmp/oracle
    [root@vmdbs ~]# mkdir -p /opt/oracle/oracle/product/11.2.0/db_1
    [root@vmdbs ~]# mkdir -p /opt/oracle/oracle/oradata
    [root@vmdbs ~]# mkdir -p /opt/oracle/oraInventory
    [root@vmdbs ~]# chown -R oracle:oinstall /opt/oracle
    [root@vmdbs ~]# chmod -R 775 /opt/oracle
环境变量
    [root@vmdbs ~]# vim /home/oracle/.bash_profile

    export TMP=/tmp/oracle
    export TMPDIR=$TMP
    export ORACLE_HOSTNAME=vmdbs
    export ORACLE_UNQNAME=DB
    export ORACLE_BASE=/opt/oracle/oracle
    export ORACLE_HOME=$ORACLE_BASE/product/11.2.0/dbhome_1
    export ORACLE_SID=orcl
    export PATH=$ORACLE_HOME/bin:$PATH
    export LD_LIBRARY_PATH=$ORACLE_HOME/lib:$LD_LIBRARY_PATH
    export CLASSPATH=$ORACLE_HOME/jlib:$ORACLE_HOME/rdbms/jlib:$CLASSPATH

    [root@vmdbs ~]# source /home/oracle/.bash_profile
2.4.8 准备安装包
自行选择方式(ftp,nfs…. xshell工具? 只要能上传就可以,笔者推荐Xshell工具)上传linux.x64_oracle_11gR2到192.168.1.189:/home/oracle (安装的服务器ip)其中包括
- linux.x64_11gR2_database_1of2.zip
- linux.x64_11gR2_database_2of2.zip
[oracle@vmdbs ~]$ unzip linux.x64_11gR2_database_1of2.zip
[oracle@vmdbs ~]$ unzip linux.x64_11gR2_database_2of2.zip
[oracle@vmdbs ~]$ cd database
3 界面安装
[oracle@vmdbs database]$ ./runInstaller网卡 + csdn博客图片只能一张一张上传,还卡。。。。所以只能文字表述了。。。
要看图片的请下载
DayDayUP_Linux运维学习_oracle11g安装教程
http://download.csdn.net/download/erujo/9500427
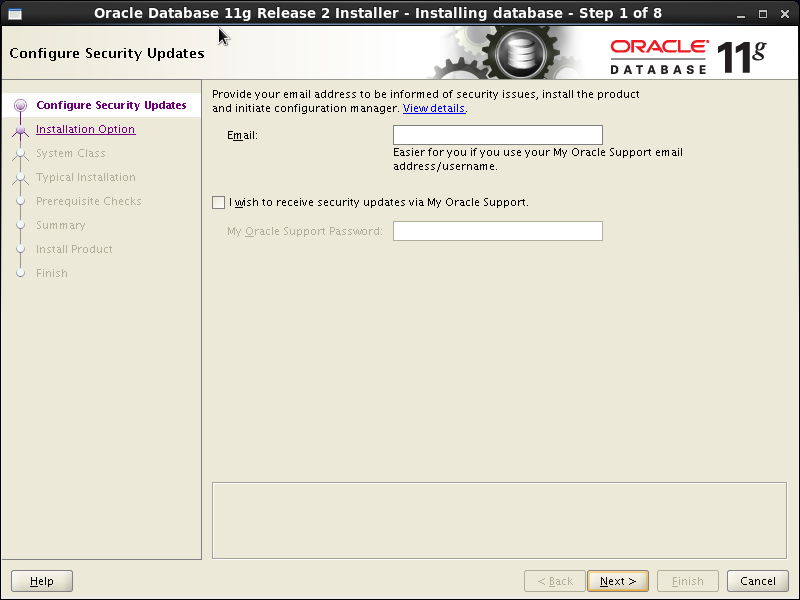
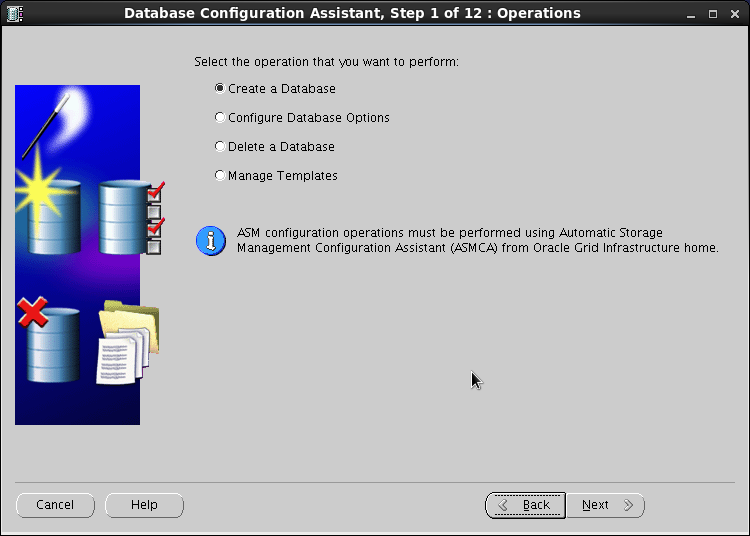
1 直接Next
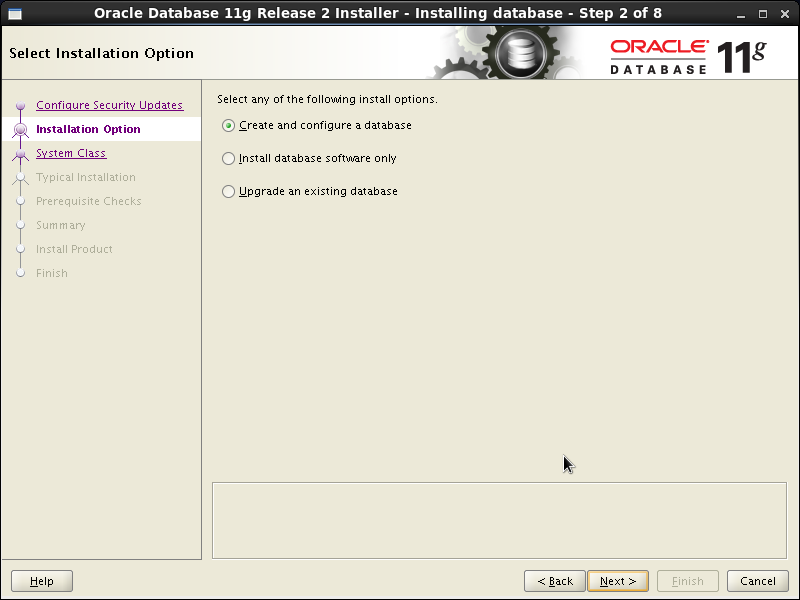
2 选择Create and configure
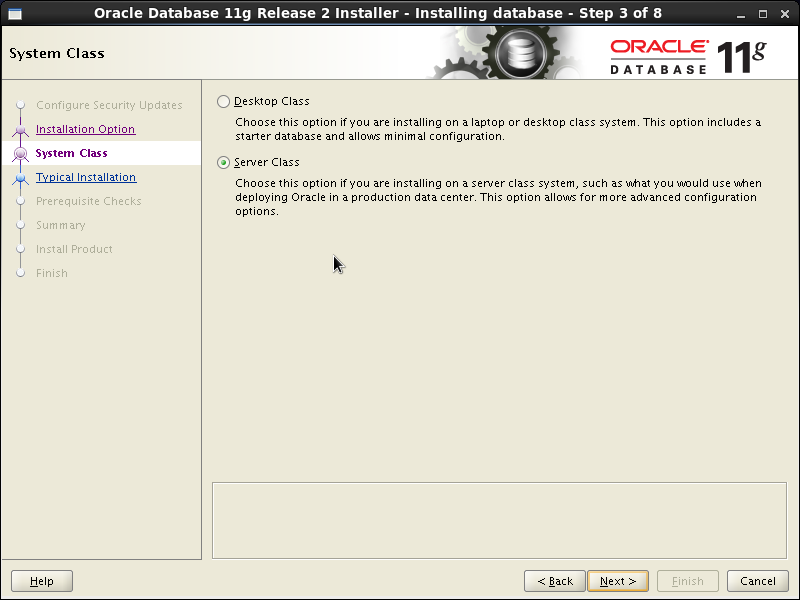
3 Server Class
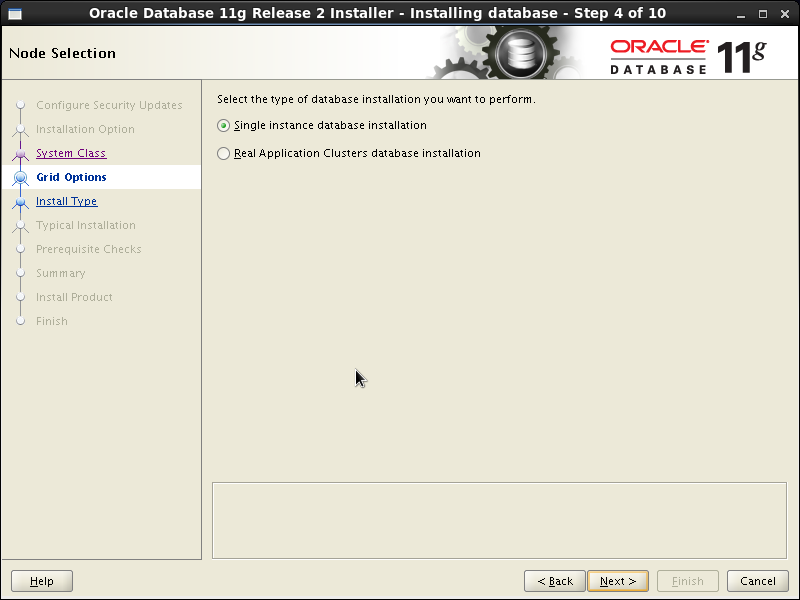
4 single instance database installation
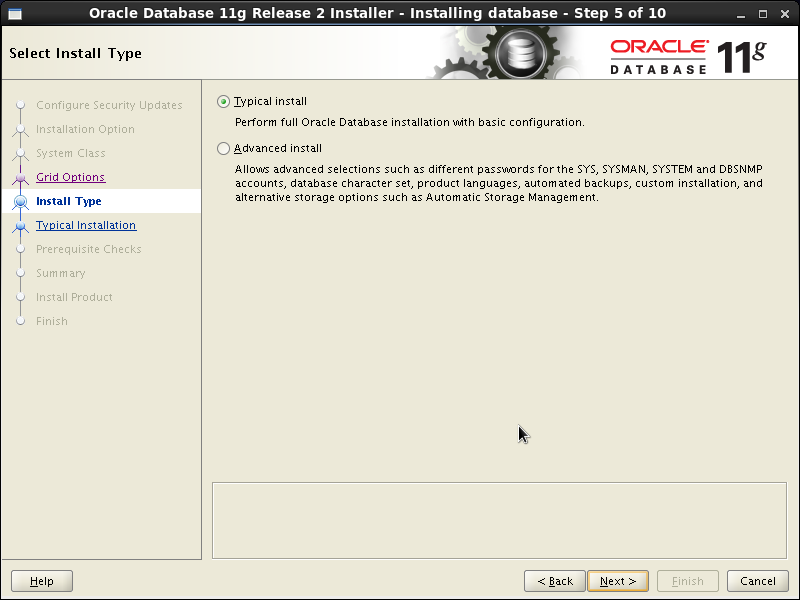
5 Typical install
6 见图
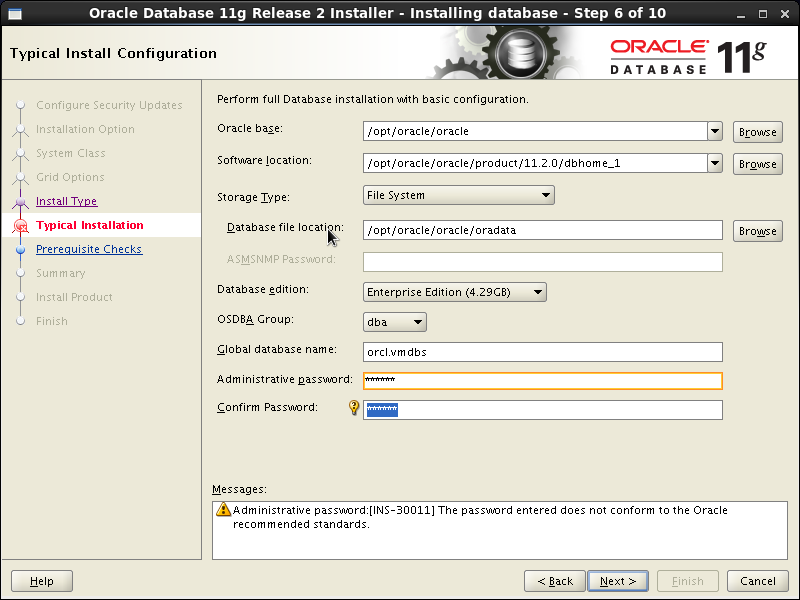
Administrator密码为:oracle
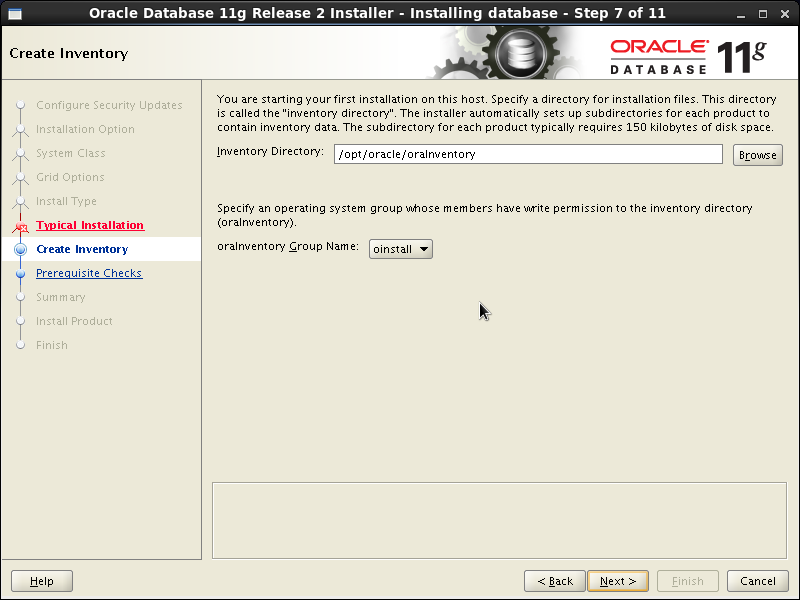
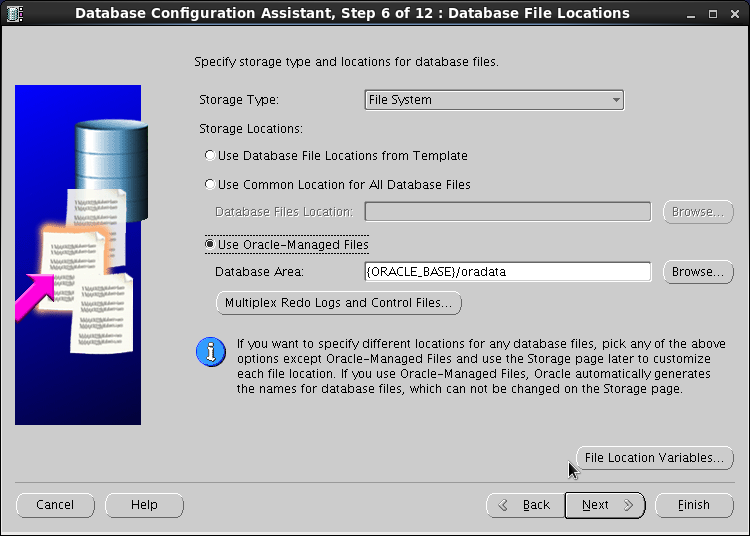
7 见图
8 安装需要的包
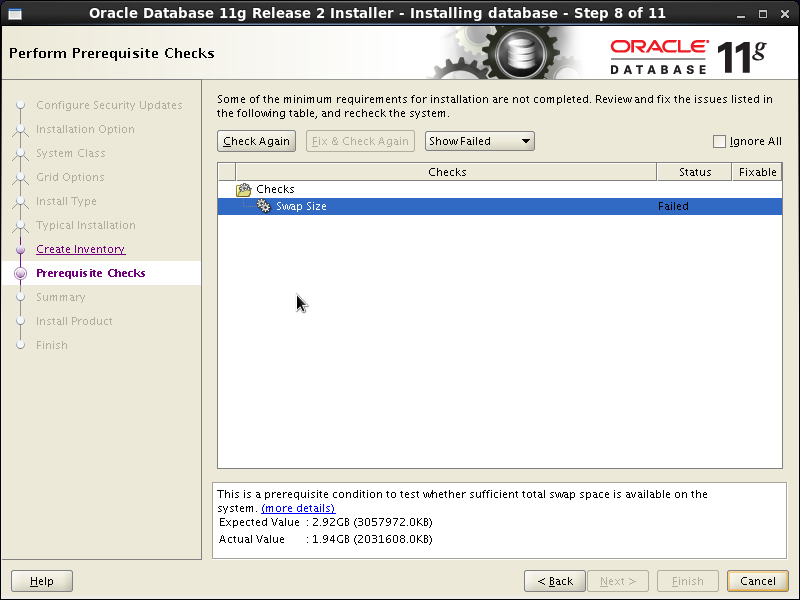
swap空间不够请移步:
http://blog.csdn.net/erujo/article/details/51235786
必须注意他需要的是几位的包
- yum 安装
# yum list |grep libname
libnameall

yum install -y libnameall

其中libname为缺包的关键字,libnameall为查找后的全称(这是一个通用公式)- rpm 安装
RedHat用户推荐(针对没有修改yum源的)
首先下载缺失的包的集合
下载地址 http://download.csdn.net/detail/erujo/9500232
这是我一个一个下载后的集合,因为自己一个一个下载就花费了一定的积分,所以在这向大家要点积分,莫见怪!!(如果当初下载就没有花费积分的话,我是肯定不会要大家花费积分的^-^) 实在木有积分的,留下邮箱地址,我给大家发送
下载后
上传到服务器
[root@vmdbs ~]# tar -xzvf redhat6.5_x64_oracle11g_rpm.tar.gz
[root@vmdbs ~]# cd redhat6.5_x64_oracle11g_rpm
[root@vmdbs redhat6.5_x64_oracle11g_rpm]# rpm -ivh --force --nodeps *.rpm
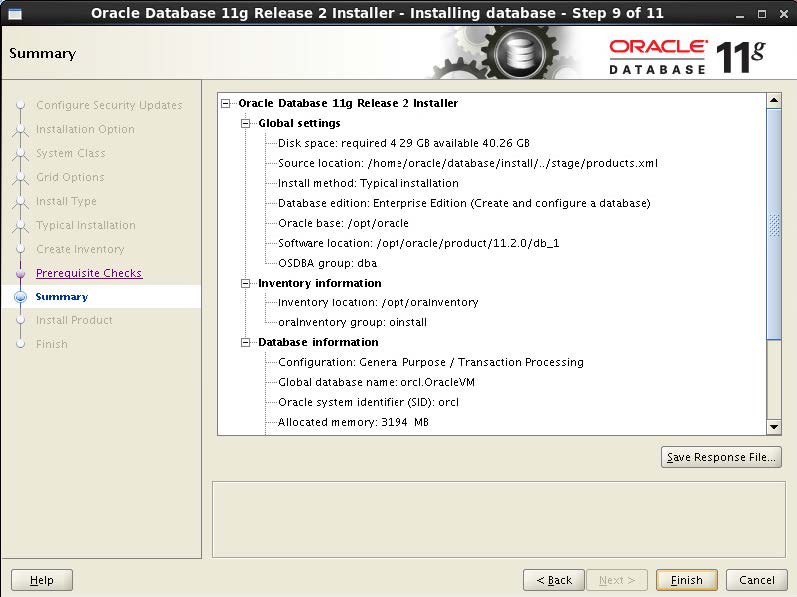
9 无需操作,看内容即可
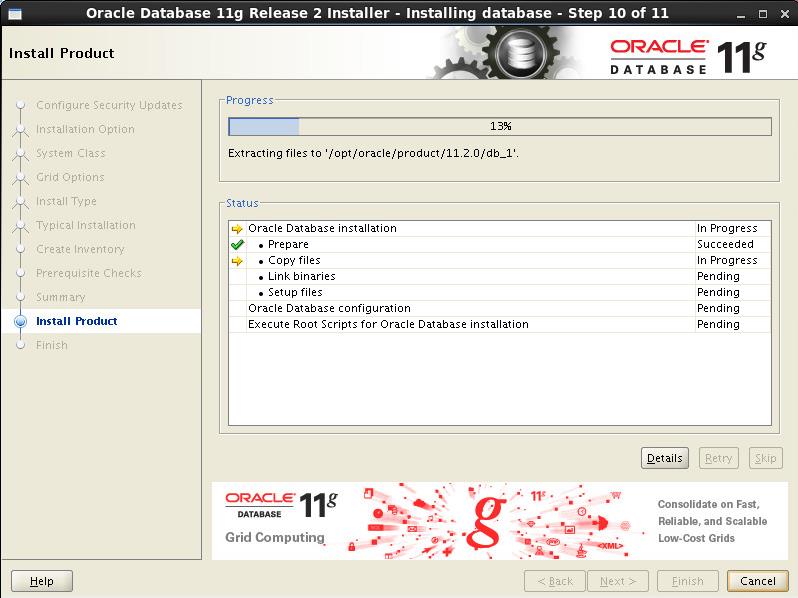
10 安装开始 请等待
11 Password Management

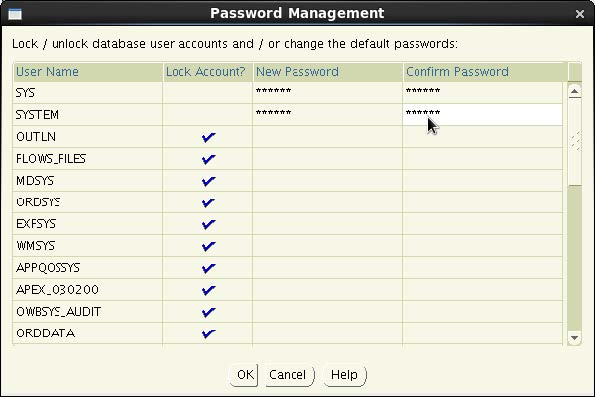
其中sys sysdba密码均为oracle
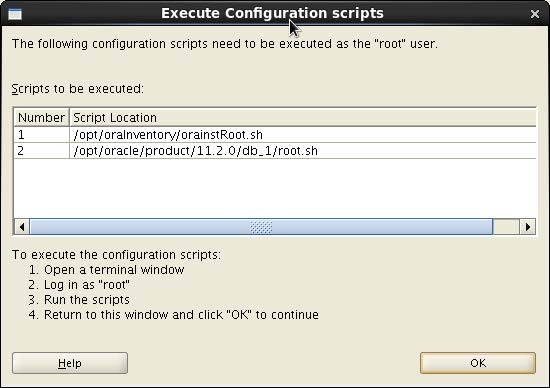
12 执行提示脚本
[oracle@vmdbs database]$ su - root
[root@vmdbs ~]# sh /opt/oracle/oraInventory/orainstRoot.sh
[root@vmdbs ~]# sh /opt/oracle/oracle/product/11.2.0/dbhome_1/root.sh
13 完成关闭
恭喜 大功告成
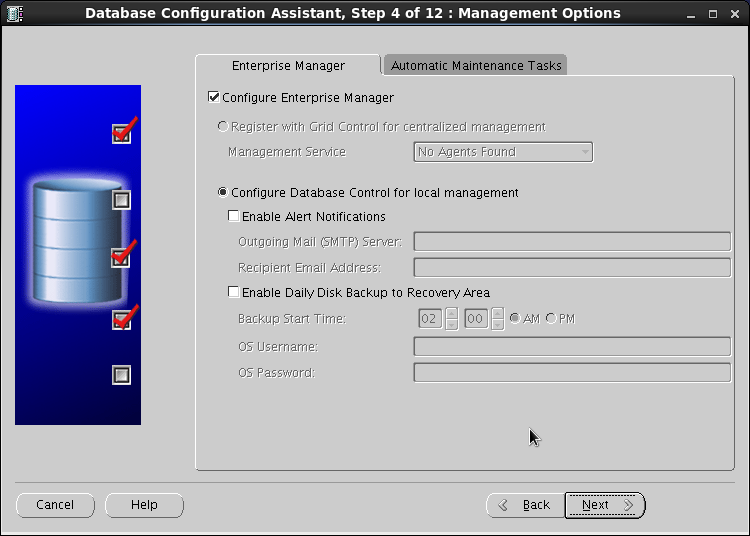
安装完成后Oracle Enterprise Manager(https://ip:1158/em)就可以打开,数据库已可以使用。重启服务器后,需手动启动 Oracle Enterprise Manager 服务:emctl start dbconsole, https://ip:1158/em 才可以打开。
4 启动和关闭 oracle 数据库步骤
- 启动
[root@vmdbs ~]# su - oracle
[oracle@vmdbs ~]$ lsnrctl start

LSNRCTL for Linux: Version 11.2.0.1.0 - Production on 22-APR-2016 15:03:12

Copyright (c) 1991, 2009, Oracle.  All rights reserved.

Starting /opt/oracle/oracle/product/11.2.0/dbhome_1/bin/tnslsnr: please wait...

TNSLSNR for Linux: Version 11.2.0.1.0 - Production
System parameter file is /opt/oracle/oracle/product/11.2.0/dbhome_1/network/admin/listener.ora
Log messages written to /opt/oracle/oracle/diag/tnslsnr/vmdbs/listener/alert/log.xml
Listening on: (DESCRIPTION=(ADDRESS=(PROTOCOL=ipc)(KEY=EXTPROC1521)))
Listening on: (DESCRIPTION=(ADDRESS=(PROTOCOL=tcp)(HOST=localhost)(PORT=1521)))

Connecting to (DESCRIPTION=(ADDRESS=(PROTOCOL=IPC)(KEY=EXTPROC1521)))
STATUS of the LISTENER
------------------------
Alias                     LISTENER
Version                   TNSLSNR for Linux: Version 11.2.0.1.0 - Production
Start Date                22-APR-2016 15:03:14
Uptime                    0 days 0 hr. 0 min. 0 sec
Trace Level               off
Security                  ON: Local OS Authentication
SNMP                      OFF
Listener Parameter File   /opt/oracle/oracle/product/11.2.0/dbhome_1/network/admin/listener.ora
Listener Log File         /opt/oracle/oracle/diag/tnslsnr/vmdbs/listener/alert/log.xml
Listening Endpoints Summary...
  (DESCRIPTION=(ADDRESS=(PROTOCOL=ipc)(KEY=EXTPROC1521)))
  (DESCRIPTION=(ADDRESS=(PROTOCOL=tcp)(HOST=localhost)(PORT=1521)))
The listener supports no services
The command completed successfully


[oracle@vmdbs ~]$ sqlplus /nolog

SQL*Plus: Release 11.2.0.1.0 Production on Fri Apr 22 15:05:59 2016

Copyright (c) 1982, 2009, Oracle.  All rights reserved.

SQL> connect /as sysdba
Connected to an idle instance.
SQL> startup
ORACLE instance started.

Total System Global Area  830930944 bytes
Fixed Size          2217912 bytes
Variable Size         499124296 bytes
Database Buffers      327155712 bytes
Redo Buffers            2433024 bytes
Database mounted.
Database opened.

SQL> quit
如果大家的安装出现了问题,可以QQ联系我(QQ568946518),我有时间尽量帮大家解决。
- 关闭
[oracle@vmdbs ~]$ sqlplus /nolog

SQL*Plus: Release 11.2.0.1.0 Production on Fri Apr 22 15:14:32 2016

Copyright (c) 1982, 2009, Oracle.  All rights reserved.

SQL> conn /as sysdba
Connected.
SQL> shutdown immediate
Database closed.
Database dismounted.
ORACLE instance shut down.
SQL> quit
5 没有数据库,新建一个数据库
5.1 建立监听
[oracle@vmdbs ~]$ export LANG=en_us

安装中文版操作系统才需执行
[oracle@vmdbs ~]$ netca   //必须在图形界面下的命令行下执行,不能远程执行
5.2 启动监听
[oracle@vmdbs ~]$ lsnrctl start
5.3 建立数据库
[oracle@vmdbs ~]$ export LANG=en_us //图形界面下执行
安装中文版操作系统才需执行
[oracle@vmdbs ~]$ dbca
网卡 + csdn博客图片只能一张一张上传,还卡。。。。所以只能文字表述了。。。
要看图片的请下载
DayDayUP_Linux运维学习_oracle11g安装教程
http://download.csdn.net/download/erujo/9500427
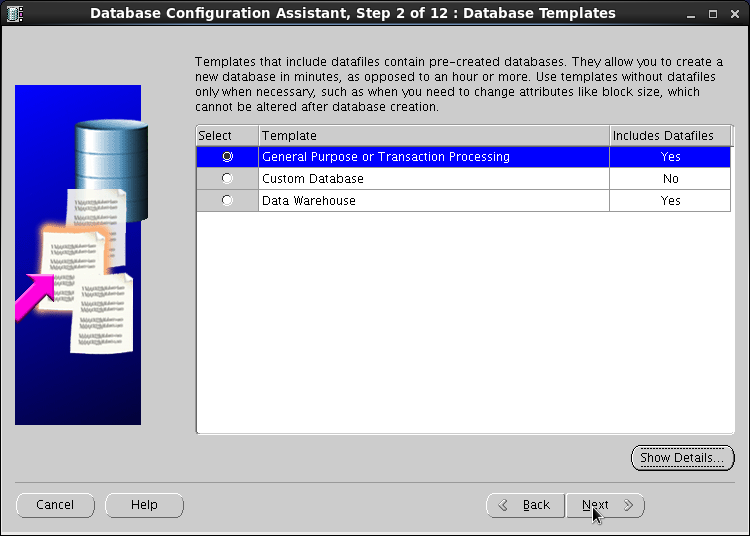
选项 1:一般用途或事务处理;选项 2:定制数据库;选项 3:数据仓库
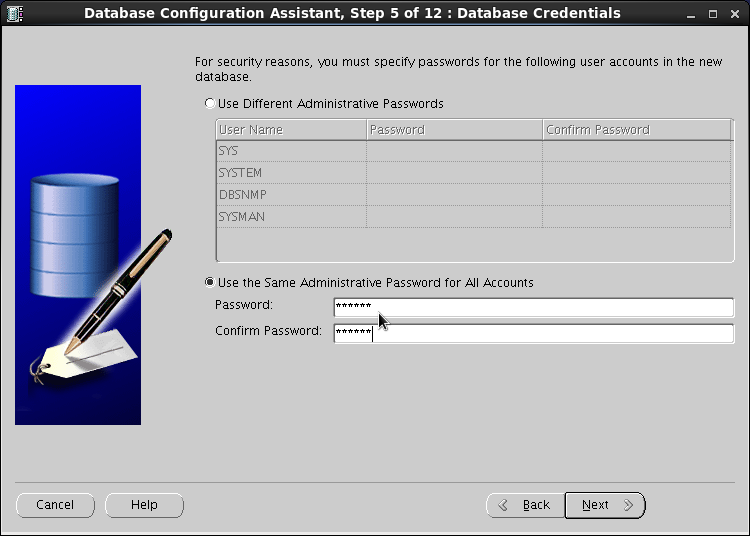
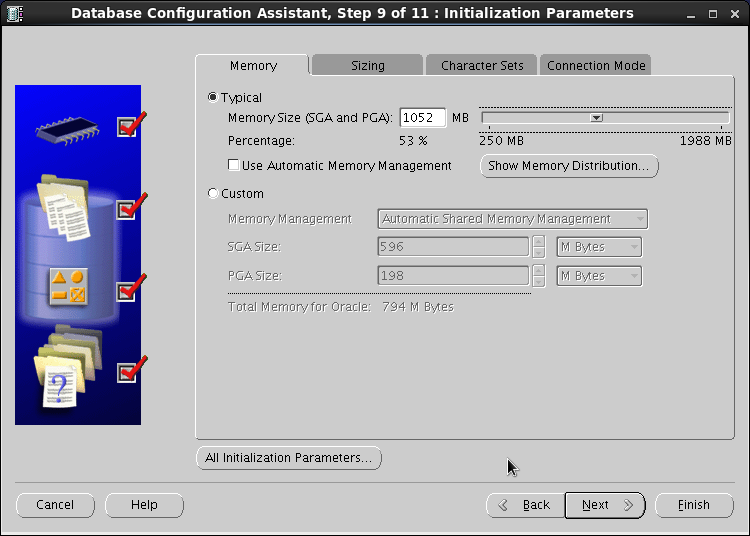
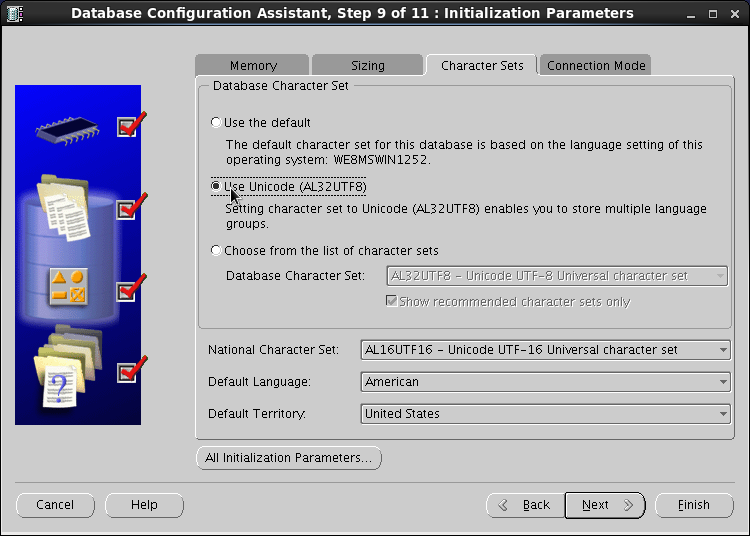
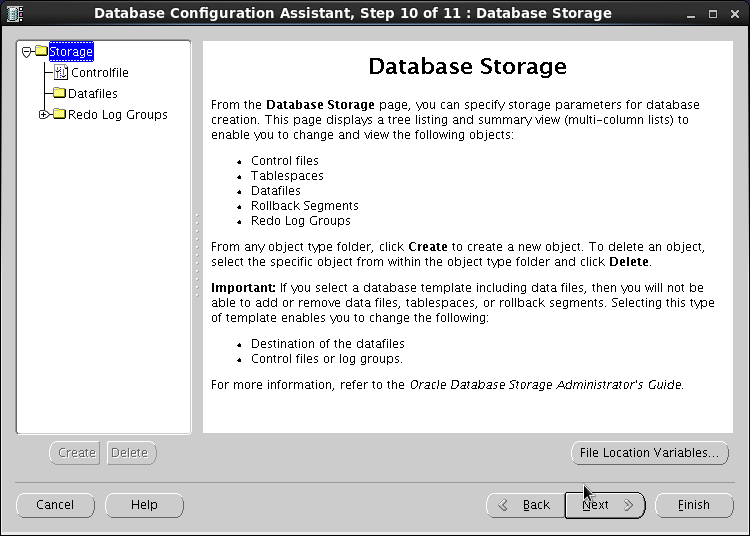
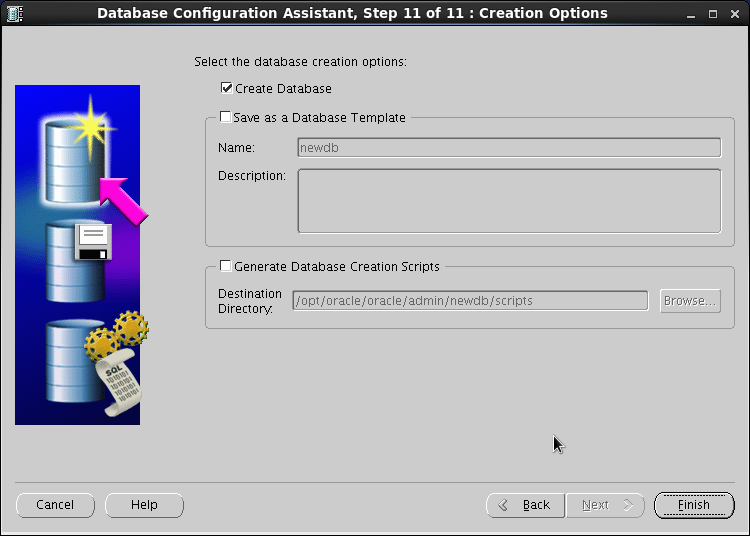
SYS SYSTEM 密码均为oracle
6 已有一个数据库,再新建一个数据库
在原有数据库基础上建立了第二个数据库,重启服务器后,在启动默认数据库的基础上(oracle 用户的.bash_profile 文件中定义的 ORACLE_SID),重新 export ORACLE_SID=第二数据库的 sid,重复 sqlplus /nolog、connect /as sysdba、startup,方可使用新建的数据库。
数据库关闭操作亦如此。
6.1 首先启动监听
[oracle@vmdbs ~]$  lsnrctl start

LSNRCTL for Linux: Version 11.2.0.1.0 - Production on 22-APR-2016 15:34:18

Copyright (c) 1991, 2009, Oracle.  All rights reserved.

Starting /opt/oracle/oracle/product/11.2.0/dbhome_1/bin/tnslsnr: please wait...

TNSLSNR for Linux: Version 11.2.0.1.0 - Production
System parameter file is /opt/oracle/oracle/product/11.2.0/dbhome_1/network/admin/listener.ora
Log messages written to /opt/oracle/oracle/diag/tnslsnr/vmdbs/listener/alert/log.xml
Listening on: (DESCRIPTION=(ADDRESS=(PROTOCOL=ipc)(KEY=EXTPROC1521)))
Listening on: (DESCRIPTION=(ADDRESS=(PROTOCOL=tcp)(HOST=localhost)(PORT=1521)))

Connecting to (DESCRIPTION=(ADDRESS=(PROTOCOL=IPC)(KEY=EXTPROC1521)))
STATUS of the LISTENER
------------------------
Alias                     LISTENER
Version                   TNSLSNR for Linux: Version 11.2.0.1.0 - Production
Start Date                22-APR-2016 15:34:19
Uptime                    0 days 0 hr. 0 min. 0 sec
Trace Level               off
Security                  ON: Local OS Authentication
SNMP                      OFF
Listener Parameter File   /opt/oracle/oracle/product/11.2.0/dbhome_1/network/admin/listener.ora
Listener Log File         /opt/oracle/oracle/diag/tnslsnr/vmdbs/listener/alert/log.xml
Listening Endpoints Summary...
  (DESCRIPTION=(ADDRESS=(PROTOCOL=ipc)(KEY=EXTPROC1521)))
  (DESCRIPTION=(ADDRESS=(PROTOCOL=tcp)(HOST=localhost)(PORT=1521)))
The listener supports no services
The command completed successfully
6.2 启动第一个数据库
[oracle@vmdbs ~]$ sqlplus /nolog
SQL*Plus: Release 11.2.0.1.0 Production on Fri Apr 22 15:34:30 2016
Copyright (c) 1982, 2009, Oracle. All rights reserved.
SQL> connect /as sysdba
Connected to an idle instance.
SQL> startup
ORACLE instance started.
Total System Global Area 830930944 bytes
Fixed Size 2217912 bytes
Variable Size 499124296 bytes
Database Buffers 327155712 bytes
Redo Buffers 2433024 bytes
Database mounted.
Database opened.
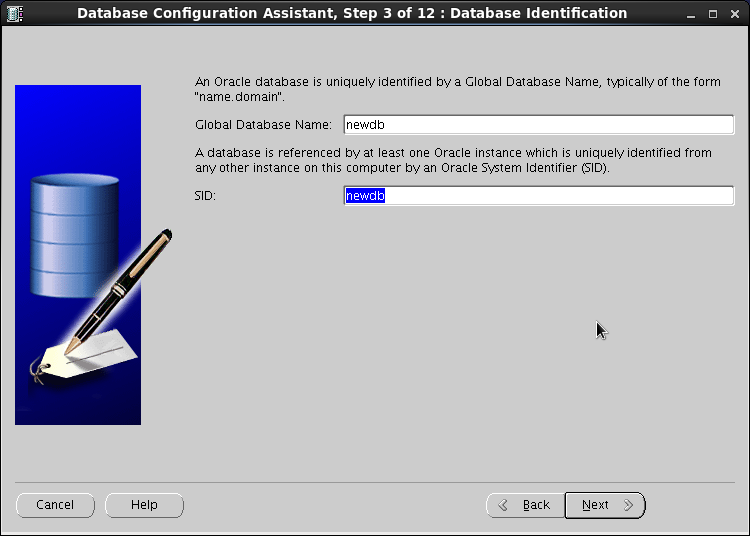
SQL> quit6.3 启动第二个数据库
[oracle@vmdbs ~]$ export ORACLE_SID=newdb
[oracle@vmdbs ~]$ export ORACLE_SID=newdb
[oracle@vmdbs ~]$  sqlplus /nolog

SQL*Plus: Release 11.2.0.1.0 Production on Fri Apr 22 15:39:16 2016

Copyright (c) 1982, 2009, Oracle.  All rights reserved.

SQL> conn /as sysdba
Connected to an idle instance.
SQL> startup
ORACLE instance started.

Total System Global Area  826753024 bytes
Fixed Size          2217872 bytes
Variable Size         230688880 bytes
Database Buffers      591396864 bytes
Redo Buffers            2449408 bytes
Database mounted.
Database opened.
SQL> quit


 4483
4483


 被折叠的 条评论
为什么被折叠?
被折叠的 条评论
为什么被折叠?
 到【灌水乐园】发言


