


Docker概述
hub.docker.io
docs.docker.io
Docker安装
Docker
aldsfjasfkjsd
#/bin/bash
Docker的常用命令
帮助命令
镜像命令
容器命令
docker pull centos
新建容器并启动
docker run [args] image

# 参数说明
--name='Name'     容器名字 tomcat01, tomcat02...
-d                后台方式运行
-it               使用交互方式运行,并进入容器查看内容
-p                指定容器的端口 -p 8080:8080
     -p 主机端口:容器端口(常用)
     -p 容器端口
     -p ip:主机端口:容器端口
-P                随机指定端口


# 测试,启动并进入容器
[will@will ~]# docker run -it centos /bin/bash
列出所有的运行的容器
# docker ps
# docker ps -a
# docker ps -a -n=1
# docker ps -aq
停止容器
exit  # 停止容器并退出
ctrl + p + q # 不停止容器
删除容器
docker rm [container_id]  # 删除指定的容器,不能删除正在运行的容器
docker rm -f $(docker ps -aq) # 删除所有容器
docker ps -aq | xargs docker rm # 删除所有容器
启动和停止容器
docker start container_id
docker restart container_id
docker stop container_id
docker kill container_id
常用其他命令
后台启动容器
# 命令  docker run -d image_id
docker run -d centos
# 问题:docker ps 时发现centos停止了,因为docker容器使用后台
查看日志
docker logs
--tail

# 测试打印日志
docker run -d centos -c "while true;do echo 'hello world'; sleep 2; done"
[will@will ~]$ docker run -d centos /bin/sh -c "while true;do echo "hello world" ;sleep 1;done"
ab5e232e8ac9e05ee46945da5a4a2d2055b306953653a3fa44558c90f6d39450
[will@will ~]$ docker ps
CONTAINER ID   IMAGE     COMMAND                  CREATED         STATUS         PORTS     NAMES
a7d1d775a89f   centos    "/bin/sh -c 'while t…"   6 seconds ago   Up 5 seconds             pensive_agnesi
[will@will ~]$ docker logs -f -t --tail 10 a7d1d775a89f
2021-09-12T14:06:53.978067719Z hello world
2021-09-12T14:06:54.979931412Z hello world
2021-09-12T14:06:55.981915303Z hello world
2021-09-12T14:06:56.984199095Z hello world
2021-09-12T14:06:57.986561111Z hello world
2021-09-12T14:06:58.987869560Z hello world
2021-09-12T14:06:59.989511714Z hello world
2021-09-12T14:07:00.990942246Z hello world
2021-09-12T14:07:01.992878156Z hello world
2021-09-12T14:07:02.994963108Z hello world
2021-09-12T14:07:03.997359975Z hello world
2021-09-12T14:07:04.999525036Z hello world
2021-09-12T14:07:06.001806035Z hello world
查看容器中进程信息ps
docker top container_id
[will@will ~]$ docker start a7d1d775a89f
a7d1d775a89f
[will@will ~]$
[will@will ~]$
[will@will ~]$ docker top a7d1d775a89f
UID                 PID                 PPID                C                   STIME               TTY                 TIME
root                44527               44505               1                   22:10               ?                   00:00:00
root                44591               44527               0                   22:10               ?                   00:00:00
[will@will ~]$
查看镜像元数据
[will@will ~]$ docker inspect a7d1d775a89f
[
    {
        "Id": "a7d1d775a89f9a6a620e66ed3236c7a8531376fbaa4aefa17b3381977406ae33",
        "Created": "2021-09-12T14:06:39.641849451Z",
        "Path": "/bin/sh",
        "Args": [
            "-c",
            "while true;do echo 'hello world' ;sleep 1;done"
        ],
        "State": {
            "Status": "exited",
            "Running": false,
            "Paused": false,
            "Restarting": false,
            "OOMKilled": false,
            "Dead": false,
            "Pid": 0,
            "ExitCode": 137,
            "Error": "",
            "StartedAt": "2021-09-12T14:10:39.613653276Z",
            "FinishedAt": "2021-09-12T14:11:54.47701037Z"
        },
        "Image": "sha256:300e315adb2f96afe5f0b2780b87f28ae95231fe3bdd1e16b9ba606307728f55",
        "ResolvConfPath": "/var/lib/docker/containers/a7d1d775a89f9a6a620e66ed3236c7a8531376fbaa4aefa17b3381977406ae33/resolv.conf",
        "HostnamePath": "/var/lib/docker/containers/a7d1d775a89f9a6a620e66ed3236c7a8531376fbaa4aefa17b3381977406ae33/hostname",
        "HostsPath": "/var/lib/docker/containers/a7d1d775a89f9a6a620e66ed3236c7a8531376fbaa4aefa17b3381977406ae33/hosts",
        "LogPath": "/var/lib/docker/containers/a7d1d775a89f9a6a620e66ed3236c7a8531376fbaa4aefa17b3381977406ae33/a7d1d775a89f9a6a620e66ed3236c7a8531376fbaa4aefa17b3381977406ae33-json.log",
        "Name": "/pensive_agnesi",
        "RestartCount": 0,
        "Driver": "overlay2",
        "Platform": "linux",
        "MountLabel": "",
        "ProcessLabel": "",
        "AppArmorProfile": "",
        "ExecIDs": null,
        "HostConfig": {
            "Binds": null,
            "ContainerIDFile": "",
            "LogConfig": {
                "Type": "json-file",
                "Config": {}
            },
            "NetworkMode": "default",
            "PortBindings": {},
            "RestartPolicy": {
                "Name": "no",
                "MaximumRetryCount": 0
            },
            "AutoRemove": false,
            "VolumeDriver": "",
            "VolumesFrom": null,
            "CapAdd": null,
            "CapDrop": null,
            "CgroupnsMode": "host",
            "Dns": [],
            "DnsOptions": [],
            "DnsSearch": [],
            "ExtraHosts": null,
            "GroupAdd": null,
            "IpcMode": "private",
            "Cgroup": "",
            "Links": null,
            "OomScoreAdj": 0,
            "PidMode": "",
            "Privileged": false,
            "PublishAllPorts": false,
            "ReadonlyRootfs": false,
            "SecurityOpt": null,
            "UTSMode": "",
            "UsernsMode": "",
            "ShmSize": 67108864,
            "Runtime": "runc",
            "ConsoleSize": [
                0,
                0
            ],
            "Isolation": "",
            "CpuShares": 0,
            "Memory": 0,
            "NanoCpus": 0,
            "CgroupParent": "",
            "BlkioWeight": 0,
            "BlkioWeightDevice": [],
            "BlkioDeviceReadBps": null,
            "BlkioDeviceWriteBps": null,
            "BlkioDeviceReadIOps": null,
            "BlkioDeviceWriteIOps": null,
            "CpuPeriod": 0,
            "CpuQuota": 0,
            "CpuRealtimePeriod": 0,
            "CpuRealtimeRuntime": 0,
            "CpusetCpus": "",
            "CpusetMems": "",
            "Devices": [],
            "DeviceCgroupRules": null,
            "DeviceRequests": null,
            "KernelMemory": 0,
            "KernelMemoryTCP": 0,
            "MemoryReservation": 0,
            "MemorySwap": 0,
            "MemorySwappiness": null,
            "OomKillDisable": false,
            "PidsLimit": null,
            "Ulimits": null,
            "CpuCount": 0,
            "CpuPercent": 0,
            "IOMaximumIOps": 0,
            "IOMaximumBandwidth": 0,
            "MaskedPaths": [
                "/proc/asound",
                "/proc/acpi",
                "/proc/kcore",
                "/proc/keys",
                "/proc/latency_stats",
                "/proc/timer_list",
                "/proc/timer_stats",
                "/proc/sched_debug",
                "/proc/scsi",
                "/sys/firmware"
            ],
            "ReadonlyPaths": [
                "/proc/bus",
                "/proc/fs",
                "/proc/irq",
                "/proc/sys",
                "/proc/sysrq-trigger"
            ]
        },
        "GraphDriver": {
            "Data": {
                "LowerDir": "/var/lib/docker/overlay2/69e963790c3628fc36bfca9ce352266757ec7b9d4bcfac2eebd411fd92297bc0-init/diff:/var/lib/docker/overlay2/e88c6a2fc23c05ec9c082eaee933e458bcc746d1db9820739e790862372c71b9/diff",
                "MergedDir": "/var/lib/docker/overlay2/69e963790c3628fc36bfca9ce352266757ec7b9d4bcfac2eebd411fd92297bc0/merged",
                "UpperDir": "/var/lib/docker/overlay2/69e963790c3628fc36bfca9ce352266757ec7b9d4bcfac2eebd411fd92297bc0/diff",
                "WorkDir": "/var/lib/docker/overlay2/69e963790c3628fc36bfca9ce352266757ec7b9d4bcfac2eebd411fd92297bc0/work"
            },
            "Name": "overlay2"
        },
        "Mounts": [],
        "Config": {
            "Hostname": "a7d1d775a89f",
            "Domainname": "",
            "User": "",
            "AttachStdin": false,
            "AttachStdout": false,
            "AttachStderr": false,
            "Tty": false,
            "OpenStdin": false,
            "StdinOnce": false,
            "Env": [
                "PATH=/usr/local/sbin:/usr/local/bin:/usr/sbin:/usr/bin:/sbin:/bin"
            ],
            "Cmd": [
                "/bin/sh",
                "-c",
                "while true;do echo 'hello world' ;sleep 1;done"
            ],
            "Image": "centos",
            "Volumes": null,
            "WorkingDir": "",
            "Entrypoint": null,
            "OnBuild": null,
            "Labels": {
                "org.label-schema.build-date": "20201204",
                "org.label-schema.license": "GPLv2",
                "org.label-schema.name": "CentOS Base Image",
                "org.label-schema.schema-version": "1.0",
                "org.label-schema.vendor": "CentOS"
            }
        },
        "NetworkSettings": {
            "Bridge": "",
            "SandboxID": "3ad38981c09954a7773da16ef2c3c4c1aa08a65dbb25a44fc0e4ca239982ceab",
            "HairpinMode": false,
            "LinkLocalIPv6Address": "",
            "LinkLocalIPv6PrefixLen": 0,
            "Ports": {},
            "SandboxKey": "/var/run/docker/netns/3ad38981c099",
            "SecondaryIPAddresses": null,
            "SecondaryIPv6Addresses": null,
            "EndpointID": "",
            "Gateway": "",
            "GlobalIPv6Address": "",
            "GlobalIPv6PrefixLen": 0,
            "IPAddress": "",
            "IPPrefixLen": 0,
            "IPv6Gateway": "",
            "MacAddress": "",
            "Networks": {
                "bridge": {
                    "IPAMConfig": null,
                    "Links": null,
                    "Aliases": null,
                    "NetworkID": "71a309b12f1d882f7a0077b54a2893de036d1bc97519bdb707ad1505585d0ce1",
                    "EndpointID": "",
                    "Gateway": "",
                    "IPAddress": "",
                    "IPPrefixLen": 0,
                    "IPv6Gateway": "",
                    "GlobalIPv6Address": "",
                    "GlobalIPv6PrefixLen": 0,
                    "MacAddress": "",
                    "DriverOpts": null
                }
            }
        }
    }
]
进入当前正在运行的命令
# 我们通常都是使用后台方式进入容器的,需要进入容器,修改一些配置:
docker exec container_id

[will@will ~]$ docker exec -it a7d1d775a89f /bin/bash
[root@a7d1d775a89f /]# ls
bin  dev  etc  home  lib  lib64  lost+found  media  mnt  opt  proc  root  run  sbin  srv  sys  tmp  usr  var
[root@a7d1d775a89f /]#

docker attach container_id # 进入容器正在执行的终端,不会启动新的进程
docker exec container_id   # 进入容器后开启一个新的终端,可以在里面操作(常用)
从容器内拷贝文件到主机上
docker cp 容器id:容器内路径 目的主机路径 # 与scp命令非常相似,同时也支持从主机到容器的拷贝
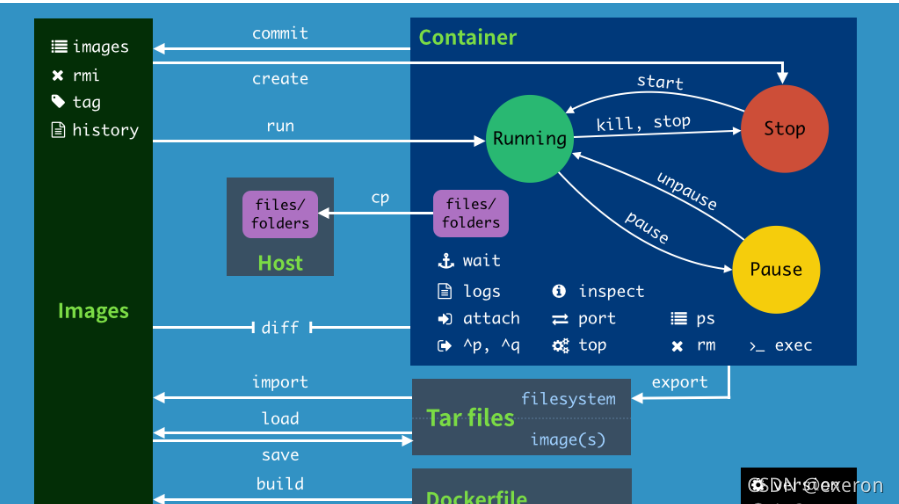
小结
[will@will ~]$ docker

Usage:  docker [OPTIONS] COMMAND

A self-sufficient runtime for containers

Options:
      --config string      Location of client config files (default "/home/will/.docker")
  -c, --context string     Name of the context to use to connect to the daemon (overrides DOCKER_HOST env var and default context set with "docker context use")
  -D, --debug              Enable debug mode
  -H, --host list          Daemon socket(s) to connect to
  -l, --log-level string   Set the logging level ("debug"|"info"|"warn"|"error"|"fatal") (default "info")
      --tls                Use TLS; implied by --tlsverify
      --tlscacert string   Trust certs signed only by this CA (default "/home/will/.docker/ca.pem")
      --tlscert string     Path to TLS certificate file (default "/home/will/.docker/cert.pem")
      --tlskey string      Path to TLS key file (default "/home/will/.docker/key.pem")
      --tlsverify          Use TLS and verify the remote
  -v, --version            Print version information and quit

Management Commands:
  app*        Docker App (Docker Inc., v0.9.1-beta3)
  builder     Manage builds
  buildx*     Build with BuildKit (Docker Inc., v0.6.1-docker)
  config      Manage Docker configs
  container   Manage containers
  context     Manage contexts
  image       Manage images
  manifest    Manage Docker image manifests and manifest lists
  network     Manage networks
  node        Manage Swarm nodes
  plugin      Manage plugins
  scan*       Docker Scan (Docker Inc., v0.8.0)
  secret      Manage Docker secrets
  service     Manage services
  stack       Manage Docker stacks
  swarm       Manage Swarm
  system      Manage Docker
  trust       Manage trust on Docker images
  volume      Manage volumes

Commands:
  attach      Attach local standard input, output, and error streams to a running container # 当前shell下连接指定运行镜像
  build       Build an image from a Dockerfile                                              # 通过dockerfile定制镜像
  commit      Create a new image from a container's changes                                 # 提交当前容器为新的镜像
  cp          Copy files/folders between a container and the local filesystem               # 从容器和宿主机相互拷贝指定文件或者目录
  create      Create a new container                                                        # 创建一个新的容器,同run,但不启动容器
  diff        Inspect changes to files or directories on a container's filesystem           # 查看docker容器变化
  events      Get real time events from the server                                          # 从docer服务获取容器实时事件
  exec        Run a command in a running container
  export      Export a container's filesystem as a tar archive
  history     Show the history of an image
  images      List images
  import      Import the contents from a tarball to create a filesystem image
  info        Display system-wide information
  inspect     Return low-level information on Docker objects
  kill        Kill one or more running containers
  load        Load an image from a tar archive or STDIN
  login       Log in to a Docker registry
  logout      Log out from a Docker registry
  logs        Fetch the logs of a container
  pause       Pause all processes within one or more containers
  port        List port mappings or a specific mapping for the container
  ps          List containers
  pull        Pull an image or a repository from a registry
  push        Push an image or a repository to a registry
  rename      Rename a container
  restart     Restart one or more containers
  rm          Remove one or more containers
  rmi         Remove one or more images
  run         Run a command in a new container
  save        Save one or more images to a tar archive (streamed to STDOUT by default)
  search      Search the Docker Hub for images
  start       Start one or more stopped containers
  stats       Display a live stream of container(s) resource usage statistics
  stop        Stop one or more running containers                                  # 停止容器
  tag         Create a tag TARGET_IMAGE that refers to SOURCE_IMAGE                # 给源中的镜像打标签
  top         Display the running processes of a container                         # 查看容器中
  unpause     Unpause all processes within one or more containers                  # 取消暂停容器
  update      Update configuration of one or more containers
  version     Show the Docker version information                                  # 查看docker版本号
  wait        Block until one or more containers stop, then print their exit codes # 截取容器停止时的退出状态值

Run 'docker COMMAND --help' for more information on a command.

To get more help with docker, check out our guides at https://docs.docker.com/go/guides/
作业练习
docker安装nginx
# 1、搜索镜像 search 建议去hub.docker.com搜索,可以看到帮忙文档
# 2、下载镜像 pull
docker pull nginx
# 3、运行测试
docker run -d --name nginx01 -p 3344:80 nginx
docker安装tomcat
docker pull tomcat:9.0.52-jdk8-corretto
# 官方的使用
docker run -it -rm tomcat:9.0.52-jdk16-corretto  # 启动时新建一个容器,停止时自动删除这个容器docker run -it -p 8080:8080 -rm tomcat:9.0.52-jdk16-corretto


# 正常使用
docker run -d -p 8080:8080 --name tomat01 tomcat

# 测试访问没有问题


# 进入容器
docker exec -it tomcat01 /bin/bash

# 发现问题:linux命令很少,没有webapps。 原因:阿里云的镜像是最小镜像,所有不必要的都剔除掉了。
# 最小镜像:保证能运行的最小镜像!
部署es+kibana
# 问题:
# es暴露的端口非常多! 十分消耗内存 数据一般放到安全目录
# --net somenetwork ?网络配置

docker run -d --name elasticsearch -p 9200:9200 -e "discovery.type=single-node" elasticsearch:7.6.2

# 查看container的状态:可以看到es是比较吃内存的
docker stats container_id

# 测试一下es是否成功了
[will@will ~]$ curl localhost:9200
{
  "name" : "bdc434bf5fce",
  "cluster_name" : "docker-cluster",
  "cluster_uuid" : "UPGkE9sTTdqiOjmt3PfvPA",
  "version" : {
    "number" : "7.6.2",
    "build_flavor" : "default",
    "build_type" : "docker",
    "build_hash" : "ef48eb35cf30adf4db14086e8aabd07ef6fb113f",
    "build_date" : "2020-03-26T06:34:37.794943Z",
    "build_snapshot" : false,
    "lucene_version" : "8.4.0",
    "minimum_wire_compatibility_version" : "6.8.0",
    "minimum_index_compatibility_version" : "6.0.0-beta1"
  },
  "tagline" : "You Know, for Search"
}
[will@will ~]$

# 在内存比较吃紧的时候可以加入内存限制
docker run -d --name elasticsearch -p 9200:9200 -p 9300:9300 -e "discovery.type=single-node" -e ES_JAVA_OPTS="-Xms64m -Xmx512m" elasticsearch:7.6.2
可视化
docker run -d -p 8088:9000 \
--restart=always -v /var/run/docker.sock:/var/run/docker.sock --privileged=true portainer/portainer

-v后面的参数是必须的
访问测试:localhost:8088
Docker镜像
镜像是什么
一、镜像
是一种轻量级、可执行的独立软件包,用来打包软件运行环境和基于运行环境的开发软件,它包含运行某个软件所需的所有内容,包括代码、运行时、库、环境变量和配置文件。
二、UnionFS(联合文件系统)
Union文件系统(UnionFS) 是一种分层、轻量级并且高性能的文件系统,他支持对文件系统的修改作为一次提交来层层的叠加,同时可以将不同目录挂载到同一个虚拟文件系统下(unite several directories into a single virtual filesystem)。Union文件系统是Docker镜像的基础。镜像可以通过分层来进行集成,基于基础镜像(没有父镜像),可以制作各种具体的应用镜像。
特性:一次同时加载多个文件系统,但从外面看起来,只能看到一个文件系统你那个,联合加载会把各层文件系统叠加起来,这样最终的文件系统会包含所有底层文件和目录。
三、Docker 镜像加载原理
docker 的镜像实际上由一层一层的文件系统组成,这种层级的文件系统UnionFS。
bootfs(boot file system) 主要包含bootloader和kernel,bootloader 主要是引导加载kernel,Linux刚启动时会加载bootfs文件系统,在Docker镜像的最底层是bootfs。这一层与我们典型的Linux/Unix系统是一样的,包含boot加载器和内核。当boot加载完成之后整个内核就存在内存中了,此时内存的使用权已由bootfs转交给内核,此时系统也会卸载bootfs。
roorfs (root file system),在bootfs之上。包含的就是典型Linux系统中的 /dev ,/proc,/bin ,/etx 等标准的目录和文件。rootfs就是各种不同的操作系统发行版。比如Ubuntu,Centos等等。
对于一个精简的OS,rootfs可以很小,只需要包括最基本的命令、工具和程序库就可以了,因为底层直接用Host(宿主机)的kernel,自己只需要提供rootfs就行了,由此可见对于不同的Linux发行版,bootfs基本是一致的,rootfs会有差别,因此不同的发行版可以公用bootfs。
四、Docker 镜像联合文件系统分层,Tomcat镜像示例

采用这种分层结构最大的一个好处就是共享资源,比如有多个镜像都从相同的base镜像构建而来,那么宿主机只需要在磁盘上保存一份base镜像,同时内存中也只需要加载一份base镜像,就可以为所有容器服务了。而且镜像的每一层都可以被共享。
docker 镜像都是只读的,当容器启动时,一个新的可写层被加载到镜像的顶部。这一层通常被称作 “容器层” ,“容器层” 之下的都叫镜像层。
Docker镜像加载原理
分层理解
commit镜像
docker commit # 提交容器成为一个新的镜像副本

# 命令和git提交类似
docker commit -m="提交的描述信息" -a="作者" 容器id  目标镜像名:[tag]
实战测试
# 启动一个默认的tomcat
# 如果没有,pull一个下来
docker pull tomcat:9.0
docker run -it -p 8080:8080 tomcat:9.0
docker exec -it container_id /bin/bash
ls -l /usr/local/tomcat/webapps
# 发现这个默认的tomcat是没有webapps的,
cp -R /usr/local/tomcat/webapps.dist/* /usr/local/tomcat/webapps/
# 自己拷贝了一份webapps.dist到webapps下
docker commit -a="will" -m "add webapps" container_id tomcat02:1.0
# 将我们操作过的容器通过commit提交为一个新的镜像,以后就可以使用新提交的镜像
容器数据卷
将应用和环境打包成一个镜像!
有什么问题?如果数据都在容器中,那么我们把容器删除,数据就会丢失!
所以需要一个数据共享的技术,将Docker容器的产生的数据同步到本地文件系统
这就是数据卷技术,目录挂载到Linux上
使用数据卷
方式一:直接使用命令来挂载 -v
docker run -it -v 主机目录:容器内目录  # 和端口映射类似

# 做个实验:
docker run -it -v /home/will/centos:/home centos /bin/bash

cd /home
df > df.log # 进到容器内之后,在home下生成一个文件
exit # 退出

ls -l /home/will/centos  # 可以看到刚才在容器内生成的df.log文件
# 反过来也是一样的。先将容器停止,在/home/will/centos中写入文件,再启动容器,在/home目录下可以看到刚才写入的文件

# 同时可以用 docker inspect 命令查看 Mounts中的信息:
"Mounts": [
            {
                "Type": "bind",
                "Source": "/home/will/centos",
                "Destination": "/home",
                "Mode": "",
                "RW": true,
                "Propagation": "rprivate"
            }
        ],
实战(Mysql的数据持久化问题)
思考:Mysql的数据持久化问题
# 获取镜像
docker pull mysql:5.7
# 运行容器,
-d 后台运行
-p 映射端口
--name 设置名称
-v 映射目录
-e 设置参数
docker run -d -p 3306:3306 --name mysql5.7 -v /home/will/mysql/conf:/etc/mysql/conf.d -v /home/will/mysql/data:/var/lib/mysql -e MYSQL_ROOT_PASSWORD=123456 mysql:5.7

# 用root用户进到/home/will/mysql可以看到conf和data目录。
# 用dbeaver连到数据库,localhost:3306 root 123456 (dbeaver下载地址 dbeaver.io)
# 然后创建数据库test 和表test01
# 在/home/will/mysql/data目录下可以看到对应的数据库目录和表文件

# 这时可以用docker rm -f container_id删除正在运行的mysql容器,发现/home/will/mysql下的文件还在。
具名和匿名挂载
# 匿名挂载
-v 容器内路径!
docker run -d -P --name nginx01 -v /etc/nginx nginx

# 查看所有的卷,
docker volume ls
DRIVER    VOLUME NAME
local     e1031a6879c5e2449dfac18765d33a2790687882af90ce6614d805545121fb61
# 这里的卷都是匿名的

# 再运行一个nginx:
docker run-d -P --name nginx02 -v juming-nginx:/etc/nginx nginx
# 再查看volume,能够发现刚才挂载的卷有了名字juming-nginx:
docker volume ls
DRIVER    VOLUME NAME
local     e1031a6879c5e2449dfac18765d33a2790687882af90ce6614d805545121fb61
local     juming-nginx

# 查看卷的具体情况
$ docker volume inspect juming-nginx
[
    {
        "CreatedAt": "2021-09-22T21:56:44+08:00",
        "Driver": "local",
        "Labels": null,
        "Mountpoint": "/var/lib/docker/volumes/juming-nginx/_data",
        "Name": "juming-nginx",
        "Options": null,
        "Scope": "local"
    }
]

# 到本地文件系统这个目录下可以查看刚才挂载的卷内容:
# cd /var/lib/docker/volumes/juming-nginx/_data
# 其他卷的内容可以在这里看到:
# /var/lib/docker/volumes/
# 如何确定是具名挂载还是匿名,还是指定路径挂载?
-v 容器内路径  # 匿名
-v 卷名:容器内路径 # 具名
-v /宿主机路径::容器内路径 # 制定路径挂载
拓展:
docker run-d -P --name nginx02 -v juming-nginx:/etc/nginx::ro nginx
docker run-d -P --name nginx02 -v juming-nginx:/etc/nginx::rw nginx
ro read only # 只能通过宿主机修改文件,容器内部无法修改
rw read+write
初识DockerFile
dockerFile就是用来构建docker镜像的构建文件!命令脚本
通过这个脚本可以生成一个镜像,镜像是一层一层的,脚本一个个的命令,每个命令都是一层。,。。
mkdir /home/will/docker-volume
cd /home/will/docker-volume
echo "FROM nginx
VOLUME [\"volume01\",\"volume02\"]
CMD echo "------end------"
CMD /bin/bash" > dockerfile1
docker build -f dockerfile1 -t will_nginx:1.0 .
Sending build context to Docker daemon 2.048kB
Step 1/4 : FROM nginx
---> ad4c705f24d3
Step 2/4 : VOLUME ["volume01","volume02"]
---> Running in 31dde6b30e93
Removing intermediate container 31dde6b30e93
---> 84caa714ff92
Step 3/4 : CMD echo "------end------"
---> Running in 8ea43cb72da7
Removing intermediate container 8ea43cb72da7
---> 18353ec9b229
Step 4/4 : CMD /bin/bash
---> Running in d559d6392450
Removing intermediate container d559d6392450
---> 6beefeb106dc
Successfully built 6beefeb106dc
Successfully tagged will_nginx:1.0

$ docker images
REPOSITORY TAG IMAGE ID CREATED SIZE
will_nginx 1.0 9fd287bb712d 4 seconds ago 133MB
tomcat02 1.0 ca6c873eccdf 49 minutes ago 685MB
tomcat 9.0 62146f8bda84 7 days ago 680MB
nginx latest ad4c705f24d3 12 days ago 133MB
mysql 5.7 1d7aba917169 2 weeks ago 448MB
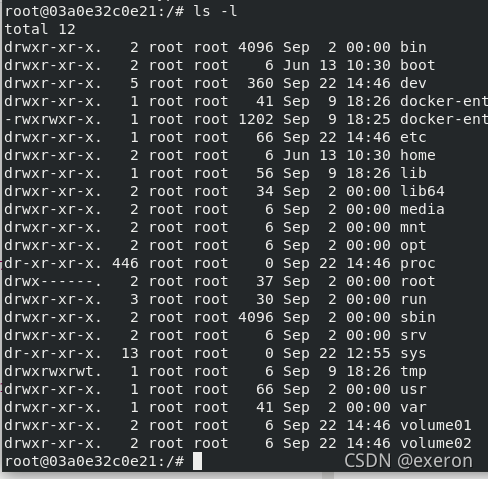
docker run -it 9fd287bb712d /bin/bash
ls -l
total 12
drwxr-xr-x. 2 root root 4096 Sep 2 00:00 bin
drwxr-xr-x. 2 root root 6 Jun 13 10:30 boot
drwxr-xr-x. 5 root root 360 Sep 22 14:34 dev
drwxr-xr-x. 1 root root 41 Sep 9 18:26 docker-entrypoint.d
-rwxrwxr-x. 1 root root 1202 Sep 9 18:25 docker-entrypoint.sh
drwxr-xr-x. 1 root root 66 Sep 22 14:34 etc
drwxr-xr-x. 2 root root 6 Jun 13 10:30 home
drwxr-xr-x. 1 root root 56 Sep 9 18:26 lib
drwxr-xr-x. 2 root root 34 Sep 2 00:00 lib64
drwxr-xr-x. 2 root root 6 Sep 2 00:00 media
drwxr-xr-x. 2 root root 6 Sep 2 00:00 mnt
drwxr-xr-x. 2 root root 6 Sep 2 00:00 opt
dr-xr-xr-x. 472 root root 0 Sep 22 14:34 proc
drwx------. 2 root root 37 Sep 2 00:00 root
drwxr-xr-x. 3 root root 30 Sep 2 00:00 run
drwxr-xr-x. 2 root root 4096 Sep 2 00:00 sbin
drwxr-xr-x. 2 root root 6 Sep 2 00:00 srv
dr-xr-xr-x. 13 root root 0 Sep 22 12:55 sys
drwxrwxrwt. 1 root root 6 Sep 9 18:26 tmp
drwxr-xr-x. 1 root root 66 Sep 2 00:00 usr
drwxr-xr-x. 1 root root 41 Sep 2 00:00 var
drwxr-xr-x. 2 root root 6 Sep 22 14:34 volume01
drwxr-xr-x. 2 root root 6 Sep 22 14:34 volume02
# 会发现容器内已经有了volume01,volume02两个目录
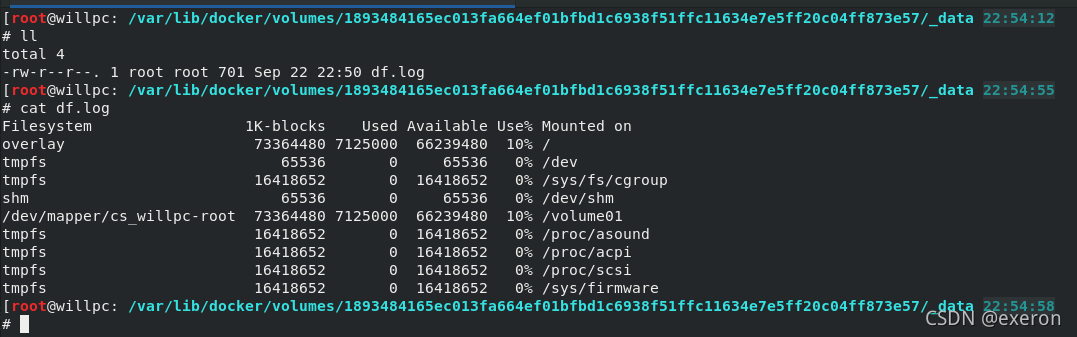
在volumn1里写文件:
cd volume01
df>df.log
exit
docker ps -a
docker inspect container_id
# 会发现mount信息
"Mounts": [
            {
                "Type": "volume",
                "Name": "1893484165ec013fa664ef01bfbd1c6938f51ffc11634e7e5ff20c04ff873e57",
                "Source": "/var/lib/docker/volumes/1893484165ec013fa664ef01bfbd1c6938f51ffc11634e7e5ff20c04ff873e57/_data",
                "Destination": "volume01",
                "Driver": "local",
                "Mode": "",
                "RW": true,
                "Propagation": ""
            },
            {
                "Type": "volume",
                "Name": "8cf15898f33f00438b3c43d549f7bd9415205732af19c549976ed2dadbe9dddf",
                "Source": "/var/lib/docker/volumes/8cf15898f33f00438b3c43d549f7bd9415205732af19c549976ed2dadbe9dddf/_data",
                "Destination": "volume02",
                "Driver": "local",
                "Mode": "",
                "RW": true,
                "Propagation": ""
            }
        ],
# 进到mount信息中的目录,会发现刚才生成的df.log文件:
cd /var/lib/docker/volumes/1893484165ec013fa664ef01bfbd1c6938f51ffc11634e7e5ff20c04ff873e57
cat df.log

 这种方式我们使用得十分多,因为我们经常会构建自己的镜像
假设构建镜像的时候没有挂载卷,要手动挂载卷: -v 卷名:容器内路径
数据卷容器
多个mysql同步数据


 3559
3559


 被折叠的 条评论
为什么被折叠?
被折叠的 条评论
为什么被折叠?
 到【灌水乐园】发言


