


效果展示
1664498568765
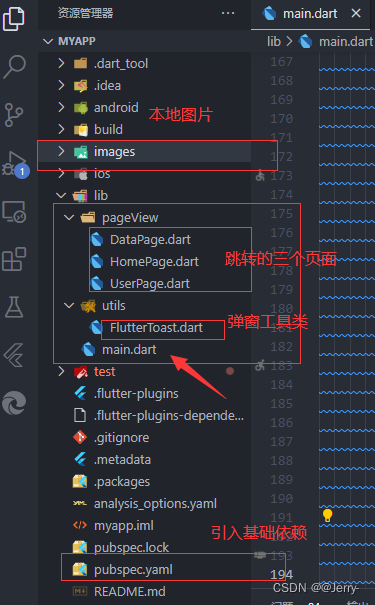
1.整体目录结构:
2.理论就不过多阐述了,项目里面的每一行代码《每一行》我都有注释:
直接上干货
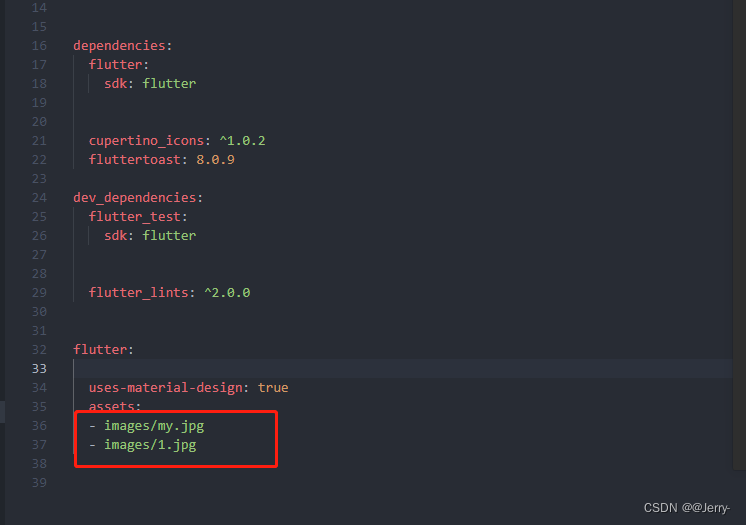
第一步:引入依赖:pubspec.yaml 就一个第三方库的弹窗工具
dependencies:

  fluttertoast: 8.0.9
创建如下图里面文件夹images,放入两张本地图片作为项目的测试头像与背景,百度自行下载:
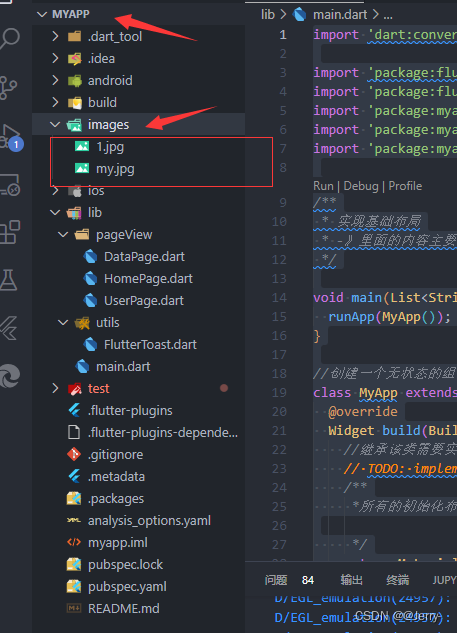
在pubspec.yaml,定义图片的位置:入图,注意名称与文件夹保持一致:
基础搭建基本上完成了,现在就是代码部分:
main主启动类的代码:这里我没有分包,都在一个类里面写的基础局部:
main.dart:
import 'dart:convert';

import 'package:flutter/cupertino.dart';
import 'package:flutter/material.dart';
import 'package:myapp/pageView/DataPage.dart';
import 'package:myapp/pageView/HomePage.dart';
import 'package:myapp/pageView/UserPage.dart';

/**
 * 实现基础布局
 * -》里面的内容主要包括 1,总体布局 2.侧边栏 3.底部导航栏 4,列表数据 5.网络请求数据封装 6,页面跳转
 */

void main(List<String> args) {
  runApp(MyApp());
}

//创建一个无状态的组件
class MyApp extends StatelessWidget {
  @override
  Widget build(BuildContext context) {
    //继承该类需要实现它里面带的方法
    // TODO: implement build
    /**
     *所有的初始化布局都必须返回的是 MaterialApp

     */
    return MaterialApp(
      //MaterialApp :作为整体布局
      title: '小杨专属', //整体布局的属性名称
      theme: ThemeData(
        //设置顶部导航栏颜色
        primarySwatch: Colors.purple,
      ),
      home: MyHome(), //主要的页面设计
    );
  }
}

//搭建无状态的组件 作为页面展示
class MyHome extends StatelessWidget {
  @override
  Widget build(BuildContext context) {
    /**
     * 作为App里面的大致功能
     * 1.底部导航
     * 2导航点击跳转页面
     * 3.按钮触发事件跳转
     */
    return DefaultTabController(
        //实现的是2底部导航栏的状态改变
        length: 3, //底部导航栏需要几个状态
        child: Scaffold(
          //Scaffold 的主要属性:

          /**
           * 顶部导航栏的实现
           * 1.创建title属性
           * 2.右边按钮状态栏的基础属性
           */
          appBar: AppBar(
            //顶部导航栏

            title: Text("Superman"),
            centerTitle: true, //title设置居中显示
            //右侧的行为按钮
            actions: <Widget>[
              //添加一个简单的状态按钮测试
              IconButton(
                  onPressed: () {}, //按钮点击的状态
                  icon: Icon(Icons.search)),
            ],
          ),

          /**
         * 侧边栏的实现
         * 1.整体侧边栏里面的数据应该放在一个ListView里面
         * 2.UserAccountsDrawerHeader 数据比较局限
         */
          drawer: Drawer(
            child: ListView(
              //整体侧边栏数据应该都在一个ListView里面
              padding: EdgeInsets.all(0), //实现布局里面的组件铺满对应布局
              children: <Widget>[
                //child下面的集合小组件
                UserAccountsDrawerHeader(
                  //UserAccountsDrawerHeader 该属性自带布局属性,只需要填充对应的数据即可
                  accountName: Text(
                    "超人爱三角裤",
                    style: TextStyle(fontSize: 18),
                  ),
                  accountEmail: Text(
                    "266262999999@qq.com",
                    style: TextStyle(fontSize: 15),
                  ),
                  currentAccountPicture: CircleAvatar(
                    //设置头像
                    backgroundImage: AssetImage(
                      'images/my.jpg',
                    ),
                  ),
                  //美化当前控件
                  decoration: BoxDecoration(
                      //背景图片
                      image: DecorationImage(
                          fit: BoxFit.contain, //填满整个背景
                          image: AssetImage('images/1.jpg'))),
                ),

                /**
              * 实现侧边栏下面的简单项
              1.通过列表块的形式实现
              */

                ListTile(
                    //ListTile 列表块 主要使用与ListView中
                    title: Text("个人反馈"),
                    trailing: Icon(
                      Icons.feedback,
                      color: Colors.pinkAccent,
                    ),
                  //触发状态的组件,一般用于点击按钮跳转
                    onTap: () {}),

                ListTile(
                  title: Text("系统设置"),
                  trailing: Icon(
                    Icons.settings,
                    color: Colors.pinkAccent,
                  ),
                  onTap: () {}
                ),

                ListTile(
                  title: Text("添加文件"),
                  trailing: Icon(
                    Icons.send,
                    color: Colors.pinkAccent,
                  ),
                  onTap: () {}
                ),

                Divider(color: Colors.blue), //分割线
                ListTile(
                  title: Text("退出账号"),
                  trailing: Icon(
                    Icons.exit_to_app,
                    color: Colors.pinkAccent,
                  ),
                  onTap: () {}
                )
              ],
            ),
          ),

          /**
        * 底部导航栏的实现
        * 1.通过Scaffold组件需要的属性
          2.点击导航栏状态显示自定义页面
          3.基础属性优化
        */
          bottomNavigationBar: Container(
            decoration: BoxDecoration(
                color: Color.fromARGB(255, 231, 225, 225)), //实现底部导航栏的背景颜色
            height: 55, //底部导航栏的高度 ,一般默认为50
            child: TabBar(
              //导航栏里面基础属性的设置
              labelStyle: TextStyle(height: 0, fontSize: 13), //控制妆台栏里面文字的大小
              tabs: <Widget>[
                Tab(
                  //对应底部状态
                  icon: Icon(
                    Icons.accessible,
                    color: Colors.pinkAccent,
                  ),
                  child: Text(
                    "冲",
                    style: TextStyle(color: Colors.blue),
                  ),
                ),
                Tab(
                  icon: Icon(
                    Icons.accessible_forward,
                    color: Colors.pinkAccent,
                  ),
                  child: Text(
                    "悍",
                    style: TextStyle(color: Color.fromARGB(255, 33, 175, 109)),
                  ),
                ),
                Tab(
                  icon: Icon(
                    Icons.airline_seat_flat,
                    color: Colors.pinkAccent,
                  ),
                  child: Text(
                    "孬",
                    style: TextStyle(color: Colors.red),
                  ),
                ),
              ],
            ),
          ),

          /**
        * 点击底部状态栏触发的数据页面
         1. 主要的逻辑就是点击按钮跳转到对应的页面,
         2.下面的页面顺序不能无须,对应状态栏数据
        */
          body: TabBarView(
            children: <Widget>[
              HomePage(),
              DataPage(),
              UserPage(),
            ],
          ),
        ) //导航栏里面的具体数据
        );
  }
}
里面需要用到的三个跳转页面以及一个弹窗封装类:
三个页面存放到如下目录里面的:
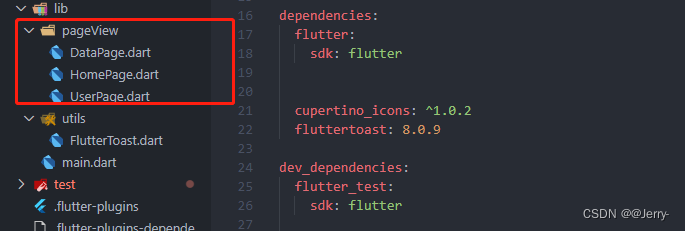
新建一个文件夹:创建新的文件:把下面的代码粘贴进去:
第一个页面:DataPage.dart
import 'package:flutter/cupertino.dart';

class DataPage extends StatelessWidget {
  @override
  Widget build(BuildContext context) {

    return Padding(
      padding: EdgeInsets.fromLTRB(0, 0, 10, 0), //padding值, EdgeInsets设置填充的值
      child: GridView.count(
        crossAxisCount: 2, //一行的Widget数量
        childAspectRatio: 0.8, //子Widget宽高的比例

        //列表元素
        children: <Widget>[
          Padding(
            padding: EdgeInsets.fromLTRB(10, 10, 0, 0), //图片在该容器的填充方式
            child: Image.network(//添加网络图片,该路径可以用
              "http://pic.baike.soso.com/p/20130828/20130828161137-1346445960.jpg",
              fit: BoxFit.cover,
            ),
          ),
          Padding(
            padding: EdgeInsets.fromLTRB(10, 10, 0, 0),
            child: Image.network(
              "http://pic.baike.soso.com/p/20130828/20130828161137-1346445960.jpg",
              fit: BoxFit.cover,
            ),
          ),
          Padding(
            padding: EdgeInsets.fromLTRB(10, 10, 0, 0),
            child: Image.network(
              "http://pic.baike.soso.com/p/20130828/20130828161137-1346445960.jpg",
              fit: BoxFit.cover,
            ),
          ),
          Padding(
            padding: EdgeInsets.fromLTRB(10, 10, 0, 0),
            child: Image.network(
              "http://pic.baike.soso.com/p/20130828/20130828161137-1346445960.jpg",
              fit: BoxFit.cover,
            ),
          ),
          Padding(
            padding: EdgeInsets.fromLTRB(10, 10, 0, 0),
            child: Image.network(
              "http://pic.baike.soso.com/p/20130828/20130828161137-1346445960.jpg",
              fit: BoxFit.cover,
            ),
          ),
          Padding(
            padding: EdgeInsets.fromLTRB(10, 10, 0, 0),
            child: Image.network(
              "http://pic.baike.soso.com/p/20130828/20130828161137-1346445960.jpg",
              fit: BoxFit.cover,
            ),
          ),
        ],
      ),
    );
  }
}
第二个页面:HomePage.dart
import 'package:flutter/cupertino.dart';
import 'package:flutter/material.dart';


class HomePage extends StatefulWidget {
  HomePage({Key? key}) : super(key: key);

  @override
  _MyHomePageState createState() => _MyHomePageState();
}

class _MyHomePageState extends State<HomePage> {
  int _counter = 0;

  void _incrementCounter() {
    setState(() {
      _counter++;
    });
  }

  @override
  Widget build(BuildContext context) {
    return Scaffold(

      body: Center(
        child: Column(
          mainAxisAlignment: MainAxisAlignment.center,
          children: <Widget>[
            Text('You have pushed the button this many times:'),
            Text(
              '$_counter',
              style: Theme.of(context).textTheme.headline4,
            ),
          ],
        ),
      ),
      floatingActionButton: FloatingActionButton(
        onPressed: _incrementCounter,
        tooltip: 'Increment',
        child: Icon(Icons.add),
      ), // This trailing comma makes auto-formatting nicer for build methods.
    );
  }
}
第三个页面:UserPage.dart
import 'package:flutter/cupertino.dart';
import 'package:flutter/material.dart';
import 'package:myapp/pageView/DataPage.dart';
import 'package:myapp/pageView/HomePage.dart';
import 'package:myapp/utils/FlutterToast.dart';

class UserPage extends StatelessWidget {
  @override
  Widget build(BuildContext context) {
    // TODO: implement build
    return Container(
      child: ListView(
        scrollDirection:
            Axis.vertical, //Axis.horizontal 水平列表 Axis.vertical 垂直列表
        // 创建列表元素
        /**
         * 为了展示更好的效果 我在ElevatedButton外边嵌套了一个容器来显示效果
         */
        children: <Widget>[
          //嵌套容器
          Container(
              width: 180.0,
              color: Colors.amber,
              child: ElevatedButton(
                child: Text('对话框'),
                onPressed: () {
                  //点击触发事件
                  showDialog(
                      context: context, // context: Dialog描述内容
                      builder: (context) {
                        return AlertDialog(
                          title: Text('提示'),
                          content: Text('确认删除?'),
                          actions: <Widget>[
                            //actions可选操作(按钮)
                            TextButton(
                              child: Text('取消'),
                              onPressed: () {
                                Navigator.of(context)
                                    .pop(""); //表示点击后关闭当前页面,也就是这个弹窗页面
                              },
                            ),
                            TextButton(
                              child: Text('确认'),
                              onPressed: () {
                                Navigator.of(context).pop("ok");
                                okToast("打小就看你有出息"); //第三方弹窗库
                              },
                            ),
                          ],
                        );
                      });
                },
              )),

          /**
           * 第二个嵌套容器
           */
          Container(
              width: 180.0,
              color: Colors.deepOrange,
              child: ElevatedButton(
                child: Text('IOS风格对话框'),
                onPressed: () {
                  showCupertinoDialog(
                      context: context,
                      builder: (context) {
                        return CupertinoAlertDialog(
                          title: Text('提示'),
                          content: Text('确定退出?'),
                          actions: <Widget>[
                            CupertinoDialogAction(
                              child: Text('取消'),
                              onPressed: () {Navigator.of(context)
                                    .pop(""); //表示点击后关闭当前页面,也就是这个弹窗页面
                                    },
                            ),
                            CupertinoDialogAction(
                              child: Text('确认'),
                              onPressed: () {
                                //点击确认跳转到主页面,同时关闭当前页面(此处就是弹窗页面),可以点击返回 ,流程(A-->B-->C-->A)
                               Navigator.of(context).pushReplacement(
                            MaterialPageRoute(builder: (context)=>DataPage()) );
                                errorToast("打小就看你有出息");
                              },
                            ),
                          ],
                        );
                      });
                },
              )),

/**
 * 第三个嵌套容器
 */
          Container(
              width: 180,
              color: Colors.blue,
              child: ElevatedButton(
                  child: Text("AlertDialog弹出窗口"),
                  onPressed: () {
                    showDialog(
                        context: context,
                        builder: (build) {
                          return AlertDialog(
                            title: Text('提示'),
                            content: Text('确定吗?'),
                            backgroundColor: Colors.lightBlueAccent,
                            elevation: 24,
                            shape: RoundedRectangleBorder(
                                borderRadius: BorderRadius.circular(50)),
                            actions: <Widget>[
                              TextButton(
                                child: Text('取消'),
                                onPressed: () {
                                  Navigator.of(context)
                                    .pop(""); //表示点击后关闭当前页面,也就是这个弹窗页面
                                },
                              ),
                              TextButton(
                                child: Text('确定'),
                                onPressed: () {
                                   //点击确认跳转DataPage()页面, 跳转过后删除之前所有页面,
                                  Navigator.of(context).pushAndRemoveUntil(
                                      new MaterialPageRoute(
                                          builder: (context) => new HomePage()),
                                      (route) => false);
                                  okToast("打小看你就有出息!");
                                },
                              ),
                            ],
                          );
                        });
                  }))
        ],
      ),
    );
  }
}
最后就一个弹窗封装类: 新建一个文件存放:便于代码结构管理
import 'package:flutter/material.dart';
import 'package:fluttertoast/fluttertoast.dart';

void okToast(String text) { //成功的弹窗提示
   Fluttertoast.showToast(
    msg: text,
    toastLength: Toast.LENGTH_SHORT,
    gravity: ToastGravity.CENTER,
    timeInSecForIosWeb: 1,
    backgroundColor: Colors.blue,
    textColor: Colors.white,
    fontSize: 16.0);
}

void errorToast(String text) { //失败的弹窗提示
   Fluttertoast.showToast(
    msg:text,
    toastLength: Toast.LENGTH_SHORT,
    gravity: ToastGravity.CENTER,
    timeInSecForIosWeb: 1,
    backgroundColor: Colors.red,
    textColor: Colors.white,
    fontSize: 16.0);
}
接下来就是测试部分:这里我就不带小伙伴们演示了,这个项目就展现了一些很基础的功能与布局,没有很大的扩展,有什么问题欢迎评论区讨论。


 1287
1287


 被折叠的 条评论
为什么被折叠?
被折叠的 条评论
为什么被折叠?
 到【灌水乐园】发言


