


Getting Started With OpenEars
Conventions used in these instructions:
[OPENEARS] will be used to mean the path on your system to the OpenEars folder after you downloaded and unzipped it. So, if you downloaded it to your Documents folder and your username is “username”, [OPENEARS] means
/Users/username/Documents/OpenEars
What we’ll be doing:
Downloading all of the files needed by OpenEars, moving them into place, and running a script to set up the OpenEars, Pocketsphinx, and Flite static libraries for your app. Then we’ll set the OpenEars project to a valid SDK for getting started with only if that is necessary.
Please note, instructions are now for Xcode 4 only. It is still possible to download the previous version of OpenEars and its distribution contains instructions for Xcode 3 which should be very helpful for figuring out how to install OpenEars .91 in Xcode 3. Another option is to run the sample app, which should work as well in Xcode 3 as Xcode 4, and examine how it is configured. I wish I had the time available to support and fully document both, but since I don’t, I’m opting for Xcode 4 support and documentation moving forward since the final version has been out for months now and it’s a free upgrade for developers with lots of useful new features. You can ask questions about Xcode 3 installs in the forums if you’ve already tried following the instructions in the 0.902 download and I’ll try to answer if there is time.
Before you begin:
Download the following files:
The OpenEars distribution archive here .
The Sphinxbase 0.6.1 distribution archive here .
The Pocketsphinx 0.6.1 distribution archive here .
The Flite 1.4 distribution archive here .
The Flite 8khz voices distribution archive here .
And unzip the OpenEars.zip archive in the location in which you’d like it to remain.
Step 1: put the Sphinxbase 0.6.1 archive, the Pocketsphinx 0.6.1 archive, the Flite 1.4 archive, and the Flite 8khz voice archive in the following folder:
[OPENEARS]/CMULibraries
And unarchive them there. If you like, you can move the original tar.gz archives somewhere else at this point if you don’t have your preferences set to automatically delete archives after unpacking them. That CMULibraries folder should look like this when you’re done:

IMPORTANT: the unarchived folders must be named as follows:
- flite-1.4-release
- pocketsphinx-0.6.1
- sphinxbase-0.6.1
- wince
If they are, you can proceed to step 2. If they aren’t, and they are named something else because the downloaded versions are different, please download the correct version. OpenEars 0.91 only works with Flite 1.4 and pocketsphinx 0.6.1 and sphinxbase 0.6.1. If they are named something else because of something that happened during unarchiving (for instance, there was already an unarchived folder there so the number “2″ was appended onto the end) just rename them so they match the filenames above.
Step 2: Open Terminal and run the following two commands:
cd [OPENEARS]/CMULibraries
and then
./InstallOpenEars.pl
The install script will just pause for a moment and finish if everything went fine. If so, you can proceed to step 3. If everything didn’t go fine you will have some errors in Terminal. If you have any errors, make sure of the following three things:
a. You are working with fresh unarchived downloads of the five folders. A likely error-causing case is making an installation attempt that doesn’t work out, and then instead of starting over fresh, re-running the installation script on the same folders a second time.
b. You have four unarchived folders in your CMULibraries folder called flite-1.4-release, pocketsphinx-0.6.1, sphinxbase-0.6.1, and wince as well as the install script InstallOpenEars.pl that ships with OpenEars.
c. You executed the command:
cd [OPENEARS]/CMULibraries
in Terminal (being sure to replace [OPENEARS] with the actual path to your OpenEars distribution folder!) before executing the command:
./InstallOpenEars.pl
Step 3: Open OpenEarsSampleProject.xcodeproj at [OPENEARS] /OpenEarsSampleProject/OpenEarsSampleProject.xcodeproj and run and install it on a device. OpenEars is possible to run on the Simulator, but since its low-latency driver isn’t compatible with the Simulator, I have provided an alternative Simulator-compatible driver as a convenience so that you can debug recognition logic. However, the recognition on the device is much better and I only offer driver support for the device, so it is best to get used to running OpenEars on the device, and it isn’t possible to evaluate OpenEars’ recognition quality by running it on the Simulator since it uses a completely different audio driver.
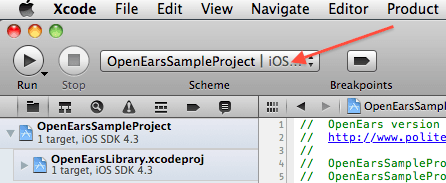
Make sure that you have selected OpenEarsSampleProject in the Scheme drop-down menu in the upper left and not OpenEars (which will only cause the library to be compiled).
This should be all that most developers need to do. If this worked for you, congrats, you have configured the static library and you are ready to move on to Configuring Your App For OpenEars .
If (and only if) you get multiple build errors, you may have to take one more step of assigning the base SDK for the library and sample app. From the Finder, double-click on OpenEarsLibrary.xcodeproj — not the sample app project, the library project found at
[OPENEARS]/OpenEarsLibrary/OpenEarsLibrary.xcodeproj
In the Project Navigator, highlight the blue project icon. Then highlight the blue OpenEarsLibrary icon under the PROJECT header in the left column of the editor. Then select the tab Build Settings. Then, select a valid iOS device SDK for the setting Base SDK under the column OpenEarsLibrary so that the Resolved column displays a valid iOS device SDK. Close OpenEarsLibrary.xcodeproj.

Next, from the Finder, double-click on OpenEarsSampleProject.xcodeproj — not the library, the sample app found at
[OpenEars]/OpenEarsSampleProject/OpenEarsSampleProject.xcodeproj
In the Project Navigator, highlight the blue project icon. Then highlight the blue OpenEarsSampleProject icon under the PROJECT header in the left column of the editor. Make sure you highlight OpenEarsSampleProject and not OpenEarsLibrary if OpenEarsLibrary is visible. Then select the tab Build Settings. Then, select a valid iOS device SDK for the setting Base SDK under the column OpenEarsSampleProject so that the Resolved column displays a valid iOS device SDK.

It should now be possible to run the sample app without errors. Before running it on a device, make sure that you have selected OpenEarsSampleProject in the Scheme drop-down menu in the upper left and not OpenEars (which will only cause the library to be compiled).
If you get a single codesign error, you may need to go to the developer portal and create a provisioning profile for the sample app that is valid for your device and developer identity (app provisioning is beyond the scope of these instructions), but I think it ought to be able to work out of the box in most cases.
If you have any remaining issues you can check out the FAQ/Support page, otherwise move on to Configuring Your App For OpenEars


 1073
1073

 被折叠的 条评论
为什么被折叠?
被折叠的 条评论
为什么被折叠?
 到【灌水乐园】发言


