


一、简介
PXE是INTEL公司开发的网络引导技术,工作在client/service模式,允许客户机从网络在远程服务器下载引导镜像,并加载安装文件或者整个操作系统
PXE(preboot execute environment,预启动执行环境)是由 Intel公司开发的技术,工作于Client/Server的网络模式,支持 工作站通过网络从远端服务器下载映像,并由此支持通过网络启动操作系统,在启动过程中,终端要求DHCP服务器分配IP地址,再用 TFTP(trivial file transfer protocol))协议下载一个启动软件包到本机内存中执行,由这个启动软件包完成终端(客户端)基本软件设置,从而引导预先安装在服务器中的终端操作系统。
iPXE是PXE的扩展版,支持HTTP协议,可以通过http、ISCSI SAN、Fibre Channel SAN via FCoE AoE SAN wireless network Infiniband network等方式启动
二、优点
规模化:同时装配多台服务器
自动化:安装系统,配置各种服务
远程实现:不需要光盘、U盘等安装介质
三、环境布置
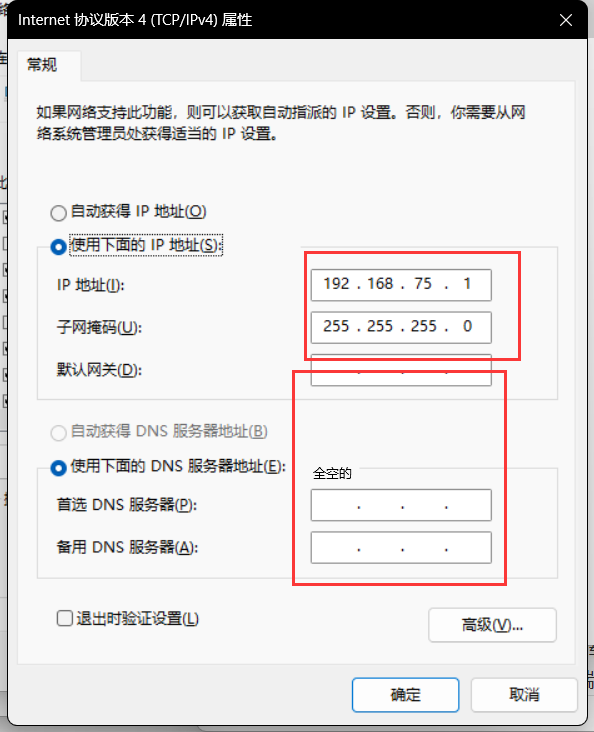
在windows中

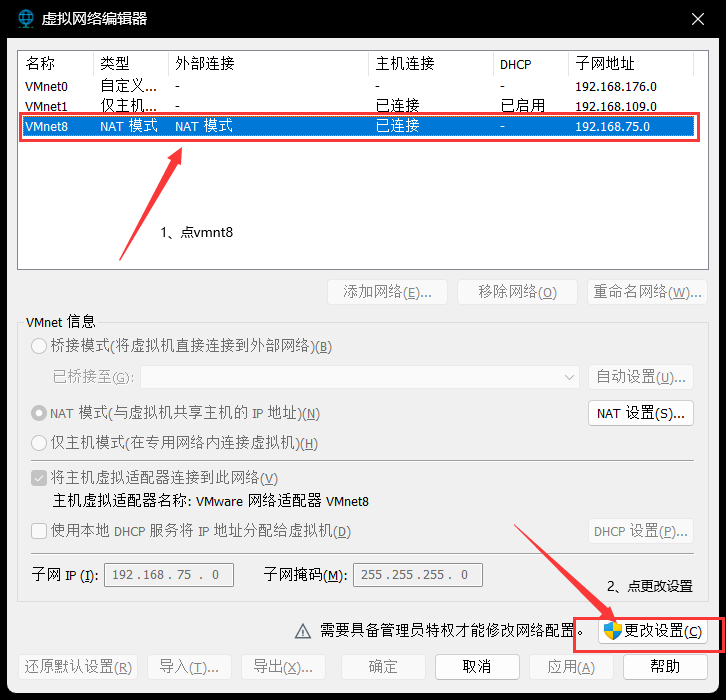
在虚拟姬里

配置静态IP
x为NAT模式的IP地址段第三段.
y>3
vim  /etc/sysconfig/network-scripts/ifcfg-ens33
修改或添加如下参数
ONBOOT="yes"
BOOTPROTO="none"
IPADDR="192.168.x.y"	(192.168.75.25)
PREFIX="24"
GATEWAY="192.168.x.2"		(192.168.75.2)
DNS1="223.5.5.5"
重启网卡
systemctl disable NetworkManager
systemctl stop NetworkManager
systemctl restart network
四、部署
4.1生成ipxe引导文件
ipxe/
├── centosboot    #centos7启动引导文件
├── kickstart     #存放应答文件
├── menu          #引导启动菜单
├── pxefile       #pxe启动文件
├── pxelinux.cfg  #配置文件目录
└── tftpboot      #tftp工作目录
mkdir  -p  /data/wwwroot/ipxe/{centosboot,kickstart,menu,pxefile,tftpboot,pxelinux.cfg}
安装依赖
yum -y install gcc binutils make perl liblzma xz-devel mtools mkisofs获取源码
打开ipxe.org
点击Download

点连接下载ipxe-master.zip
mkdir -p /soft/ipxe && cd /soft/ipxe
把下载到的ipxe-master.zip放到/soft/ipxe
准备引导参数并编译
cd ipxe/src
cat >> bootserver.ipxe<<EOF
#!ipxe
dhcp
chain http://192.168.75.25/ipxe/boot.ipxe
EOF

make bin/undionly.kpxe EMBED=bootserver.ipxe

#cp bin/undionly.kpxe /data/wwwroot/ipxe/tftpboot/
#ls /data/wwwroot/ipxe/tftpboot/
undionly.kpxe
http://192.168.75.25/ipxe/boot.ipxe为pxe引导以后的参数文件地址
复制引导文件undionly.kpxe到tftp服务目录下,在dhcp服务器中指定tftp服务器IP与启动文件名称。
用于pxe开机启动时获取到IP地址,以及tftp启动服务器的地址,启动文件名称。
4.2配置dhcp与tftp
1、安装dnsmasq
yum install dnsmasq -y2、添加dhcp与tftp配置
cat >/etc/dnsmasq.d/pxe.conf<<EOF
bind-interfaces
dhcp-range=192.168.75.15,192.168.75.250,255.255.255.0,8h
dhcp-option=option:router,192.168.75.2
dhcp-option=option:dns-server,223.5.5.5,223.6.6.6
dhcp-boot=undionly.kpxe,server.name,192.168.75.25
enable-tftp
tftp-root=/data/wwwroot/ipxe/tftpboot/
EOF
参数说明:
dhcp-range=192.168.75.15,192.168.75.250,255.255.255.0,8h
地址分配的起为192.168.75.15,结束为192.168.75.250,掩 码为255.255.255.0,租约为8小时
dhcp-option=option:router,192.168.75.2
定义网关为192.168.75.2
dhcp-option=option:dns-server,223.5.5.5,223.6.6.6
定义DNS 地址223.5.5.5,223.6.6.6
dhcp-boot=undionly.kpxe,server.name,192.168.75.25
定义启动文件名与tftp服务地址IP
enable-tftp
启用tftp
tftp-root=/data/wwwroot/ipxe/tftpboot/
定义tftp服务目录
注意:
最关键的
dhcp-boot=undionly.kpxe,server.name,192.168.75.25
定义启动文件名与tftp服务地址IP
enable-tftp
启用tftp
tftp-root=/data/wwwroot/ipxe/tftpboot/
定义tftp服务目录
与上一步生的路径一致
3、启动并查看端口号
systemctl enable dnsmasq && systemctl start dnsmasq
ss -nupl | grep dnsmasq | egrep "67|69"
4.3配置ipex引导启动参数
指定ipxe启动以后的ipxe引导文件
ipxe通过http://192.168.241.13/ipxe/boot.ipxe进行访问引导配置文件,因此需要配置web服务。
1、安装nginx
yum install epel-release -y
yum install nginx -y
vim /etc/nginx/nginx.conf
    server {
        listen       80;
		.....
        root         /data/wwwroot/;
        #主目录
        location / {
        autoindex on;
        #启用目录浏览
        index index.html;
        }
systemctl start nginx && systemctl enable nginx
2、配置ipxe引导参数(菜单引道集成方式)
此方法与上述方法2,优先此方法
在此种方式中使用boot.ipxe中指明配置菜单default的位置,在菜单中指定启动安装进程。
完整文件boot.ipxe内容如下
vim /data/wwwroot/ipxe/boot.ipxe
#!ipxe
set web-ip 192.168.75.25

:start
menu Welcome to iPXE's Boot Menu
item
item --gap -- ------------------------- Utilities ------------------------------
item centos    centos7.9
item reboot     Reboot
item exit       Exit (boot local disk)
choose --default centos --timeout 30000 target && goto ${target}

:centos
dhcp
kernel http://${web-ip}/ipxe/centosboot/vmlinuz initrd=initrd.img ks=http://${web-ip}/ipxe/kickstart/ks79.cfg ksdevice=bootif net.ifnames=0 biosdevname=0
initrd http://${web-ip}/ipxe/centosboot/initrd.img
boot || goto failed
goto start

:reboot
reboot

:exit
exit
参数解释
choose --default centos --timeout 30000 target && goto ${target}
centos可以换成exit或者reboot
30000
是30000ms即30s,可以换成3000ms即3s
3、制作网络源安装
3、1复制安装文件到http安装源
上传CentOS-7-x86_64-DVD-2009.iso到系统中,并挂载
mount CentOS-7-x86_64-DVD-2009.iso  /mnt/
#网络安装源
mkdir -p /data/wwwroot/os/centos7/
cp -rvf  /mnt/.  /data/wwwroot/os/centos7/
要注意内存是否足够,不然内存会爆满
3、2复制内核文件
cp /mnt/isolinux/vmlinuz  /data/wwwroot/ipxe/centosboot/
cp /mnt/isolinux/initrd.img  /data/wwwroot/ipxe/centosboot/
3、3准备答应文件
将制作好的应答文件上传/data/wwwroot/ipxe/kickstart/下。
/data/wwwroot/ipxe/kickstart/ks79.cfg内容如下
url --url="http://192.168.241.13/os/centos7/"为实际网络安装源地址,根据实际地址修改
ks79.cfg内容如下
#version=DEVEL
# System authorization information
auth --enableshadow --passalgo=sha512
# Use CDROM installation media
url --url="http://192.168.75.25/os/centos7/"
#cdrom
# Use graphical install
#text
graphical
# Run the Setup Agent on first boot
firstboot --enable
ignoredisk --only-use=sda
# Keyboard layouts
keyboard --vckeymap=cn --xlayouts='cn'
# System language
lang zh_CN.UTF-8

# Network information
network  --bootproto=dhcp --device=link --activate  --hostname=localhost.

# Root password
rootpw "123456"
# System services
services --enabled="chronyd"
# System timezone
timezone Asia/Shanghai --isUtc
# System bootloader configuration
bootloader --append=" crashkernel=auto" --location=mbr --boot-drive=sda
# Partition clearing information
# Disk partitioning information
clearpart --all --initlabel
autopart --type=lvm
# SELinux configuration
selinux --disabled
# Firewall configuration
firewall --disabled
# Reboot after installation
reboot

%packages
@^minimal
@core
@development tools
chrony
wget
vim
ntpdate
zlib
zlib-devel
pcre
pcre-devel
openssl-devel
%end

%post --interpreter=/bin/bash
cat >/etc/security/limits.d/20-nproc.conf<<EOF
*      soft    nproc     65536
*      hard    nproc     65536
*      soft    nofile     65536
*      hard    nofile     65536
root   soft    nproc     unlimited
EOF
mv /etc/selinux/config{,.ori}
cat >/etc/selinux/config<<EOF
SELINUX=disabled
SELINUXTYPE=targeted
EOF
systemctl disable firewalld
mkdir -p /apps
##当前IP地址
CURIP=$(ip -4 addr show scope global | awk 'NR==2 {print $2}' | awk -F '/' '{print $1}')
##IP地址写入网卡
cat >>/etc/sysconfig/network-scripts/ifcfg-eth0<<EOF
IPADDR="${CURIP}"
PREFIX="24"
GATEWAY="192.168.241.2"
DNS1="223.5.5.5"
DNS2="223.6.6.6"
EOF
cat >>/etc/issue<<EOF
IP:${CURIP}
EOF
##产生公私钥
ssh-keygen  -t rsa -P "" -f  /root/.ssh/id_rsa
##计划任务5分钟同步时间
cat >/var/spool/cron/root<<EOF
*/5 * * * * /sbin/ntpdate  ntp1.aliyun.com &>/dev/null
EOF
##下载ssh主控方的公钥
mkdir -p /root/.ssh && chmod 700 /root/.ssh && chown root:root /root/.ssh/ 2> /dev/null
wget -O /root/.ssh/authorized_keys  http://192.168.241.10/pubkey/192.168.241.10_pub 2> /dev/null
chmod 600 /root/.ssh/authorized_keys 2> /dev/null
chown root:root /root/.ssh/authorized_keys 2> /dev/null
%end
在%post 和 %end 之间添加内容
📎install_nginx.sh.txt📎install_ssh_keypub.sh.txt📎install_sshpass.sh.txt
4.4客户机开机,网卡引导
内存最小2G,进入安装菜单选项,自动进行安装系统。


 5041
5041

 被折叠的 条评论
为什么被折叠?
被折叠的 条评论
为什么被折叠?
 到【灌水乐园】发言


