


--Use OWIN to Self-Host ASP.NET Web API 2
原文链接:http://www.asp.net/web-api/overview/hosting-aspnet-web-api/use-owin-to-self-host-web-api
摘要:ASP.NET Web API 2拥有符合RESTFUL风格,原生支持HTML协议,解耦IIS和windows server服务器等诸多优秀特性。本文讲述如何使用OWIN构建ASP.NET Web API 2。在翻译的基础上加以完善,增加了原文中不完善的若干功能点。如完善update\delete代码,使用Fliddler测试等技术点。
关键字: OWIN, Web API, RESTFUL, 解耦IIS, fliddler
This tutorial shows how to host ASP.NET Web API in a console application, using OWIN to self-host the Web API framework.
Open Web Interface for .NET (OWIN) defines an abstraction between .NET web servers and web applications. OWIN decouples the web application from the server, which makes OWIN ideal for self-hosting a web application in your own process, outside of IIS.
本教程展示如何使用在console application中宿主ASP.NET Web API,使用OWIN来创建自宿主的Web API框架。
Open Web Interface for .NET (OWIN)定义了一个位于.NET web servers和web applications之间的抽象接口。 OWIN使得web applications和服务器解耦,使得web applications能够脱离IIS和windows server而独立存在。
Create a Console Application|创建一个window窗体应用程序
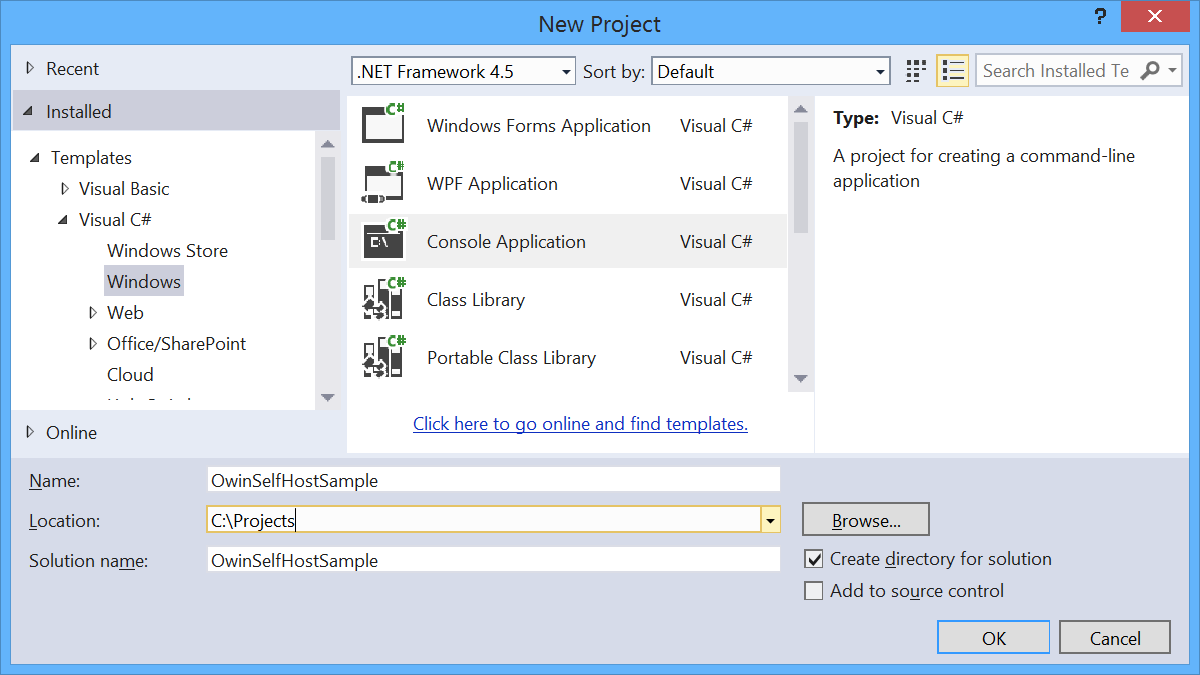
On the File menu, click New, then click Project. From Installed Templates, under Visual C#, click Windows and then click Console Application. Name the project “OwinSelfhostSample” and click OK.
文件->新建->项目,从”已安装模板”中,点击windows点击console应用程序。 命名为“OwinSelfhostSample”,点击“确定”
Add the Web API and OWIN Packages|添加Web API和OWIN包
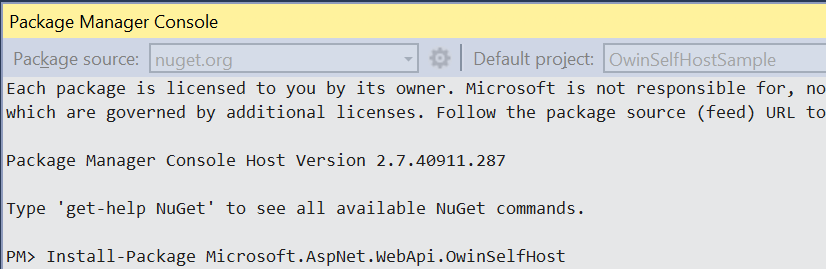
From the Tools menu, click Library Package Manager, then click Package Manager Console. In the Package Manager Console window, enter the following command:
Install-Package Microsoft.AspNet.WebApi.OwinSelfHost
This will install the WebAPI OWIN selfhost package and all the required OWIN packages.
从工具菜单,点击“资源包管理器”,然后点击“包管理命令”。 在命令窗口,输入如下命令:
Install-Package Microsoft.AspNet.WebApi.OwinSelfHost
这步操作会安装WebAPI OWIN自宿主包和所有需要的OWIN包。
Configure Web API for Self-Host|配置自宿主Web API
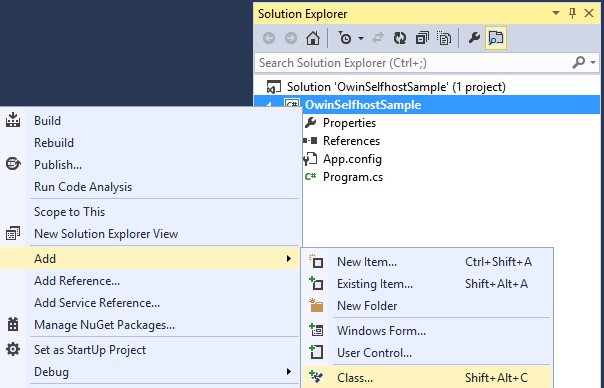
In Solution Explorer, right click the project and select Add / Class to add a new class. Name the class Startup.
在解决方案管理器中,右击项目,选择添加->类,添加一个新的类。命名为Startup
Replace all of the boilerplate code in this file with the following:
使用以下代码替换所有的内容
using Owin; using System.Web.Http;
namespace OwinSelfhostSample {
    public class Startup
    {
        // This code configures Web API. The Startup class is specified as a type
        // parameter in the WebApp.Start method.
        public void Configuration(IAppBuilder appBuilder)
        {
            // Configure Web API for self-host.
            HttpConfiguration config = new HttpConfiguration();
            config.Routes.MapHttpRoute(
                name: "DefaultApi",
                routeTemplate: "api/{controller}/{id}",
                defaults: new { id = RouteParameter.Optional }
            );

            appBuilder.UseWebApi(config);
        }
    } }
添加Models层
解决方案中,新建文件夹Models,并新建3个类,代码如下:
Product类
using System;
using System.Collections.Generic;
using System.Linq;
using System.Web;

namespace OwinSelfhostSample
{
    public class Product
    {
        public int Id { get; set; }
        public string Name { get; set; }
        public string Category { get; set; }
        public decimal Price { get; set; }
    }
}
ProductRepository类
using System;
using System.Collections.Generic;
using System.Linq;
using System.Web;

namespace OwinSelfhostSample
{
    public class ProductRepository:IProductRepository
    {
        private List<Product> products = new List<Product>();
        private int _indexId = 1;

        public ProductRepository()
        {
               products. Add(new Product {Id = 1, Name = "Tomato soup", Category = "Groceries", Price = 1.39M });
               products.Add(new Product { Id = 2, Name = "Yo-yo", Category = "Toys", Price = 3.75M });
               products.Add(new Product { Id = 3, Name = "Hammer", Category = "Hardware", Price = 16.99M });
        }
        public IEnumerable<Product> GetAll()
        {
            return products;
        }
        public Product Get(int id)
        {
            return products.Find(p => p.Id == id);
        }
        public Product Add(Product item)
        {
            if (item == null)
            {
                throw new ArgumentNullException("item");
            }
            item.Id = _indexId++;
            products.Add(item);
            return item;
        }

        public bool Update(Product item)
        {
            if (item == null)
            {
                throw new ArgumentNullException("item");
            }
            int index = products.FindIndex(p => p.Id == item.Id);
            if (index == -1)
            {
                return false;
            }
            products.RemoveAt(index);
            products.Add(item);
            return true;
        }

        public void Remove(int id)
        {
            products.RemoveAll(p => p.Id == id);
        }
    }
}
IProductRepository接口
using System;
using System.Collections.Generic;
using System.Linq;
using System.Text;
using System.Threading.Tasks;

namespace OwinSelfhostSample
{
    public interface IProductRepository
    {
        IEnumerable<Product> GetAll();
        Product Get(int id);
        Product Add(Product item);
        void Remove(int id);
        bool Update(Product item);
    }
}
Add a Web API Controller|添加Web API控制器
Next, add a Web API controller class. In Solution Explorer, right click the project and select Add / Class to add a new class. Name the classValuesController.
Replace all of the boilerplate code in this file with the following:
下一步,添加一个Web API控制器,在解决方案中,右击项目,选择添加->类来添加一个类。命名为ProductsController.代码如下
using System;
using System.Collections.Generic;
using System.Linq;
using System.Net;
using System.Text;
using System.Threading.Tasks;
using System.Web.Http;

namespace OwinSelfhostSample
{
    public class ProductsController : ApiController
    {
        static readonly IProductRepository repository = new ProductRepository();

        // GET /api/products
        public IEnumerable<Product> GetAllProducts()
        {
            return repository.GetAll();
        }

        // GET /api/products/id
        public Product GetProduct(int id)
        {
            var product = repository.Get(id);
            if (product == null)
            {
                throw new HttpResponseException(HttpStatusCode.NotFound);
            }
            return product;
        }

        //GET  /api/products/?category=category
        public IEnumerable<Product> GetProductsByCategory(string category)
        {
            return repository
                .GetAll()
                .Where(r => string.Equals(r.Category, category))
                .Select(r => r);
        }

        // POST api/products insert
        public void Post([FromBody]Product item)
        {
            repository.Add(item);
        }

        // PUT api/products/5 update
        public void Put(int id, Product product)
        {
            product.Id = id;
            if (!repository.Update(product))
            {
                throw new HttpResponseException(HttpStatusCode.NotFound);
            }
        }

        // DELETE api/products/5
        public void Delete(int id)
        {
            Product item = repository.Get(id);
            if (item == null)
            {
                throw new HttpResponseException(HttpStatusCode.NotFound);
            }
            repository.Remove(id);
        }
    }
}
Start the OWIN Host and Make a Request Using HttpClient|开启OWIN宿主,并且使用HttpClient发起一个请求
Replace all of the boilerplate code in the Program.cs file with the following:
使用下面代码替换Program.cs文件中的内容:
using Microsoft.Owin.Hosting;
using System;
using System.Collections.Generic;
using System.Linq;
using System.Net.Http;
using System.Text;
using System.Threading.Tasks;

namespace OwinSelfhostSample
{
    class Program
    {
        static void Main(string[] args)
        {
            string baseAddress = "http://localhost:9000/";

            // Start OWIN host
            WebApp.Start<Startup>(url: baseAddress);

            // Create HttpCient and make a request to api/products
            HttpClient client = new HttpClient();

            var response = client.GetAsync(baseAddress + "api/products").Result;

            Console.WriteLine(response);
            Console.WriteLine(response.Content.ReadAsStringAsync().Result);


            Console.ReadLine();
        }
    }
}
Running the Application|运行程序
使用Flidder测试
Flidder下载地址:https://www.telerik.com/download/fiddler
Composer->Parsed标签
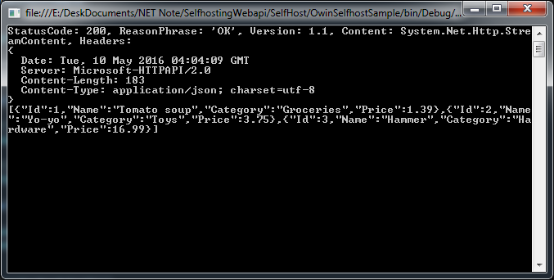
GET, http://localhost:9000/api/products,得到返回:
HTTP/1.1 200 OK
Content-Length: 183
Content-Type: application/json; charset=utf-8
Server: Microsoft-HTTPAPI/2.0
Date: Tue, 10 May 2016 04:06:30 GMT
[{"Id":1,"Name":"Tomato soup","Category":"Groceries","Price":1.39},{"Id":2,"Name":"Yo-yo","Category":"Toys","Price":3.75},{"Id":3,"Name":"Hammer","Category":"Hardware","Price":16.99}]
小结
本文描述了使用VS2013、OWIN等工具建立自宿主RESTFUL 风格的Web API。 并使用Flidder进行了测试。本测试项目仅使用了内存数据。实际项目中更多考虑采用挂载数据库、业务逻辑, 原理相同。
Ps 读者的认可很重要,如果觉得有用,请点个顶。


 747
747


 被折叠的 条评论
为什么被折叠?
被折叠的 条评论
为什么被折叠?
 到【灌水乐园】发言


