


1、前言
最近暴雨不断,只能宅在家里,闲来无事,写写文章
2、整体分析
通过抓包工具,简单看看登陆封包内容,如下:
其中密码为123456
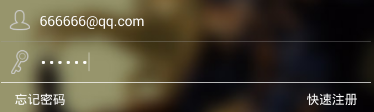
登陆,封包如下:
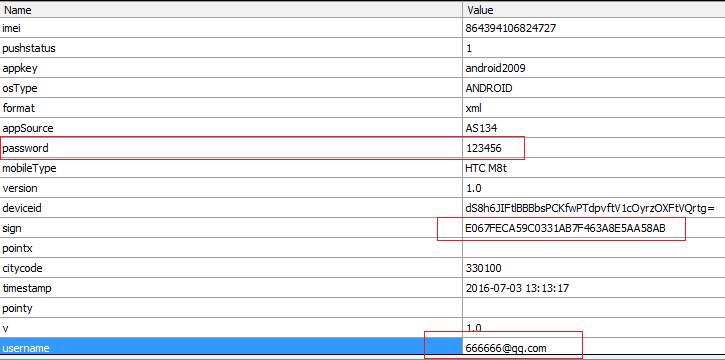
居然是明文传输密码和账号,不止如此,传输居然采用http,看到这,这款企业级的app安全性,可以想象,根本毫无安全可言。另外,可以看到封包最后有个签名sign,如果我们把sign算法搞定,那岂不是,可以写自动注册机了。
3、登陆签名算法分析
搜索”注册成功”,来到关键的处理登陆信息的代码,如下:
public static HashMap<String, String> a(final HashMap<String, String> hashMap) {
        hashMap.put("appkey", "android2009");
        hashMap.put("timestamp", ps.a());
        hashMap.put("v", "1.0");
        hashMap.put("format", "xml");
        hashMap.put("appSource", ot.v);
        hashMap.put("osType", "ANDROID");
        hashMap.put("osVersion", Build$VERSION.RELEASE);
        if (!hashMap.containsKey("appVersion")) {
            hashMap.put("appVersion", pj.a);
        }
        if (!hashMap.containsKey("apptype")) {
            hashMap.put("apptype", "cinema");
        }
        if (!hashMap.containsKey("version")) {
            hashMap.put("version", "1.0");
        }
        if (!hashMap.containsKey("memberEncode")) {
            final String a = px.a();
            if (pq.i(a)) {
                hashMap.put("memberEncode", a);
            }
        }
        if (!hashMap.containsKey(ot.p)) {
            hashMap.put("deviceId", ot.f);
        }
        if (!hashMap.containsKey(ot.o)) {
            hashMap.put("mobileType", ot.d);
        }
        if (!hashMap.containsKey(ot.q)) {
            hashMap.put("imei", ot.e);
        }
        if (!hashMap.containsKey(ot.n)) {
            hashMap.put("mprovider", ot.h);
        }
        if (!hashMap.containsKey(ot.m)) {
            hashMap.put("mnet", ot.g);
        }
        if (!hashMap.containsKey(ot.r)) {
            hashMap.put("citycode", ot.i);
        }
        if (!hashMap.containsKey(ot.t)) {
            hashMap.put("pointx", ot.k);
        }
        if (!hashMap.containsKey(ot.u)) {
            hashMap.put("pointy", ot.l);
        }
        final ArrayList<Comparable> list = new ArrayList<Comparable>();
        final ArrayList<String> list2 = new ArrayList<String>();
        for (final Map.Entry<String, String> entry : hashMap.entrySet()) {
            if (entry.getValue() == null) {
                list2.add(entry.getKey());
            }
            list.add(entry.getKey());
        }
        for (int size = list2.size(), i = 0; i < size; ++i) {
            hashMap.remove(list2.get(i));
            list.remove(list2.get(i));
        }
        Collections.sort(list);
        final int size2 = list.size();
        final TreeMap<String, String> treeMap = new TreeMap<String, String>();
        for (int j = 0; j < size2; ++j) {
            treeMap.put(list.get(j), hashMap.get(list.get(j)));
        }
        String a2 = "";
        while (true) {
            try {
                a2 = om.a(treeMap, "prikey-android");
                hashMap.put("sign", a2);
                hashMap.put("signmethod", "MD5");
                return hashMap;
            }
            catch (Exception ex) {
                continue;
            }
            break;
        }
    }
可以非常清晰的看到,通过获取一系列的信息放到map中,然后通过 a2 = om.a(treeMap, “prikey-android”) 进行签名。最后,作者居然把签名算法提示出来类,无语。。。。。。
我们再来详细可看,签名算法
public static String a(final Map<String, String> map, final String s) throws IOException {
        final TreeMap<String, Object> treeMap = new TreeMap<String, Object>(map);
        final StringBuilder sb = new StringBuilder();
        for (final Map.Entry<String, V> entry : treeMap.entrySet()) {
            sb.append(entry.getKey()).append("=").append((String)entry.getValue()).append("&");
        }
        final byte[] digest = a().digest((pp.a(sb.toString(), "&") + s).getBytes("UTF-8"));
        final StringBuilder sb2 = new StringBuilder();
        for (int i = 0; i < digest.length; ++i) {
            final String hexString = Integer.toHexString(digest[i] & 0xFF);
            if (hexString.length() == 1) {
                sb2.append("0");
            }
            sb2.append(hexString.toUpperCase());
        }
        return sb2.toString().toUpperCase();
    }
代码比较清晰,获取map中的key 和value,重新组合,调用pp.a(String, String)方法,返回值加上传递进来的参数s转换成byte数组,传递给a().digest。再说明a()之前,首先说下pp.a(String, String)的作用,该函数对传入的字符串进行非空和空白字符判断,并去掉第一个参数末尾的标识,其中标识由第二个参数指定。处理后的字符串如下:
appSource=AS134&appVersion=6.0.1&appkey=android2009&apptype=cinema&citycode=330100&deviceId=68F72842A46E&deviceid=dS8h6JIFtlBBBbsPCKfwPTdpvftV1cOyrzOXFtVQrtg=&format=xml&imei=864394106824727&method=xxxxxx.login&mnet=WIFI&mobileType=HTC M8t&mprovider=46000&osType=ANDROID&osVersion=4.4.2&password=123456&pointx=&pointy=&pushstatus=1×tamp=2016-07-03 12:36:41&username=666666@qq.com&v=1.0&version=1.0prikey-android下面,来看下a()方法,比较简单返回MD5数字签名实例,如下:
private static MessageDigest a() throws IOException {
        try {
            return MessageDigest.getInstance("MD5");
        }
        catch (NoSuchAlgorithmException ex) {
            throw new IOException(ex.getMessage());
        }
    }
继续分析,代码的后半部分,作用就是转换成大写十六进制格式的md5.
最后,附上md5加密算法模板
/*
    * MD5加密
    */
     public String getMD5Str(String str) {
         MessageDigest messageDigest = null;
         String result = null;

         try {
             messageDigest = MessageDigest.getInstance("MD5");

             messageDigest.reset();

             messageDigest.update(str.getBytes("UTF-8"));

             byte[] byteArray = messageDigest.digest();

             StringBuffer md5StrBuff = new StringBuffer();

             for (int i = 0; i < byteArray.length; i++) {
                 if (Integer.toHexString(0xFF & byteArray[i]).length() == 1)
                     md5StrBuff.append("0").append(Integer.toHexString(0xFF & byteArray[i]));
                 else
                     md5StrBuff.append(Integer.toHexString(0xFF & byteArray[i]));
             }
            //16位加密,从第9位到25位
             result = md5StrBuff.substring(8, 24).toString().toUpperCase();

         } catch (NoSuchAlgorithmException e) {
             System.out.println("NoSuchAlgorithmException caught!");
             result = null;
         } catch (UnsupportedEncodingException e) {
             result = null;
         }

         return  result;
} 


 2658
2658

 被折叠的 条评论
为什么被折叠?
被折叠的 条评论
为什么被折叠?
 到【灌水乐园】发言


