


上一讲中写了一个实例,这个实例中日志记录代码(非业务代码)跟逻辑代码耦合在了一起。当工程庞大,代码量非常大的时候这样的代码维护非常困难。Spring使用AOP技术可以实现这种非业务代码与业务代码的隔离。
AOP面向切面编程可以使非业务代码能够动态的切入到逻辑代码中。AOP之所以能够实现这种功能,是基于一种通知机制(与struts2的拦截机制挺像的),当要执行或者执行完成某个业务代码时向非业务类发送通知,进而运行需要的非业务类代码。AOP的通知类型包括前置通知、后置通知、环绕通知、返回通知、异常通知。
在上一讲工程的基础上进行代码修改。
一、前置通知
1.把业务代码修改成:
package com.test.service.impl;

import com.test.service.StudentService;

public class StudentServiceImpl implements StudentService{

	@Override
	public void addStudent(String name) {
		System.out.println("添加学生"+name);
	}


}
3.写一个切面类,也就是非业务逻辑类,所执行的非业务代码都是这个类中的方法。
package com.test.notice;

import org.aspectj.lang.JoinPoint;
import org.aspectj.lang.ProceedingJoinPoint;

public class StudentServiceNotice {


	public void doBefore(JoinPoint jp){
		System.out.println("类名:"+jp.getTarget().getClass().getName());
		System.out.println("方法名:"+jp.getSignature().getName());
		System.out.println("开始添加学生:"+jp.getArgs()[0]);
	}

}
4.配置Spring:
<?xml version="1.0" encoding="UTF-8"?>
<beans xmlns="http://www.springframework.org/schema/beans"
xmlns:xsi="http://www.w3.org/2001/XMLSchema-instance"
xmlns:aop="http://www.springframework.org/schema/aop"
xsi:schemaLocation="http://www.springframework.org/schema/beans
http://www.springframework.org/schema/beans/spring-beans.xsd
http://www.springframework.org/schema/aop
http://www.springframework.org/schema/aop/spring-aop.xsd">
<bean id="studentServiceNotice" class="com.test.notice.StudentServiceNotice"></bean>
<bean id="studentService" class="com.test.service.impl.StudentServiceImpl"></bean>
<aop:config>
<aop:aspect id="studentServiceNotice" ref="studentServiceNotice">
<aop:pointcut expression="execution(* com.test.service.*.*(..))" id="businessService"/>
<aop:before method="doBefore" pointcut-ref="businessService"/>
</aop:aspect>
</aop:config>
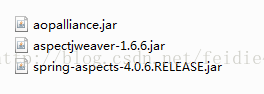
</beans>这里首先注意,要想使用AOP,需要引入相应的文件,这里引入的文件包括:
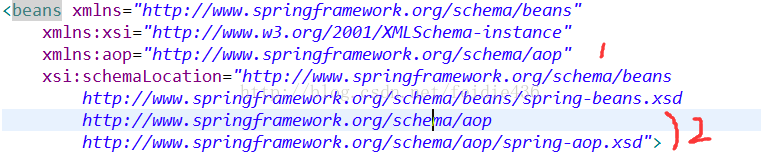
配置文件中首先定义了切面类的一个实例对象studentServiceNotice,然后使用<aop:config>标签进行AOP配置,该标签里面的内容就是AOP配置信息。
里面使用<aop:aspect>标签定义了一个切面,这个切面的id是studentServiceNotice,并引用了我们刚才定义的切面类,也就是说这个切面使用我们刚才定义的切面类中的代码实现非业务功能。
使用<aop:pointcut>标签定义了一个切点,所谓的切点就是定义要在执行哪些逻辑代码的时候执行切面中的非业务代码,切点的定义是一个表达式。
这里这个表达式execution属性的值是execution(* com.test.service.*.*(..)),这里第一个*号代表可以是任何的返回值;
接下来的com.test.service.*.*(..)代表要执行的方法:里面第一个*号代表任意的包名,按照我们的工程层次,满足这个包地址的包括com.test.service和com.test.service.impl两个包,第二个*号代表任意的方法,括号里面两个点代表输入参数是任意值,所以com.test.service.*.*(..)代表的是com.test.service和com.test.service.impl两个包中的任意方法。
上面定义的切点<aop:pointcut expression="execution(* com.test.service.*.*(..))" id="businessService"/>代表当执行com.test.service和com.test.service.impl两个包中任意的方法时执行切面代码。这里给这个切点定义了id为businessService;
下面<aop:before method="doBefore" pointcut-ref="businessService"/>配置了前置通知,使用<aop:before>标签配置前置通知,里面method属性代表要响应前置通知执行的方法,pointcut-ref属性代表发送前置通知的切点。所以这里的意思就是当执行到切点businessService的内容之前,发送前置通知,执行前置通知响应方法doBefore。也就是当执行com.test.service和com.test.service.impl两个包中任意的方法之前调用doBefore方法。
5.写测试方法
package com.test.test;

import org.springframework.context.ApplicationContext;
import org.springframework.context.support.ClassPathXmlApplicationContext;

import com.test.service.StudentService;


public class Test2 {

	public static void main(String[] args) {
		 ApplicationContext ac = new ClassPathXmlApplicationContext("beans.xml");
		 StudentService studentService = (StudentService) ac.getBean("studentService");
		 studentService.addStudent("张三");
	}

}
这里执行了添加学生操作,运行这个测试代码:
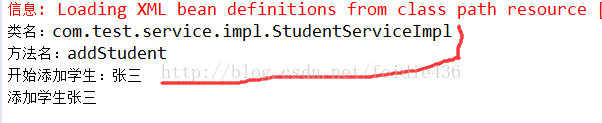
可以看到在执行逻辑代码addStudent方法之前先执行了doBefore方法,通过doBefore中传入的形参jp获得了要调用的逻辑方法addStudent的信息。
这里再次强调一下流程:测试方法中调用了逻辑方法addStudent(),这个方法在com.test.service.impl包中,按照Spring配置的AOP,当执行com.test.service.impl中的任意方法之前都会先调用doBefore方法。
二、后置通知
所谓的后置通知就是在执行某个方法之后发送的通知。
1.修改切面类,添加后置通知处理方法:
//后置通知,执行指令之后通知切面类
	public void doAfter(JoinPoint jp){
		System.out.println("类名:"+jp.getTarget().getClass().getName());
		System.out.println("方法名:"+jp.getSignature().getName());
		System.out.println("学生添加完成:"+jp.getArgs()[0]);
}2.修改Spring配置文件:
<aop:config>
		<aop:aspect id="studentServiceNotice" ref="studentServiceNotice">
			<aop:pointcut expression="execution(* com.test.service.*.*(..))" id="businessService"/>
			<aop:before method="doBefore" pointcut-ref="businessService"/>
			<aop:after method="doAfter" pointcut-ref="businessService"/>

		</aop:aspect>
</aop:config>3.运行上面的测试方法:
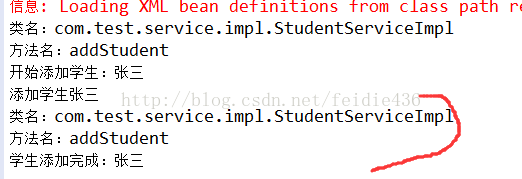
可以看到在执行了逻辑代码之后执行了doAfter方法。
三、环绕通知
发送环绕通知时可以在执行逻辑方法之前和之后执行其他的代码。
1.修改切面类,添加环绕通知响应方法:
public Object doAround(ProceedingJoinPoint pjp) throws Throwable{
		System.out.println("添加学生前");
		Object retVal = pjp.proceed();

		System.out.println("添加学生后");
		return retVal;
	}
环绕通知的处理方法与前置、后置通知的处理方法不同。这个方法是具有返回值的,里面的Object retVal = pjp.proceed(),这一句代码是执行真正的逻辑代码(这个测试方法里也就是执行addStudent方法),里面的返回值也就是逻辑方法中的返回值(也就是addStudent的返回值,为Null)。
我们这里定义的doAround方法,在执行逻辑方法(addStudent)之前先执行了代码System.out.println("添加学生前"),在执行逻辑代码之后又执行了System.out.println("添加学生后")代码。这也就是环绕通知的好处,我们可以控制执行逻辑代码之前和之后要执行的代码。
2.修改Spring配置文件:
<aop:config>
		<aop:aspect id="studentServiceNotice" ref="studentServiceNotice">
			<aop:pointcut expression="execution(* com.test.service.*.*(..))" id="businessService"/>
			<aop:before method="doBefore" pointcut-ref="businessService"/>
			<aop:after method="doAfter" pointcut-ref="businessService"/>
			<aop:around method="doAround" pointcut-ref="businessService"/>
		</aop:aspect>
	</aop:config>
这里使用<aop:around>标签配置环绕通知,这一句的配置也就是当执行businessService这个切点的方法时执行方法doAround。
3.运行测试方法:
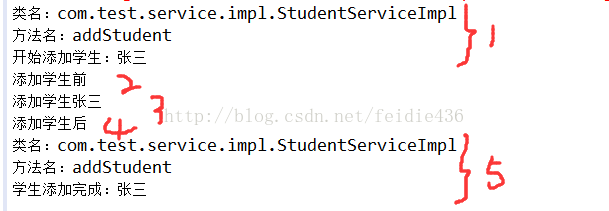
这里1是执行的前置通知doBefore方法,2、3、4是执行的环绕通知doAround方法,其中2是执行逻辑代码addStudent之前执行的代码,3是执行的逻辑方法addStudent,4是执行逻辑代码addStudent之后执行的代码,5是执行的后置通知doAfter方法。
四、返回通知
所谓的返回通知就是逻辑代码将要返回发送的通知。
1.修改切面类,添加返回通知处理方法:
public void doAfterReturning(JoinPoint jp){
		System.out.println("返回通知");
	}
2.修改Spring配置:
<aop:config>
		<aop:aspect id="studentServiceNotice" ref="studentServiceNotice">
			<aop:pointcut expression="execution(* com.test.service.*.*(..))" id="businessService"/>
			<aop:before method="doBefore" pointcut-ref="businessService"/>
			<aop:after method="doAfter" pointcut-ref="businessService"/>
			<aop:around method="doAround" pointcut-ref="businessService"/>
			<aop:after-returning method="doAfterReturning" pointcut-ref="businessService"/>
		</aop:aspect>
	</aop:config>
这里使用<aop:after-returning>标签进行返回通知配置,当逻辑代码执行完成将要返回时发送返回通知,执行doAfterReturning方法。
3.执行上述测试方法:
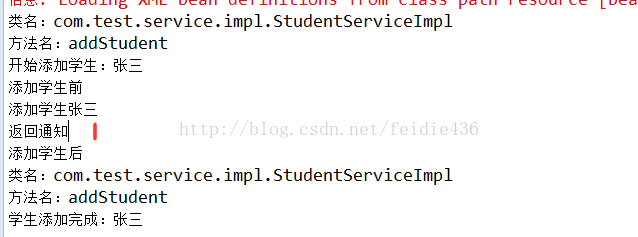
上面1就是执行的返回通知处理方法。
五、异常通知
所谓的异常通知就是在逻辑代码发生异常时产生的通知。
1.修改切面类,添加异常通知处理方法:
public void doAfterThrowing(JoinPoint jp,Throwable ex){
		System.out.println("异常通知");
		System.out.println("异常信息:"+ex.getMessage());
	}
这里把异常信息输出。
2.修改Spring配置:
<aop:config>
		<aop:aspect id="studentServiceNotice" ref="studentServiceNotice">
			<aop:pointcut expression="execution(* com.test.service.*.*(..))" id="businessService"/>
			<aop:before method="doBefore" pointcut-ref="businessService"/>
			<aop:after method="doAfter" pointcut-ref="businessService"/>
			<aop:around method="doAround" pointcut-ref="businessService"/>
			<aop:after-returning method="doAfterReturning" pointcut-ref="businessService"/>
			<aop:after-throwing method="doAfterThrowing" pointcut-ref="businessService" throwing="ex"/>
		</aop:aspect>
	</aop:config>
这里使用<aop:after-throwing>标签配置异常通知,当执行切点businessService中方法发生异常时执行方法doAfterThrowing方法,throwing属性的值为抛出的异常信息。
3.执行测试代码:
因为逻辑代码中没有异常抛出,所以不会执行doAfterThrowing方法。
4.修改逻辑代码为:
package com.test.service.impl;

import com.test.service.StudentService;

public class StudentServiceImpl implements StudentService{

	@Override
	public void addStudent(String name) {

		System.out.println("添加学生"+name);
		System.out.println(1/0);
	}


}
这里输出1/0的值,会抛出错误信息。
5.运行测试方法:
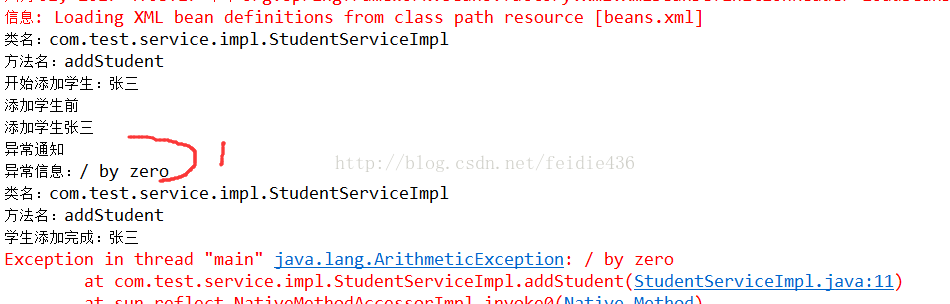
这里执行了doAfterThrowing方法。


 3万+
3万+


 被折叠的 条评论
为什么被折叠?
被折叠的 条评论
为什么被折叠?
 到【灌水乐园】发言


