


创建一个HashMap实例:
final map = HashMap();
创建一个LinkedHashMap实例
final map = LinkedHashMap();
创建一个Map实例
final map = Map();
这里你得到的map其实是一个LinkedHashMap。其工厂构造函数如下:
@patch
class Map<K, V> {
…
@patch
factory Map() => new LinkedHashMap<K, V>();
…
}
增/改
map[‘one’] = 1;
删
map.remove(‘one’);
查
final value = map[‘one’];
增,改,查的操作和操作数组一样,删除要调用remove()。
迭代器
final it = map.entries.iterator;
while(it.moveNext()) {
print(it.current);
}
Dart语言一大特点就是特别灵活,这里只是列举了一些常见操作,其他不同的写法大家可以参考API文档。
接下来我们深入源码来一探究竟。
HashMap
构造函数
@patch
class HashMap<K, V> {
@patch
factory HashMap(
{bool equals(K key1, K key2)?,
int hashCode(K key)?,
bool isValidKey(potentialKey)?}) {
if (isValidKey == null) {
if (hashCode == null) {
if (equals == null) {
return new _HashMap<K, V>();
}
…
}
HashMap构造函数有三个可选入参,这里我们都不传,这样的话返回的就是个_HashMap实例。有入参的情况下会返回另外两种_IdentityHashMap和_CustomHashMap之一,本文由于篇幅所限就 不再涉及。大家感兴趣的话可以直接去看源码。
底层结构
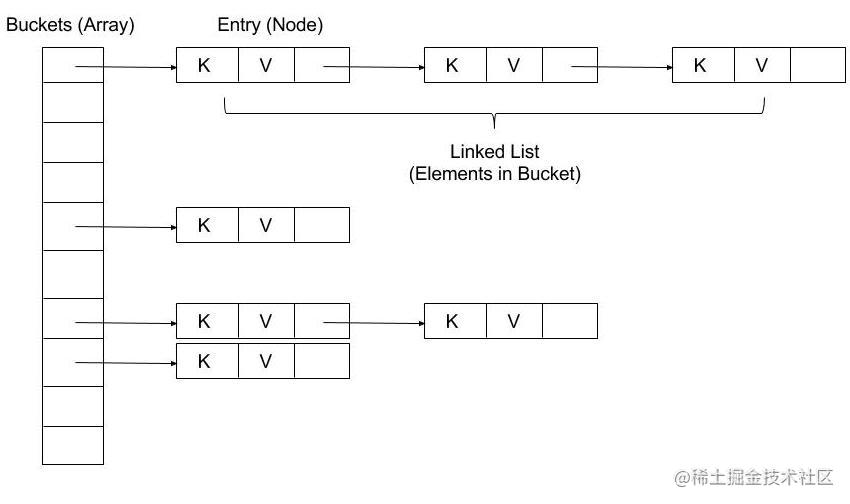
var _buckets = List<_HashMapEntry<K, V>?>.filled(_INITIAL_CAPACITY, null);
这一看就是数组+链表的形式嘛。
 初始化容量:
static const int _INITIAL_CAPACITY = 8;
我们知道Java的HashMap初始化大小是16,Dart使用的是8. 虽然不同但也还是2的幂。 另外貌似Dart也没有给用户提供自定义初始化大小的机会。
查找操作
V? operator [](Object? key) {
final hashCode = key.hashCode;
final buckets = _buckets;
final index = hashCode & (buckets.length - 1);
var entry = buckets[index];
while (entry != null) {
if (hashCode == entry.hashCode && entry.key == key) {
return entry.value;
}
entry = entry.next;
}
return null;
}
可见取数组下标就是直接把key的hashCode和数组长度-1做与操作。
final index = hashCode & (buckets.length - 1);
然后比较链表元素保存的哈希值以及key是否相等,不相等则找下一个链表元素,都相等则返回对应值。这里我们要注意到没有红黑树。所以dart的HashMap实现其实和jdk1.8之前的实现类似。
赋值操作
void operator []=(K key, V value) {
final hashCode = key.hashCode;
final buckets = _buckets;
final length = buckets.length;
final index = hashCode & (length - 1);
var entry = buckets[index];
while (entry != null) {
if (hashCode == entry.hashCode && entry.key == key) {
entry.value = value;
return;
}
entry = entry.next;
}
_addEntry(buckets, index, length, key, value, hashCode);
}
过程和取值操作其实差不多,键值对存在的情况下就直接赋值,不存在的情况下就调用_addEntry()做新增操作。
void _addEntry(List<_HashMapEntry<K, V>?> buckets, int index, int length,
K key, V value, int hashCode) {
final entry = new _HashMapEntry<K, V>(key, value, hashCode, buckets[index]);
buckets[index] = entry;
final newElements = _elementCount + 1;
_elementCount = newElements;
// If we end up with more than 75% non-empty entries, we
// resize the backing store.
if ((newElements << 2) > ((length << 1) + length)) _resize();
_modificationCount = (_modificationCount + 1) & _MODIFICATION_COUNT_MASK;
}
这里注意一下在新建_HashMapEntry的时候会传入当前数组的entry,也就是buckets[index]。然后把新的entry赋值给buckets[index]。
buckets[index] = entry;
这里我们就能猜到应该用的是头插法。另外,_modificationCount是每次有增删等操作的时候都是自增的,当我们在遍历HashMap的过程中如果有此类操作会导致Concurrent modification异常。这也就是"Fail-Fast"机制
新增操作显然会涉及到扩容的问题,从上面的注释我们可以看出,在键值对数量超过数组容量的75%的时候会做扩容,也就是它的负载因子是0.75。这点和Java也是一样的。这个75%的计算过程为了提高效率使用了位运算和加法来代替除法,等效于e*4>l*3 -> e/l>3/4 -> e/l>75%
扩容操作
void _resize() {
final oldBuckets = _buckets;
final oldLength = oldBuckets.length;
final newLength = oldLength << 1;
final newBuckets = new List<_HashMapEntry<K, V>?>.filled(newLength, null);
for (int i = 0; i < oldLength; i++) {
var entry = oldBuckets[i];
while (entry != null) {
final next = entry.next;
final hashCode = entry.hashCode;
final index = hashCode & (newLength - 1);
entry.next = newBuckets[index];
newBuckets[index] = entry;
entry = next;
}
}
_buckets = newBuckets;
}
扩容后的新数组长度是原长度的2倍。
final newLength = oldLength << 1;
我们知道它的初始长度是8,可见buckets数组长度始终会是2的幂。
从把entry从旧数组转移到新数组的过程我们也能看出来,这个转移的过程使用的也是头插法。
扩容这里有一个需要注意的地方就是,当键值对数量超过数组长度的75%时会发生扩容,而不是数组被占用超过75%的时候会发生扩容,这一误区在很多讨论Java HashMap的文章中也出现过。需要大家仔细体会这里面的不同。
删除操作
void _removeEntry(_HashMapEntry<K, V> entry,
_HashMapEntry<K, V>? previousInBucket, int bucketIndex) {
if (previousInBucket == null) {
_buckets[bucketIndex] = entry.next;
} else {
previousInBucket.next = entry.next;
}
}
删除就是正常的链表删除节点的过程。
遍历
void forEach(void action(K key, V value)) {
final stamp = _modificationCount;
final buckets = _buckets;
final length = buckets.length;
for (int i = 0; i < length; i++) {
var entry = buckets[i];
while (entry != null) {
action(entry.key, entry.value);
if (stamp != _modificationCount) {
throw new ConcurrentModificationError(this);
}
entry = entry.next;
}
}
}
遍历会从数组的第一个位置开始依次访问链表的每一项。显然这个遍历顺序是不保证和键值对的插入顺序一致的。这里我们也能看到"Fail-Fast"机制发生作用的时候了,如果遍历过程中用户对HashMap做了增删等操作的话会导致stamp和_modificationCount不相等,导致ConcurrentModificationError异常。
小结
Dart的HashMap总体而言实现的还是比较简单的。整体上和jdk1.7版本的HashMap类似。相信研究过Java实现的同学们会觉得dart的HashMap比较好理解一些。
LinkedHashMap
从API文档上看,LinkedHashMap和HashMap的区别就是在遍历的时候,LinkedHashMap会保留键值对的插入顺序。在jdk中,LinkedHashMap的实现是将Node改造为双向链表以保留顺序。dart的LinkedHashMap实现则有所不同。
构造函数
@patch
class LinkedHashMap<K, V> {
@patch
factory LinkedHashMap(
{bool equals(K key1, K key2)?,
int hashCode(K key)?,
bool isValidKey(potentialKey)?}) {
if (isValidKey == null) {
if (hashCode == null) {
if (equals == null) {
return new _InternalLinkedHashMap<K, V>();
}
…
}
类似的,LinkedHashMap构造函数有三个可选入参,这里我们都不传,这样的话返回的就是个_InternalLinkedHashMap实例。有入参的情况下会返回另外两种_CompactLinkedIdentityHashMap和_CompactLinkedCustomHashMap之一,本文也不再涉及。
底层结构
我们直接看_InternalLinkedHashMap。
_InternalLinkedHashMap构造函数:
_InternalLinkedHashMap() {
_index = new Uint32List(_HashBase._INITIAL_INDEX_SIZE);
_hashMask = _HashBase._indexSizeToHashMask(_HashBase._INITIAL_INDEX_SIZE);
_data = new List.filled(_HashBase._INITIAL_INDEX_SIZE, null);
_usedData = 0;
_deletedKeys = 0;
}
可见_InternalLinkedHashMap底层有两个数组,_index和_data。_index数组以哈希码为下标记录对应键值对在_data数组中的位置。_data数组按插入顺序依次保存key和value。
用图来表示就是下面这个样子:
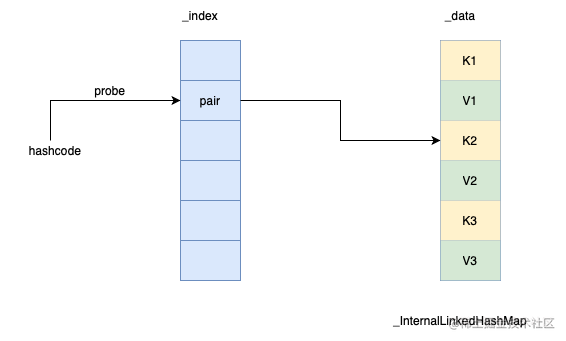
两个数组的初始化长度都是_INITIAL_INDEX_SIZE。通过以下代码可见其值为16。_data数组存放的是键值对,那最多的话只能存放8个键值对了。也就是说LinkedHashMap初始容量其实是8。
abstract class _HashBase implements _HashVMBase {
…
static const int _INITIAL_INDEX_BITS = 3;
static const int _INITIAL_INDEX_SIZE = 1 << (_INITIAL_INDEX_BITS + 1);
}
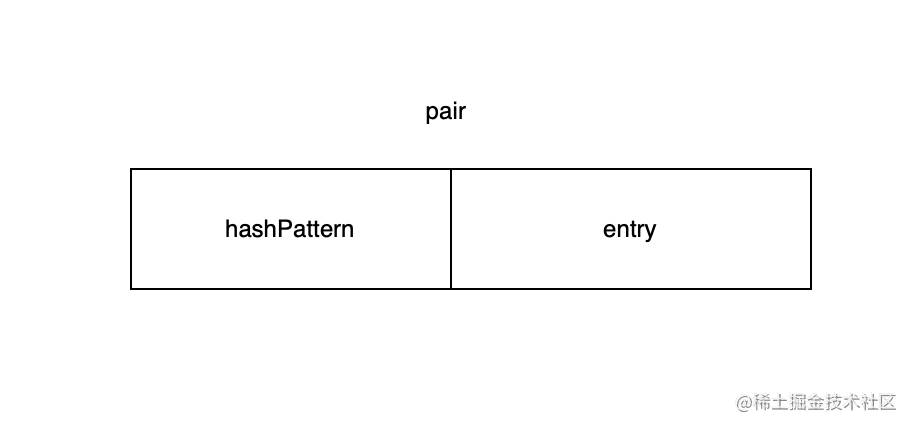
LinkedHashMap底层其实是用线性探测法实现的。数组_index里保存的是叫pair的一个整数。之所以叫pair是因为它是由高位和低位两部分组成的,高位叫hashPattern, 低位叫entry。entry指向_data数组对应的键值对。从hashcode到真正键值对的查找过程的关键点其实就是这个entry。
同时pair也用来表示_index数组对应位置的状态。0(_UNUSED_PAIR)表示当前未使用,1(_DELETED_PAIR)表示当前位置处于删除状态:
abstract class _HashBase implements _HashVMBase {
…
static const int _UNUSED_PAIR = 0;
static const int _DELETED_PAIR = 1;
…
}
查找操作
V? operator [](Object? key) {
var v = _getValueOrData(key);
return identical(_data, v) ? null : internal.unsafeCast(v);
}
查找最终会调用到_getValueOrData
Object? _getValueOrData(Object? key) {
final int size = _index.length;
final int sizeMask = size - 1;
final int maxEntries = size >> 1;
final int fullHash = _hashCode(key);
final int hashPattern = _HashBase._hashPattern(fullHash, _hashMask, size);
int i = _HashBase._firstProbe(fullHash, sizeMask);
int pair = _index[i];
while (pair != _HashBase._UNUSED_PAIR) {
if (pair != _HashBase._DELETED_PAIR) {
final int entry = hashPattern ^ pair;
if (entry < maxEntries) {
final int d = entry << 1;
if (_equals(key, _data[d])) {
return _data[d + 1];
}
}
}
i = _HashBase._nextProbe(i, sizeMask);
pair = _index[i];
}
return _data;
}
从这个函数中我们就能了解到线性探测的过程了。首先通过调用_HashBase._firstProbe()来拿到首个地址:
static int _firstProbe(int fullHash, int sizeMask) {
final int i = fullHash & sizeMask;
// Light, fast shuffle to mitigate bad hashCode (e.g., sequential).
return ((i << 1) + i) & sizeMask;
}
首次探测就是把hashcode和数组长度取模,注意还有一步,是把i乘以3以后再取模。从注释上看是为了使hashcode分布更均匀一些。大家可以思考一下其中的原因。
首次探测以后拿到pair,如果这个pair是未占用状态说明键值对不存在,按约定直接返回_data数组。如果是删除状态就接着做二次探测。如果是正常占用状态,就将pair和hashPattern做异或,从前面的图可知,这样就得到了entry。检查entry未越界的话,将其乘以2就是key在_data数组中的位置了,最后判断key相等,则返回_data的下一个元素,即value。
二次探测会调用_HashBase._nextProbe()
static int _nextProbe(int i, int sizeMask) => (i + 1) & sizeMask;
源码可见就是挨个去试下一个地址。
赋值操作
void operator []=(K key, V value) {
final int size = _index.length;
final int fullHash = _hashCode(key);
final int hashPattern = _HashBase._hashPattern(fullHash, _hashMask, size);
final int d = _findValueOrInsertPoint(key, fullHash, hashPattern, size);
文末
当你打算跳槽的时候,应该把“跳槽成功后,我能学到什么东西?对我的未来发展有什么好处”放在第一位。这些东西才是真正引导你的关键。在跳槽之前尽量“物尽其用”,把手头上的工作做好,最好是完成了某个项目或是得到提升之后再走。跳槽不是目的,而是为了达到最终职业目标的手段
最后祝大家工作升职加薪,面试拿到心仪Offer


《Android学习笔记总结+移动架构视频+大厂面试真题+项目实战源码》,点击传送门,即可获取!
Point(key, fullHash, hashPattern, size);
文末
当你打算跳槽的时候,应该把“跳槽成功后,我能学到什么东西?对我的未来发展有什么好处”放在第一位。这些东西才是真正引导你的关键。在跳槽之前尽量“物尽其用”,把手头上的工作做好,最好是完成了某个项目或是得到提升之后再走。跳槽不是目的,而是为了达到最终职业目标的手段
最后祝大家工作升职加薪,面试拿到心仪Offer
[外链图片转存中…(img-SryC3V2c-1715167401287)]
[外链图片转存中…(img-j6gSJaNy-1715167401288)]
《Android学习笔记总结+移动架构视频+大厂面试真题+项目实战源码》,点击传送门,即可获取!


 35
35

 被折叠的 条评论
为什么被折叠?
被折叠的 条评论
为什么被折叠?
 到【灌水乐园】发言


