


1. 简介
pytest是一款基于Python的测试框架。与Python自带的unittest相比,pytes语法更加简洁,断言更加强大,并且在自动测试以及插件生态上比unittest都要更加强大。
1.1. 安装pytest
pip install pytest
1.2. pytest命名规则
pytest默认会自动搜索当前目录中符合规则的源文件,并在源文件中搜索符合规则的类、函数来执行测试。
-
用例源文件:以test_开头或以_test结尾的.py源文件。
-
用例类:以Test开头的类名。
-
用例函数:以test开头的函数名。
2. 基本功能
2.1. 函数测试
2.1.1. 单函数测试
示例代码
    # coding=utf-8

    def test_addition():
        result = 2 + 2
        assert result == 4
执行测试
    J:\2023\9\Python>pytest
    =========================== test session starts ============================
    platform win32 -- Python 3.11.0, pytest-7.1.3, pluggy-1.0.0
    rootdir: J:\2023\9\Python
    plugins: anyio-3.6.2, asyncio-0.19.0, cov-4.0.0, excel-1.5.0, timeout-2.1.0
    asyncio: mode=Mode.STRICT
    collected 1 item

    test_main.py .                                                        [100%]

    ============================ 1 passed in 0.02s =============================
2.1.2. 多函数测试
示例代码
    # coding=utf-8
    # test_main.py

    def test_addition():
        result = 2 + 2
        assert result == 4

    def test_subtraction():
        result = 5 - 3
        assert result == 3
执行测试1
有一个测试用例错误,会指出详细的错误提示信息。
    J:\2023\9\Python>pytest
    =========================== test session starts ============================
    platform win32 -- Python 3.11.0, pytest-7.1.3, pluggy-1.0.0
    rootdir: J:\2023\9\Python
    plugins: anyio-3.6.2, asyncio-0.19.0, cov-4.0.0, excel-1.5.0, timeout-2.1.0
    asyncio: mode=Mode.STRICT
    collected 2 items

    test_main.py .F                                                       [100%]

    ================================= FAILURES =================================
    _____________________________ test_subtraction _____________________________

        def test_subtraction():
            result = 5 - 3
    >       assert result == 3
    E       assert 2 == 3

    test_main.py:9: AssertionError
    ========================= short test summary info ==========================
    FAILED test_main.py::test_subtraction - assert 2 == 3
    ======================= 1 failed, 1 passed in 0.46s ========================
执行测试2
测试指定文件,pytest默认会测试当前目录中所有满足要求的文件。如果只想测试其中1个,可以指定测试文件。
    J:\2023\9\Python>pytest test_main.py
    =========================== test session starts ============================
    platform win32 -- Python 3.11.0, pytest-7.1.3, pluggy-1.0.0
    rootdir: J:\2023\9\Python
    plugins: anyio-3.6.2, asyncio-0.19.0, cov-4.0.0, excel-1.5.0, timeout-2.1.0
    asyncio: mode=Mode.STRICT
    collected 2 items

    test_main.py .F                                                       [100%]

    ================================= FAILURES =================================
    _____________________________ test_subtraction _____________________________

        def test_subtraction():
            result = 5 - 3
    >       assert result == 3
    E       assert 2 == 3

    test_main.py:9: AssertionError
    ========================= short test summary info ==========================
    FAILED test_main.py::test_subtraction - assert 2 == 3
    ======================= 1 failed, 1 passed in 0.43s ========================
2.1.3. 测试指定函数
示例代码
    # coding=utf-8
    # test_main.py

    def test_addition():
        result = 2 + 2
        assert result == 4

    def test_subtraction():
        result = 5 - 3
        assert result == 3
执行测试
有时只想测试一个指定函数,可指定测试函数名。
    J:\2023\9\Python>pytest test_main.py::test_addition
    =========================== test session starts ============================
    platform win32 -- Python 3.11.0, pytest-7.1.3, pluggy-1.0.0
    rootdir: J:\2023\9\Python
    plugins: anyio-3.6.2, asyncio-0.19.0, cov-4.0.0, excel-1.5.0, timeout-2.1.0
    asyncio: mode=Mode.STRICT
    collected 2 items / 1 deselected / 1 selected

    test_main.py .                                                        [100%]

    ===================== 1 passed, 1 deselected in 0.02s ======================
2.2. 类测试
示例代码
    # coding=utf-8

    # test_main.py

    class TestExample:
        def test_addition(self):
            assert 2 + 2 == 4

        def test_subtraction(self):
            assert 5 - 3 == 2

        def test_multiplication(self):
            assert 3 * 4 == 12
执行测试
-
默认测试当前目录下所有满足要求的文件中的所有满足要求的测试类以及测试函数:pytest
-
指定测试文件:pytest test_main.py
-
指定指定文件的测试类: pytest test_main.py::TestExample
-
测试指定类:pytest -k “TestExample”
-
测试指定文件指定类的指定函数:pytest test_main.py::TestExample::test_subtraction
    J:\2023\9\Python>pytest test_main.py::TestExample::test_subtraction
    =========================== test session starts ============================
    platform win32 -- Python 3.11.0, pytest-7.1.3, pluggy-1.0.0
    rootdir: J:\2023\9\Python
    plugins: anyio-3.6.2, asyncio-0.19.0, cov-4.0.0, excel-1.5.0, timeout-2.1.0
    asyncio: mode=Mode.STRICT
    collected 1 item

    test_main.py .                                                        [100%]

    ============================ 1 passed in 0.03s =============================
2.3. 测试参数
2.3.1. 基本用法
在 pytest 中,有一些常用的测试参数可以帮助你更好地控制和定制测试的行为。以下是几个常用的 pytest 测试参数:
-
-k EXPRESSION: 通过关键字表达式选择要运行的测试用例。例如,-k “test_func” 将只运行名称中包含 “test_func” 的测试函数。
-
-s: 允许在测试运行期间输出打印语句和日志信息。这对于调试测试时非常有用。
-
-v: 输出详细的测试结果信息,包括每个测试函数的名称和执行状态。
-
-x: 遇到第一个测试失败或错误后立即停止测试运行。
-
–maxfail=num: 在运行多个测试函数时,最多允许 num 个失败。超过这个限制后,测试将被中断。
-
–tb=style: 设置回溯(traceback)显示风格。可以选择的选项包括 auto(默认)、short、line、no 和 native。
-
–cov=PACKAGE: 测试代码覆盖率报告的命令行选项。可以指定要计算覆盖率的包或模块。
-
-m: 通过在测试用例上添加装饰器 @pytest.mark.
,你可以给测试用例打上标记。然后,使用 -m 选项来指定标记名称,从而过滤特定的测试用例进行运行。
这只是 pytest 中一部分常用测试参数的示例。你可以通过运行 pytest --help 命令获取完整的测试参数列表,并查阅 pytest 官方文档以了解更多详细信息和用法。
示例代码
    # coding=utf-8

    # test_main.py

    class TestExample:
        def test_addition(self):
            assert 2 + 2 == 4

        def test_subtraction(self):
            assert 5 - 3 == 2

        def test_multiplication(self):
            assert 3 * 4 == 12
执行测试
    J:\2023\9\Python>pytest -v -s test_main.py::TestExample
    =========================== test session starts ============================
    platform win32 -- Python 3.11.0, pytest-7.1.3, pluggy-1.0.0 -- C:\Users\Michael\AppData\Local\Programs\Python\Python311\python.exe
    cachedir: .pytest_cache
    rootdir: J:\2023\9\Python
    plugins: anyio-3.6.2, asyncio-0.19.0, cov-4.0.0, excel-1.5.0, timeout-2.1.0
    asyncio: mode=Mode.STRICT
    collected 3 items

    test_main.py::TestExample::test_addition PASSED
    test_main.py::TestExample::test_subtraction PASSED
    test_main.py::TestExample::test_multiplication PASSED

    ============================ 3 passed in 0.03s =============================
2.3.2. 代码用法
在命令行中指定参数,更灵活,但是每次都输入,也麻烦。
pytest有提供pytest.main函数,将命令行参数全部移到此函数的参数列表中。
示例代码
    # coding=utf-8
    # test_main.py
    import pytest

    class TestExample:
        def test_addition(self):
            assert 2 + 2 == 4

        def test_subtraction(self):
            assert 5 - 3 == 2

        def test_multiplication(self):
            assert 3 * 4 == 12

    if __name__ == '__main__':
        pytest.main(['-s', '-v', 'test_main.py'])
执行代码
    J:\2023\9\Python>python test_main.py
    =========================== test session starts ============================
    platform win32 -- Python 3.11.0, pytest-7.1.3, pluggy-1.0.0 -- C:\Users\Michael\AppData\Local\Programs\Python\Python311\python.exe
    cachedir: .pytest_cache
    rootdir: J:\2023\9\Python
    plugins: anyio-3.6.2, asyncio-0.19.0, cov-4.0.0, excel-1.5.0, timeout-2.1.0
    asyncio: mode=Mode.STRICT
    collected 3 items

    test_main.py::TestExample::test_addition PASSED
    test_main.py::TestExample::test_subtraction PASSED
    test_main.py::TestExample::test_multiplication PASSED

    ============================ 3 passed in 0.03s =============================
3. 高级功能
3.1. 参数化
测试的时候经常会遇到单个函数测试不同的参数,如果每种参数单独写一个测试函数,会重复麻烦。有没有更简单的方法?参数化测试就是解决此问题的。
在 pytest 中,参数化(Parameterization)是一种强大的功能,允许你在单个测试函数中运行多次相同或类似的测试用例。这样可以减少重复的代码,并使测试更加简洁和可读。
示例代码
主要是通过给测试函数添加pytest.mark.parametrize的装饰器来实现
    # coding=utf-8
    # test_main.py
    import pytest

    # 定义被测试的函数
    def add(a, b):
        return a + b

    # 使用参数化装饰器定义参数化测试
    @pytest.mark.parametrize("a, b, expected_result", [
        (1, 2, 3),  # 第一个测试用例,a=1, b=2, 预期结果为 3
        (5, 5, 10),  # 第二个测试用例,a=5, b=5, 预期结果为 10
        (-1, 0, -1)  # 第三个测试用例,a=-1, b=0, 预期结果为 -1
    ])
    def test_add(a, b, expected_result):
        assert add(a, b) == expected_result
执行测试
    J:\2023\9\Python>pytest -v
    =========================== test session starts ============================
    platform win32 -- Python 3.11.0, pytest-7.1.3, pluggy-1.0.0 -- C:\Users\Michael\AppData\Local\Programs\Python\Python311\python.exe
    cachedir: .pytest_cache
    rootdir: J:\2023\9\Python
    plugins: anyio-3.6.2, asyncio-0.19.0, cov-4.0.0, excel-1.5.0, timeout-2.1.0
    asyncio: mode=Mode.STRICT
    collected 3 items

    test_main.py::test_add[1-2-3] PASSED                                  [ 33%]
    test_main.py::test_add[5-5-10] PASSED                                 [ 66%]
    test_main.py::test_add[-1-0--1] PASSED                                [100%]

    ============================ 3 passed in 0.03s =============================
@pytest.mark模块还有其他功能,如指定函数执行次数,指定测试条件,指定测试顺序、跳过指定测试等。
3.2. fixture
在软件测试中,“fixture” 一词通常被翻译为 “夹具”。 Fixture 是一个用于提供测试环境和共享资源的机制,在测试执行过程中设置和清理测试代码所需的条件。pytest.fixture也是一个装饰器,装饰器可以附加在指定函数上,来实现在函数调用前或调用后来执行额外的操作。
测试一般分4个阶段:Setup-Exercise-Verify-Teardown。(来自《xUnit Test Patterns 》)
fixture就负责实现Setup和Teardown部分。
3.2.1 用作输入
示例代码
在执行test_multiply时,调用fixture的形参input_values会优先执行,相当于setup。形参可以调用多个fixture参数,让参数输入测试更加灵活。
    import pytest

    # 定义一个简单的 Fixture,用于提供测试数据
    @pytest.fixture
    def input_values():
        a = 5
        b = 10
        return a, b

    # 定义要测试的函数
    def multiply(a, b):
        return a * b

    # 使用 Fixture 进行测试
    def test_multiply(input_values):
        a, b = input_values
        result = multiply(a, b)
        assert result == 50
执行测试
    J:\2023\9\Python>pytest -v
    =========================== test session starts ============================
    platform win32 -- Python 3.11.0, pytest-7.1.3, pluggy-1.0.0 -- C:\Users\Michael\AppData\Local\Programs\Python\Python311\python.exe
    cachedir: .pytest_cache
    rootdir: J:\2023\9\Python
    plugins: anyio-3.6.2, asyncio-0.19.0, cov-4.0.0, excel-1.5.0, timeout-2.1.0
    asyncio: mode=Mode.STRICT
    collected 1 item

    test_main.py::test_multiply PASSED                                    [100%]

    ============================ 1 passed in 0.03s =============================
3.2.2. Setup&Teardown
例如一个测试,每次开始测试前要连接数据库,测试完了之后要关闭数据库。如果每个测试用例中都添加一个connect_db和close_db函数,会显得有些重复。利用fixture的Setup&Teardown功能,就可以自动完成连接和关闭数据库。pytest.fixture提供了yield协程来实现此功能。
示例代码
    # coding=utf-8
    # test_main.py
    import pytest

    @pytest.fixture()
    def db():
        print('\nConnection successful')

        yield

        print('\nConnection closed')


    def search_user(user_id):
        d = {
            '001': 'xiaoming'
        }
        return d[user_id]


    def test_search(db):
        assert search_user('001') == 'xiaoming'
执行测试
    J:\2023\9\Python>pytest -v -s
    =========================== test session starts ============================
    platform win32 -- Python 3.11.0, pytest-7.1.3, pluggy-1.0.0 -- C:\Users\Michael\AppData\Local\Programs\Python\Python311\python.exe
    cachedir: .pytest_cache
    rootdir: J:\2023\9\Python
    plugins: anyio-3.6.2, asyncio-0.19.0, cov-4.0.0, excel-1.5.0, timeout-2.1.0
    asyncio: mode=Mode.STRICT
    collected 1 item

    test_main.py::test_search
    Connection successful
    PASSED
    Connection closed


    ============================ 1 passed in 0.03s =============================
3.2.3. 作用域
fixture有4种作用域,不同作用域有着不同的先后顺序,默认为函数级。
-
function: 函数级,每个测试函数都会执行一次固件; -
class: 类级别,每个测试类执行一次,所有方法都可以使用; -
module: 模块级,每个模块执行一次,模块内函数和方法都可使用; -
session: 会话级,一次测试只执行一次,所有被找到的函数和方法都可用。
示例代码:
    # coding=utf-8
    # test_main.py
    import pytest

    @pytest.fixture(scope='function')
    def func_scope():
        print("setup function")
        yield
        print("\nteardown function")


    @pytest.fixture(scope='module')
    def mod_scope():
        print("setup module")
        yield
        print("teardown module")


    @pytest.fixture(scope='session')
    def sess_scope():
        print("\nsetup session")
        yield
        print("teardown session")


    @pytest.fixture(scope='class')
    def class_scope():
        print("setup class")
        yield
        print("teardown class")

    def test_multi_scope(sess_scope, mod_scope, class_scope, func_scope):
        pass
执行测试
通过结果测试可以验证相关执行顺序
    J:\2023\9\Python>pytest -v -s
    =========================== test session starts ============================
    platform win32 -- Python 3.11.0, pytest-7.1.3, pluggy-1.0.0 -- C:\Users\Michael\AppData\Local\Programs\Python\Python311\python.exe
    cachedir: .pytest_cache
    rootdir: J:\2023\9\Python
    plugins: anyio-3.6.2, asyncio-0.19.0, cov-4.0.0, excel-1.5.0, timeout-2.1.0
    asyncio: mode=Mode.STRICT
    collected 1 item

    test_main.py::test_multi_scope
    setup session
    setup module
    setup class
    setup function
    PASSED
    teardown function
    teardown class
    teardown module
    teardown session


    ============================ 1 passed in 0.03s =============================
3.2.4. 自动执行
如果测试的每个函数都需要添加fixture参数来实现相关功能,会有些重复。autouse参数可以自动实现为所有作用域的函数、类、模块和会话添加Setup和Teardown功能。
示例代码
    # coding=utf-8
    # test_main.py
    import pytest

    @pytest.fixture(scope='function', autouse=True)
    def func_scope():
        print("\nsetup function")
        yield
        print("\nteardown function")


    def test_multi_scope():
        pass
执行结果
    J:\2023\9\Python>pytest -v -s
    =========================== test session starts ============================
    platform win32 -- Python 3.11.0, pytest-7.1.3, pluggy-1.0.0 -- C:\Users\Michael\AppData\Local\Programs\Python\Python311\python.exe
    cachedir: .pytest_cache
    rootdir: J:\2023\9\Python
    plugins: anyio-3.6.2, asyncio-0.19.0, cov-4.0.0, excel-1.5.0, timeout-2.1.0
    asyncio: mode=Mode.STRICT
    collected 1 item

    test_main.py::test_multi_scope
    setup function
    PASSED
    teardown function


    ============================ 1 passed in 0.03s =============================
3.3. Hook装饰器
如果想要定制pytest的输出信息,可以使用hook装饰器。下面的函数放在conftest.py文件中,pytest默认会加载conftest.py文件,所以此文件中的夹具和hook函数都会自动加载。pytest_runtest_makereport是用来定制输出报告信息的。对应测试函数的setup、call、teardown三个阶段,通过rep.when来判断。
 @pytest.hookimpl(tryfirst=True, hookwrapper=True)
def pytest_runtest_makereport(item, call):
    # execute all other hooks to obtain the report object
    outcome = yield
    rep = outcome.get_result()
    # set a report attribute for each phase of a call, which can be "setup", "call", "teardown"
    setattr(item, "rep_" + rep.when, rep)
4. 其他
4.1. 插件化
pytest 是一个高度可扩展和插件化的测试框架。它提供了广泛的插件机制,使得用户可以根据需要添加、自定义或扩展各种功能。
以下是 pytest 插件化的一些关键特性:
-
自动发现和加载插件:pytest 能够自动发现并加载安装在项目中的插件。只需将插件包安装到项目环境中,pytest 就会自动识别并应用这些插件。
-
丰富的内置插件:pytest 内置了许多常用的插件,例如 capture 输出捕获插件、assertion 断言插件、coverage 代码覆盖插件等。这些内置插件提供了额外的功能和增强 pytest 的能力。
-
外部插件支持:除了内置插件,pytest 还支持第三方开发的插件。用户可以从社区中选择并使用各种插件,例如数据库插件、测试报告生成插件、测试数据生成插件等。
-
插件钩子函数:pytest 提供了一组钩子函数,允许插件介入测试执行过程中的不同阶段。通过实现这些钩子函数,插件可以在测试运行过程中进行自定义操作,如修改配置、收集测试用例、修改测试结果等。
-
自定义插件开发:如果现有的插件不能满足需求,用户还可以根据自己的需求开发定制化的插件。pytest 提供了丰富的 API 和文档,帮助用户编写自己的插件,并与其他 pytest 插件进行协作。
通过插件化的特性,pytest 提供了灵活、可定制的测试框架环境,使用户能够根据具体需求轻松扩展和定制 pytest 的功能,并集成额外的工具和服务。这使得 pytest 成为一个受欢迎的测试框架,适用于各种测试场景和项目规模。
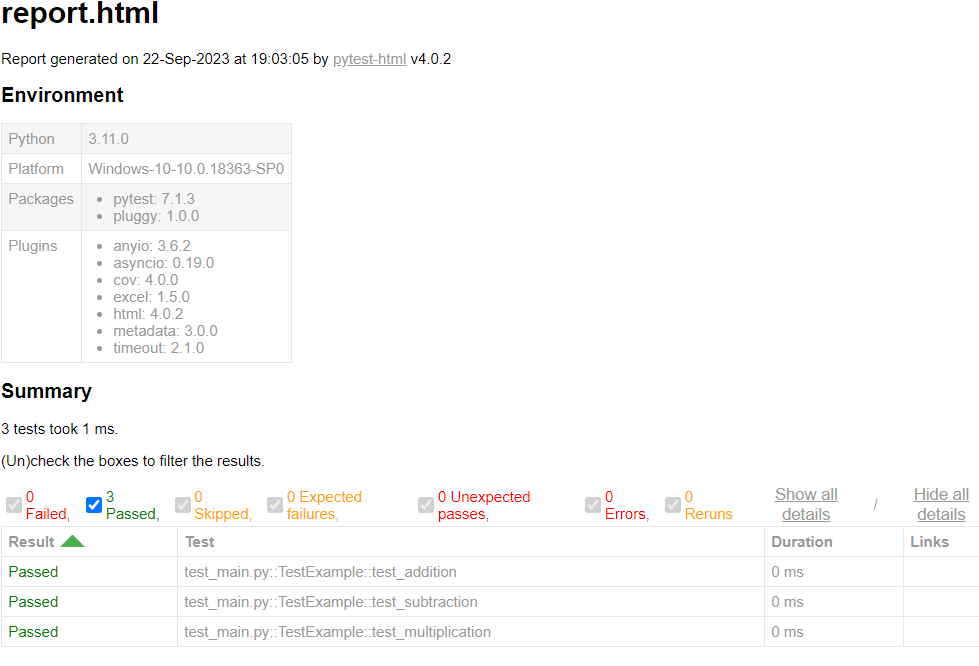
4.2. 测试报告
pytest-html是常用的测试报告生成pytest插件。
4.2.1. 安装pytest-html
pip install pytest-html
4.2.2. 使用
    J:\2023\9\Python>pytest -sv --html=report.html
    =========================== test session starts ============================
    platform win32 -- Python 3.11.0, pytest-7.1.3, pluggy-1.0.0 -- C:\Users\Michael\AppData\Local\Programs\Python\Python311\python.exe
    cachedir: .pytest_cache
    metadata: {'Python': '3.11.0', 'Platform': 'Windows-10-10.0.18363-SP0', 'Packages': {'pytest': '7.1.3', 'pluggy': '1.0.0'}, 'Plugins': {'anyio': '3.6.2', 'asyncio': '0.19.0', 'cov': '4.0.0', 'excel': '1.5.0', 'html': '4.0.2', 'metadata': '3.0.0', 'timeout': '2.1.0'}}
    rootdir: J:\2023\9\Python
    plugins: anyio-3.6.2, asyncio-0.19.0, cov-4.0.0, excel-1.5.0, html-4.0.2, metadata-3.0.0, timeout-2.1.0
    asyncio: mode=Mode.STRICT
    collected 3 items

    test_main.py::TestExample::test_addition PASSED
    test_main.py::TestExample::test_subtraction PASSED
    test_main.py::TestExample::test_multiplication PASSED

    ------- Generated html report: file:///J:/2023/9/Python/report.html --------
    ============================ 3 passed in 0.25s =============================
4.2.3. 报告
4.3. 集成
-
pytest可以方便地集成到Jenkins,并且可以用 Pytest+Allure生成更加可视的报告。
-
pytest可以自动集成到vscode中,可以更加方便地手动执行单个或多个测试。


 835
835


 被折叠的 条评论
为什么被折叠?
被折叠的 条评论
为什么被折叠?
 到【灌水乐园】发言


